2013 SKODA ROOMSTER wipers
[x] Cancel search: wipersPage 6 of 219

Table of Contents
Materials defect liability and ŠKODA warranty for
new cars5
Mobility warranty and ŠKODA extended
warranty
6
Abbreviations
Operation
Cockpit
9
Overview
8
Instruments and Indicator Lights
10
Instrument cluster
10
Multifunction display (MFD)
13
Service Interval Display
16
MAXI DOT display
18
Warning lights
20
Unlocking and locking
28
Unlocking and locking
28
Central locking system
31
Remote control
34
Anti-theft alarm system
35
Luggage compartment lid
37
Electrical power windows
38
Lights and visibility
41
Lights
41
Interior lights
46
Visibility
47
Windscreen wipers and washers
48
Rear window
51
Seats and stowing
52
Front seats
52
Rear seats
54Head restraints56Boot57
Variable loading floor in the luggage
compartment (Estate)
61
Bicycle carrier in the luggage compartment
63
Roof rack system
65
Useful equipment
65
Storage compartments
68
Praktik
73
Heating and air-conditioning
77
Heating, ventilation, cooling
77
Heating
78
Air conditioning system (manual air conditioning system)
80
Climatronic (automatic air conditioningsystem)
83
Communication and multimedia
86
Universal telephone preinstallation GSM II
86
Voice control
91
Multimedia
92
Driving
Starting-off and Driving
95
Steering
95
Starting and stopping the engine
96
Brakes
98
Manual gear changing and pedals
99
Automatic transmission
100
Running in
103
Economical driving and environmental
sustainability
104
Avoiding damage to your vehicle
108
Driving abroad
109
Assist systems
110
Brake assist systems
110
Parking aid
112Cruise Control System113START-STOP115
Towing a trailer
117
Towing device
117
Trailer
120
Safety
Passive Safety
123
General information
123
Correct seated position
124
Seat belts
127
Using seat belts
127
Inertia reels and belt tensioners
130
Airbag system
132
Description of the airbag system
132
Airbag overview
133
Deactivating airbags
136
Transporting children safely
139
Child seat
139
Fastening systems
141
General Maintenance
Car care
144
Service intervals
144
Services, modifications and technical
alterations
146
Washing your car
149
Taking care of your vehicle exterior
150
Taking care of the interior
154
Inspecting and replenishing
157
Fuel
157
Engine compartment
159
Engine oil
163
Coolant
1653Table of Contents
Page 51 of 219

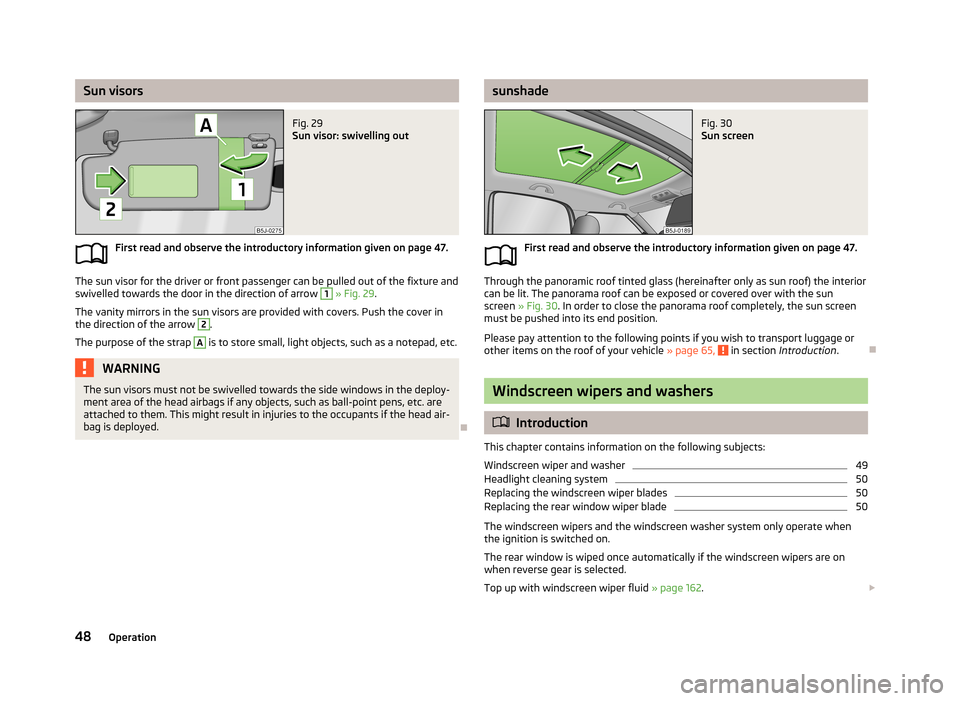
Sun visorsFig. 29
Sun visor: swivelling out
First read and observe the introductory information given on page 47.
The sun visor for the driver or front passenger can be pulled out of the fixture and
swivelled towards the door in the direction of arrow
1
» Fig. 29 .
The vanity mirrors in the sun visors are provided with covers. Push the cover in the direction of the arrow
2
.
The purpose of the strap
A
is to store small, light objects, such as a notepad, etc.
WARNINGThe sun visors must not be swivelled towards the side windows in the deploy-
ment area of the head airbags if any objects, such as ball-point pens, etc. are attached to them. This might result in injuries to the occupants if the head air-
bag is deployed.
sunshadeFig. 30
Sun screen
First read and observe the introductory information given on page 47.
Through the panoramic roof tinted glass (hereinafter only as sun roof) the interior can be lit. The panorama roof can be exposed or covered over with the sun
screen » Fig. 30 . In order to close the panorama roof completely, the sun screen
must be pushed into its end position.
Please pay attention to the following points if you wish to transport luggage or other items on the roof of your vehicle » page 65,
in section Introduction .
Windscreen wipers and washers
Introduction
This chapter contains information on the following subjects:
Windscreen wiper and washer
49
Headlight cleaning system
50
Replacing the windscreen wiper blades
50
Replacing the rear window wiper blade
50
The windscreen wipers and the windscreen washer system only operate when
the ignition is switched on.
The rear window is wiped once automatically if the windscreen wipers are on when reverse gear is selected.
Top up with windscreen wiper fluid » page 162.
48Operation
Page 52 of 219

WARNING■Properly maintained windscreen wiper blades are essential for clear visibility
and safe driving » page 50.■
Do not use the windscreen washer system at low temperatures, without
heating the windscreen beforehand. Otherwise the window cleaner could
freeze on the windscreen and restrict the view to the front.
■
Replace the windscreen wiper blades once or twice a year for safety rea-
sons. These can be purchased from a ŠKODA Partner.
CAUTION
■ In cold temperatures and during the winter, check before the journey or before
switching on the ignition that the wiper blades are not frozen to the windscreen. If the windscreen wipers are switched on when the blades are frozen to the
windscreen, this may damage both the blades and windscreen wiper motor!■
If the ignition is switched off while the windscreen wipers are switched on, the
windscreen wipers will continue wiping in the same mode after the ignition is
turned back on. The windscreen wipers could freeze up in cold temperatures be- tween the time the ignition was turned off and when it was turned back on again.
■
Carefully detach frozen wiper blades from the front or rear window.
■
Remove snow and ice from the windscreen wipers before driving.
■
If the windscreen wipers are handled carelessly, there is a risk of damage to the
windscreen.
Note
■ The windscreen washer nozzles for the windscreen are heated when the en-
gine is running and the outside temperature is less than approx. +10 °C.■
The content of the windscreen washer fluid reservoir is 3.5 litres. On vehicles
fitted with the headlight cleaning system, the volume is around 5.4 litres.
■
The wiper blades should be cleaned on a regular basis with a windscreen clean-
er to avoid any smears. The wiper blades should be cleaned with a sponge or
cloth if they are heavily soiled by insect residues, for example.
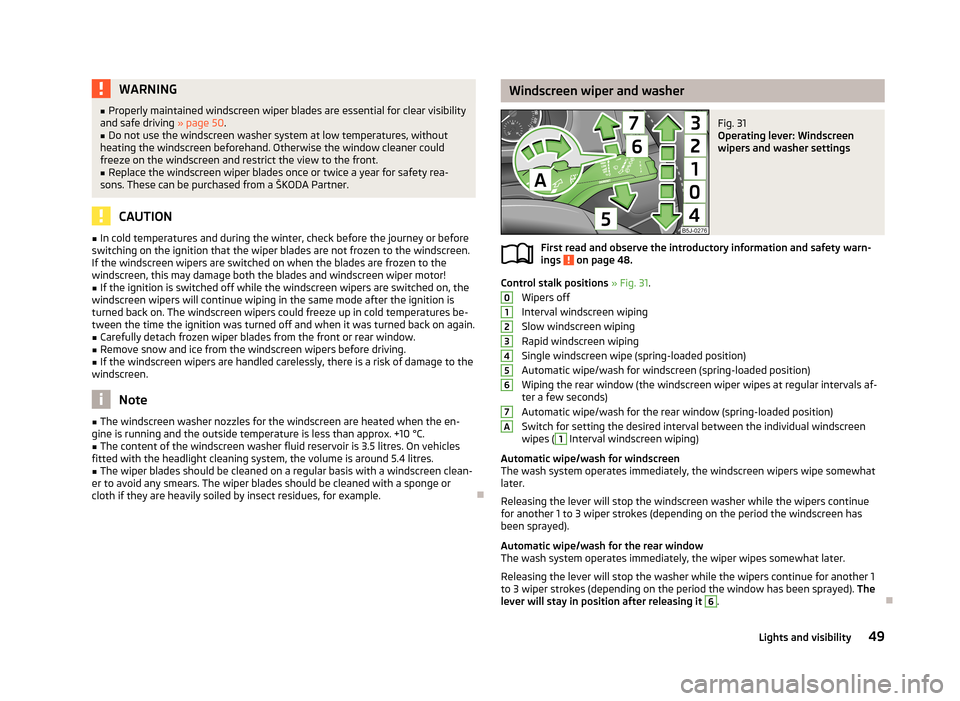
Windscreen wiper and washerFig. 31
Operating lever: Windscreen
wipers and washer settings
First read and observe the introductory information and safety warn-
ings on page 48.
Control stalk positions » Fig. 31 .
Wipers off
Interval windscreen wiping Slow windscreen wiping
Rapid windscreen wiping
Single windscreen wipe (spring-loaded position)
Automatic wipe/wash for windscreen (spring-loaded position) Wiping the rear window (the windscreen wiper wipes at regular intervals af- ter a few seconds)
Automatic wipe/wash for the rear window (spring-loaded position)
Switch for setting the desired interval between the individual windscreen wipes (
1
Interval windscreen wiping)
Automatic wipe/wash for windscreen
The wash system operates immediately, the windscreen wipers wipe somewhat
later.
Releasing the lever will stop the windscreen washer while the wipers continue
for another 1 to 3 wiper strokes (depending on the period the windscreen has
been sprayed).
Automatic wipe/wash for the rear window The wash system operates immediately, the wiper wipes somewhat later.
Releasing the lever will stop the washer while the wipers continue for another 1
to 3 wiper strokes (depending on the period the window has been sprayed). The
lever will stay in position after releasing it
6
.
01234567A49Lights and visibility
Page 153 of 219

CAUTION■When washing the car by hand, protect your hands and arms from sharp-edged
metal parts (e.g. when cleaning the undertray, exhaust system, the inside of the
wheel housings or the wheel trims etc.) - there is a risk of cutting yourself.■
Only apply slight pressure when cleaning the vehicle's paintwork.
Automatic car wash systems
First read and observe the introductory information and safety warn-
ings
on page 149.
The usual precautionary measures must be taken before washing the vehicle in
an automatic car wash system (e.g. closing the windows and the sliding/tilting
roof etc.).
If your vehicle is fitted with any particular attached parts, such as a spoiler, roof
rack system, two-way radio aerial etc., it is best to consult the operator of the car
wash system beforehand.
After an automatic wash with wax treatment, the lips of the wipers should be cleaned with cleaning agents specially designed for the purpose, and then de-
greased.
WARNINGFold in the exterior mirrors to prevent damage before washing the vehicle in
an automatic car wash system.
Washing with a high-pressure cleaner
First read and observe the introductory information and safety warn-
ings
on page 149.
When washing the vehicle with a high-pressure cleaner, the instructions for use
of the equipment must be observed. This applies in particular to the pressure
used and to the spraying distance .
Maintain a sufficiently large distance to the parking aid sensors and soft materials
such as rubber hoses or insulation material.
WARNINGNever use circular spray nozzles or dirt cutters!
CAUTION
■ If washing the vehicle in the winter using a hose or high-pressure cleaner, en-
sure that the jet of water is not aimed directly at the locking cylinders or the
door/panel joints – risk of freezing!■
To avoid damaging the parking aid sensors while cleaning with high-pressure
cleaners or steam jets, the sensors must only be directly sprayed for short periods
while a minimum distance of 10 cm must be observed.
■
The temperature of the water used for cleaning must not exceed 60 °C – risk of
damaging the vehicle.
■
See also Washing cars with decorative films using a high-pressure clean-
er » page 152 .
Taking care of your vehicle exterior
Introduction
This chapter contains information on the following subjects:
Taking care of your vehicle's paintwork
151
Plastic parts
151
Rubber seals
152
Chrome parts
152
Decorative films
152
Windows and exterior mirrors
152
Headlight lenses
153
Door lock cylinders
153
Cavity protection
153
Wheels
153
Underbody protection
154
Regular and proper care help to retain the efficiency and value of your vehicle. It
may also be one of the requirements for the acceptance of warranty claims relat- ing to corrosion damage and paint defects on the bodywork.
150General Maintenance
Page 164 of 219

CAUTIONAlways top up using the correct specification of fluids. This may result in major
operating problems and also vehicle damage!
For the sake of the environment
In view of the requirements for the environmentally friendly disposal of fluids and the special tools and knowledge required for such work, we recommend that flu-
ids be changed by a specialist garage.
Note
■ Please consult a specialist garage for any questions relating to fluids.■Fluids with the correct specifications can be purchased from ŠKODA Original Ac-
cessories.
Opening and closing the bonnet
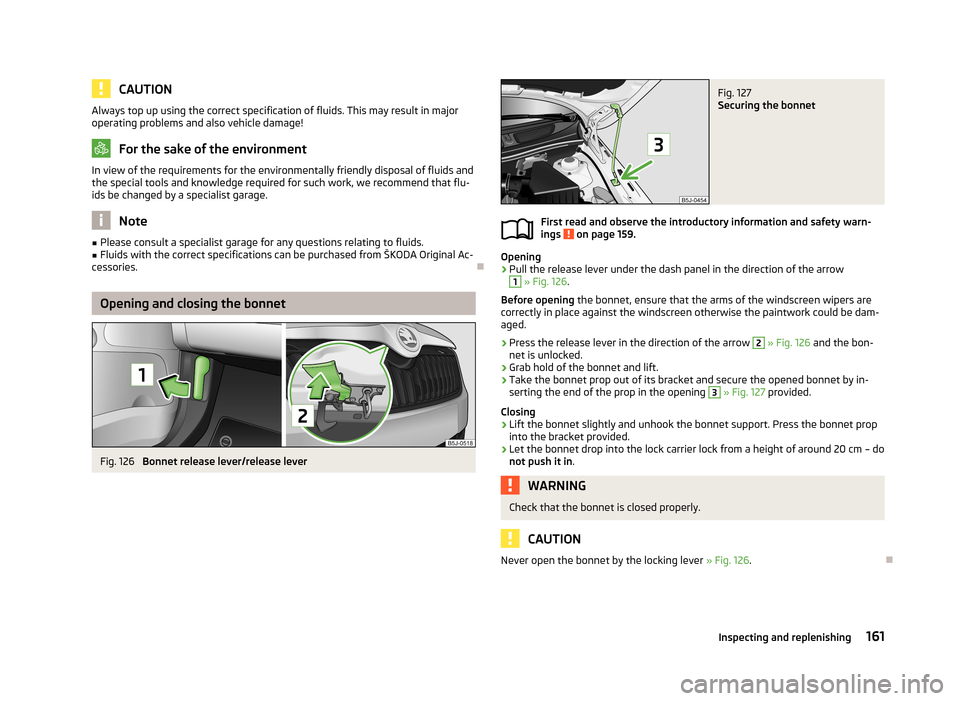
Fig. 126
Bonnet release lever/release lever
Fig. 127
Securing the bonnet
First read and observe the introductory information and safety warn-
ings on page 159.
Opening
›
Pull the release lever under the dash panel in the direction of the arrow
1
» Fig. 126 .
Before opening the bonnet, ensure that the arms of the windscreen wipers are
correctly in place against the windscreen otherwise the paintwork could be dam- aged.
›
Press the release lever in the direction of the arrow
2
» Fig. 126 and the bon-
net is unlocked.
›
Grab hold of the bonnet and lift.
›
Take the bonnet prop out of its bracket and secure the opened bonnet by in- serting the end of the prop in the opening
3
» Fig. 127 provided.
Closing
›
Lift the bonnet slightly and unhook the bonnet support. Press the bonnet prop into the bracket provided.
›
Let the bonnet drop into the lock carrier lock from a height of around 20 cm – do
not push it in .
WARNINGCheck that the bonnet is closed properly.
CAUTION
Never open the bonnet by the locking lever » Fig. 126
.
161Inspecting and replenishing
Page 191 of 219

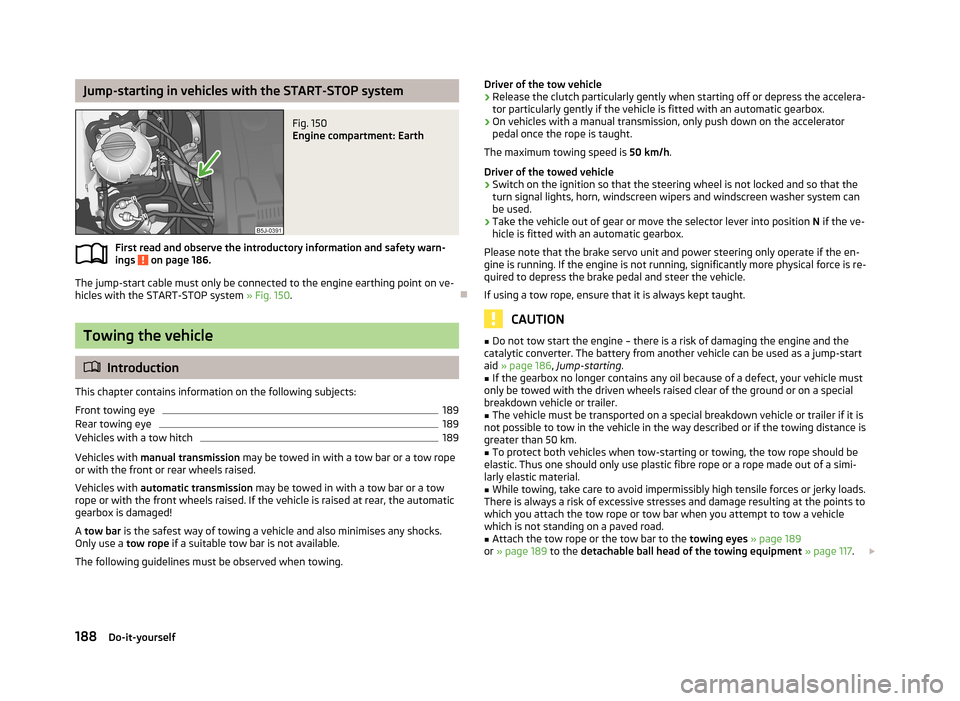
Jump-starting in vehicles with the START-STOP systemFig. 150
Engine compartment: Earth
First read and observe the introductory information and safety warn-ings on page 186.
The jump-start cable must only be connected to the engine earthing point on ve-
hicles with the START-STOP system » Fig. 150.
Towing the vehicle
Introduction
This chapter contains information on the following subjects:
Front towing eye
189
Rear towing eye
189
Vehicles with a tow hitch
189
Vehicles with manual transmission may be towed in with a tow bar or a tow rope
or with the front or rear wheels raised.
Vehicles with automatic transmission may be towed in with a tow bar or a tow
rope or with the front wheels raised. If the vehicle is raised at rear, the automatic
gearbox is damaged!
A tow bar is the safest way of towing a vehicle and also minimises any shocks.
Only use a tow rope if a suitable tow bar is not available.
The following guidelines must be observed when towing.
Driver of the tow vehicle›Release the clutch particularly gently when starting off or depress the accelera-
tor particularly gently if the vehicle is fitted with an automatic gearbox.›
On vehicles with a manual transmission, only push down on the accelerator pedal once the rope is taught.
The maximum towing speed is 50 km/h.
Driver of the towed vehicle
›
Switch on the ignition so that the steering wheel is not locked and so that the turn signal lights, horn, windscreen wipers and windscreen washer system can
be used.
›
Take the vehicle out of gear or move the selector lever into position N if the ve-
hicle is fitted with an automatic gearbox.
Please note that the brake servo unit and power steering only operate if the en-
gine is running. If the engine is not running, significantly more physical force is re-
quired to depress the brake pedal and steer the vehicle.
If using a tow rope, ensure that it is always kept taught.
CAUTION
■ Do not tow start the engine – there is a risk of damaging the engine and the
catalytic converter. The battery from another vehicle can be used as a jump-start
aid » page 186 , Jump-starting .■
If the gearbox no longer contains any oil because of a defect, your vehicle must
only be towed with the driven wheels raised clear of the ground or on a special
breakdown vehicle or trailer.
■
The vehicle must be transported on a special breakdown vehicle or trailer if it is
not possible to tow in the vehicle in the way described or if the towing distance is greater than 50 km.
■
To protect both vehicles when tow-starting or towing, the tow rope should be
elastic. Thus one should only use plastic fibre rope or a rope made out of a simi-
larly elastic material.
■
While towing, take care to avoid impermissibly high tensile forces or jerky loads.
There is always a risk of excessive stresses and damage resulting at the points to
which you attach the tow rope or tow bar when you attempt to tow a vehicle
which is not standing on a paved road.
■
Attach the tow rope or the tow bar to the towing eyes » page 189
or » page 189 to the detachable ball head of the towing equipment » page 117 .
188Do-it-yourself
Page 196 of 219

No.Consumer32High pressure fuel pump, pressure valve33Engine control unit34Engine control unit, vacuum pump35Daytime running lights/radio for vehicles with START-STOP36Main beam37Rear fog light, DC/DC converter START-STOP38Fog lights39Air blower for heating40-41Not assigned42Rear window heater43Horn44Windscreen wipers45Central control unit for convenience system46Engine control unit, fuel pump47Cigarette lighter, power socket in the luggage compartment48ABS, START-STOP (DC/DC) converter ESP49Turn signal lights, brake lights50START-STOP (DC/DC) transformer, radio51Electrical power window (front and rear) - left side52Electrical power window (front and rear) - right side53Parking light = left side, electrical sliding/tilting roof54START-STOP (instrument cluster), alarm55Automatic gearbox control unit56Headlight cleaning system, parking light - right side57Left low beam, headlight range adjustment58Low beam on the right
Fuses in the engine compartmentFig. 155
Vehicle battery: Distribution board cover.
Fig. 156
Schematic representation of
fuse box in engine compartment
First read and observe the introductory information and safety warn-
ings on page 191.
› Press the securing clips on the fuse box cover together at the same time in the
direction of arrow
A
» Fig. 155 and remove the cover in the direction of arrow
B
.
› Release the fixtures in the openings
C
using a flat screwdriver and fold the
cover upwards in direction of arrow
D
.
Fuse assignment in engine compartment
No.Consumer1Alternator2Not assigned3Interior4Electrical auxiliary heating system 193Fuses and light bulbs
Page 215 of 219

TransportBoot57
Roof rack system65
Transporting children safely139
Trays folding table in the middle back seat
72
Turn signals43
Two-way radio systems86
Type plate199
Tyre load-bearing capacity Refer to Wheels
174
Tyre pressure monitor Setting
175
Tyre repair Check pressure
186
Preparations185
Sealing and inflating the tyre185
Tyres172
Inflation pressure173
New174
See Wheels174
Sizes173
Tyre wear indicator173
U
Underbody protection
154
Unleaded petrol109
unlock Central locking system
33
Unlocking Remote control
34
without central locking30
Unlocking and locking28
USB94
Useful equipment65
12-volt power outlet67
Ashtray66
Car park ticket holder68
Cigarette lighter67
Clothes hood68
Cupholders66
Using the selector lever101
V
Variable loading floor
61
Dividing the luggage compartment61
Removing and refitting62
Vehicle battery Automatic load deactivation
171
Charging170
Checking the electrolyte level170
Cover169
Disconnecting and reconnecting171
Operation in winter170
Replacing171
Safety instructions168
Vehicle care Alcantara
155
Fabrics155
Synthetic leather155
Vehicle data sticker199
Vehicle dimensions201
vehicle identification number - VIN199
Vehicle key28
Vehicle status see Auto Check Control
19
Vehicle tool kit180
Visors48
W
Warning lights
20
Warning symbols see warning lights
20
Warning triangle179
Warranty5
Washing144
Automatic car wash system150
by hand149
Chrome parts152
High-pressure cleaner150
Water Driving through
108
Wax treatment See Taking care of your vehicle
151
Weights199
Wheel bolts Anti-theft wheel bolt
183
Caps177
Loosening and tightening182
Wheel rims172
Wheels Bolts
178
Changing180
Full trim177
General information172
Load index174
Replacing wheels173
Service life of tyres173
Snow chains178
Spare wheel176
Speed symbol175
Storing wheels173
Temporary spare wheel176
Tyre pressure173
Tyre sizes173
Tyre wear indicator173
Unidirectional tyres175
Winter tyres178
Wheels and tyres Hubcaps
177
Window convenience operation40
Windows152
Deicing152
See Electrical power windows38
Window wipers Replacing the rear window wiper blade
50
Windscreen Deicing
152
212Index