2013 SKODA ROOMSTER height
[x] Cancel search: heightPage 143 of 219

Use of a child seat on the front passenger seat
Never use a backwards-facing child restraint system on a seat that is protected by an active airbag installed in front of it. This could cause the child severe injury
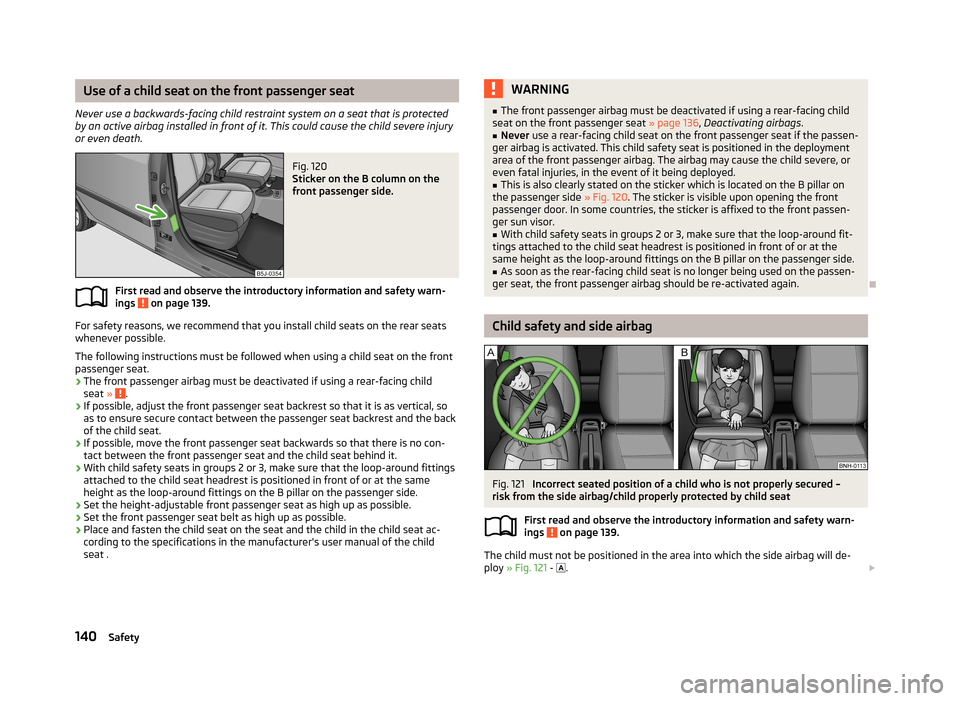
or even death.Fig. 120
Sticker on the B column on the
front passenger side.
First read and observe the introductory information and safety warn- ings on page 139.
For safety reasons, we recommend that you install child seats on the rear seats
whenever possible.
The following instructions must be followed when using a child seat on the front passenger seat.
› The front passenger airbag must be deactivated if using a rear-facing child
seat »
.
› If possible, adjust the front passenger seat backrest so that it is as vertical, so
as to ensure secure contact between the passenger seat backrest and the back
of the child seat.
› If possible, move the front passenger seat backwards so that there is no con-
tact between the front passenger seat and the child seat behind it.
› With child safety seats in groups 2 or 3, make sure that the loop-around fittings
attached to the child seat headrest is positioned in front of or at the same
height as the loop-around fittings on the B pillar on the passenger side.
› Set the height-adjustable front passenger seat as high up as possible.
› Set the front passenger seat belt as high up as possible.
› Place and fasten the child seat on the seat and the child in the child seat ac-
cording to the specifications in the manufacturer's user manual of the child seat .
WARNING■ The front passenger airbag must be deactivated if using a rear-facing child
seat on the front passenger seat » page 136, Deactivating airbags .■
Never use a rear-facing child seat on the front passenger seat if the passen-
ger airbag is activated. This child safety seat is positioned in the deployment
area of the front passenger airbag. The airbag may cause the child severe, or
even fatal injuries, in the event of it being deployed.
■
This is also clearly stated on the sticker which is located on the B pillar on
the passenger side » Fig. 120. The sticker is visible upon opening the front
passenger door. In some countries, the sticker is affixed to the front passen-
ger sun visor.
■
With child safety seats in groups 2 or 3, make sure that the loop-around fit-
tings attached to the child seat headrest is positioned in front of or at the
same height as the loop-around fittings on the B pillar on the passenger side.
■
As soon as the rear-facing child seat is no longer being used on the passen-
ger seat, the front passenger airbag should be re-activated again.
Child safety and side airbag
Fig. 121
Incorrect seated position of a child who is not properly secured –
risk from the side airbag/child properly protected by child seat
First read and observe the introductory information and safety warn-
ings
on page 139.
The child must not be positioned in the area into which the side airbag will de-
ploy » Fig. 121 -
.
140Safety
Page 164 of 219

CAUTIONAlways top up using the correct specification of fluids. This may result in major
operating problems and also vehicle damage!
For the sake of the environment
In view of the requirements for the environmentally friendly disposal of fluids and the special tools and knowledge required for such work, we recommend that flu-
ids be changed by a specialist garage.
Note
■ Please consult a specialist garage for any questions relating to fluids.■Fluids with the correct specifications can be purchased from ŠKODA Original Ac-
cessories.
Opening and closing the bonnet
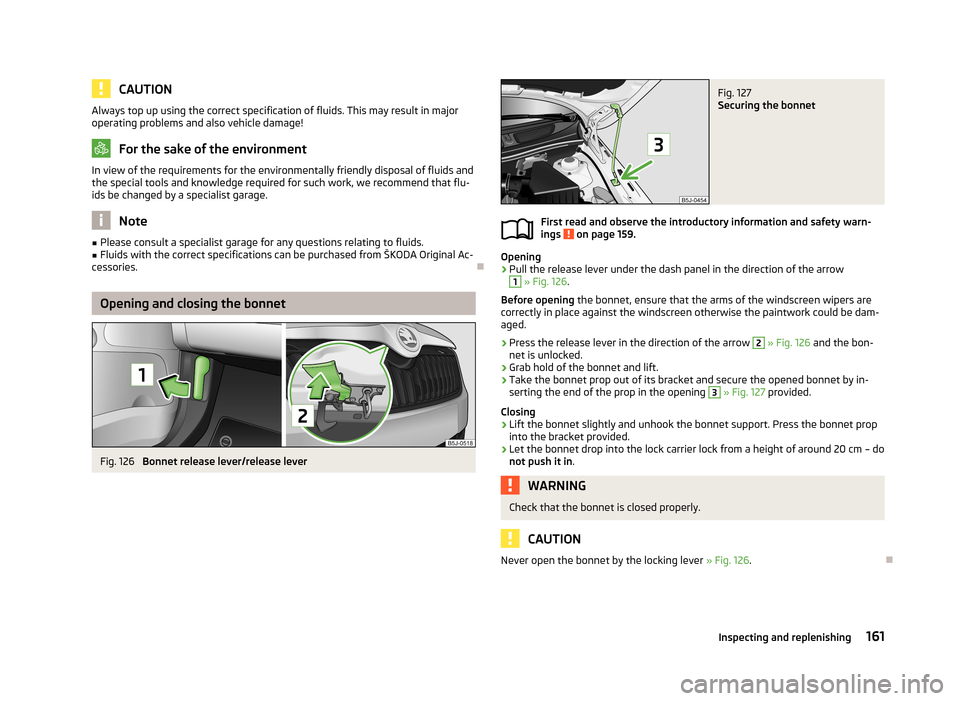
Fig. 126
Bonnet release lever/release lever
Fig. 127
Securing the bonnet
First read and observe the introductory information and safety warn-
ings on page 159.
Opening
›
Pull the release lever under the dash panel in the direction of the arrow
1
» Fig. 126 .
Before opening the bonnet, ensure that the arms of the windscreen wipers are
correctly in place against the windscreen otherwise the paintwork could be dam- aged.
›
Press the release lever in the direction of the arrow
2
» Fig. 126 and the bon-
net is unlocked.
›
Grab hold of the bonnet and lift.
›
Take the bonnet prop out of its bracket and secure the opened bonnet by in- serting the end of the prop in the opening
3
» Fig. 127 provided.
Closing
›
Lift the bonnet slightly and unhook the bonnet support. Press the bonnet prop into the bracket provided.
›
Let the bonnet drop into the lock carrier lock from a height of around 20 cm – do
not push it in .
WARNINGCheck that the bonnet is closed properly.
CAUTION
Never open the bonnet by the locking lever » Fig. 126
.
161Inspecting and replenishing
Page 177 of 219

Always check the inflation pressure when the tyres are cold. Do not reduce the
higher pressure of warm tyres.
With greater additional load, adjust the tyre inflation pressure accordingly.
Driving style
Fast cornering, sharp acceleration and braking increase the wear of your tyres.
Balancing wheels
The wheels of a new vehicle are balanced. When driving, however, there are a
range of factors that may result in an imbalance. This may become apparent by
“vibration” in the steering.
Have the wheels rebalanced after replacing the tyres.
Wheel alignment errors
Incorrect wheel alignment at the front or rear leads to excess wear of the tyres.
Tyre damage
Drive over kerbs and other such obstacles slowly and at right angles wherever
possible in order to avoid damage to tyres and wheel trims.
We recommend checking your tyres and wheel rims for damage (punctures, cuts,
splits and bulges, etc.) on a regular basis. Remove foreign bodies (e.g. small
stones) from the tyre tread immediately.
Replacing wheels
If significantly greater wear is present on the front tyres, we recommend swap-
ping the front wheels with the rear wheels as shown in the diagram » Fig. 136.
You will then obtain approximately the same life for all the tyres.
We recommend that you swap the tyres every 10,000 km in order to achieve evenwear on all tyres and to ensure optimal service life for the tyres.
Storing tyres
Identify disassembled tyres so that the previous direction of rotation can be
maintained if the tyres are reassembled.
Always store wheels or tyres in a cool, dry place that is as dark as possible. Tyres
which are not fixed to a wheel trim should be stored upright.
Wear indicators
The base of the tread of the tyres has 1.6 mm high wear indicators installed.
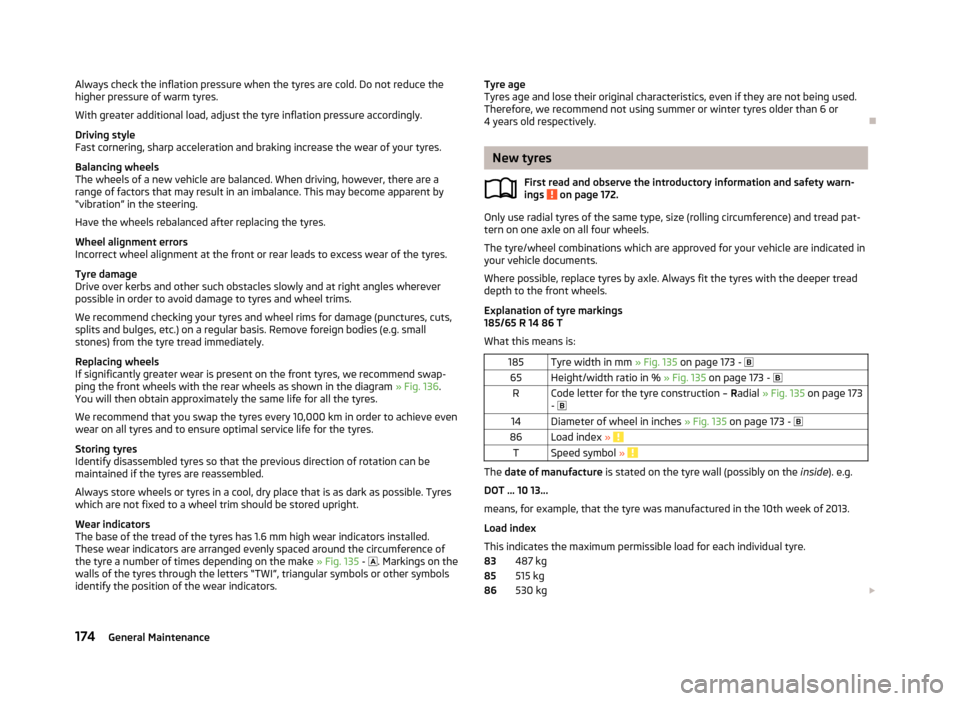
These wear indicators are arranged evenly spaced around the circumference of the tyre a number of times depending on the make » Fig. 135 -
. Markings on the
walls of the tyres through the letters “TWI”, triangular symbols or other symbols identify the position of the wear indicators.Tyre age
Tyres age and lose their original characteristics, even if they are not being used.
Therefore, we recommend not using summer or winter tyres older than 6 or 4 years old respectively.
New tyres
First read and observe the introductory information and safety warn-
ings
on page 172.
Only use radial tyres of the same type, size (rolling circumference) and tread pat-
tern on one axle on all four wheels.
The tyre/wheel combinations which are approved for your vehicle are indicated in
your vehicle documents.
Where possible, replace tyres by axle. Always fit the tyres with the deeper tread
depth to the front wheels.
Explanation of tyre markings
185/65 R 14 86 T
What this means is:
185Tyre width in mm » Fig. 135 on page 173 - 65Height/width ratio in % » Fig. 135 on page 173 - RCode letter for the tyre construction – Radial » Fig. 135 on page 173
- 14Diameter of wheel in inches » Fig. 135 on page 173 - 86Load index » TSpeed symbol »
The date of manufacture is stated on the tyre wall (possibly on the inside). e.g.
DOT ... 10 13...
means, for example, that the tyre was manufactured in the 10th week of 2013.
Load index
This indicates the maximum permissible load for each individual tyre. 487 kg
515 kg
530 kg
838586174General Maintenance
Page 204 of 219

DimensionsFirst read and observe the introductory information given on page 199.
Vehicle dimensions (mm)
ROOMSTERPRAKTIKSCOUTLength421442134240Width168416841695Width including exterior mirror188218821882Height160716071650Clearance140140141Wheel base262026202620Track gauge front/rear1436/1500
(1420/1484) a)1436/1500
(1420/1484) a)1427/1494a)
Valid for vehicles, which have factory-fitted 15" wheels.
201Technical data
Page 213 of 219

Onboard computersee Multifunction display13
Operation in winter Diesel fuel
159
Vehicle battery170
Outside temperature15
Overview Engine compartment
162
warning lights20
P
Paintwork See Paintwork care
151
Paintwork care151
Panoramic roof48
Parking Parking aid
112
Parking lights41
Part replacement146
Passive safety Before setting off
123
Driving safety124
Safety equipment123
Passive Safety123
Pedals100
Footmats100
Petrol refer to Fuel
158
Polishing the paintwork See Taking care of your vehicle
151
Power steering95
Power window force limiter39
praktik adjusting the safety partition
75
Praktik73
Adjustable safety partition behind the front seats
74
emergency release of the loading area door75
Fastening the loading floor74
Internal lighting75
Internal lights75
R
Radiator fan
162
Radio reception See windows
152
Raise vehicle183
Rear-view mirror Exterior mirrors
51
Manually dimmed rear-view mirror51
Rear fog light44
rear seats in the longitudinal direction
54
Tilt the seat backrest54
Rear seats54
Rear Seats fold back into the starting position
56
Rear window heating47
Recirculated air mode Manual air conditioning
82
Recommended gear13
Refuelling157
Fuel157
Regulation Headlight beam
42
Remote control34
Synchronisation process35
Remote control key Replacing the battery
29
Repairs and technical alterations146
Replacing Bulb for the licence plate light
197
Bulbs194
Bulbs in the tail light198
Fuses191
Fuses in the dash panel192
Fuses in the engine compartment193
Vehicle battery171
Windscreen wiper blades50
Replenishing Coolant
167
Engine oil165
Windscreen washer fluid162
Running-in The first 1500 km
103
Running in Brake pads
104
Engine103
Tyres104
S
SAFE see Safe securing
32
SAFELOCK see Safe securing
32
Safe securing32
Safety123
Child safety139
Child safety seats139
Correct seated position124
Head restraints56
ISOFIX141
TOP TETHER143
Safety belts rear middle seat
130
Saving electrical energy104
Seals Taking care of your vehicle
152
Seat Adjusting
53
Seat belt warning light
21
Seat belt height adjuster130
Seat belts127
Belt tensioners131
Cleaning156
fastening and unfastening129
210Index
Page 214 of 219

Height adjustment130
Inertia reels130
The physical principle of a frontal collision128
Seats Head restraints
56
Heating53
Removing seats55
Seats and stowing52
Selector lever see Using the selector lever
101
Service147
Service display16
Service intervals144
Setting Heating
79
Manual air conditioning system82
Manually dimmed rear-view mirror51
Setting the clock Clock
12
Shifting gears Driving and saving energy
105
Side airbag135
Snow chains178
Spare wheel176
Speedometer11
Speed symbol Refer to Wheels
175
Spoiler148
Stalk Main beam
43
Turn signals43
START-STOP115
Manually activating/deactivating the system116
Operating conditions for the system115
Starting/shutting down the engine115
Starting and stopping the engine96
Starting engine Jump-starting
186
Starting the engine97
Jump-starting187
Starting the engine97
START STOP Information messages
116
Jump-starting188
Steering force assistance95
Steering wheel95
Storage68
Storage compartment Storage compartment on the driver's side
70
Storage compartment on the front passenger side
69
Storage Compartment Lighting
47
Storage compartments68
Flexible storage compartment73
Storage compartment in the front centre console 71
storage pockets on the front seat
70
Stowage compartment beneath the front seat
71
compartment for glasses70
compartments in the doors72
compartments in the luggage73
sun roof48
sunshade48
Sun visors48
Switching lights on and off41
Switching off the engine98
Synthetic leather155
T
Taking care of the vehicle Natural leather
155
Seat belts156
Taking care of your vehicle Automatic car wash system
150
Cavity protection153
Chrome parts152
Cleaning the wheels153
Decorative films152
Door lock cylinders153
Headlight lenses153
High-pressure cleaner150
Plastic parts151
Polishing the paintwork151
Rubber seals152
Taking care of the interior154
Taking care of your vehicle exterior150
Washing149
Washing by hand149
Wash system150
Wax treatment151
Taking care of your vehicles Fabric covers
156
Technical data199
Telephone86
Temporary spare wheel176
the rear seats fold down seat backrest and fold seat fully for- ward
55
Tiptronic102
Tools180
TOP TETHER143
Tourist lights44
Towing188
Towing a trailer117
Towing device Description
117
Drawbar load117
Use and care120
Towing eye Front
189
Rear189
Towing protection36
Traction Control System (ASR)111
Trailer117, 120
Loading120
Towing a trailer121
211Index