2013 SKODA OCTAVIA change wheel
[x] Cancel search: change wheelPage 188 of 287
Airbag system
Description of the airbag system
Introduction
This chapter contains information on the following subjects:
System description
185
Airbag deployment
185WARNING■ An airbag can only offer you optimal protection in combination with a fas-
tened seat belt .■
The airbag is not a substitute for the seat belt, but instead forms part of the
complete passive vehicle safety concept.
■
To ensure passengers are protected with the greatest possible effect when
the airbag is deployed, the front seats must be correctly adjusted to match
the body size » page 177, Correct seated position .
■
If you do not fasten the seat belts when driving, lean too far forward or
adopt an incorrect seated position, you are exposing yourself to increased risk of injury in the event of an accident.
WARNINGObserve the following instructions for handling the airbag system.■If there is a fault, the airbag system must be checked by a specialist garage
immediately. Otherwise, there is a risk of the airbag not being activated in the
event of an accident.■
No modifications of any kind must be made to parts of the airbag system.
■
Any work on the airbag system including the installation and removal of sys-
tem components due to other repair work (e.g. removal of the steering wheel) must only be carried out by a specialist garage.
■
Never make any changes to the front bumper or bodywork.
■
It is prohibited to manipulate individual parts of the airbag system as this
might result in the airbag being deployed.
■
The protective function of the airbag system is sufficient for only one acci-
dent. The airbag system must then be replaced if the airbag has been de-
ployed.
System description
First read and observe the introductory information and safety warn-ings
on page 185.
The functional status of the airbag system is indicated by the indicator light in
the instrument cluster » page 19.
When the airbags are deployed they fill with gas and inflate.
A grey white or red, non-harmful gas is released when the airbag is inflated. This
is perfectly normal and is not an indication of a fire in the vehicle.
The airbag system consists – depending on the vehicle equipment – of the
following modules.
› Electronic control unit.
› Front airbag for the driver and the front passenger
» page 187.
› Driver’s knee airbag
» page 188.
› Side airbags
» page 188.
› Head airbags
» page 189.
› Airbag warning light in the instrument cluster
» page 19.
› Key switch for the front passenger airbag
» page 191.
› Warning light for the front passenger airbag/activation in dash panel cen-
tre » page 191 .
Note
■
The airbag system needs no maintenance during its working life.■If you sell your vehicle, provide the complete vehicle documentation to the new
owner. Please note that the information relating to the possibility of deactivating
the front passenger airbag must be included!■
When disposing of vehicle or parts of the airbag system, it is important to com-
ply with the national legal requirements.
Airbag deployment
First read and observe the introductory information and safety warn-
ings
on page 185.
The airbags inflate in fractions of a second and at a high speed in order to be able
to offer that additional protection in the event of an accident.
The airbag system is only functional when the ignition is switched on.
185Airbag system
Page 194 of 287
Deactivating airbagsFirst read and observe the introductory information given on page 190.
Deactivating an airbag should be considered in cases such as the ones outlined
below.
› If using a rear-facing child seat on the front passenger seat (due to different le-
gal regulations, the airbag must be deactivated if using a forward-facing child
seat in some countries) » page 193, Transporting children safely .
› If not being able to maintain a distance of at least 25 cm between the middle of
the steering wheel and chest, despite the driver's seat being correctly adjusted.
› If special attachments are required in the area of the steering wheel because of
a physical disability.
› If other seats have been installed (e.g. orthopaedic seats without side airbags).
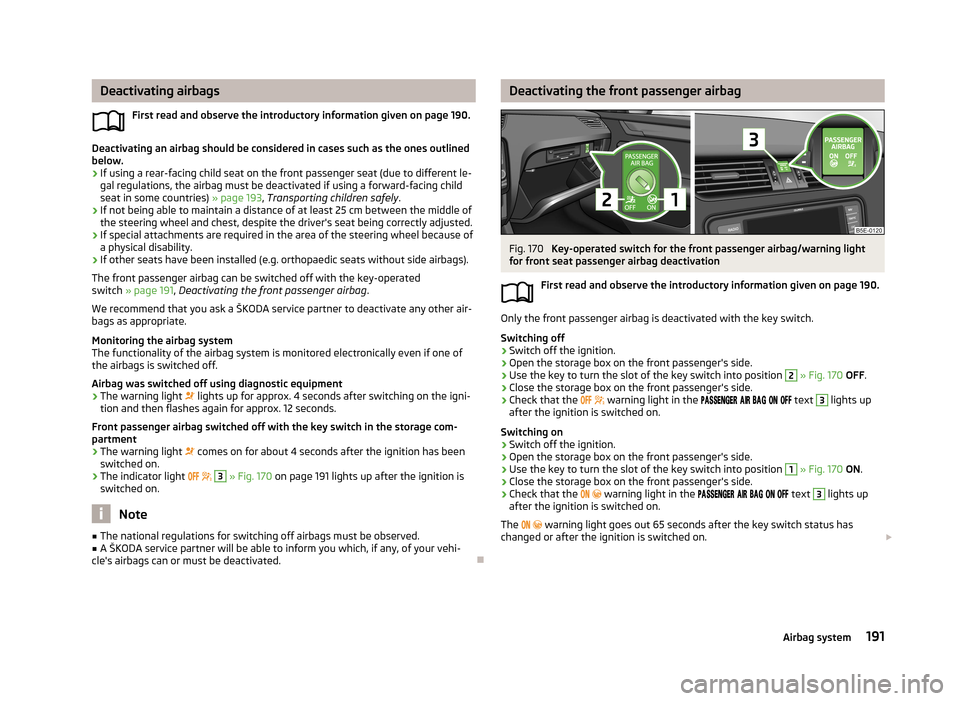
The front passenger airbag can be switched off with the key-operated
switch » page 191 , Deactivating the front passenger airbag .
We recommend that you ask a ŠKODA service partner to deactivate any other air-
bags as appropriate.
Monitoring the airbag system
The functionality of the airbag system is monitored electronically even if one of
the airbags is switched off.
Airbag was switched off using diagnostic equipment › The warning light
lights up for approx. 4 seconds after switching on the igni-
tion and then flashes again for approx. 12 seconds.
Front passenger airbag switched off with the key switch in the storage com-
partment
› The warning light
comes on for about 4 seconds after the ignition has been
switched on.
› The indicator light
3
» Fig. 170 on page 191 lights up after the ignition is
switched on.
Note
■ The national regulations for switching off airbags must be observed.■A ŠKODA service partner will be able to inform you which, if any, of your vehi-
cle's airbags can or must be deactivated.
Deactivating the front passenger airbagFig. 170
Key-operated switch for the front passenger airbag/warning light
for front seat passenger airbag deactivation
First read and observe the introductory information given on page 190.
Only the front passenger airbag is deactivated with the key switch.
Switching off
›
Switch off the ignition.
›
Open the storage box on the front passenger's side.
›
Use the key to turn the slot of the key switch into position
2
» Fig. 170 OFF .
›
Close the storage box on the front passenger's side.
›
Check that the
warning light in the
text
3
lights up
after the ignition is switched on.
Switching on
›
Switch off the ignition.
›
Open the storage box on the front passenger's side.
›
Use the key to turn the slot of the key switch into position
1
» Fig. 170 ON .
›
Close the storage box on the front passenger's side.
›
Check that the
warning light in the
text
3
lights up
after the ignition is switched on.
The
warning light goes out 65 seconds after the key switch status has
changed or after the ignition is switched on.
191Airbag system
Page 206 of 287

AirbagsFirst read and observe the introductory information and safety warn-
ings
on page 200.
The system components of the airbag system can be situated in the front bump-
er, doors, front seats, roof lining or body.
WARNINGAny work on the airbag system including the installation and removal of sys-
tem components due to other repair work (e.g. removal of the steering wheel) must only be carried out by a specialist garage.■
Modifications, repairs and technical alterations that have been carried out
unprofessionally can cause damage and operational faults, and can also seri-
ously impair the effectiveness of the airbag system – risk of accident and fatal
injury!
■
The airbag system must then be replaced if the airbag has been deployed.
Airbag modules cannot be repaired.
WARNINGObserve the following instructions for handling the airbag system.■It is prohibited to manipulate individual parts of the airbag system, as this
might result in the airbag being deployed.■
Never install any airbag parts into the vehicle that have been removed from
old cars or have been recycled.
■
Never install damaged airbag parts in the vehicle. The airbags may then not
be triggered properly or not at all in the event of an accident.
■
No modifications of any kind must be made to parts of the airbag system.
WARNING■ A change to the vehicle's wheel suspension, including the use of non-ap-
proved wheels and tire combinations, can alter the functioning of the airbag system - risk of accident and fatal injury!■
Never make any changes to the front bumper or the bodywork.
WARNINGThe airbag control unit operates using pressure sensors located in the front
doors. For this reason, no adjustments may be carried out to the doors or door
panels (e.g. installation of additional loudspeakers). Resulting damage can have a negative impact on the function of the airbag system. Any work on thefront doors and door panels must be carried out by a specialist garage. The
following guidelines must be observed.■
Never drive with inner door panels removed.
■
Never drive if parts of the inner door panel have been removed and the re-
sulting openings have not been properly sealed.
■
Never drive if the loudspeakers in the doors have been removed, unless the
loudspeaker openings have been properly sealed.
■
Always make sure that the openings are covered or filled if additional loud-
speakers or other equipment parts have been installed in the inner door pan-
els.
Washing your car
Introduction
This chapter contains information on the following subjects:
Washing by hand
204
Automatic car wash systems
204
Washing with a high-pressure cleaner
204
The best way to protect your vehicle against harmful environmental influences is frequent washing.
How often the vehicle should be washed depends, for example, on the following
factors.
› Frequency of use.
› Parking situation (garage, below trees, etc.).
› Season of the year.
› Weather conditions.
› Environmental influences.
203Vehicle care
Page 213 of 287

■Sharp-edged objects on items of clothing such as zip fasteners, rivets, sharp-
edged belts, jewellery and pendants may leave permanent scratches or signs of
rubbing on the surface. Such damage cannot be subsequently recognised as a
justified complaint.■
The use of a mechanical steering wheel lock may damage the leather surface of
the steering wheel.
■
Use a care cream with light blocker and impregnation effect on a regular basis
and each time after cleaning. The cream nourishes the leather, allows it to
breathe and keeps it supple and also provides moisture. It also creates surface
protection.
■
Some clothing materials, e.g. dark denim, do not have sufficient colour fastness.
This can cause damage or clearly visible discolouration to seat covers, even when used correctly. This applies particularly to light-coloured seat covers. This does
not relate to a fault in the seat cover, but rather to poor colour fastness of the
clothing textiles.
Note
During the use of the vehicle, minor visible changes can occur on the leather
parts of the covers (e. g wrinkles or creases as a result of the stress of the cov-
ers).
Artificial leather, cloths and Alcantara ®
First read and observe the introductory information and safety warn- ings
on page 208.
Artificial leather
Clean artificial leather with a damp cloth.
If this method does not completely clean the artificial leather, use a mild soap sol- ution or cleaning products specially designed for this purpose.
Fabric
Clean upholstery cover materials and cloth trims on doors, luggage compartment cover, etc. using specific cleaning agents, e.g., dry foam.
Use a soft sponge, brush, or commercially available microfibre cloth.
Use a cloth and a cleaning agent specifically designed for this purpose to clean
the roof trim.
Remove any lumps on the cover fabric and any fabric residue using a brush.
Remove stubborn hair using a “cleaning glove”.
Alcantara ®
Dust and fine dirt particles in pores, creases and seams may chafe and damage
the surface.
If you leave your vehicle parked in the open for lengthy periods, protect the Al-
cantara ®
seat covers from the direct rays of the sun to prevent fading.
Minor changes in colour caused by use are normal.
CAUTION
■ Do not use any leather cleaners on Alcantara ®
seat covers.■For Alcantara ®
seat covers do not use any solvents, floor wax, shoe cream, stain
remover, or similar agents.■
Avoid leaving the vehicle in bright sunlight for long periods of time in order to
stop the fabric from bleaching. If the vehicle is parked outside for long periods of
time, cover the fabric to protect it from direct sunlight.
■
Some clothing materials, e.g. dark denim, do not have sufficient colour fastness.
This can cause damage or clearly visible discolouration to seat covers, even when used correctly. This applies particularly to light-coloured seat covers. This does
not relate to a fault in the seat cover, but rather to poor colour fastness of the
clothing textiles.
Seat covers
First read and observe the introductory information and safety warn-
ings
on page 208.
Electrically heated seats
Do not clean the covers by moistening, as this can damage the seat heating sys-
tem.
Use a specific cleaning agent such as dry foam or similar to clean the covers.
Seats without seat heating
Thoroughly vacuum the seat covers with a vacuum cleaner before cleaning.
Clean the seat covers with a damp cloth or cleaning products specially designed for this purpose.
Indented points arising on the fabrics by everyday use, can be removed by brush- ing against the direction of hair with a damp brush.
Always clean all parts of the covers, so that there are no visible edges. Then allow the seat to dry completely.
210General Maintenance
Page 233 of 287

Always check the inflation pressure when the tyres are cold. Do not reduce the
higher pressure of warm tyres.
With greater payload, adjust the tyre inflation pressure accordingly.
Driving style
Fast cornering, sharp acceleration and braking increase the wear of your tyres.
Balancing wheels
The wheels of a new vehicle are balanced. When driving, there are a wide range
of influences which may result in an imbalance. This may become apparent by a
“vibration” in the steering.
Have the wheels rebalanced after replacing the tyres.
Wheel alignment errors
An incorrect wheel alignment at the front or rear leads to excess wear on the tyres.
Tyre damage
Drive over kerbs and other such obstacles slowly and perpendicularly wherever possible in order to avoid damage to tyres and wheel trims.
We recommend checking your tyres and wheel rims for damage (punctures, cuts,
splits and bulges, etc.) on a regular basis. Remove foreign bodies (e.g. small
stones) from the tyre profile immediately.
Changing wheels around
If significantly greater wear is present on the front tyres, we recommend replac-
ing the front wheels with the rear wheels as shown in the diagram » Fig. 190 .
You will then obtain approximately the same life for all the tyres.
We recommend that you change the tyres around every 10000 km in order to
achieve even wear on all tyres and to obtain optimal tyre life.
Storing tyres
Mark them previously used tyres so that you are able to fit them on again to run in the same direction.
Always store wheels or tyres in a cool, dry and, where possible, dark place. Tyres which are not fixed to a wheel trim should be stored upright.
Wear indicators
The base of the tread of the tyres has 1.6 mm high wear indicators installed.
These wear indicators are evenly spaced around the circumference of the tyre,
depending on the make » Fig. 189 -
. Markings on the walls of the tyres through
the letters “TWI”, triangular symbols or other symbols identify the position of the
wear indicators.Tyre age
Tyres age losing their original characteristics, even if they are not used. There-
fore, we recommend not to use summer or winter tyres that are older than 6 years or 4 years respectively.
New tyres
First read and observe the introductory information and safety warn-
ings
on page 228.
Only fit radial tyres of the same type, size (rolling circumference) and the same
tread pattern on one axle on all 4 wheels.
The tyre/wheel combinations which are approved for your vehicle are indicated in
your vehicle documents.
Where possible replace tyres by axle. Always fit the tyres with the deeper tread
depth to the front wheels.
Explanation of tyre markings
195/65 R 15 91 T
What this means is:
195Tyre width in mm » Fig. 189 on page 229 - 65Height/width ratio in % » Fig. 189 on page 229 - RCode letter for the type of tyre – Radial » Fig. 189 on page 229 - 15Diameter of wheel in inches » Fig. 189 on page 229 - 91Load index » TSpeed symbol »
The date of manufacture is stated on the tyre wall (possibly on the inside). e.g.
DOT ... 10 13...
means, for example, that the tyre was manufactured in the 10th week of 2013.
Load index
This indicates the maximum permisible load on each indvidua tyre. 615 kg
630 kg
650 kg
670 kg
91929394230General Maintenance
Page 235 of 287

›The wheels of one axle are loaded more heavily (e.g. when towing a trailer or
when driving uphill or downhill).
› Snow chains are mounted.
› The spare wheel is mounted.
› One wheel per axle was changed.
For vehicles with Infotainment 1)
it can be determined which tyres should be
checked » Manual Infotainment , chapter Vehicle settings (key CAR) .WARNING■
When the warning light illuminates, immediately reduce the speed and
avoid sudden steering and brake manoeuvres. Stop the vehicle as soon as
possible and inspect the tyres and their inflation pressure.■
Under certain circumstances (e.g. sporty style of driving, wintry or unpaved
roads) the may light up after a delay, or not at all.
CAUTION
■
The tyre control display does therefore not replace the regular tyre inflation
pressure control, as the system cannot detect an even loss of pressure.■
The system cannot warn in case of very rapid tyre inflation pressure loss, e.g. in
case of sudden tyre damage. In this case carefully bring the vehicle to a standstill
without sudden steering movements or sharp braking.
■
To ensure a proper functioning of the tyre control display, it is necessary to re-
peat the basic setting every 10000 km or once a year.
Spare wheel
Fig. 192
Luggage compartment: Spare
wheel
First read and observe the introductory information and safety warn-
ings on page 228.
The spare wheel is located in a well under the floor covering in the boot and is
fixed in place with a special bolt » Fig. 192.
Take out wheel
›
Open the boot lid.
›
Raise the floor covering in the boot » page 99.
›
Remove the box with the tool kit.
›
Pull out safety lock
1
» Fig. 192 in the direction of the arrow.
›
Unscrew the
2
bolt in a counterclockwise direction.
›
Remove the wheel.
Store wheel away
›
Place the replaced wheel into the spare wheel well with the wheel rim pointing
downward.
›
Screw in bolt
2
» Fig. 192 in a clockwise direction, until the wheel is secure.
›
Insert safety lock
1
» Fig. 192 in the opposite direction to which the arrow is
pointing.
›
Place the box with the tool kit back into the spare wheel and secure it with the
tape.
›
Fold back the floor covering in the boot » page 99.
›
Shut the boot lid.
Install a wheel having the appropriate version and dimensions as soon as possi-
ble.
If the dimensions or design of the spare wheel differ from the tyres fitted to the
vehicle (e.g. winter tyres or low-profile tyres), it must only be used briefly in the
event of a puncture and if an appropriately cautious style of driving is adop-
ted »
.
Temporary spare wheel
A yellow warning label is displayed on the rim of the temporary spare wheel.
Please note the following if you intend to use the temporary spare wheel. › The warning label must not be covered after installing the wheel.
› Be specially attentive when driving.
› The inflation pressure for the temporary spare wheel is identical to the maxi-
mum inflation pressure of the standard tyres.
› Only use this temporary spare wheel to reach the nearest specialist garage, as it
is not intended for long-term use.
1)
Does not apply to vehicles with the Infotainment Blues and Swing system.
232General Maintenance
Page 240 of 287
WARNING■The factory-supplied lifting jack is only intended for your model of vehicle.
Under no circumstances attempt to lift heavier vehicles or other loads – risk of
injury!■
Ensure that the vehicle tool kit is safely secured in the luggage compart-
ment.
■
Ensure that the box is always secured with the strap.
Changing a wheel
Introduction
This chapter contains information on the following subjects:
Preparation
237
Changing a wheel
238
Follow-up tasks
238
Loosening/tightening wheel bolts
239
Raising the vehicle
239
Securing wheels against theft
240WARNING■ If you are in flowing traffic, switch on the hazard warning light system and
set up the warning triangle at the prescribed distance! The national legal re-
quirements must be observed.■
Park the vehicle as far away as possible from the flow of traffic. Park on as
flat and firm a surface as possible.
■
If the vehicle is subsequently fitted with tyres which are different from
those it was fitted with at the works, follow these guidelines » page 230, New
tyres .
WARNINGObserve the following instructions for lifting the vehicle.■If the wheel has to be changed on a slope, first of all block the opposite
wheel with a stone or similar object to prevent the vehicle from unexpectedly
rolling away.■
Secure the base plate of the lifting jack with suitable means to prevent pos-
sible moving. A soft and slippery ground under the base plate may move the lifting jack, causing the vehicle to fall down. It is therefore always necessary to
place the lifting jack on a solid surface or use a wide and stable base. Use a non-slip base (e.g. a rubber foot mat) if the surface is smooth, such as cobbled
stones, tiled floor, etc.
■
Only attach the lifting jack to the attachment points provided for this pur-
pose.
■
Always raise the vehicle with the doors closed.
■
Never position any body parts, such as arms or legs under the vehicle, while
the vehicle is raised with a lifting jack.
■
Never start the engine with the vehicle sitting on the raised jack – risk of in-
jury.
CAUTION
■ The tightening torque specified for the wheel bolts for steel and light alloy
wheels is 120 Nm.■
If the wheel bolts are fastened too tightly, this can cause damage to the anti-
theft wheel bolt or the adapter.
Note
The national legal requirements must be observed when changing a wheel.
Preparation
First read and observe the introductory information and safety warn-
ings
on page 237.
Always change a wheel on a level surface as far as possible.
The following steps must be carried out before actually changing the wheel:
237Emergency equipment, and self-help
Page 258 of 287

No.Power consumer20Alarm21Windscreen heater - left22Engine control unit23Starter24Electrical auxiliary heating system31Not assigned32Not assigned33Not assigned34Windscreen heater - right35Not assigned36Not assigned37Control unit for auxiliary heating38Not assigned
Bulbs
Introduction
This chapter contains information on the following subjects:
Bulb arrangement in the headlights
256
Replacing the low beam bulb
256
Replacing bulb for main beam and daytime running lights
256
Replacing bulb for daytime running lights and parking lights
257
Change bulb for additional parking light
257
Replacing the bulb for the fog lights
258
Replacing the bulb for the licence plate light
258
Rear light (Octavia)
259
Replacing bulbs in rear light (Octavia)
260
Rear light (Octavia Estate)
261
Replacing bulbs in rear light (Octavia Estate)
262
Some manual skills are required to change a bulb. For this reason, we recommend
having bulbs replaced by a specialist garage or seeking other expert help in the
event of any uncertainties.
› Switch off the ignition and all of the lights before replacing a bulb.
› Faulty bulbs must only be replaced with the same type of bulbs. The designa-
tion is located on the light socket or the glass bulb.
› A stowage compartment for replacement bulbs is located in a plastic box in the
spare wheel or underneath the floor covering in the luggage compartment.WARNING■ Always read and observe the warnings before completing any work in the
engine compartment » page 215.■
Accidents can be caused if the road in front of the vehicle is not sufficiently
illuminated and the vehicle cannot or can only be seen with difficulty by other
road users.
■
Bulbs H7 H8 and H15 are pressurised and may burst when changing the bulb
- risk of injury! We therefore recommended wearing gloves and safety glasses when changing a bulb.
■
Gas discharge bulbs (xenon bulbs) operate with a high voltage, professional
knowledge is required – risk of death!
■
The relevant lamp must always be switched off before a light bulb is re-
placed.
CAUTION
Do not take hold of the glass bulb with naked fingers (even the smallest amount of dirt reduces the working life of the light bulb). Use a clean cloth, napkin, or sim-
ilar.
Note
■ This Owner's Manual only describes the replacement of bulbs where it is possi-
ble to replace the bulbs on your own without any complications arising. Other bulbs must be replaced by a specialist garage.■
We recommend that a box of replacement bulbs always be carried in the vehi-
cle. Replacement bulbs can be purchased from ŠKODAOriginal Accessories.
■
We recommend having the headlight settings checked by a specialist garage af-
ter replacing a bulb in the main beam, low beam or fog lights.
■
In case of failure of a xenon gas discharge lamp or an LED diode, visit a special-
ist garage.
255Fuses and light bulbs