2013 SKODA OCTAVIA light
[x] Cancel search: lightPage 55 of 90

Route optionsFirst read and observe the introductory information given on page 52.›
In the navigation main menu, press → Route options
■ Suggest 3 alternative routes - Switch on/off manual selection of the route type
(economical, fast, short) » page 68
■ Route: - Automatic selection of the preferred route type (manual route selec-
tion is switched off)
■ Economical - Calculate the most economical route with shortest travelling
time and distance travelled – displayed in green
■ Fast - Calculate the fastest route to the destination, even if a detour is neces-
sary - displayed in red
■ Short - Calculate the shortest route to the destination, even if a longer travel-
ling time is required - displayed in orange
■ Dynamic route - Switch on/off dynamic route calculation using TMC traffic re-
ports » page 70
■ Avoid motorways - switches on/off the use of motorways
■ Avoid ferries and motorail trains - Switch use of ferries and motorail trains
on/off
■ Avoid toll roads switches on/off the use of toll roads
■ Avoid tunnels - Switch use of tunnels on/off
■ Avoid routes requiring toll stickers - Switch use of routes requiring toll
stickers on/off
■ Show available toll stickers - select from the list of routes requiring toll stickers
for which a valid toll sticker is available
Map
First read and observe the introductory information given on page 52.
›
In the navigation main menu, press
→ Map
■ Day/night: - Select the background colour of the map
■ Day - light coloured background
■ Night - dark coloured background
■ Automatic - map with light or dark coloured background; the background
changes once you turn on the lights (does not apply to daytime running lights)
■ Autozoom - Switch on/off the automatic zoom in/out of the map display while
driving » page 55
■ Show traffic signs - Switch on/off the display of traffic signs
■ Select categories for POIs - Select POIs to be displayed in the map from a list of
available POIs (max. 10 POIs) » page 66
■ Show brands for POIs - Switch on/off the display company logos at the POIs
■ Show favourites - Switch on/off the display of favourites
■ Lane guidance - Switch on/off the display of a window with the recommended
lane for complicated intersections » page 69
Fuel options
First read and observe the introductory information given on page 52.
›
In the navigation main menu, press
Fuel options .
The following warning message is displayed when the fuel gauge pointer reaches the reserve marking: Warning: fuel tank almost empty. Would you like to find a
fuel station nearby?
■ Select preferred fuel station - Select your preferred fuel station brand (the se-
lected station brand will be displayed on the first positions of the list)
■ Fuel warning - Switch on/off the display of the warning message for low on fuel
with the following: ■ Cancel - Close the window with the warning
■ Find - Search for the nearest fuel station; when you select the fuel station,
the new route will be calculated from your current position
Navigation announcements
First read and observe the introductory information given on page 52.
›
In the navigation main menu, press
→ Nav. announcements
■ Volume - Set the volume of the navigation announcements
■ Nav. announcements: - Set the type of navigation announcements
■ Comprehensive - Full navigation announcements
■ Brief - Short navigation announcements
■ Congestion only - navigation announcements only when there is congestion
■ No voice guidance during call - Switch on/off navigation announcements during
a telephone call (if using a phone connected to the device » page 41)
53Description of the navigation system
Page 57 of 90

Introductory informationFig. 32
Map display: Main menu
First read and observe the introductory information given on page 54.
Explanation of graphicMap
Traffic sign symbol » page 56
Current vehicle position
Status bar » page 54
POI icons » page 66
›
Press NAV.
The last opened navigation menu opens.
If a menu other than the main menu » Fig. 32 is opened, the main menu can be
opened by pressing NAV
again.
Map display options
First read and observe the introductory information given on page 54.
Switch between different navigation map display modes depending on the con-
text. You can also display an additional window with further navigation informa-
tion.
›
In the navigation main menu, press . There is a list of function keys displayed.
ABCDEList of Function Keys
2D - current vehicle position in the 2D map display
3D - current vehicle position in the 3D map display 3D map with spatial representation of buildings (topographic map)
Destination display (appears after route calculation)
Displays the overview map to the destination. (After calculating the route,
the device displays the route from the vehicle location to the destination. The scale is adjusted to the length of the route.)
Map display with light or dark backgroundSwitches the split screen on/off in the map » page 57
Map operation
First read and observe the introductory information given on page 54.
Moving the map
The map can be moved in any direction by touching it with your finger and drag-
ging it on the screen in the desired direction.
Changing the scale
› with the menu button
2
›
by touching the screen with two fingers and pulling the fingers together or
apart.
Function keys and map display symbols
■ - Context-dependent change in the map orientation
■ 2D map display - the map rotates and the direction of travel arrow
C
» Fig. 32
on page 55 points to the top of screen, or the north is aligned with the top
edge of the screen, and the arrow
C
shows the direction of travel
■ 3D map view -the direction of travel arrow
C
points to the top of the screen
(if the map scale is larger than 100 km, the map is aligned to the north).
■ - Touch to align the map to the position of the vehicle (the function key is
available when you move the map in the vehicle position display)
■ - Touch to align the map to the destination position and/or route display (the
function key is available when you move the map within the destination- or
route display )
Day/nightSplit screen55Description of the navigation system
Page 58 of 90

■ - The number located below the symbol indicates the elevation 1)
■ - Touch to increase the map scale for a few seconds before it resets to the
original scale (quick view)
■ - Displays the manually set map scale
■ - Displays the automatic map scale
■ - Switches the autozoom on/off during route guidance. Active autozoom is
indicated by a green symbol. If Autozoom is active, the map scale will change
automatically depending on the route travelled (motorway trip: large map scale
- city: small map scale)
The autozoom can be switched off by touching → or off by changing the
map scale. Touching again the (function key highlighted in green) turns the au-
tozoom on again. Autozoom can also be switched on/off in the navigation set-
tings » page 53
Autozoom is only functional when the map is aligned with the vehicle position
(the function key
with the symbol).
Traffic signs
First read and observe the introductory information given on page 54.
The system provides the option to display traffic signs
B
» Fig. 32 on page 55 in
the information display and on the unit screen that are:
› stored in the navigation data of the maps;
› recognised by the camera.
The information given by traffic signs that are recognized by the front camera al- ways takes precedence over stored navigation data.
If the Traffic signs split screen is not switched on, only one traffic sign is dis-
played on the unit screen.
Switching on the traffic sign display function » page 53.
Home address entry
First read and observe the introductory information given on page 54.›
In the navigation main menu, press → Manage memory → Define home ad-
dress .
If the home address has not been entered, an input window is displayed with the following message:
Please select as your home address: your current position or a new address.
The following function keys are displayed:
› Current position
- Entry of the home address via the acquisition of the current
location;
› Address
- Enter the home address in writing » page 60
Description of the adjustment or deletion process of the home address » page 54.
Extra window
Introduction
This chapter contains information on the following subjects:
Menus in the extra window
57
Audio
57
Compass
58
Man.
58
Traffic signs / Traffic
58
GPS
59
Map
59
First and foremost, pay attention to the safety instructions » page 4 , Important
notes .
1)
Display of elevation requires the reception of signals from at least five satellites. Route guidance
must not be running in demo mode.
56Navigation
Page 76 of 90

Vehicle
Vehicle systems
Vehicle settings
Introduction
This chapter contains information on the following subjects:
Selecting driving mode
74
Vehicle data
75
Auxiliary heater and ventilation
76
ESC system
77
Tyre
77
Driver assistance
77
Parking and manoeuvring
78
Light
78
mirrors and wiper
79
Opening and closing
79
Seats
79
Multifunction display
79
Service
80
Restore factory settings
80
Climatronic settings
80
First and foremost, pay attention to the safety instructions
» page 4 , Important
notes .
Settings relating to the vehicle systems can only be made when the ignition is
switched on.
Note■ The individual systems are described in the » Vehicle Owner's Manual .■If the functions of some systems are disabled, some functions, such as parts of
the ESC system, are switched on again automatically for security reasons, after
switching the ignition off and on.■
When you press the button CAR, the system displays the last displayed menu
.
Selecting driving mode
Fig. 50
Button for selecting the driving mode: Octavia, Octavia Combi / Fa-
bia RS Octavia RS
First read and observe the introductory information given on page 74.
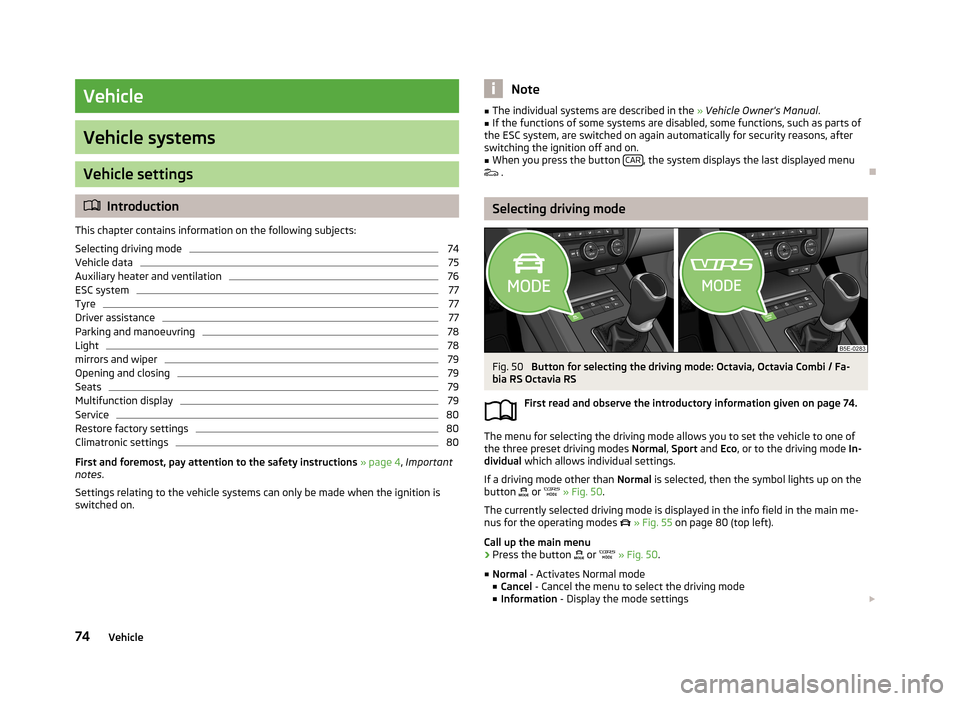
The menu for selecting the driving mode allows you to set the vehicle to one of
the three preset driving modes Normal, Sport and Eco, or to the driving mode In-
dividual which allows individual settings.
If a driving mode other than Normal is selected, then the symbol lights up on the
button
or
» Fig. 50 .
The currently selected driving mode is displayed in the info field in the main me- nus for the operating modes
» Fig. 55 on page 80 (top left).
Call up the main menu
›
Press the button
or
» Fig. 50 .
■ Normal - Activates Normal mode
■ Cancel - Cancel the menu to select the driving mode
■ Information - Display the mode settings
74Vehicle
Page 77 of 90

■Sport - Activates Sport mode
■ Cancel - Cancel the menu to select the driving mode
■ Information - Display the mode settings
■ Eco - Activates the fuel-saving mode
■ Cancel - Cancel the menu to select the driving mode
■ Information - Display the mode settings
■ Individual - Activates the Individual mode
■ Cancel - Cancel the menu to select the driving mode
■ Setup - Individual setting
■ Steering: - Set the power steering characteristics
■ Normal - Normal
■ Sport - Sports
■ Engine: - Set the engine (drive) characteristics
■ Normal - Normal
■ Sport - Sports
■ Eco - Economical
■ ACC: - Set the vehicle acceleration when adaptive cruise control is activated
■ Normal - Normal
■ Sport - Sports
■ Eco - Economical
■ Dynamic bend lighting: - Set the characteristics of the adaptive headlights
■ Normal - Normal
■ Sport - Sports
■ Eco - Economical
■ Air conditioning: - Sets the Climatronic characteristics
■ Normal - Normal
■ Eco - Economical
■ Reset mode - Sets the profile Normal
Note
If you do not operate the unit for longer than approx. 10 seconds in the "Select
driving mode" menu, it will switch to the last selected menu or switch itself off.
Vehicle dataFig. 51
Driving data/vehicle condition
Fig. 52
Tire pressure monitor - Display
example: Check the right rear
tire and its filling pressure
First read and observe the introductory information given on page 74.
›
Press the button CAR
→
.
Explanation of graphic Distance
Driving time
Average speed
Average fuel consumption
Approximate range
ABCDE75Vehicle systems
Page 78 of 90

Range (if the estimated range is less than 300 km, the vehicle starts to ap-
proach the symbol: )
Vehicle representation (the zones of the vehicle are shown in different col- ours, corresponding to any warning messages that occur. The warning mes-
sages are displayed once you touch vehicle)
■ Driving data - Display travel data » Fig. 51
You can display one of three trip memories on the screen:
■ Since start - Driving data for the individual trip
■ Long-term - Long-term driving data
■ Since refuelling - Data since last refuelling
Changing between the individual travel data storage locations can be done with /
.
■ Convenience consumers - Displays up to three devices which use the largest
share of fuel and displays the fuel consumption required to run all conv. con-
sumers » Vehicle Owner's Manual , chapter Commercial driving and environmen-
tal compatibility
■ Vehicle status - Displays vehicle status » Fig. 51 or tyre pressure monitoring in-
formation
■ Vehicle status - Displays vehicle status information
■ /
- No message/warning messages relating to vehicle status or number
of messages (if there is only one message, one warning message text is dis-
played)
■ - Display information about the status of the START-STOP system
■ TPMS - Tyre pressure monitoring function » Fig. 52
■ SET - Start a new calibration process
Changing between the individual menus can be done with
/
.
Note
For more information on the warning messages concerning the vehicle status and
information on the START-STOP system, see the » Vehicle Owner's Manual .FGAuxiliary heater and ventilationFig. 53
Auxiliary heater: Main menu/set preset time
First read and observe the introductory information given on page 74.
Press the CAR/SETUP button on the Climatronic unit
→
.
Set-up Departure time: Day and time when the vehicle is to be ready for use » Fig. 53
Heating/ventilation: Set the operating mode
Select the preset time, switch off the preset timeSet the preset times 1 to 3 and the duration (10 - 60 minutes)
When the heating or ventilation is running, the windows are highlighted in
red or blue
Note
■ Only one preset time can be active. The activated preset time will be deactiva-
ted again after it has started automatically. For the next start, activate one of the preset times.■
In the selection of the day in the preset time, there is an option between Sun-
day and Monday without the specified day. If this setting is made, the vehicle will
be ready for use at the selected time, regardless of the current day.
■
The system in operation switches off on expiration of the operating duration or
can be deactivated by pressing the direct on/off icon or by using the radio re-
mote control.
■
If a different time is set » page 21, Time and date settings , the activated preset
time is automatically deactivated. The preset time must be reactivated.
ABCDE76Vehicle
Page 80 of 90

Parking and manoeuvringFig. 54
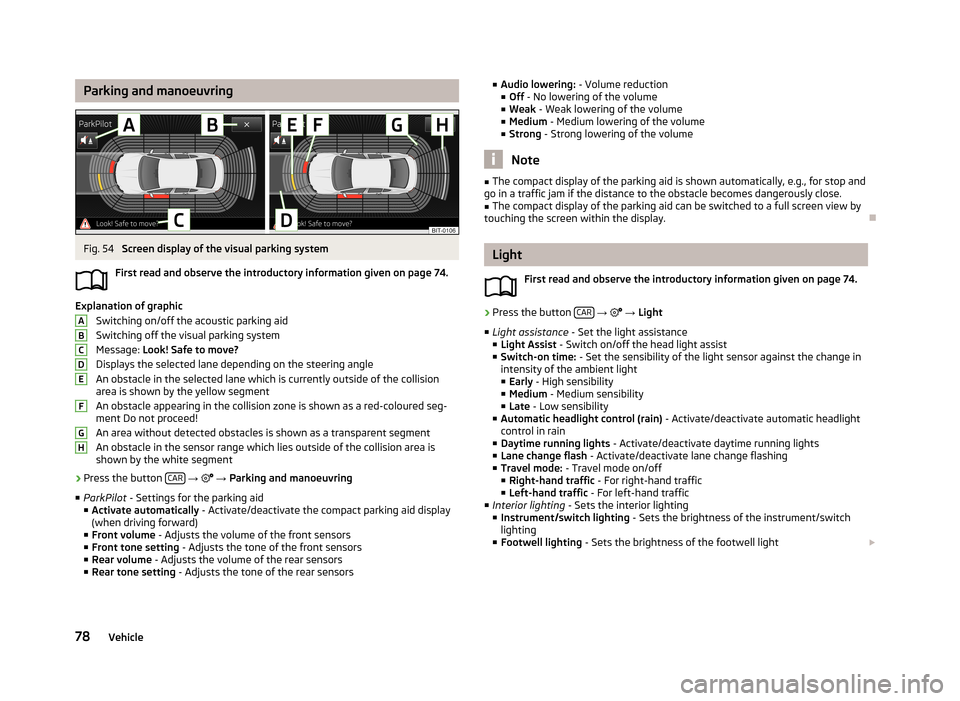
Screen display of the visual parking system
First read and observe the introductory information given on page 74.
Explanation of graphic Switching on/off the acoustic parking aidSwitching off the visual parking system
Message: Look! Safe to move?
Displays the selected lane depending on the steering angle An obstacle in the selected lane which is currently outside of the collisionarea is shown by the yellow segment
An obstacle appearing in the collision zone is shown as a red-coloured seg- ment Do not proceed!
An area without detected obstacles is shown as a transparent segment An obstacle in the sensor range which lies outside of the collision area is
shown by the white segment
›
Press the button CAR
→
→ Parking and manoeuvring
■ ParkPilot - Settings for the parking aid
■ Activate automatically - Activate/deactivate the compact parking aid display
(when driving forward)
■ Front volume - Adjusts the volume of the front sensors
■ Front tone setting - Adjusts the tone of the front sensors
■ Rear volume - Adjusts the volume of the rear sensors
■ Rear tone setting - Adjusts the tone of the rear sensors
ABCDEFGH■
Audio lowering: - Volume reduction
■ Off - No lowering of the volume
■ Weak - Weak lowering of the volume
■ Medium - Medium lowering of the volume
■ Strong - Strong lowering of the volume
Note
■
The compact display of the parking aid is shown automatically, e.g., for stop and
go in a traffic jam if the distance to the obstacle becomes dangerously close.■
The compact display of the parking aid can be switched to a full screen view by
touching the screen within the display.
Light
First read and observe the introductory information given on page 74.
›
Press the button CAR
→
→ Light
■ Light assistance - Set the light assistance
■ Light Assist - Switch on/off the head light assist
■ Switch-on time: - Set the sensibility of the light sensor against the change in
intensity of the ambient light
■ Early - High sensibility
■ Medium - Medium sensibility
■ Late - Low sensibility
■ Automatic headlight control (rain) - Activate/deactivate automatic headlight
control in rain
■ Daytime running lights - Activate/deactivate daytime running lights
■ Lane change flash - Activate/deactivate lane change flashing
■ Travel mode: - Travel mode on/off
■ Right-hand traffic - For right-hand traffic
■ Left-hand traffic - For left-hand traffic
■ Interior lighting - Sets the interior lighting
■ Instrument/switch lighting - Sets the brightness of the instrument/switch
lighting
■ Footwell lighting - Sets the brightness of the footwell light
78Vehicle
Page 81 of 90

■Coming/Leaving Home function - Setting the COMING HOME / LEAVING HOME-
function
■ Coming Home function - Sets the period that the lights remain on after you
leave the vehicle (0 - 30 seconds; 0 = function deactivated)
■ Leaving Home function - Sets the period that the lights remain on after you
unlock the vehicle (0 - 30 seconds; 0 = function deactivated)
mirrors and wiper
First read and observe the introductory information given on page 74.
›
Press the button CAR
→
→ Mirrors and wipers .
■ Mirrors - Adjusts the mirrors
■ Synchronous adjustment - Activate/deactivate synchronous mirror adjust-
ment
■ Lower while reversing - Activate/deactivate the lowering of the front passen-
ger mirror
■ Fold in when parked - Activate/deactivate folding the mirror via the remote
control or by using the sensor in the handle (KESSY)
■ Wipers - Adjusts the windscreen wipers
■ Automatic wiping in rain - Activate/deactivate automatic windscreen wiping
in rain
■ Automatic rear wiper - Activate/deactivate automatic rear window wiping
Opening and closing
First read and observe the introductory information given on page 74.
›
Press the button CAR
→
→ Opening and closing
■ Window operation - Window operation settings
■ Convenience opening: - Set the convenience opening feature
■ All windows - All windows
■ Driver window - Driver's window only
■ Off - Deactivates the convenience opening
■
Central locking - Settings for opening and closing of doors
■ Door unlocking: - Set the door unlocking feature
■ All doors - All doors
■ Single door - Driver's door or driver's or passenger door with KESSY system
■ Vehicle side - Doors on the driver's side or on the driver's or passenger's
side with KESSY system
■ Automatic locking - Activate/deactivate automatic locking when starting off
■ Acoustic confirmation - Activate/deactivate acoustic signals when locking/un-
locking the vehicle with an anti-theft alarm system
Seats
First read and observe the introductory information given on page 74.
›
Press the button CAR
→
→ Seats
■ Store seat position - Store the driver's seat position and exterior mirror position
in the remote control key when locking the vehicle
■ Vehicle key activated - Activate/deactivate storing the driver's seat position
and exterior mirror position when locking the vehicle
Multifunction display
First read and observe the introductory information given on page 74.
›
Press the button CAR
→
→ Multifunction display
■ Current consumption - Switch on/off the display of current fuel consumption in
the display of the instrument cluster
■ Average consumption - Switch on/off the display of average fuel consumption
in the display of the instrument cluster
■ Refuel quantity - Switch on/off the display of refuel quantity in the display of
the instrument cluster
■ Convenience consumers - Switch on/off the display of consumption by conven-
ience consumers on/off in the display of the instrument cluster
■ Eco tips - Switch on/off the display of tips for economical driving in the display
of the instrument cluster
■ Travelling time - Switch on/off the display of travelling time in the display of
the instrument cluster
79Vehicle systems