2013 SKODA OCTAVIA AUX
[x] Cancel search: AUXPage 13 of 83

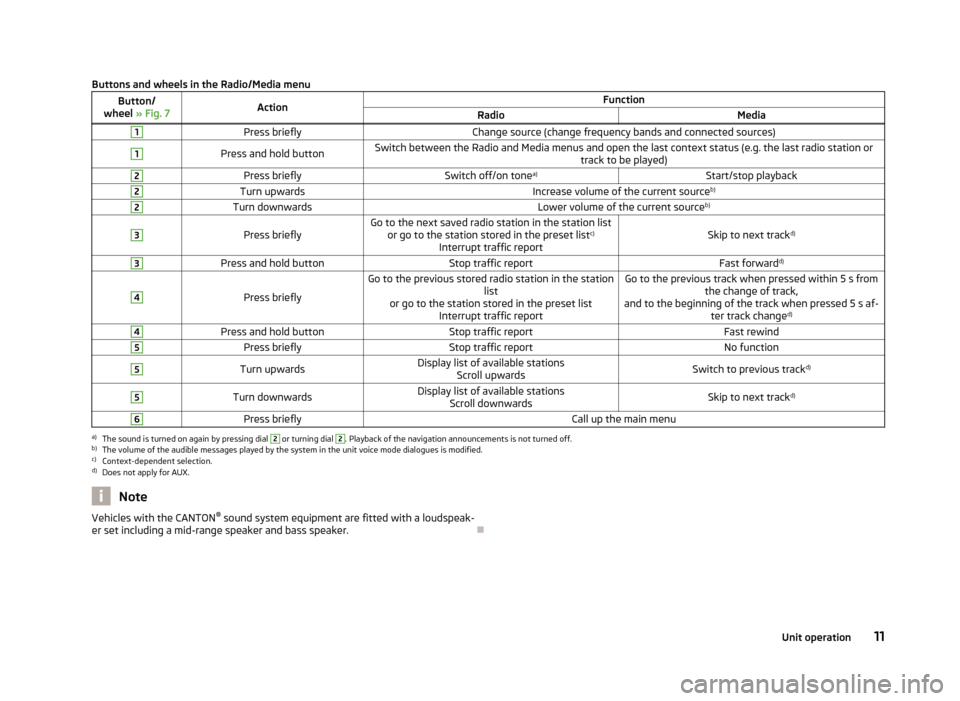
Buttons and wheels in the Radio/Media menuButton/
wheel » Fig. 7ActionFunctionRadioMedia1Press brieflyChange source (change frequency bands and connected sources)1Press and hold buttonSwitch between the Radio and Media menus and open the last context status (e.g. the last radio station or
track to be played)2Press brieflySwitch off/on tonea)Start/stop playback2Turn upwardsIncrease volume of the current source b)2Turn downwardsLower volume of the current sourceb)3
Press brieflyGo to the next saved radio station in the station list
or go to the station stored in the preset list c)
Interrupt traffic reportSkip to next track d)
3Press and hold buttonStop traffic reportFast forwardd)4
Press briefly
Go to the previous stored radio station in the station
list
or go to the station stored in the preset list Interrupt traffic reportGo to the previous track when pressed within 5 s from the change of track,
and to the beginning of the track when pressed 5 s af- ter track changed)4Press and hold buttonStop traffic reportFast rewind5Press brieflyStop traffic reportNo function5Turn upwardsDisplay list of available stations
Scroll upwardsSwitch to previous track d)5Turn downwardsDisplay list of available stations
Scroll downwardsSkip to next track d)6Press brieflyCall up the main menua)
The sound is turned on again by pressing dial
2
or turning dial
2
. Playback of the navigation announcements is not turned off.
b)
The volume of the audible messages played by the system in the unit voice mode dialogues is modified.
c)
Context-dependent selection.
d)
Does not apply for AUX.
NoteVehicles with the CANTON ®
sound system equipment are fitted with a loudspeak-
er set including a mid-range speaker and bass speaker.
11Unit operation
Page 21 of 83

■Navigation database: ... - Version of the navigation data
■ Media codec: ... - Media codec version
■ Update software - manual software upgrade
■ Copyright - Information on licences and copyrights are only available in English
Sound settings
Fig. 12
Sound settings / Balance - fader settings
First read and observe the introductory information given on page 18.
›
Press the Menu button
→
→ Sound .
■ Volume - Volume settings
■ Traffic report - Volume settings for the traffic program alerts (TP)
■ Nav. announcement - Volume settings for the navigation announcements.
■ Voice control - Volume settings for voice control
■ Maximum switch-on volume - Maximum volume setting after switching on
■ Volume adjustment - Speed-dependent volume increase
■ Telephone - Telephone volume settings
■ iPod volume - Sets the volume for the connected iPod
■ Quiet - Low volume
■ Medium - Medium volume
■ Loud - High volume
■ AUX volume - Volume settings for the device connected through AUX
■ Quiet - Low volume
■ Medium - Medium volume
■ Loud - High volume
■
Bluetooth audio - Volume settings for the connected Bluetooth ®
device
■ Quiet - Low volume
■ Medium - Medium volume
■ Loud - High volume
■ Audio lowering: - Setting the reduction of the volume when the park distance
control is active ■ Off - Switched off
■ Weak - Slight reduction
■ Medium - Average reduction
■ Strong - strong reduction
■ Bass - Mid - Treble - Sets the bass, mid and treble
■ Balance - Fader - Sets the balance between left and right, front and rear
■ Confirmation tone - Switch on/off confirmation tone when a function key is
pressed
■ No navigation sound during call - Switch on/off navigation announcements
during a telephone call (using a phone connected to the hands-free system)
■ Subwoofer - Subwoofer volume settings
■ CANTON advanced setup - Setup of the Canton®
sound system
■ Select equaliser sound - Equaliser settings
■ Music - Music
■ Language - Language
■ Sound focus: - Settings for the sound perception for different zones in the ve-
hicle interior
■ Off - Settings apply to the whole vehicle
■ Front - Optimised setting for the front seat occupants
■ Driver - Optimised setting for the driver
■ CANTON surround - Virtual Canton®
surround system (active during media
playback)
Screen settings
First read and observe the introductory information given on page 18.
›
Press the Menu button
→
→ Screen .
19Device settings
Page 30 of 83

Media
Operation
Introduction
This chapter contains information on the following subjects:
Main menu
28
Title-/Folder list
29
Playback
29
Media settings
29
First and foremost, pay attention to the safety instructions » page 4 , Important
notes .
The device allows you to play audio files in various formats » page 30 and to
connect different source types.
When the source has been connected, the device starts to automatically play au- dio files in alphabetical order.
Types of device operation » page 8 .
› The device via the controls.
› Via the function keys in the device screen
› Via the Maxi DOT display.
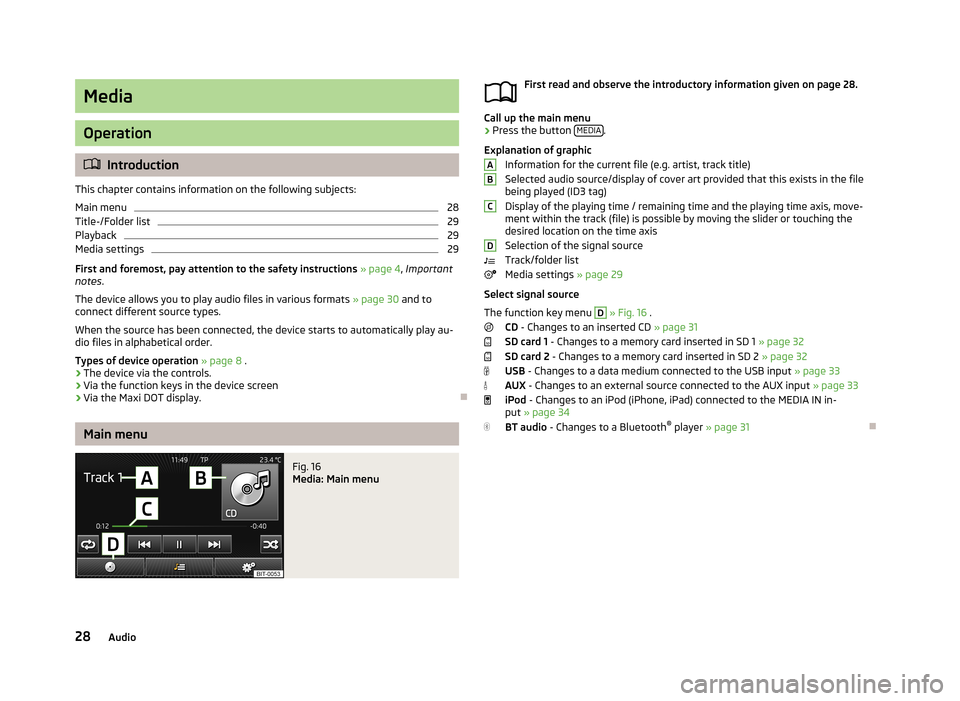
Main menu
Fig. 16
Media: Main menu
First read and observe the introductory information given on page 28.
Call up the main menu
›
Press the button
MEDIA.
Explanation of graphic Information for the current file (e.g. artist, track title)Selected audio source/display of cover art provided that this exists in the file
being played (ID3 tag)
Display of the playing time / remaining time and the playing time axis, move-
ment within the track (file) is possible by moving the slider or touching the
desired location on the time axis
Selection of the signal source
Track/folder list
Media settings » page 29
Select signal source
The function key menu
D
» Fig. 16 .
CD - Changes to an inserted CD » page 31
SD card 1 - Changes to a memory card inserted in SD 1 » page 32
SD card 2 - Changes to a memory card inserted in SD 2 » page 32
USB - Changes to a data medium connected to the USB input » page 33
AUX - Changes to an external source connected to the AUX input » page 33
iPod - Changes to an iPod (iPhone, iPad) connected to the MEDIA IN in-
put » page 34
BT audio - Changes to a Bluetooth ®
player » page 31
ABCD28Audio
Page 32 of 83

■Bluetooth - Settings for the Bluetooth ®
function » page 21
■ Video (iPod) - Parameter settings for a video played by an Apple device (bright-
ness, colour, contrast, format, standard) » page 34
■ Traffic programme (TP) - Switches traffic programme on/off
■ External AUX device - Activate/deactivate the input of the external AUX audio
source
■ Remove safely - Safe removal / disconnection of SD memory card / USB device
■ SD card 1
■ SD card 2
■ USB 1
Signal sources
Introduction
This chapter contains information on the following subjects:
Supported sources and file formats
30
Requirements and restrictions
31
Bluetooth ®
player
31
CD
31
SD memory card
32
USB-, AUX-inputs
33
MEDIA IN input
34
First and foremost, pay attention to the safety instructions » page 4 , Important
notes .
WARNING■
Never place signal sources close to airbags. Loose objects could hit a de-
ployed airbag and injure occupants – danger of death!■
Never place signal sources on the dashboard. Loose objects can be thrown
forward during a sudden manoeuvre or in case of an accident and can injure
the occupants or other road users.
■
Do not have signal sources in your hand or on your knees while driving.
Loose objects can be thrown forward during a sudden manoeuvre or in case of an accident and can injure the occupants or other road users.
■
Always route the connection cable of the external signal source such that
does not restrict you when driving.
CAUTIONWe recommend that you do not save any important data on CD media, Bluetooth ® players, to a SD memory card or connected external signal sources. The ŠKODA
Partner is not responsible for losses resulting from the loss of data stored on
these media.
Note
In some signal sources you can change the output level.
Supported sources and file formats
First read and observe the introductory information and safety warn-
ings
on page 30.
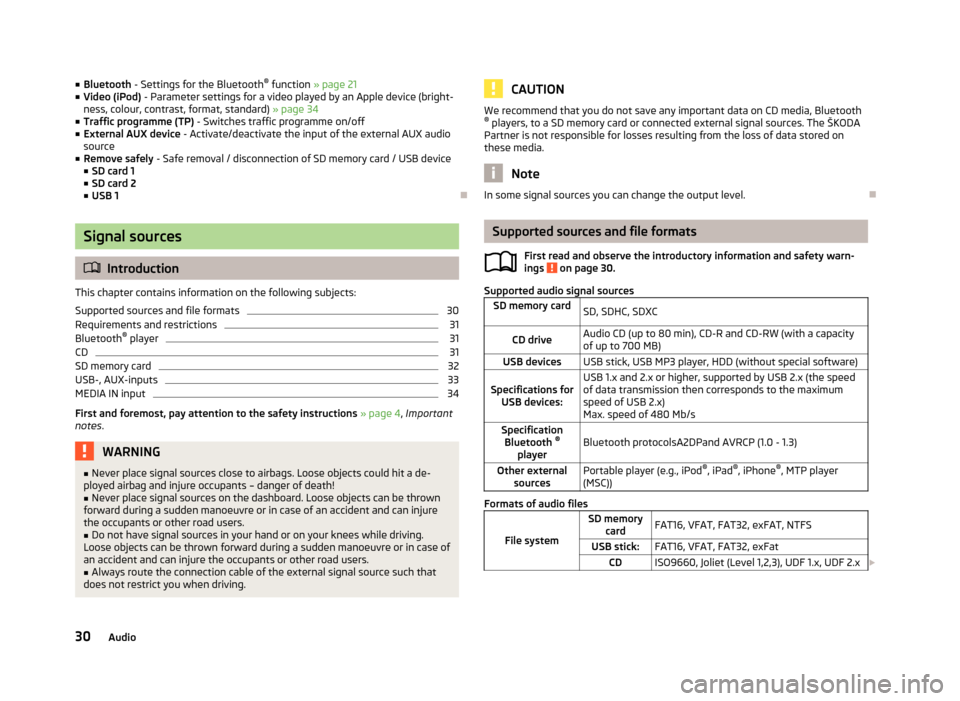
Supported audio signal sources
SD memory cardSD, SDHC, SDXCCD driveAudio CD (up to 80 min), CD-R and CD-RW (with a capacity
of up to 700 MB)USB devicesUSB stick, USB MP3 player, HDD (without special software)Specifications for USB devices:USB 1.x and 2.x or higher, supported by USB 2.x (the speed
of data transmission then corresponds to the maximum speed of USB 2.x)
Max. speed of 480 Mb/sSpecification Bluetooth ®
playerBluetooth protocolsA2DPand AVRCP (1.0 - 1.3)Other external sourcesPortable player (e.g., iPod ®
, iPad ®
, iPhone ®
, MTP player
(MSC))
Formats of audio files
File system
SD memory cardFAT16, VFAT, FAT32, exFAT, NTFSUSB stick:FAT16, VFAT, FAT32, exFatCDISO9660, Joliet (Level 1,2,3), UDF 1.x, UDF 2.x 30Audio
Page 35 of 83

CAUTION■Only use SD cards in standard size. When using smaller SD card with the adapt-
er the SD memory card can fall out while driving the vehicle due to vibrations
from the adapter.■
We recommend using class 4 SD memory cards and higher. This guarantees the
fastest possible access to the audio files.
■
Always store the SD cards in suitable cases to protect them from dirt, dust and
other forms of damage.
USB-, AUX-inputs
Fig. 20
USB and AUX inputs
First read and observe the introductory information and safety warn-
ings on page 30.
The device allows you to play audio files from USB storage devices, as well as ex-
ternal devices connected to the analogue AUX input.
The USBand AUXinputs are located above the storage compartment at the front
of the centre console » Fig. 20.
A data carrier or system can be connected to the USB or AUX inputs either direct-
ly or through a connection cable from the ŠKODA range of original accessories.
AUX input
External audio sources connected to the AUX input cannot be operated from your
device.
The standard 3.5 mm jack plug is used for the AUXinput. If the external audio source does not have this jack plug, you must use an adapter.
It is also possible to adjust the input sensitivity setting on the AUX input depend-
ing on the source connected » page 19, Sound settings .
USB input
External audio sources connected to the USB input cannot be operated from
your 1)
device.
Proceed as follows before removing the USB device:›
Press the MENU button
→ → Remove USB device safely .
Do not use USB extension cables or adapters. This can impair the functioning of
the connected signal source.
USB hubs are not supported.
CAUTION
The AUX input must only be used for audio sources!
Note
■ If an external audio source is connected to the AUXinput, which is equipped
with an adapter for external power supply, the sound may be impaired. This de-
pends on the quality of the adapter which is used.1)
Some options for the control of an external device may not be supported.
33Media
Page 69 of 83

Vehicle
Vehicle systems
Vehicle settings
Introduction
This chapter contains information on the following subjects:
Selecting driving mode
67
Vehicle data
68
Auxiliary heater and ventilation
69
ESC system
70
Tires
70
Driver assistance
70
Parking and manoeuvring
71
Light
71
Mirrors and wiper
72
Opening and closing
72
Seats
72
Multifunction display
72
Service
73
Restore factory settings
73
Climatronic settings
73
First and foremost, pay attention to the safety instructions
» page 4 , Important
notes .
Settings relating to the vehicle systems can only be made when the ignition is
switched on.
Note
■ The individual systems are described in the » Vehicle Owner's Manual .■If the functions of some systems are disabled, some functions, such as parts of
the ESC system, are switched on again automatically for security reasons, after
switching the ignition off and on.■
When you press the button CAR, the last displayed menu from
is displayed.
Selecting driving modeFig. 44
Button for selecting the driving mode Octavia, Octavia Combi / Octa-
via RS, Octavia Combi RS
First read and observe the introductory information given on page 67.
The menu for selecting the driving mode allows you to set the vehicle to one of
the three preset driving modes Normal, Sport and Eco, or to the driving mode In-
dividual , which allows individual settings.
If a driving mode other than Normal is selected, then the symbol
or
» Fig. 44 lights up in the button.
The currently selected driving mode is displayed in the info field in the main me-
nus for the operating modes
» Fig. 49 on page 73(top left).
Call up the main menu
›
Press the button
or
» Fig. 44 .
■ Normal - Activate Normal mode
■ Cancel - Cancel the menu to select the driving mode
■ Information - Display the mode settings
■ Sport - Activate Sport mode
■ Cancel - Cancel the menu to select the driving mode
■ Information - Display the mode settings
■ Eco - Activate fuel-saving mode
■ Cancel - Cancel the menu to select the driving mode
■ Information - Display the mode settings
67Vehicle systems
Page 71 of 83

Range (if the estimated range is less than 300 km, the vehicle starts to ap-
proach the symbol: )
Vehicle representation (the zones of the vehicle are shown in different col- ours, corresponding to any warning messages that occur. The warning mes-
sages are displayed once you touch vehicle)
■ Driving data - Display travel data » Fig. 45
You can display one of three trip memories on the screen:
■ Since start - Driving data for the individual trip
■ Long-term - Long-term driving data
■ Since refuelling - Data since last refuelling
You can switch between the individual travel data memories
/
.
■ Convenience consumers - Display up to three devices which use the largest
share of fuel and display the fuel consumption required to run all conv. consum-
ers » Vehicle Owner's Manual , chapter Commercial driving and environmental
compatibility
■ Vehicle status - Displays vehicle status » Fig. 45 or tire pressure monitoring in-
formation
■ Vehicle status - Display vehicle status information
■ /
/ - No message/warnings relating to vehicle status or number of mes-
sages (if there is only one message, one warning message text is displayed)
■ - Display information about the status of the START-STOP system
■ TPMS - Function of the tire pressure monitor » Fig. 46
■ SET - Start a new calibration process
You can switch between the individual menus
/
.
Note
For more information on the warning messages concerning the vehicle status and
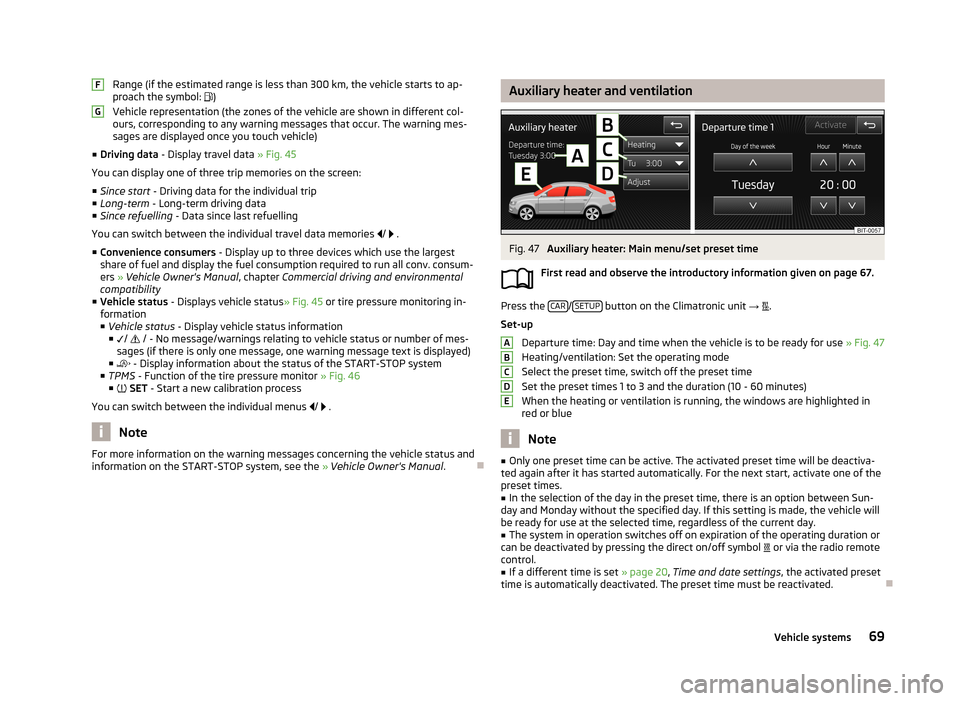
information on the START-STOP system, see the » Vehicle Owner's Manual .FGAuxiliary heater and ventilationFig. 47
Auxiliary heater: Main menu/set preset time
First read and observe the introductory information given on page 67.
Press the CAR/SETUP button on the Climatronic unit
→
.
Set-up Departure time: Day and time when the vehicle is to be ready for use » Fig. 47
Heating/ventilation: Set the operating mode
Select the preset time, switch off the preset timeSet the preset times 1 to 3 and the duration (10 - 60 minutes)
When the heating or ventilation is running, the windows are highlighted in
red or blue
Note
■ Only one preset time can be active. The activated preset time will be deactiva-
ted again after it has started automatically. For the next start, activate one of the preset times.■
In the selection of the day in the preset time, there is an option between Sun-
day and Monday without the specified day. If this setting is made, the vehicle will
be ready for use at the selected time, regardless of the current day.
■
The system in operation switches off on expiration of the operating duration or
can be deactivated by pressing the direct on/off symbol or via the radio remote
control.
■
If a different time is set » page 20, Time and date settings , the activated preset
time is automatically deactivated. The preset time must be reactivated.
ABCDE69Vehicle systems
Page 75 of 83

■Distance - Switch on/off the display of distance travelled in the display of the
instrument cluster
■ Average speed - Switch on/off the display of average speed in the display of
the instrument cluster
■ Digital speed display - Switch on/off the display of current speed in the display
of the instrument cluster
■ Speed warning - Switch on/off the display of speed warning in the display of
the instrument cluster
■ Oil temperature - Switch on/off the display of oil temperature in the display of
the instrument cluster
■ Coolant temperature - Switch on/off the display of coolant temperature in the
display of the instrument cluster
■ Reset Since start driving data - Reset the trip memory in the device screen and
in the display of the instrument cluster
■ Reset Long-term driving data - Reset the long-term memory in the device
screen and in the display of the instrument cluster
Service
First read and observe the introductory information given on page 67.
›
Press the CAR button
→
→ Service .
■ Vehicle no.: - Display the vehicle identification number
■ Inspection: --- / --- - Number of km/days remaining until the next service event
■ Oil change service: --- / --- - Number of km/days remaining until the next oil
change
Restore factory settings
First read and observe the introductory information given on page 67.
›
Press the CAR button
→
→ Factory settings .
■ All settings - All menu items
■ Driver assistance - Menu Driver assistance
■ Parking and manoeuvring - Menu Parking and manoeuvring
■ Light - Menu Light
■ Mirrors and wipers - Menu Mirrors and wipers
■
Opening and closing - Menu Opening and closing
■ Multifunction display - Menu Multifunction display
If one of the above menu items is selected, the system will ask you whether you
really want to reset the settings.
■ Cancel - Return to higher-level menu
■ Reset - Reset the settings
Climatronic settings
Fig. 49
Climatronic: Main menu
First read and observe the introductory information given on page 67.
If Climatronic is switched on, the system displays the desired temperature for the
driver's side and front passenger side » Fig. 49. Depending on the desired temper-
ature, the airflow from the air outlet vents is shown in blue (temperature under
22 °C) or red (temperature above 22.5 °C).
When using Climatronic in automatic mode, AUTO is shown on the screen.
Call up the main menu
›
Press the button SETUP on the Climatronic control panel.
■ Air con. profile: ... - Set the Climatronic operating mode
■ ON /OFF - Switches Climatronic on/off
■ - Access the auxiliary heater and ventilation settings » page 69
■ - Settings for Climatronic
■ Air con. profile: - Set the Climatronic operating mode
■ Light - Low power, quiet operation
■ Medium - Base power
■ Strong - High power
73Vehicle systems