2013 SKODA FABIA wheel
[x] Cancel search: wheelPage 184 of 223

Note■The fire extinguisher must comply with national legal requirements.■Pay attention to the expiration date of the fire extinguisher. Proper functioning
of the fire extinguisher is not assured once it has passed its expiry date.■
The fire extinguisher is part of the scope of delivery in certain countries only.
Vehicle tool kit
Fig. 140
Vehicle tool kit
First read and observe the introductory information given on page 180.
The vehicle tool kit and the jack are housed in a plastic box in the spare wheel or
in the storage space for the spare wheel. There is also space here for the remova-
ble ball rod for the trailer towing device. The box is attached with a strap on the spare wheel.
The components of the vehicle tool kit (depending on equipment) » Fig. 140.
Screwdriver
Adapter for anti-theft wheel bolts
Towing eye
Wire tool for removing the full wheel trims
Car jack
Wheel brace
123456Tool for removing wheel bolt caps
Replacement bulb set
Screw the car jack back to its initial position after use to store it back in the box with the vehicle tool kit.WARNING■ The factory-supplied lifting jack is only intended for your model of vehicle.
Under no circumstances attempt to lift heavier vehicles or other loads – there
is a risk of injury.■
Ensure that the vehicle tool kit is safely secured in the boot.
■
Ensure that the box is always secured with the strap.
Changing a wheel
Introduction
This chapter contains information on the following subjects:
Preparation
182
Changing a wheel
182
Subsequent steps
183
Loosening/tightening wheel bolts
183
Raising the vehicle
184
Securing wheels against theft
184WARNING■ If you are in flowing traffic, switch on the hazard warning lights and set up
the warning triangle at the prescribed distance. National legal requirements
must be observed.■
Park the vehicle as far away as possible from the flow of traffic. Park on as
flat and firm a surface as possible.
■
If the vehicle has been retrofitted with tyres which are different from those
it was fitted with at the works, follow these guidelines » page 175, New tyres .
78181Emergency equipment, and self-help
Page 185 of 223

WARNINGObserve the following instructions for raising the vehicle.■If the wheel has to be changed on a slope, first of all block the opposite
wheel with a stone or similar object to prevent the vehicle from unexpectedly
rolling away.■
Secure the base plate of the lifting jack with suitable means to prevent pos-
sible moving. A soft and slippery ground under the base plate may move the
lifting jack, causing the vehicle to fall down. It is therefore always necessary to
place the lifting jack on a solid surface or use a wide and stable base. Use a
non-slip base (e.g. a rubber foot mat) if the surface is smooth, such as cobbled
stones, tiled floor, etc.
■
Only attach the lifting jack to the attachment points provided for this pur-
pose.
■
Always raise the vehicle with the doors closed.
■
Never position any body parts, such as arms or legs under the vehicle, while
the vehicle is raised with a lifting jack.
■
Never start the engine with the vehicle sitting on the raised jack – there is a
risk of injury.
CAUTION
■ The tightening torque specified for the wheel bolts for steel and light alloy
wheels is 120 Nm.■
If the wheel bolts are fastened too tightly, this can cause damage to the anti-
theft wheel bolt or the adapter.
Note
■ The anti-theft wheel bolt set and adapter can be purchased from a ŠKODA Part-
ner.■
The national legal requirements must be observed when changing a wheel.
Preparation
First read and observe the introductory information and safety warn-
ings
on page 181.
Always change a wheel on a level surface as far as possible.
The following steps must be carried out before actually changing the wheel:
› Have
all the occupants get out. The passengers should not stand on the road
(instead they should remain behind a crash barrier, for instance) while the wheel is being changed.›
Switch off the engine.
›
Move the gearshift lever into Neutral or move the selector lever for the auto-
matic gearbox into position P.
›
Apply the handbrake firmly.
›
Uncouple any trailer.
›
Remove the vehicle tool kit » page 181 and the spare wheel » page 177 , Spare
wheel from the boot.
Changing a wheel
First read and observe the introductory information and safety warn-
ings
on page 181.
›
Remove the full wheel trim » page 178 or caps » page 178 .
›
In the case of light alloy wheel rims remove the wheel trim cap » page 178.
›
First of all slacken the anti-theft wheel bolt and then the other wheel
bolts » page 183 .
›
Jack up the vehicle until the wheel that needs changing is clear of the
ground » page 184 .
›
Unscrew the wheel bolts and place them on a clean surface (cloth, paper, etc.).
›
Remove the wheel carefully.
›
Attach the spare wheel and slightly screw on the wheel bolts.
›
Lower the vehicle.
›
Tighten the opposite wheel bolts alternately (cross-wise) with the wheel
wrench. Tighten the anti-theft wheel bolt last » page 183.
›
Reinstall the wheel trim/wheel trim cap or the caps.
Note
■
All bolts must be clean and must turn easily.■Under no circumstances grease or oil the wheel bolts!■
When fitting unidirectional tyres, ensure that the direction of rotation is cor-
rect » page 176 , Unidirectional tyres .
182Do-it-yourself
Page 186 of 223

Subsequent stepsFirst read and observe the introductory information and safety warn-
ings
on page 181.
The following steps must also be performed after changing the wheel.
›
Stow and attach the replaced wheel in the spare wheel well using a special screw » page 177 , Spare wheel .
›
Stow the tool kit in the space provided and secure using the strap.
›
Check the tyre pressure on the installed spare wheel as soon as possible.
›
Have the tightening torque of the wheel bolts checked with a torque wrench
as soon as possible.
›
Change the damaged wheel or consult a specialist garage about repair possibili-
ties.
Note
■ If it is determined that the wheel bolts are corroded and difficult to turn when
changing the wheel, the bolts must be replaced before checking the tightening
torque.■
Drive cautiously and only at a moderate speed until the tightening torque has
been checked.
Loosening/tightening wheel bolts
Fig. 141
Changing a wheel: Loosening
the wheel boltsFirst read and observe the introductory information and safety warn-
ings on page 181.
Undoing
›
Push the wheel wrench onto the wheel bolt as far as the stop 1)
.
›
Grip the wrench at its end and turn the bolt about one turn in the direction of
the arrow » Fig. 141.
Tightening
›
Push the wheel wrench onto the wheel bolt as far as the stop 1)
.
›
Grip the wrench at its end and turn the bolt against the direction of the ar-
row » Fig. 141 until it is tight.
WARNINGUndo the wheel bolts only a little (about one turn) until the vehicle has been
jacked up. Otherwise the wheel could come off and fall down – there is a risk
of injury.
Note
If it proves difficult to undo the bolts, carefully apply pressure to the end of the
wrench with your foodt. Keep hold of the vehicle when doing so, and make sure
you keep your footing.
1)
Use the appropriate adapter for undoing and tightening the anti-theft wheel bolts » page 184.
183Emergency equipment, and self-help
Page 187 of 223

Raising the vehicleFig. 142
Jacking points for positioning
lifting jack
Fig. 143
Attach lifting jack
First read and observe the introductory information and safety warn-
ings
on page 181.
Position the car jack below the jacking point closest to the flat tyre » Fig. 142. The
jacking point is located directly below the engraving in the lower sill.
›
Wind the jack below the jacking point with the crank up until its claw is posi- tioned below the vertical web of the lower sill.
›
Offer the jack up so that its claw encloses the web » Fig. 143 -
.
›
Support the base plate of the jack with its full area resting on level ground and
ensure that the jack is located in a vertical position at the point where the claw
encloses the web » Fig. 143 -
.
›
Continue turning up the jack until the wheel is just about lifted off the ground.
WARNING■
Only raise the vehicle at the jacking points.■Choose a flat and firm surface for jacking the vehicle.
Securing wheels against theft
Fig. 144
Principle sketch: Anti-theft
wheel bolt with adapter
First read and observe the introductory information and safety warn- ings on page 181.
The anti-theft wheel bolts can only be removed/tightened with the aid of the
adapter » page 181 , Vehicle tool kit .
›
Pull off the full wheel trim from the wheel rim or the cap from the anti-theft
wheel bolt.
›
Insert adapter
B
» Fig. 144 with its toothed end fully into the inner toothing of
the anti-theft wheel bolt
A
to the stop so that only the outer hexagon
projects.
›
Push the wheel wrench onto the adapter
B
up to the stop.
›
Loosen or tighten the wheel bolt » page 183.
›
After removing the adapter, refit the solid wheel trim or push the cap onto the
anti-theft wheel bolt.
›
Have the tightening torque checked with a torque wrench as soon as possible.
184Do-it-yourself
Page 188 of 223

Note■Make a note of the code number hammered into the rear side of the adapter or
the rear side of the anti-theft wheel bolt. This number can be used to purchase a
ŠKODA Original Parts replacement adapter, if necessary.■
We recommend that you always carry the adapter for the wheel bolts with you
in the vehicle. It should be stowed in the vehicle tool kit.
■
The anti-theft wheel bolt set and adapter can be purchased from a ŠKODA Part-
ner.
Tyre repair
Introduction
This chapter contains information on the following subjects:
Breakdown kit
186
Preparations for using the breakdown kit
186
Sealing and inflating the tyre
186
Check after 10 minutes' driving
187
Use the breakdown kit to reliably repair tyre damage caused by foreign bodies or
a puncture with diameters up to approx. 4 mm.
A repair made using the breakdown kit is never intended to replace a permanent
repair on the tyre. Its purpose is to get you to the nearest specialist garage.
The wheel need not be removed during the repair.
Do not remove foreign bodies , e.g. screws or nails, from the tyre.
The breakdown kit must not be used under the following circumstances. › There is damage to the rim.
› The outside temperature is less than -20 °C.
› The tears or punctures are greater than 4 mm in size.
› There is damage to the tyre wall.
› Driving with very low tyre pressure or with a completely flat tyre.
› If the use-by-date (see inflation bottle) has passed.
WARNING■
A tyre filled with sealant has the same driving characteristics as a standard
tyre.■
Do not travel faster than 80 km/h.
■
Avoid accelerating at full throttle, sharp braking and fast cornering.
■
Check the tyre pressure after driving for 10 minutes.
■
The sealant is hazardous to heath. Remove immediately if it comes into con-
tact with the skin.
For the sake of the environment
Used sealant or sealant whose expiry date has passed must be disposed of in ac- cordance with environmental protection regulations.
Note
■ Observe the manufacturer's usage instructions for the breakdown kit.■A new bottle of sealant can be purchased from ŠKODA Original Parts.■
Immediately replace the wheel that was repaired using the breakdown kit or
consult a specialist garage about repair possibilities.
185Emergency equipment, and self-help
Page 189 of 223

Breakdown kitFig. 145
Components of the breakdown kit
First read and observe the introductory information and safety warn-
ings
on page 185.
The kit is located in a box under the floor covering in the luggage compartment.
Components of the breakdown kit Valve remover
Sticker with “max. 80 km/h”/“max. 50 mph” speed designation
Inflation hose with plug
Air compressor
Tyre inflation hose
Tyre pressure indicator
Air release valve
ON and OFF switch
12 volt cable connector
Tyre inflator bottle with sealing agent
Replacement valve core
The valve remover
1
has a slot at its lower end which fits into the valve core.
This is the only way in which you can remove and re-install the valve core from
the tyre valve. The same also applies to the replacement valve core
11
.
1234567891011Preparations for using the breakdown kit
First read and observe the introductory information and safety warn-
ings
on page 185.
The following preparatory work must be carried out before using the breakdown
kit.
›
Park the vehicle as far away as possible from the flow of traffic. Park on as flat and firm a surface as possible.
›
If you are in flowing traffic, switch on the hazard warning lights and set up thewarning triangle at the prescribed distance. National legal requirements must
be observed.
›
Have all the occupants get out. The passengers should not stand on the road
(instead they should remain behind a crash barrier, for instance) while the wheel is being changed.
›
Switch off the engine and move the gearshift lever into Neutral or move the se-
lector lever on the automatic gearbox into position P.
›
Apply the handbrake firmly.
›
Check that you can carry out the repairs with the breakdown kit » page 185.
›
Uncouple any trailer.
›
Remove the breakdown kit from the boot.
›
Stick the sticker
2
» Fig. 145 on page 186 on the dashboard in the driver's field
of view.
›
Do not remove the foreign body, e.g. screw or nail, from the tyre.
›
Unscrew the valve cap.
›
Use the valve remover
1
to unscrew the valve core and place it on a clean sur-
face (rag, paper, etc.).
Sealing and inflating the tyre
First read and observe the introductory information and safety warn-
ings
on page 185.
Sealing
›
Shake the tyre inflator bottle
10
» Fig. 145 on page 186 vigorously several times.
›
Firmly screw the inflation hose
3
onto the tyre inflator bottle
10
in a clockwise
direction. The film on the cap is pierced automatically.
›
Remove the plug from the inflation hose
3
and plug the open end fully onto
the tyre valve.
›
Hold the bottle
10
with the bottom facing upwards and fill all of the sealing
agent from the tyre inflator bottle into the tyre.
186Do-it-yourself
Page 192 of 223
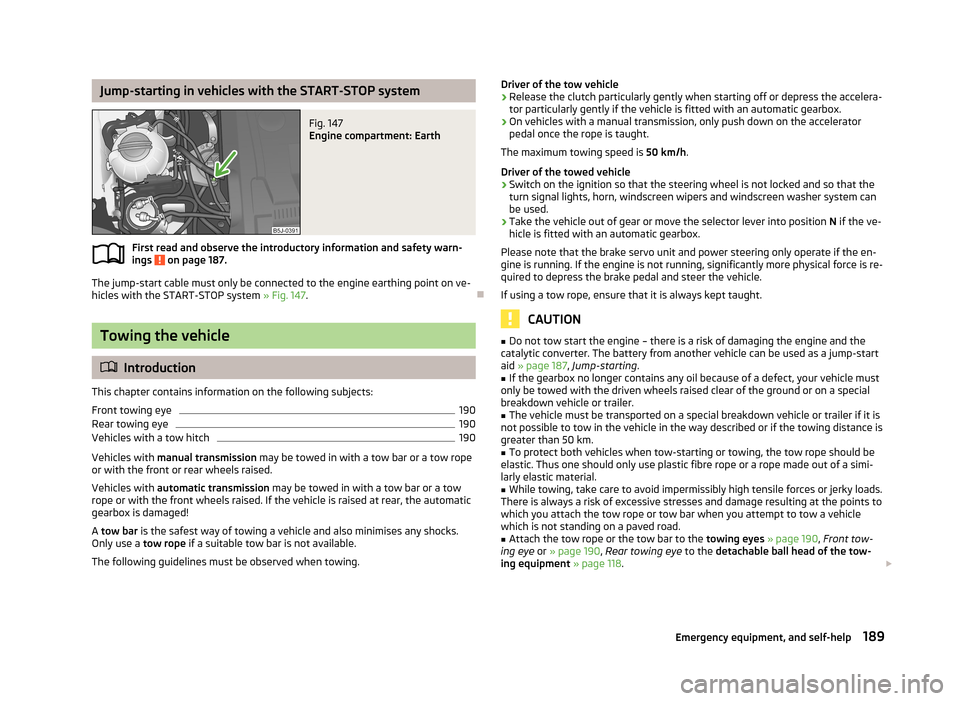
Jump-starting in vehicles with the START-STOP systemFig. 147
Engine compartment: Earth
First read and observe the introductory information and safety warn-ings on page 187.
The jump-start cable must only be connected to the engine earthing point on ve-
hicles with the START-STOP system » Fig. 147.
Towing the vehicle
Introduction
This chapter contains information on the following subjects:
Front towing eye
190
Rear towing eye
190
Vehicles with a tow hitch
190
Vehicles with manual transmission may be towed in with a tow bar or a tow rope
or with the front or rear wheels raised.
Vehicles with automatic transmission may be towed in with a tow bar or a tow
rope or with the front wheels raised. If the vehicle is raised at rear, the automatic
gearbox is damaged!
A tow bar is the safest way of towing a vehicle and also minimises any shocks.
Only use a tow rope if a suitable tow bar is not available.
The following guidelines must be observed when towing.
Driver of the tow vehicle›Release the clutch particularly gently when starting off or depress the accelera-
tor particularly gently if the vehicle is fitted with an automatic gearbox.›
On vehicles with a manual transmission, only push down on the accelerator pedal once the rope is taught.
The maximum towing speed is 50 km/h.
Driver of the towed vehicle
›
Switch on the ignition so that the steering wheel is not locked and so that the turn signal lights, horn, windscreen wipers and windscreen washer system can
be used.
›
Take the vehicle out of gear or move the selector lever into position N if the ve-
hicle is fitted with an automatic gearbox.
Please note that the brake servo unit and power steering only operate if the en-
gine is running. If the engine is not running, significantly more physical force is re-
quired to depress the brake pedal and steer the vehicle.
If using a tow rope, ensure that it is always kept taught.
CAUTION
■ Do not tow start the engine – there is a risk of damaging the engine and the
catalytic converter. The battery from another vehicle can be used as a jump-start
aid » page 187 , Jump-starting .■
If the gearbox no longer contains any oil because of a defect, your vehicle must
only be towed with the driven wheels raised clear of the ground or on a special
breakdown vehicle or trailer.
■
The vehicle must be transported on a special breakdown vehicle or trailer if it is
not possible to tow in the vehicle in the way described or if the towing distance is
greater than 50 km.
■
To protect both vehicles when tow-starting or towing, the tow rope should be
elastic. Thus one should only use plastic fibre rope or a rope made out of a simi-
larly elastic material.
■
While towing, take care to avoid impermissibly high tensile forces or jerky loads.
There is always a risk of excessive stresses and damage resulting at the points to
which you attach the tow rope or tow bar when you attempt to tow a vehicle
which is not standing on a paved road.
■
Attach the tow rope or the tow bar to the towing eyes » page 190 , Front tow-
ing eye or » page 190 , Rear towing eye to the detachable ball head of the tow-
ing equipment » page 118 .
189Emergency equipment, and self-help
Page 193 of 223

Note■We recommend using a tow rope from ŠKODA Original Accessories available
from a ŠKODA Partner.■
Towing another vehicle requires a certain amount of practice. Both drivers
should be familiar with the particular points about towing a vehicle. Unskilled
drivers should not attempt to tow in another vehicle or to be towed in.
■
When towing, respect the national legal provisions, especially those which re-
late to the identification of the towing vehicle and the vehicle being towed.
■
The tow rope must not be twisted as it may in certain circumstances result in
the front towing eye being unscrewed out of your vehicle.
Front towing eye
Fig. 148
Front bumper: Cap/installing the towing eye
First read and observe the introductory information and safety warn- ings
on page 189.
Remove the cap carefully as follows.
›
Press on the left half of the cap in the area of the arrow » Fig. 148 -
.
›
Remove the cap from the front bumper.
›
Screw the towing eye in clockwise by hand up to the stop » Fig. 148 -
. For
tightening purposes, we recommend, for example, using the wheel wrench, towing eye from another vehicle or a similar object that can be pushed through
the eye.
›
In order to reinstall the cap after screwing out the towing eye, insert it in the
mounts and then press on the right side of the cap. The cap must engage firmly.
CAUTIONThe towing eye must always be screwed in fully and firmly tightened, otherwise
the towing eye can tear when towing in or tow-starting.
Rear towing eye
Fig. 149
Rear towing eye
First read and observe the introductory information and safety warn-
ings on page 189.
The rear towing eye is located below the rear bumper on the right » Fig. 149.
Vehicles with a tow hitch
First read and observe the introductory information and safety warn-
ings
on page 189.
The removable towing ball may be fitted and used for towing on vehicles with a
factory fitted tow hitch » page 118, Towing a trailer .
Towing the vehicle using the towing device is a viable alternative solution to us-
ing the towing eye.
CAUTION
The detachable ball rod and/or the vehicle can be damaged if an unsuitable tow bar is used. 190Do-it-yourself