2013 SKODA FABIA fuel cap
[x] Cancel search: fuel capPage 177 of 223

WARNINGObserve the following information regarding the wheel bolts.■The wheel bolts must be clean and must turn easily. Never apply grease or
oil.■
The specified tightening torque of the wheel bolts for steel and light alloy
wheels is 120 Nm.
■
If the wheel bolts are insufficiently tightened, the rim can come loose when
the car is moving – there is the risk of an accident. A tightening torque which
is too high can damage the bolts and threads and this can result in permanent
deformation of the contact surfaces on the rim.
■
The wheel can loosen when the car is moving if the wheel bolts are not han-
dled correctly – there is the risk of an accident.
WARNINGObserve the following information regarding the spare wheel.■Only use the spare wheel while absolutely necessary.■
Never drive with more than one spare wheel fitted.
■
The snow chains cannot be used on the spare wheel.
CAUTION
■ If a spare wheel is used that is not identical to the fitted tyres, the following
must be observed » page 177, Spare wheel .■
Protect the tyres from contact with oil, grease and fuel.
■
Replace lost dust caps.
■
If, in the event of a puncture, it is necessary to fit a spare wheel with a tyre
without a dedicated running direction or the opposite running direction, drive carefully as the optimum characteristics of the tyre are no longer applicable in
this situation.
For the sake of the environment
Tyres which are insufficiently inflated increase your fuel consumption.
Note
■ We recommend that any work on the wheels or tyres is carried out by a special-
ist garage.■
We recommend that you use wheel rims, tyres, full wheel trims and snow chains
from ŠKODA Original Accessories.
Tyre service lifeFig. 132
Principle sketch: Tyre tread with wear indicators/Open fuel filler
flap with a table detailing the tyre sizes and tyre pressures
Fig. 133
Swapping wheels around
First read and observe the introductory information and safety warn-
ings on page 173.
The life of tyres depends on the pressure, driving style, and other circumstances.
Following the advice below can extend the service life of your tyres.
Tyre pressure
Check the tyre pressure, including that of the spare wheel, at least once a month and also before setting off on a long journey.
The tyre pressures for tyres are shown on the inside of the fuel filler
flap » Fig. 132 –
.
The tyre pressure should be at the highest pressure specified for your vehicle at
all times.
174General Maintenance
Page 190 of 223

›Remove the empty tyre inflator bottle from the valve.›Screw the valve core back into the tyre valve using the valve remover 1.
Inflating›
Screw the air compressor tyre inflation hose
5
» Fig. 145 on page 186 firmly on-
to the tyre valve.
›
Check that the air release valve
7
is closed.
›
Start the engine and run it in idle.
›
Plug the connector
9
into 12 Volt socket » page 70, 12-volt power outlet .
›
Switch on the air compressor with the ON and OFF switch
8
.
›
Allow the air compressor to run until a pressure of 2.0 - 2.5 bar is achieved. Max-
imum run time of 8 minutes » !
›
Switch off the air compressor.
›
If you cannot reach an air pressure of 2.0 – 2.5 bar, unscrew the tyre inflation
hose
5
from the tyre valve.
›
Drive the vehicle 10 metres forwards or backwards to allow the sealing agent to
“distribute” in the tyre.
›
Firmly screw the tyre inflation hose
5
back onto the tyre valve and repeat the
inflation process.
›
If you cannot reach the required tyre inflation pressure here either, this means
the tyre has sustained too much damage. You cannot seal with tyre with the breakdown kit »
.
›
Switch off the air compressor.
›
Remove the tyre inflation hose
5
from the tyre valve.
Once a tyre pressure of 2.0 – 2.5 bar is reached, the journey may be continued at a maximum speed of 80 km/h (50 mph).
Check the tyre inflation pressure after driving for 10 minutes » page 187.
WARNING■
The tyre inflation hose and air compressor may get hot as the tyre is being
inflated – there is a risk of injury.■
Do not place the hot tyre inflation hose or hot air compressor on flammable
materials – there is a risk of fire.
■
If you cannot inflate the tyre to at least 2.0 bar, this means the damage sus-
tained was too serious. The sealing agent cannot be used to seal the tyre.
Do not drive the vehicle. Seek help from a specialist garage.
CAUTIONSwitch off the air compressor after running 8 minutes at the latest – there is a
risk of overheating. Allow the air compressor to cool a few minutes before switch- ing it on again.
Check after 10 minutes' driving
First read and observe the introductory information and safety warn-ings
on page 185.
Check the tyre inflation pressure after driving for 10 minutes!
If the tyre pressure is 1.3 bar or less
›
Do not drive the vehicle. You cannot properly seal with tyre with the break-
down kit.
If the tyre pressure is 1.3 bar or more
›
Adjust the tyre pressure to the correct value again (see inside of fuel filler cap).
›
Continue driving carefully to the nearest specialist garage at a maximum speed
of 80 km/h (50 mph).
Jump-starting
Introduction
This chapter contains information on the following subjects:
Jump-starting using the battery from another vehicle
188
Jump-starting in vehicles with the START-STOP system
189WARNING■ A discharged vehicle battery may already freeze at temperatures just below
0 °C. If the battery is frozen, do not jump start with the battery of another ve- hicle – there is a risk of explosion.■
Pay attention to the warning instructions relating to working in the engine
compartment » page 160, Engine compartment .
187Emergency equipment, and self-help
Page 205 of 223

The operating weight also contains the weight of the driver (75 kg), the weight of
the operating fluids, the tool kit, and a fuel tank filled to 90 % capacity.
It is possible to calculate the approximate loading capacity from the difference
between the permissible total weight and the operating weight »
.
The payload consists of the following components: › Passengers
› All items of luggage and other loads
› Roof load including roof rack system
› Equipment not included in the operating weight
› Trailer drawbar load when towing a trailer (max. 50 kg).
Measuring the fuel consumption and CO 2 emissions according to the ECE
regulations and EU directives
The measurement of the intra-urban cycle begins with a cold start of the engine.
Afterwards urban driving is simulated.
In the extra-urban driving cycle, the vehicle is accelerated and decelerated in all gears, corresponding to daily routine driving conditions. The driving speed varies
between 0 and 120 km/h.
The calculation of the combined fuel consumption considers a weighting of about 37 % for the intra-urban cycle and 63 % for the extra-urban cycle.WARNINGDo not exceed the specified maximum permissible weights – there is the riskof an accident and damage.
Note
■ If required, you can find out the precise weight of your vehicle by contacting a
specialist garage.■
The fuel consumption and emission values have been determined in accordance
with rules and under conditions set out by legal or technical requirements for de-
termining operational and technical data for motor vehicles.
■
Depending on the range of equipment, style of driving, traffic situation, weather
influences and vehicle condition, consumption values may deviate from the indi-
cated values.
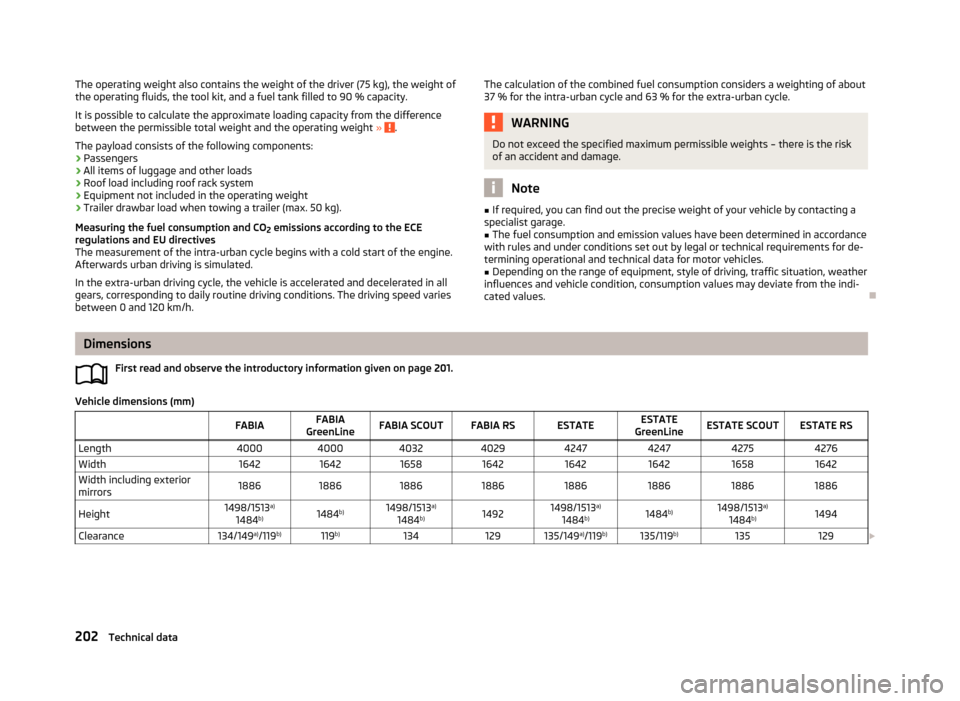
Dimensions
First read and observe the introductory information given on page 201.
Vehicle dimensions (mm)
FABIAFABIA
GreenLineFABIA SCOUTFABIA RSESTATEESTATE
GreenLineESTATE SCOUTESTATE RSLength40004000403240294247424742754276Width16421642165816421642164216581642Width including exterior
mirrors18861886188618861886188618861886Height1498/1513 a)
1484 b)1484 b)1498/1513 a)
1484 b)14921498/1513 a)
1484 b)1484b)1498/1513 a)
1484 b)1494Clearance134/149 a)
/119 b)119b)134129135/149 a)
/119 b)135/119 b)135129
202Technical data
Page 215 of 223

DisplayService interval16
Distance driven12
Door Child safety lock
29
Closing30
Door open warning light21
Opening30
Doors Emergency locking
31
Driving Abroad
109
Driving through water on streets109
Emissions201
Fuel consumption201
Maximum speed204
Driving economically Economical gear changing
105
Driving through water109
E
Economical and environmentally friendly driving 104
Economical driving Anticipation in driving
105
Ballast107
Driving at full throttle106
Idling106
Regular maintenance107
Saving energy107
Short distances106
Tyre pressure106
EDS112
Electrical power windows Button in the driver's door
38, 39
Button in the rear door39
Central locking system40
Electric power windows Operational faults
40
Electric sliding/tilting roof40
Electronic Differential Lock112
Electronic immobilizer97
Emergency Changing a wheel
181
Hazard warning light system47
Jump-starting187, 188
locking of the doors31
Selector lever-unlocking103
Sliding/tilting roof42
Towing the vehicle189
Towing the vehicle using the tow hitch190
Tyre repair185
Unlocking the boot lid38
Emergency equipment Fire extinguisher
180
First aid kit180
Jack181
Vehicle tool kit181
Warning triangle180
Emissions201
Engine Running in
104
Starting and stopping the engine96
Starting the engine97
Switching off the engine98
Engine compartment160
Brake fluid168
Coolant167
Overview163
Vehicle battery169
Engine oil164
Capacity164
Changing166
Checking165
Replenishing166
Specifications164
Warning light21
Engine revolutions counter11
Environment104
Environmental compatibility107
Environmentally friendly driving104
ESC Function111
warning light23
F
Films
153
Fire extinguisher180
First aid kit180
Flashers45
Fog lights46
Footmats100
see Footmats100
Front airbag135
Front seats54
Fuel158
Diesel160
Fuel gauge11
gauge11
refer to Fuel158
Refuelling158
Unleaded petrol159
Fuel consumption104
Fuses Assignment
192
Changing192
Colour coding192
G
Gear Recommended gear
13
Gearbox Display messages
19
Gear changing Gear stick
100
General view Cockpit
9
Glow plug system Warning light
24
GSM86
212Index