2013 Seat Leon SC radio
[x] Cancel search: radioPage 27 of 72

26Audio modeFunction buttons of the main menu MediaFunctionbuttonEffectSOURCEOpens the list of available devices/media. Press to select an-other media source ⇒ page 27.CD, internal CD drive ⇒ page 27.SD card 1, SD card 2: SD memory card ⇒ page 28.BT Audio: Bluetooth audio ⇒ page 31.MEDIA-IN: Media-In ⇒ page 29.
SELECTIONOpens the list of tracks ⇒ page 33. or Changes track in Media mode ⇒ page 32.Playback will stop. The function button changes to ⇒ page 32.Playback will continue. The function button changes to ⇒ page 32.SETTINGSOpens the menu Media setup ⇒ page 33.Repeat all the tracks.Repeat the current track.Random play.SCANSCANWith the scan function running, all the tracks in the currentplaylist will be played for ten seconds each.The function button is displayed only when the scan functionis running. To start the scan function, press the setup buttonor open the track list Selection and press the function buttonSCAN or press the right knob.
Instructions and symbols in the main menu MediaNotice⇒ Fig. 18MeaningADisplay of the track information (CD text , ID3 tag in MP3)files.audio CDs: Display of the title and number, in accordance withthe play order on the data medium.Audio files: Display of the artist, album and title.
BDisplay of the album cover, if available on the data medium.CRemaining time in minutes and seconds. The remaining play-ing time cannot be displayed for files with variable bit rate(VBR).
DTime passed RDS radio data service deactivated. The RDS can be activatedin the menu Setup (FM, AM) ⇒ page 20.TPThe TP is active and receiving ⇒ page 19. No traffic news station can be received.No DAB reception possible.
Page 30 of 72

29Audio modeThings to note when operating an external audio source using the AUX-INmultimediauseEffectSelection of another audio sourceon the radio-navigation system.The external audio source continuesto run in the background.Stopping playback on the externalaudio source.The infotainment system remains inthe AUX menu.Disconnecting the plug from theAUX-IN multimedia socket.The infotainment system changes,and plays the last media source thatwas active.
Note
●Please read and observe the external audio source manufacturer operat-ing manual.●
Interference may be heard if the external audio source is powered fromthe vehicle’s 12-volt socket.
MEDIA-IN multimedia interface
Fig. 21
Standard repre-sentation: MEDIA-IN mul-timedia interface.
Depending on the market and the features, the vehicle may have a MEDIA-IN multimedia interface ⇒ Booklet Instruction manual.
The infotainment system enables you to play and manage audio files andsome video files from an external data medium connected to the MEDIA-INmultimedia interface.
Where this manual refers to external data media, this means USB mass stor-age devices containing supported audio files, such as MP3 players, iPods®
and USB sticks.
The MEDIA-IN multimedia interface supplies the usual USB voltage of 5volts.
Adapter for connecting a data medium
The external data media are connected to the MEDIA-IN multimedia inter-face using an adaptor.
Depending on the market and features, the adaptor is included in the sup-ply. Other adaptors can be purchased from your SEAT Dealership.
Do not use memory card adaptors, USB extension cords or USB hubs!
Requirements
Connectable data mediaCompatible formats and filesData media compliant with the USB 2.0specification.Data media with the FAT16 (< 2 GB)or FAT32 (> 2 GB) file system.iPods® and iPhones® of various genera-tions.a)
MTP players with the “PlaysForSure” or“ReadyForVista” logo.
– Audio files in MP3, WMA,OGG Vorbis and AAC format.– Playlists in PLS, B4S, ASXand WPL format.
Read and bear in mind the manufacturer's instruction manual for the exter-nal data medium.
a)
iPod® and iPhone® are protected registered trademarks of Apple Inc.
Page 35 of 72

34Audio modeFunction button: effectMenu “Sound”: sound setup ⇒ page 64. Mix/Repeat incl. subfolders: the subfolders are taken into account in theplayback mode selected.Bluetooth: Bluetooth setup ⇒ page 31. Traffic Information (TP): the TP function (monitoring of traffic reports) is ac-tive ⇒ page 19.If the function button is deactivated (in grey), you must first activate the Radio data system (RDS) function button in the Setup menu ⇒ page 20.
External AUX device: enables the socket.
Page 37 of 72

36Navigation●Insert the memory card ⇒ page 28.●
Do not remove the memory card while testing. Wait for the testing iconto disappear.
If the inserted memory card contains valid navigation data, the followingnotice appears: “The source contains a valid navigation database”. It is nowpossible to navigate with the memory card data. When it is no longer neces-sary to keep the memory card in the hardware, it will prepare for its extrac-tion ⇒ page 28.
Note
●Do not extract the memory card while navigation data is in use. Thiscould damage the memory card!●
The navigation memory card may not be used as memory for other files.The infotainment system will not recognise the files saved.
●
SEAT recommends only using original SEAT memory cards to use naviga-tion data. The use of other memory cards could limit its operation.
Main menu of navigation
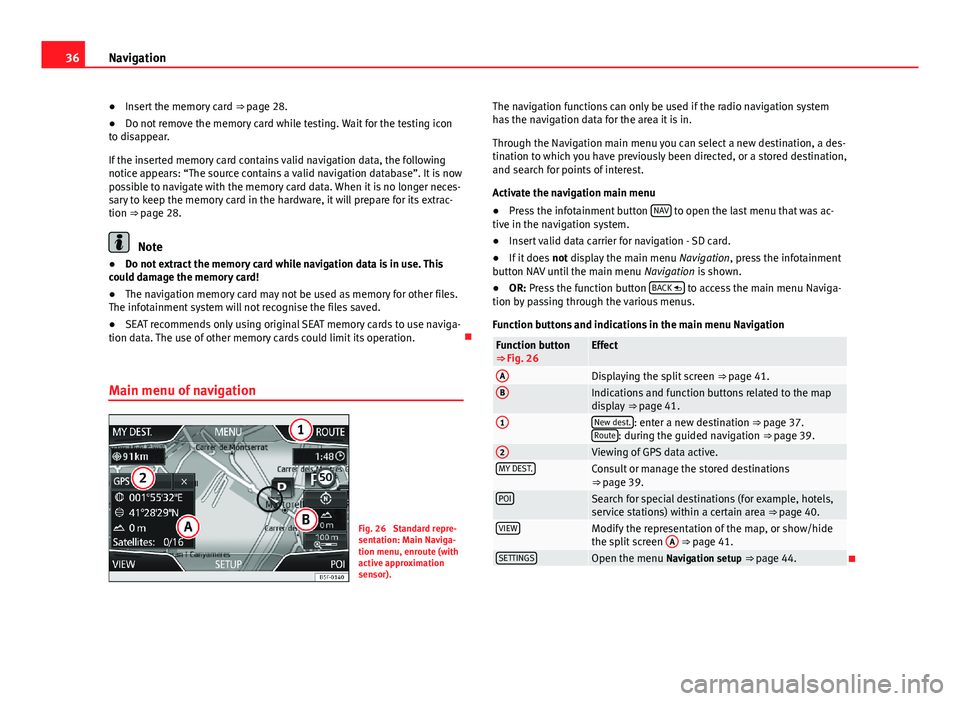
Fig. 26
Standard repre-sentation: Main Naviga-tion menu, enroute (withactive approximationsensor).
The navigation functions can only be used if the radio navigation systemhas the navigation data for the area it is in.
Through the Navigation main menu you can select a new destination, a des-tination to which you have previously been directed, or a stored destination,and search for points of interest.
Activate the navigation main menu
●
Press the infotainment button NAV to open the last menu that was ac-tive in the navigation system.
●
Insert valid data carrier for navigation - SD card.
●
If it does not display the main menu Navigation, press the infotainmentbutton NAV until the main menu Navigation is shown.
●
OR: Press the function button BACK to access the main menu Naviga-tion by passing through the various menus.
Function buttons and indications in the main menu Navigation
Function button⇒ Fig. 26EffectADisplaying the split screen ⇒ page 41.BIndications and function buttons related to the mapdisplay ⇒ page 41.
1New dest.: enter a new destination ⇒ page 37.Route: during the guided navigation ⇒ page 39.
2Viewing of GPS data active.MY DEST.Consult or manage the stored destinations⇒ page 39.POISearch for special destinations (for example, hotels,service stations) within a certain area ⇒ page 40.VIEWModify the representation of the map, or show/hidethe split screen
A
⇒ page 41.SETTINGSOpen the menu Navigation setup ⇒ page 44.
Page 44 of 72

43Navigationwith traffic. The quality of the dynamic route guidance depends on the infor-mation contained in the TMC traffic reports. The radio stations broadcastingthis information are responsible for the content.
The route to cover can also be blocked manually to force a new route to becalculated ⇒ page 39.
TMC traffic reports on the map
Icon: meaning: queues: traffic jam: accident: slippery ground: danger of skidding: danger: roadworks: strong wind: road closed
During guided navigation, traffic incidents that affect the calculated routeare represented in red, while those that do not are represented in grey.
The length of a traffic incident along the route calculated is represented bya red line.
The TMC symbol is located at the start of the traffic delay, provided it hasbeen defined clearly in the TMC traffic report.
Depending on the scale of the map, other congestion icons may be hiddenbehind one TMC icon. In this case, press the TMC icon and a list will openwith further traffic incidents present.
●
Select the desired entry by pressing it.
Guide to the destination in demonstration mode (Demo)
If, in the menu Navigation setup, Demo mode is active ⇒ page 44, an addi-tional pop-up window will appear when guided navigation starts.
●
Pressing the function button Demo mode starts a “virtual” guided naviga-tion to the final destination indicated.
●
If you press the function button Normal mode, the “real” guided naviga-tion will begin.
The sequence of events and the operations in virtual route guidance aresimilar to those in real route guidance.
Virtual route guidance is repeated when you reach the fictitious destinationand always starts again from the starting point if it is interrupted.
If in the menu Navigation setup the starting point of the Demo mode was de-termined manually, the virtual guided navigation will begin from this posi-tion.
If the vehicle is moved and the unit can determine its current location byGPS, any manually entered starting point will be overwritten with the currentvehicle location.
When real route guidance is started following virtual route guidance indemo mode, the unit first has to reorient itself. This orientation can lastsome time depending on the number of satellites that are received at thattime. Moving the vehicle may speed up the reorientation process.
Note
Deactivate the Demo mode after use, because otherwise before starting gui-ded navigation you will always have to select whether you want virtual orreal navigation.
Page 47 of 72

46CAR menuCAR menuIntroduction to managing the CAR menu
Car menu
By pressing the “CAR” infotainment button you will access its main menuwith the following options:
●
VIEW
●
MINIPLAYER (Radio and Media function)
●
PREVIOUS-NEXT (to change screen)
●
SETUP ⇒ Booklet Instruction Manual, chapter System setup (CAR)
With the function button View you can access the following information:
●
DRIVING DATA
●
ECO
●
VEHICLE STATUS
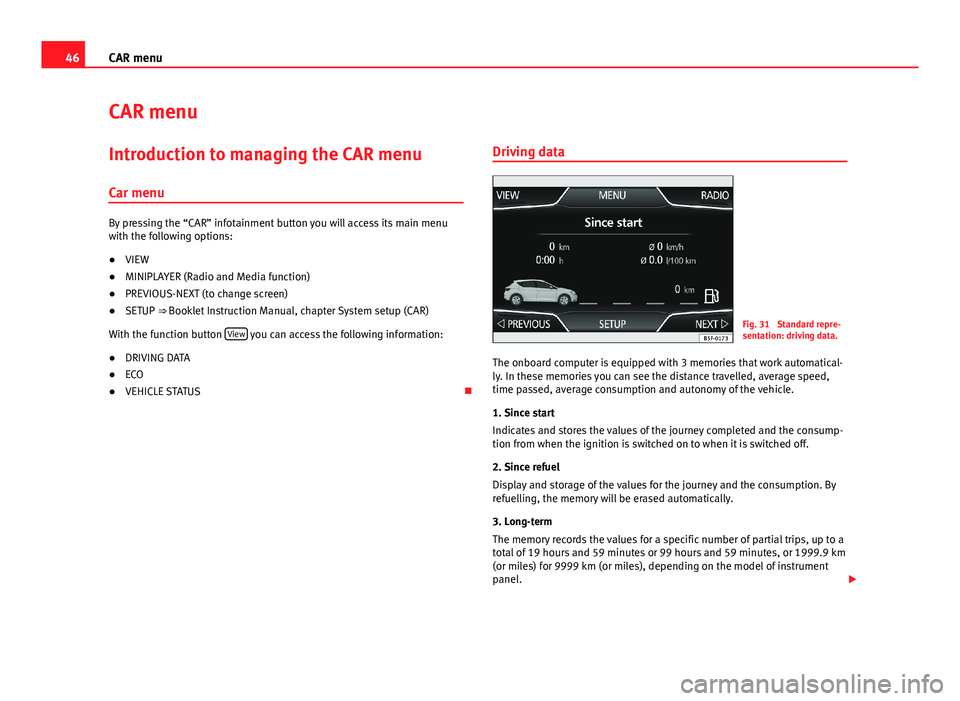
Driving dataFig. 31
Standard repre-sentation: driving data.
The onboard computer is equipped with 3 memories that work automatical-ly. In these memories you can see the distance travelled, average speed,time passed, average consumption and autonomy of the vehicle.
1. Since start
Indicates and stores the values of the journey completed and the consump-tion from when the ignition is switched on to when it is switched off.
2. Since refuel
Display and storage of the values for the journey and the consumption. Byrefuelling, the memory will be erased automatically.
3. Long-term
The memory records the values for a specific number of partial trips, up to atotal of 19 hours and 59 minutes or 99 hours and 59 minutes, or 1999.9 km(or miles) for 9999 km (or miles), depending on the model of instrumentpanel.
Page 51 of 72

50Telephone management (PHONE)●If you detect any strange behaviour between your mobile phone and theradio, restart your mobile by switching it off and on again.●
Consult the compatibility list to ensure your mobile phone will workproperly.
●
Most electronic devices are shielded against high-frequency radio sig-nals. On certain occasions, nevertheless, electronic equipment might notbe protected against the radio frequency signals of the telephone manage-ment (Phone). This may produce interference.
Places with special regulations
Switch off the mobile phone and the preinstallation for mobile telephonesin places with risk of explosion. These areas are common but are not alwaysclearly marked ⇒ in Introduction on page 49. They include, for example:
●
Areas with piping and reservoirs containing chemical products.
●
Below deck, on boats and ferries.
●
Near vehicles that run on liquefied gas (such as propane or butane).
●
In places where there are chemical substances or particles such as flour,dust or metal chips in the air.
●
In any other place where you must turn off the engine of your vehicle.
WARNINGSwitch off your mobile phone in places with risk of explosion! Your mo-bile phone will automatically connect to the mobile phone network assoon as the Bluetooth connection is cut from the mobile preinstallation.
NoteIn areas with special requirements and where the use of mobile phones isprohibited, you must keep the mobile phone and its preinstallation switch-ed off at all times. The radiation emitted by mobile phones when switchedon can cause interference in sensitive technical and medical equipment,which could damage this equipment or cause it to stop working properly.
Linking and connecting your mobile phone to the
infotainment system
To operate a mobile phone through the infotainment system, you need tolink both devices one time only.
For your safety, we recommend you make the link when the vehicle is sta-tionary. In some countries you cannot make the link with the vehicle run-ning.
You must guarantee the following setup in the mobile phone and the info-tainment system:
●
The Bluetooth® function must be active and visible on the mobile phoneand infotainment system, respectively.
●
The keypad lock of the mobile phone must be disconnected.
●
The notification and key tones of your mobile phone must be disconnec-ted.
In some countries, after switching the ignition on, the Bluetooth® functionof the infotainment system should be activated or remain visible for around3 minutes.
During the linking process you must enter data using your mobile phone'skeypad. To do so, you must have your mobile phone to hand.
Once the link has been made, the schedule and call lists stored in your mo-bile phone will be loaded. The duration of the loading process depends on
Page 53 of 72

52Telephone management (PHONE)Note●The behaviour may vary depending on the device connected.●
For some android mobile devices you must accept the request to accessthe PBAP phonebook after linking, to be able to access the phonebook. It isrecommended to activate the option “always” so as not to have to accept itevery time you connect.
General information
Please refer to the notes on using a mobile phone in the vehicle withoutconnection to exterior antenna ⇒ Booklet Instruction Manual, chapter Ac-cessories and technical modifications.
Only use devices that support Bluetooth. At your SEAT dealership, or on theInternet, you will find information about products that support Bluetooth.
Take into account the instruction manual of the mobile phone and of themanufacturer of the accessories. In areas with poor coverage there may beanomalies in the reception and calls may be interrupted.
Most electronic devices are shielded against radio frequency signals (high-frequency). On some occasions, nevertheless, electronic devices cannot beprotected against the radio frequency signals from the telephone manager.This may produce interference.
Note
●There may be restrictions on the use of Bluetooth devices in some coun-tries. Information is available from the local authorities.●
To connect the telephone manager to a device via Bluetooth technology,read the corresponding instruction manual for the particular safety instruc-tions. Only use products that support Bluetooth.
Bluetooth®
Bluetooth®
Bluetooth technology is used to connect a mobile phone to the vehicle's tel-ephone manager. To use the telephone manager with a mobile phone withBluetooth, the linking process must be carried out once.
If a connection has already been established, some mobile telephones withBluetooth are recognised and a connection is established with them auto-matically when the ignition is switched on. For this purpose, the mobilephone and its Bluetooth must be connected, and all the live Bluetooth con-nections with other devices must be closed.
The Bluetooth wireless connection is free.
BluetoothR is a registered trademark of Bluetooth® SIG, Inc.
Bluetooth® profiles
When you connect a mobile phone to the telephone manager, the data ex-change is through one of the 2 Bluetooth profiles.
●
Hands-free Bluetooth profile (HFP): If a mobile phone is connected tothe telephone manager through the HFP, calls can be made wirelesslythrough the hands-free device.
●
Advanced audio profile (A2DP): Bluetooth profile for transmitting audiosignals with stereo quality.
Voice control
Many radio, media, telephone and navigation functions may be activatedthrough voice commands.
The voice control of the infotainment system is only available for the lan-guage that has been selected in system setup ⇒ page 62.