2013 Seat Leon 5D seat adjustment
[x] Cancel search: seat adjustmentPage 51 of 339

49
Child safety
WARNING
● Never install a child seat facing backwards on the front passenger
seat unless the front passenger front airbag has been disabled. Risk of
potentially fatal injuries to the child! However, if it is necessary, in excep-
tional cases, to transport a child in the front passenger seat, the front
passenger front airbag must always be disabled ⇒ page 45. If the pas-
senger seat has a height adjustment option, move it to the highest, most
upright position. If you have a fixed seat, do not install any child restraint
system in this location.
● For those vehicles that do not include a key lock switch to deactivate
the airbag, the vehicle must be taken to a Technical Service.
● All vehicle occupants, especially children, must assume the proper
sitting position and be properly belted in while travelling.
● Never hold children or babies on your lap, this can result in potential-
ly fatal injuries to the child!
● Never allow a child to be transported in a vehicle without being prop-
erly secured, or to stand up or kneel on a seat while travelling. In an acci-
dent, the child could be flung through the vehicle, causing possibly fatal
injuries to themselves and to the other vehicle occupants.
● If children assume an improper sitting position when the vehicle is
moving, they expose themselves to greater risk of injury in the event of a
sudden braking manoeuvre or in an accident. This is particularly impor-
tant if the child is travelling on the front passenger seat and the airbag
system is triggered in an accident; as this could cause serious injury or
even death.
● A suitable child seat can protect your child!
● Never leave an unsupervised child alone on a child seat or in the vehi-
cle.
● Depending on weather conditions, it may become extremely hot or
cold inside the vehicle. This can be fatal.WARNING (Continued)
● Children who are less than 1.5 metres tall must not wear a normal
seat belt without a child seat, as this could cause injuries to the abdomi-
nal and neck areas during a sudden braking manoeuvre or in an accident.
● Do not allow the seat belt to become twisted or jammed, or to rub on
any sharp edges.
● Incorrectly worn seat belts can cause injuries even in a minor colli-
sion or in sudden braking manoeuvres.
● The seat belt provides maximum protection only when the seat belt is
properly positioned ⇒ page 26, Seat belts.
● Only one child may occupy a child seat ⇒ page 50, Child seats.
Safety FirstOperating instructionsPractical TipsTechnical specifications
Page 55 of 339
53
Child safety
Securing child seats
Ways to secure a child seat
A child seat can be secured differently on the rear seat and
on the front passenger seat.
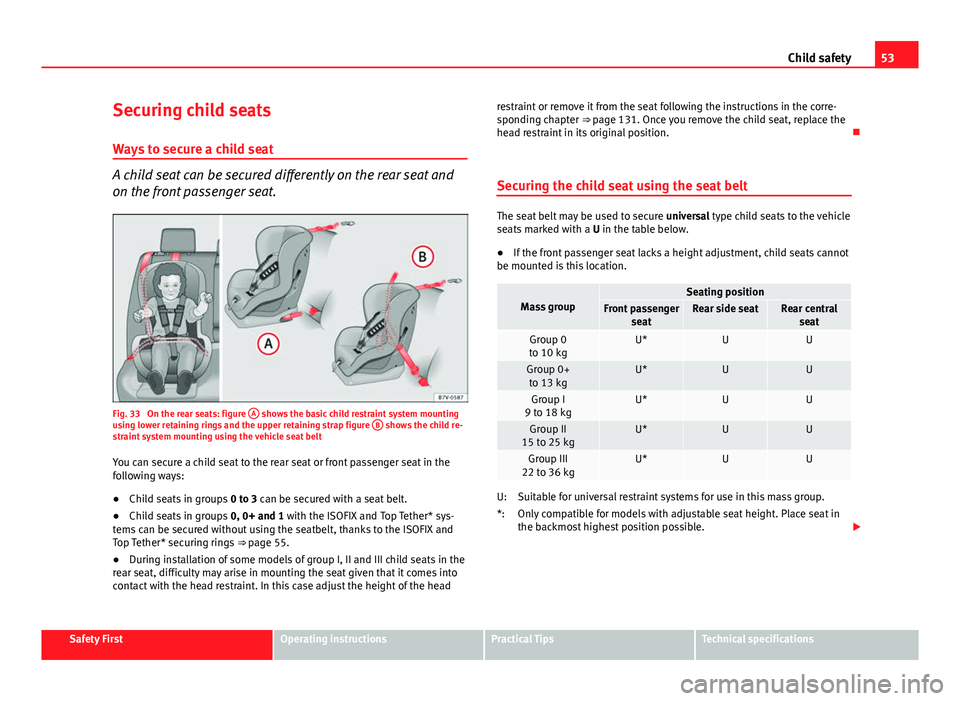
Fig. 33 On the rear seats: figure A shows the basic child restraint system mounting
using lower retaining rings and the upper retaining strap figure B shows the child re-
straint system mounting using the vehicle seat belt
You can secure a child seat to the rear seat or front passenger seat in the
following ways:
● Child seats in groups 0 to 3 can be secured with a seat belt.
● Child seats in groups 0, 0+ and 1 with the ISOFIX and Top Tether* sys-
tems can be secured without using the seatbelt, thanks to the ISOFIX and
Top Tether* securing rings ⇒ page 55.
● During installation of some models of group I, II and III child seats in the
rear seat, difficulty may arise in mounting the seat given that it comes into
contact with the head restraint. In this case adjust the height of the head restraint or remove it from the seat following the instructions in the corre-
sponding chapter ⇒
page 131. Once you remove the child seat, replace the
head restraint in its original position.
Securing the child seat using the seat belt
The seat belt may be used to secure universal type child seats to the vehicle
seats marked with a U in the table below.
● If the front passenger seat lacks a height adjustment, child seats cannot
be mounted is this location.
Mass groupSeating positionFront passenger seatRear side seatRear centralseat
Group 0
to 10 kgU*UU
Group 0+ to 13 kgU*UU
Group I
9 to 18 kgU*UU
Group II
15 to 25 kgU*UU
Group III
22 to 36 kgU*UU
Suitable for universal restraint systems for use in this mass group.
Only compatible for models with adjustable seat height. Place seat in
the backmost highest position possible.
U:
*:
Safety FirstOperating instructionsPractical TipsTechnical specifications
Page 59 of 339

57
Child safety
Child seats with the Top Tether system come with a strap for securing the
seat to the vehicle anchor point, located at the back of the rear seat back-
rest.
The objective of the retainer strap is to reduce forward movements of the
child seat in a crash, helping reduce the risk of injuries to the head from hit-
ting the inside of the vehicle.
Using the Top Tether in rear-facing mounted seats
Currently, there are very few rear-facing child safety seats that have Top
Tether. Please carefully read and follow the seat manufacturer instructions
to learn the proper way to install the Top Tether strap.
Fitting the Top Tether child restraint to the anchoring point
Fig. 36 Retainer strap:
correct adjustment and
fitting
Securing the Top Tether child restraint to the anchor point situated
on the rear of the backrest
– Pull out the fastening belt of the child restraint seat according
to the manufacturer's instructions. –
Guide the Top Tether fastening belt under the rear seat head re-
straint ⇒ Fig. 36 (lift the head restraint where necessary).
– Slide the belt so that the Top Tether belt of the child restraint
seat is correctly secured to the anchor on the back of the rear
seat.
– Firmly tighten the Top Tether belt following the child restraint
seat manufacturer's instructions.
Releasing the retaining strap
– Release the retainer strap in line with the instructions given by
the child safety seat manufacturer.
– Push the lock and release it from the anchoring support.
WARNING
An undue installation of the safety seat will increase the risk of injury in
the event of a crash.
● Never tie the retainer strap to a hook in the luggage compartment.
● Never secure or tie luggage or other items to the lower anchorages
(ISOFIX) or the upper ones (Top Tether).
Safety FirstOperating instructionsPractical TipsTechnical specifications
Page 118 of 339

116Lights and visibility
When a car that is manufactured in a country that drives on the right travels
to a country that drives on the left (or vice versa), it is normally necessary to
cover part of the headlight bulbs with stickers or to change the adjustment
of the headlights to avoid dazzling other drivers.
In such cases, the regulations specify certain light values that must be com-
plied with for designated points of the light distribution. This is known as
“Tourist light”.
The light distribution that the halogen and full-LED headlights of the SEAT
Leon range have, allows the specific “tourist light” values to be met without
the need for stickers or changes in the settings.
Note
“Tourist light” is only allowed temporarily. If you are planning a long stay in
a country that drives on the other side, you should take the vehicle to an
Authorised Technical Service to change the headlights.
Coming home “function”
This function may be connected/disconnected through the radio menu. The
“Coming Home” and/or “Leaving Home” delay functions may also be set
(default: 30 sec.).
Vehicle with halo-
gen headlightsIn the “Coming Home” function, the daytime running
lights (DRL), the rear side lights and the licence plate
lights are turned on.
Vehicle with full-
LED headlightsIn the “Coming Home” function, the dipped beams
and the daytime running lights (DRL), the rear side
lights and the licence plate lights are switched on.
Automatic “Coming Home” activation*
For vehicles with a light and rain sensor (rotary light switch in position ). ●
Switch off the engine and remove the key from the ignition with the rota-
ry light switch in position ⇒ Fig. 65.
● The automatic “Coming Home” function is only active when the light
sensor detects darkness.
● When the car door is opened, the “Coming Home” lighting comes on.
Activation “Coming Home” manual
For vehicles with a light and rain sensor (rotary light switch without position
).
● Switch off the engine and remove the key from the ignition.
● Activate the headlight flashers for approximately 1 second.
● Activated for any position of the rotary light switch.
● When the car door is opened, the “Coming Home” lighting comes on.
The headlights are turned off 60 seconds after the vehicle door is opened.
Deactivation
● If no door has been closed, they go out automatically after 60 seconds.
● After the last door has been closed, the headlights will be switched off
after the “Coming Home” delay (as established in the radio menu).
● On turning the light switch to position ⇒ Fig. 65 .
● When the ignition is switched on (when starting the engine).
Leaving Home “function”
The “Leaving Home” function is only available for vehicles with a light and
rain sensor (rotary light switch in position ).
This function may be connected/disconnected through the radio menu. The
“Leaving Home” delay may also be set (default: 30 sec.).
Page 131 of 339
129
Seats and storage
Front seats
Manual seat adjustment
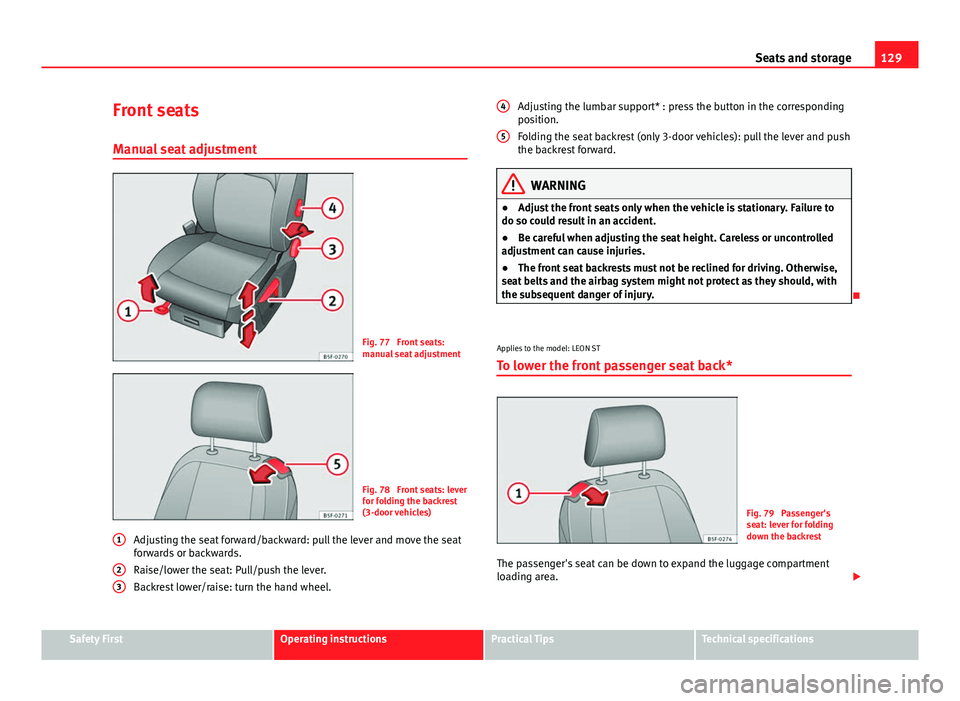
Fig. 77 Front seats:
manual seat adjustment
Fig. 78 Front seats: lever
for folding the backrest
(3-door vehicles)
Adjusting the seat forward/backward: pull the lever and move the seat
forwards or backwards.
Raise/lower the seat: Pull/push the lever.
Backrest lower/raise: turn the hand wheel.
1
23
Adjusting the lumbar support* : press the button in the corresponding
position.
Folding the seat backrest (only 3-door vehicles): pull the lever and push
the backrest forward.
WARNING
● Adjust the front seats only when the vehicle is stationary. Failure to
do so could result in an accident.
● Be careful when adjusting the seat height. Careless or uncontrolled
adjustment can cause injuries.
● The front seat backrests must not be reclined for driving. Otherwise,
seat belts and the airbag system might not protect as they should, with
the subsequent danger of injury.
Applies to the model: LEON ST
To lower the front passenger seat back*
Fig. 79 Passenger's
seat: lever for folding
down the backrest
The passenger's seat can be down to expand the luggage compartment
loading area.
4
5
Safety FirstOperating instructionsPractical TipsTechnical specifications
Page 132 of 339
130Seats and storage
● Pull on lever 1
⇒ Fig. 79 and push the backrest forwards so that the
backrest is horizontal.
WARNING
When the passenger's backrest is folded down this place cannot be occu-
pied by a passenger.
Front centre armrest
The centre armrest can be adjusted to various levels. Adjusting the centre armrest
– To adjust the tilt, lift the armrest from the starting position so
that it is engaged.
– To return the armrest to the starting position, remove the arm-
rest from the upper fixed position and lower it.
The armrest can be moved backwards and forwards.
Seat functions Introduction
Additional information and warnings
● Adjusting the position of the seats ⇒ page 10
● Seat belts ⇒ page 20 ●
Airbag system ⇒ page 31
● Child seats (accessories) ⇒ page 48
WARNING
Inappropriate use of the seat functions can cause severe injuries.
● Assume the proper sitting position before your trip and remain in it
throughout. This also applies to the other occupants.
● Always keep hands, fingers, feet and other parts of the body away
from the operating radius and the adjustment of seats.
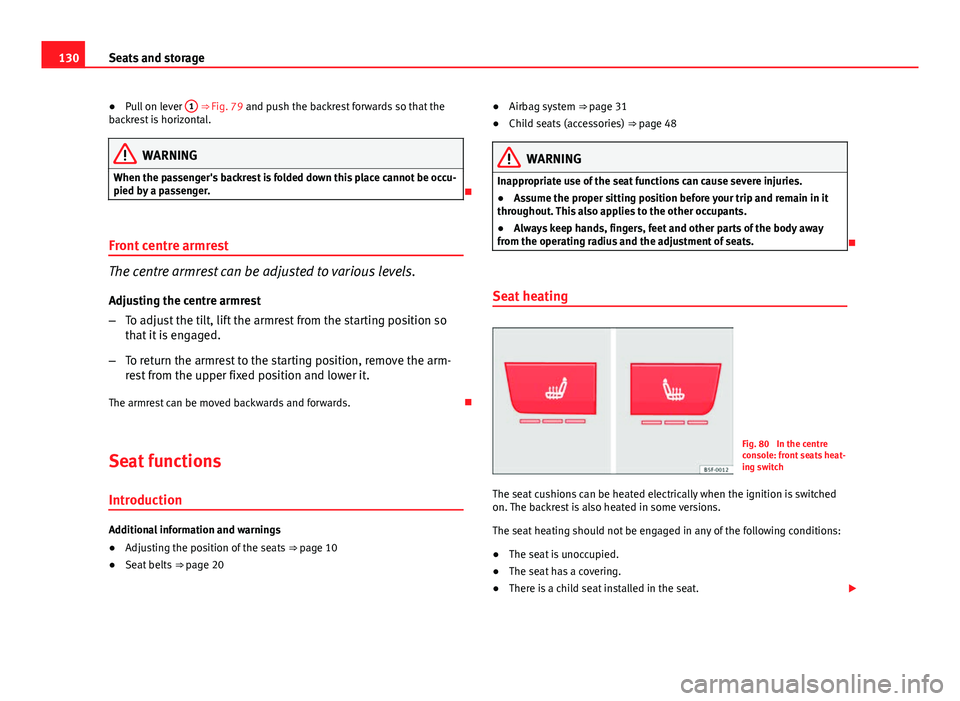
Seat heating
Fig. 80 In the centre
console: front seats heat-
ing switch
The seat cushions can be heated electrically when the ignition is switched
on. The backrest is also heated in some versions.
The seat heating should not be engaged in any of the following conditions:
● The seat is unoccupied.
● The seat has a covering.
● There is a child seat installed in the seat.
Page 157 of 339

155
Air conditioning
Control but-
tonAdditional information. Climatronic.
Defrost function. The air drawn in from outside the vehicle
is directed at the windscreen and air recirculation is auto-
matically switched off. To defrost the windscreen more
quickly, the air is dehumidified at temperatures over ap-
proximately +3 °C (+38 °F) and the fan runs at maximum
output.
The air is directed at the chest of driver and passengers by
the dash panel air vents.
Air distribution towards the footwell.
Upward air distribution.
Heated rear window: this only works when the engine is
running and switches off automatically after a maximum of
10 minutes.
Air recirculation ⇒ page 160.
Buttons for seat heating ⇒ page 130.
Press the button to switch on or off the cooling system.
Press the button to make maximum cooling capacity avail-
able. The recirculation of air and the cooling system turn
on automatically and air distribution adjusts automatically
to the position .
Control but-
tonAdditional information. Climatronic.
Transfer the driver side temperature settings to the pas-
senger side: when the button lamp is lit , the tempera-
ture settings on the driver side also apply to the passenger
side. Press the button or the temperature control on the
passenger side in order to change the temperature on that
side. The button lamp is lit.
Automatic adjustment of temperature, fan, and air distribu-
tion. Press the button to switch on the function. The button
will light up
.
When the configuration button is pressed the air con-
ditioner management menu will be shown on the Easy
Connect system screen.
Switching offTurn the fan control to the 0 position or press the button .
WARNING
Stuffy or used air will increase fatigue and reduce driver concentration
possibly resulting in a serious accident.
● Never leave the fresh air fan turned off or use the air recirculation for
long periods of time; the air in the vehicle interior will not be refreshed.
Adjust through the Easy Connect system* 1)
In the Easy Connect system it is also possible to perform various adjust-
ments to the Climatronic.
1)
Applies to vehicles with a Touch/Colour Media System
Safety FirstOperating instructionsPractical TipsTechnical specifications
Page 192 of 339

190Driver assistance systems
WARNING (Continued)
● If the vehicle continues to move following a driver intervention re-
quest, apply the foot brake.
● If the instrument panel display shows a driver intervention request,
adjust the distance yourself.
● The driver must be ready to accelerate or brake by him- or herself at
any time.
CAUTION
If you have the impression that the radar sensor is damaged, disconnect the
ACC. This will prevent possible damage. In this case have it adjusted.
● A radar sensor repair requires specialist knowledge and special tools.
SEAT recommends visiting a SEAT dealership for this.
Note
● If the ACC does not operate as described in this chapter, do not use it
until it has been checked by a specialised workshop. SEAT recommends vis-
iting a SEAT dealership for this.
● The maximum speed with the ACC switched on is limited to 160 km/h
(100 mph).
● When the ACC is switched on, strange noises may be heard during auto-
matic braking. Messages on the display, control and warning lampsFig. 130 On the instrument panel display: (A) ACC temporarily inactive, vehicle detec-
ted ahead, temporary distance adjusted. (B) ACC active, vehicle detected ahead, a tem-
porary distance is adjusted.
Status display
Messages on the display ⇒ Fig. 130:
Vehicle ahead, the ACC is inactive.
Distance margin selected, the ACC is inactive.
Vehicle detected ahead. The ACC is active.
Adjustment of the temporary distance with regard to the vehicle ahead
with a set speed.
Temporary distance adjusted with regard to the vehicle ahead with a
set speed.
1
234
5