2013 Seat Ibiza ST warning
[x] Cancel search: warningPage 48 of 294

46Child safety
Group 1 child seats
A suitable child seat and a correctly adjusted seat belt can
help you to protect your child.
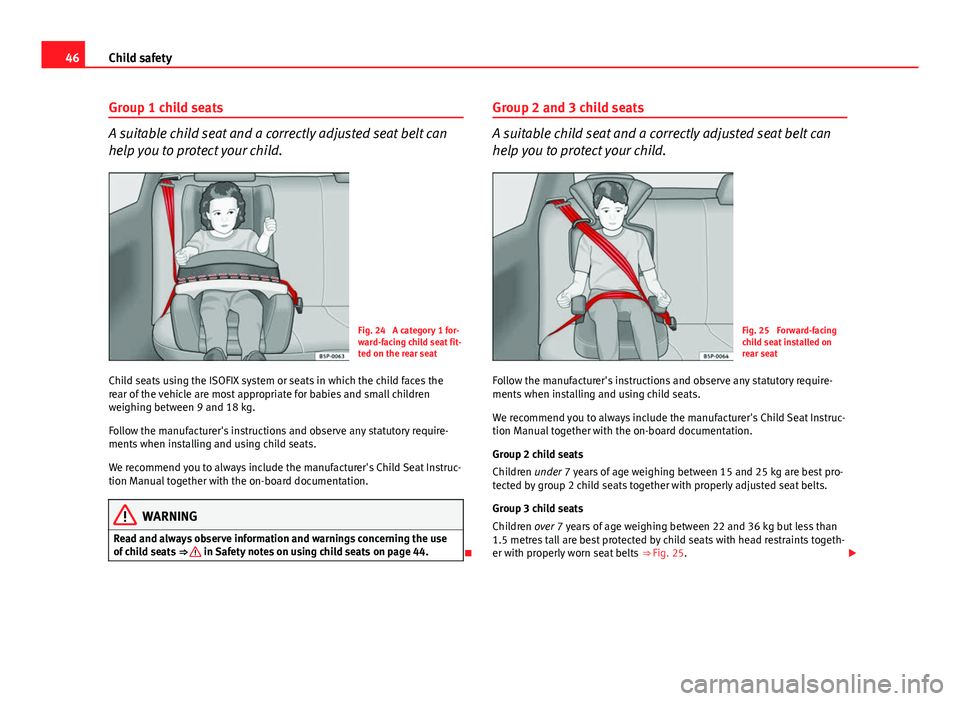
Fig. 24 A category 1 for-
ward-facing child seat fit-
ted on the rear seat
Child seats using the ISOFIX system or seats in which the child faces the
rear of the vehicle are most appropriate for babies and small children
weighing between 9 and 18 kg.
Follow the manufacturer's instructions and observe any statutory require-
ments when installing and using child seats.
We recommend you to always include the manufacturer's Child Seat Instruc-
tion Manual together with the on-board documentation.
WARNING
Read and always observe information and warnings concerning the use
of child seats ⇒
in Safety notes on using child seats on page 44.Group 2 and 3 child seats
A suitable child seat and a correctly adjusted seat belt can
help you to protect your child.
Fig. 25 Forward-facing
child seat installed on
rear seat
Follow the manufacturer's instructions and observe any statutory require-
ments when installing and using child seats.
We recommend you to always include the manufacturer's Child Seat Instruc-
tion Manual together with the on-board documentation.
Group 2 child seats
Children under 7 years of age weighing between 15 and 25 kg are best pro-
tected by group 2 child seats together with properly adjusted seat belts.
Group 3 child seats
Children over 7 years of age weighing between 22 and 36 kg but less than
1.5 metres tall are best protected by child seats with head restraints togeth-
er with properly worn seat belts ⇒ Fig. 25.
Page 49 of 294

47
Child safety
WARNING
● The shoulder part of the seat belt must lie approximately on the cen-
tre of the shoulder, never across the neck or the arm. The seat belt must
lie close to the upper part of the body. The lap belt part must lie across
the pelvis, not across the stomach, and always fit closely. Pull the belt
tight if necessary to take up any slack ⇒ page 25, Seat belts.
● Read and always observe information and warnings concerning the
use of child seats ⇒
in Safety notes on using child seats on page 44.
Safety FirstOperating instructionsPractical TipsTechnical Specifications
Page 50 of 294

48Child safety
Securing child seats
Ways to secure a child seat
A child seat can be secured differently on the rear seat and
on the front passenger seat. You can secure a child seat to the rear seat or front passenger seat in the
following ways:
● Child seats in groups 0 to 3 can be secured with a seat belt.
● Child seats for groups 0, 0+ and 1 with the ISOFIX system can be se-
cured, without fastening seat belts, with the ISOFIX securing rings
⇒ page 49.
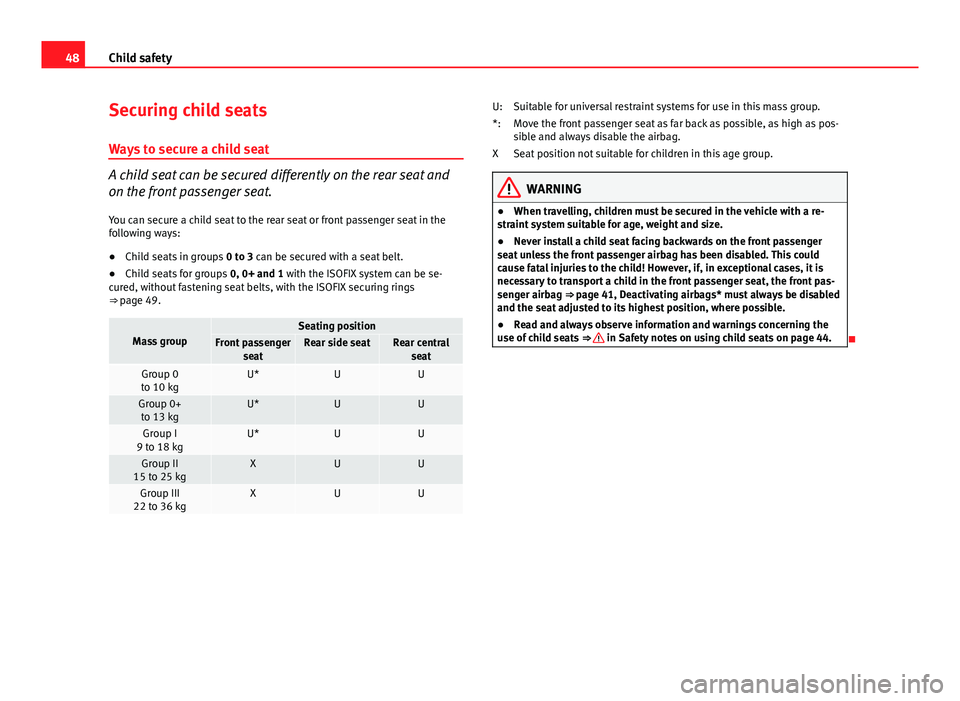
Mass groupSeating positionFront passenger seatRear side seatRear centralseat
Group 0
to 10 kgU*UU
Group 0+ to 13 kgU*UU
Group I
9 to 18 kgU*UU
Group II
15 to 25 kgXUU
Group III
22 to 36 kgXUU
Suitable for universal restraint systems for use in this mass group.
Move the front passenger seat as far back as possible, as high as pos-
sible and always disable the airbag.
Seat position not suitable for children in this age group.
WARNING
● When travelling, children must be secured in the vehicle with a re-
straint system suitable for age, weight and size.
● Never install a child seat facing backwards on the front passenger
seat unless the front passenger airbag has been disabled. This could
cause fatal injuries to the child! However, if, in exceptional cases, it is
necessary to transport a child in the front passenger seat, the front pas-
senger airbag ⇒ page 41, Deactivating airbags* must always be disabled
and the seat adjusted to its highest position, where possible.
● Read and always observe information and warnings concerning the
use of child seats ⇒
in Safety notes on using child seats on page 44.
U:
*:
X
Page 52 of 294

50Child safety
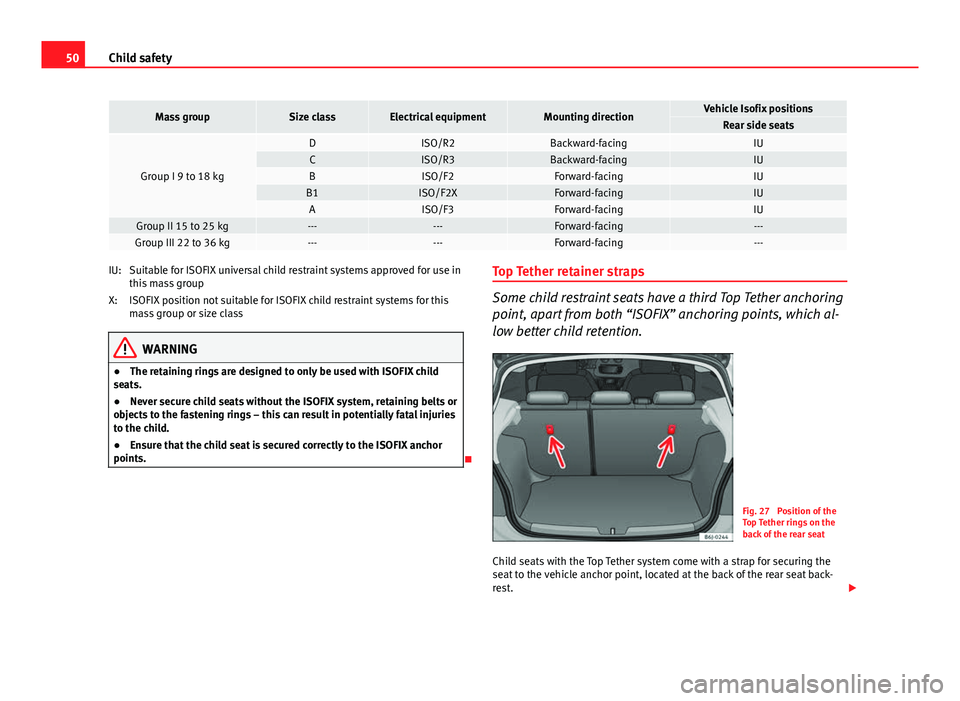
Mass groupSize classElectrical equipmentMounting directionVehicle Isofix positionsRear side seats
Group I 9 to 18 kg
DISO/R2Backward-facingIUCISO/R3Backward-facingIUBISO/F2Forward-facingIUB1ISO/F2XForward-facingIUAISO/F3Forward-facingIUGroup II 15 to 25 kg------Forward-facing---Group III 22 to 36 kg------Forward-facing---
Suitable for ISOFIX universal child restraint systems approved for use in
this mass group
ISOFIX position not suitable for ISOFIX child restraint systems for this
mass group or size class
WARNING
● The retaining rings are designed to only be used with ISOFIX child
seats.
● Never secure child seats without the ISOFIX system, retaining belts or
objects to the fastening rings – this can result in potentially fatal injuries
to the child.
● Ensure that the child seat is secured correctly to the ISOFIX anchor
points.
IU:
X:
Top Tether retainer straps
Some child restraint seats have a third Top Tether anchoring
point, apart from both “ISOFIX” anchoring points, which al-
low better child retention.
Fig. 27 Position of the
Top Tether rings on the
back of the rear seat
Child seats with the Top Tether system come with a strap for securing the
seat to the vehicle anchor point, located at the back of the rear seat back-
rest.
Page 53 of 294

51
Child safety
The retainer strap is used to reduce forwards movements of the safety seat
in a crash, helping reduce the risk of injuries to the head from hitting the
inside of the vehicle.
It is foreseen that an EU Directive will introduce requirements related to the
retention of child restraint systems by means of ISOFIX and Top Tether an-
chorages (probably compulsory for new types from 2010), which will entail
improved retention of the child restraint seat and less head movement in
case of frontal collisions.
Use of retainer straps on rear-facing seats
At present there are very few rear-facing child safety seats fitted with a re-
tainer strap. Please carefully read and follow the safety seat manufacturer's
instructions for information on how to install the retainer strap properly.
WARNING
An undue installation of the safety seat will increase the risk of injury in
the event of a crash.
● Never tie the retainer strap to a hook in the luggage compartment.
● Never secure or tie luggage or other items to the lower anchorages
(ISOFIX) or the upper ones (Top Tether).
Fitting the Top Tether child restraint to the anchoring point
Fig. 28 Retainer strap:
correct adjustment and
fitting
Securing the Top Tether child restraint to the anchor point situated
on the rear of the backrest
– Pull out the fastening belt of the child restraint seat according
to the manufacturer's instructions.
– Guide the Top Tether fastening belt under the rear seat head re-
straint ⇒ Fig. 28 (lift the head restraint where necessary).
– Slide the belt so that the Top Tether belt of the child restraint
seat is correctly secured to the anchor on the back of the rear
seat.
– Firmly tighten the Top Tether belt following the child restraint
seat manufacturer's instructions.
Releasing the retaining strap
– Release the retainer strap in line with the instructions given by
the child safety seat manufacturer.
Safety FirstOperating instructionsPractical TipsTechnical Specifications
Page 54 of 294

52Child safety
–Push the lock and release it from the anchoring support.
WARNING
Read and bear in mind all the WARNINGS ⇒ page 50.
Page 57 of 294

55
Cockpit
Operating instructions Cockpit
Overview Overview of the dash panel
This overview will help you to familiarise yourself with the
controls and displays. Door release lever
Light switch . . . . . . . . . . . . . . . . . . . . . . . . . . . . . . . . . . . . . . . . . . . . . . . 101
Light dimmer for instrument panel lighting* . . . . . . . . . . . . . . . .103
Headlight range control* . . . . . . . . . . . . . . . . . . . . . . . . . . . . . . . . . . 103
Air vents
Lever for:
– turn signals/dipped beam . . . . . . . . . . . . . . . . . . . . . . . . . . . . . . 107
– cruise control* . . . . . . . . . . . . . . . . . . . . . . . . . . . . . . . . . . . . . . . . . 171
Instrument panel and warning lamps:
– Instruments . . . . . . . . . . . . . . . . . . . . . . . . . . . . . . . . . . . . . . . . . . . . 57
– Control and warning lamps . . . . . . . . . . . . . . . . . . . . . . . . . . . . . . 65
Horn (only works when the ignition is on)/ and driver
front airbag* . . . . . . . . . . . . . . . . . . . . . . . . . . . . . . . . . . . . . . . . . . . . . . 30
Steering and starter lock . . . . . . . . . . . . . . . . . . . . . . . . . . . . . . . . . . 148
Lever for:
– windscreen wiper/washer . . . . . . . . . . . . . . . . . . . . . . . . . . . . . . . 111
– rear window wiper/washer* . . . . . . . . . . . . . . . . . . . . . . . . . . . . . 111
– multifunction display* . . . . . . . . . . . . . . . . . . . . . . . . . . . . . . . . . . 61
1
23456
7
8
910
Radio
Glove compartment/Storage compartment
. . . . . . . . . . . . . . . . .125
Passenger airbag* . . . . . . . . . . . . . . . . . . . . . . . . . . . . . . . . . . . . . . . . 34
Dash panel switches:
– ESC OFF . . . . . . . . . . . . . . . . . . . . . . . . . . . . . . . . . . . . . . . . . . . . . . . . 148, 176
– Hazard warning lights . . . . . . . . . . . . . . . . . . . . . . . . . . . . . . . . . . 106
– Airbag deactivation warning lamp* . . . . . . . . . . . . . . . . . . . . . .31, 41
Switches for:
– Heating and ventilation . . . . . . . . . . . . . . . . . . . . . . . . . . . . . . . . . 137
– Air conditioning* . . . . . . . . . . . . . . . . . . . . . . . . . . . . . . . . . . . . . . . 140
– Climatronic* . . . . . . . . . . . . . . . . . . . . . . . . . . . . . . . . . . . . . . . . . . . . 143
Cigarette lighter/Power socket . . . . . . . . . . . . . . . . . . . . . . . . . . . . . 128
Drink holder/Ashtray . . . . . . . . . . . . . . . . . . . . . . . . . . . . . . . . . . . . . . 127
Controls on the centre console:
– Start-Stop operation button . . . . . . . . . . . . . . . . . . . . . . . . . . . . . 153
– LPG gas system control button . . . . . . . . . . . . . . . . . . . . . . . . . . 152
– Tyre pressure monitoring* . . . . . . . . . . . . . . . . . . . . . . . . . . . . . . . 73
– Heated rear window . . . . . . . . . . . . . . . . . . . . . . . . . . . . . . . . . . . . 106
– Heated seats* . . . . . . . . . . . . . . . . . . . . . . . . . . . . . . . . . . . . . . . . . . 121
– Central locking* . . . . . . . . . . . . . . . . . . . . . . . . . . . . . . . . . . . . . . . . 85
Handbrake lever . . . . . . . . . . . . . . . . . . . . . . . . . . . . . . . . . . . . . . . . . . 164
Gear lever
– automatic* . . . . . . . . . . . . . . . . . . . . . . . . . . . . . . . . . . . . . . . . . . . . . 157
– manual . . . . . . . . . . . . . . . . . . . . . . . . . . . . . . . . . . . . . . . . . . . . . . . . 156
11121314
15
161718
1920
Safety FirstOperating instructionsPractical TipsTechnical Specifications
Page 60 of 294

58Cockpit
Rev counter
The rev counter displays the engine speed in revolutions per
minute.
The start of the red zone ⇒ Fig. 30 1
indicates the maximum engine speed
operating at service temperature. However, it is advisable to change up into
a higher gear, move the selector lever to D or lift your foot off the accelerator
before the needle reaches the red zone.
CAUTION
To prevent possible engine malfunctions, the rev counter needle should not
reach the red zone. The start of the red zone on the dial is different for some
engine versions.
For the sake of the environment
Changing up into higher gears sooner, following the recommended gear in-
dications ⇒ Fig. 33 will help you to reduce fuel consumption, emissions and
also engine noise.
Speedometer
The speedometer is equipped with a digital odometer and a trip recorder, in
addition to a service intervals display.
During the running-in period, the instructions shown on ⇒ page 179
should be followed. LPG system*
LPG gauge
Fig. 31 Instrument pan-
el: gas gauge.
LPG system filler level display
The LPG tank ⇒
in the spare wheel well has a capacity of 52.8 litres at an
outside temperature of +15 °C (+59 °F) ⇒ page 202, Refuelling with LPG.
The charge level can be checked on the analogue gas gauge located on the
instrument panel ⇒ Fig. 31. When the level reaches reserve, the gas reserve
warning lamp lights up and an audible warning is heard. Refill with LPG at
the earliest opportunity.
If while driving with LPG a sudden acoustic signal is heard, the on-screen
message is shown 1)
:
ERROR FUNC_ A GAS
1)
Depending on the model version