2013 Seat Ibiza ST weight
[x] Cancel search: weightPage 122 of 294

120Seats and storage
Front seats
Adjustment of the front seats
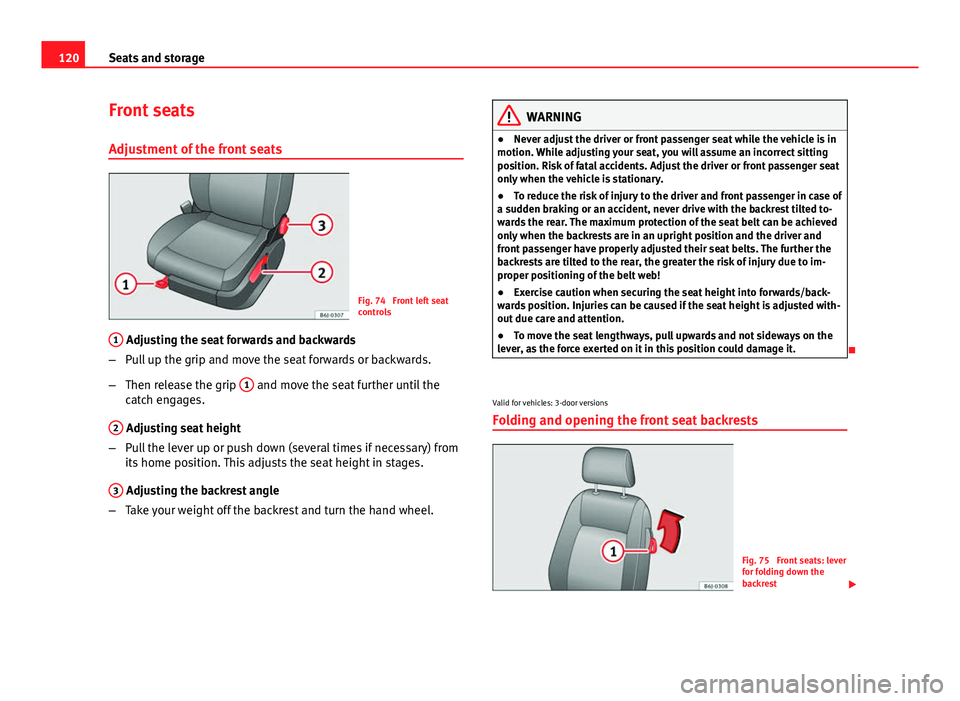
Fig. 74 Front left seat
controls
1
Adjusting the seat forwards and backwards
– Pull up the grip and move the seat forwards or backwards.
– Then release the grip 1
and move the seat further until the
catch engages.
2
Adjusting seat height
– Pull the lever up or push down (several times if necessary) from
its home position. This adjusts the seat height in stages.
3
Adjusting the backrest angle
– Take your weight off the backrest and turn the hand wheel.
WARNING
● Never adjust the driver or front passenger seat while the vehicle is in
motion. While adjusting your seat, you will assume an incorrect sitting
position. Risk of fatal accidents. Adjust the driver or front passenger seat
only when the vehicle is stationary.
● To reduce the risk of injury to the driver and front passenger in case of
a sudden braking or an accident, never drive with the backrest tilted to-
wards the rear. The maximum protection of the seat belt can be achieved
only when the backrests are in an upright position and the driver and
front passenger have properly adjusted their seat belts. The further the
backrests are tilted to the rear, the greater the risk of injury due to im-
proper positioning of the belt web!
● Exercise caution when securing the seat height into forwards/back-
wards position. Injuries can be caused if the seat height is adjusted with-
out due care and attention.
● To move the seat lengthways, pull upwards and not sideways on the
lever, as the force exerted on it in this position could damage it.
Valid for vehicles: 3-door versions
Folding and opening the front seat backrests
Fig. 75 Front seats: lever
for folding down the
backrest
Page 128 of 294

126Seats and storage
Navigator mount on dash panel*
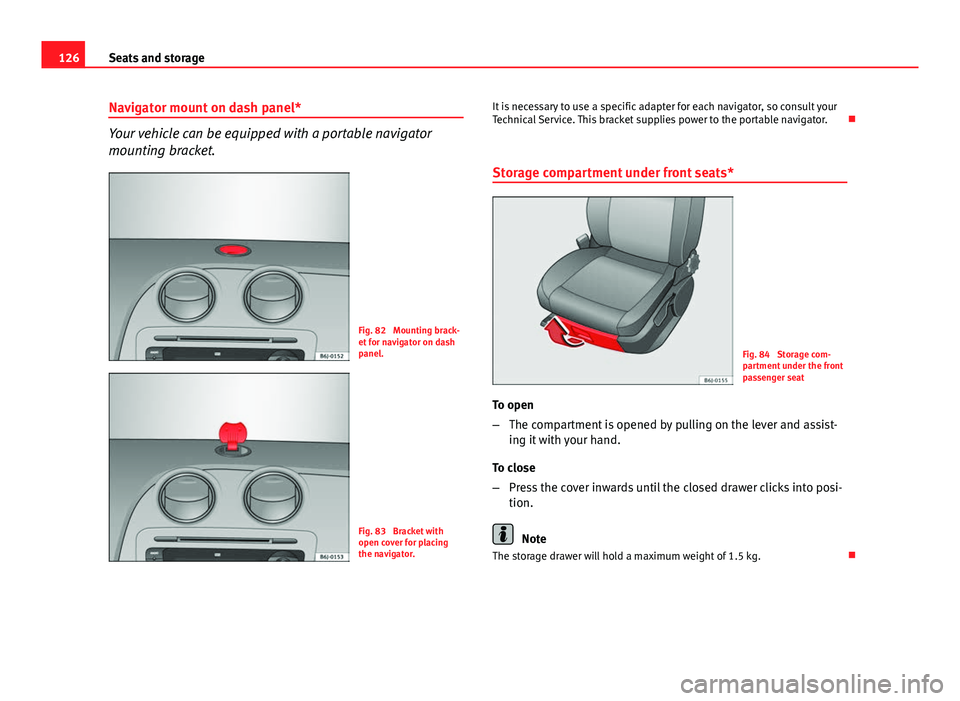
Your vehicle can be equipped with a portable navigator
mounting bracket.
Fig. 82 Mounting brack-
et for navigator on dash
panel.
Fig. 83 Bracket with
open cover for placing
the navigator. It is necessary to use a specific adapter for each navigator, so consult your
Technical Service. This bracket supplies power to the portable navigator.
Storage compartment under front seats*
Fig. 84 Storage com-
partment under the front
passenger seat
To open
– The compartment is opened by pulling on the lever and assist-
ing it with your hand.
To close
– Press the cover inwards until the closed drawer clicks into posi-
tion.
Note
The storage drawer will hold a maximum weight of 1.5 kg.
Page 138 of 294

136Seats and storage
Note
● Ensure that, when placing items of clothing on the luggage compart-
ment cover, rear visibility is not reduced.
● If your vehicle has a storage compartment*, only place light objects in-
side.
Roof rack*
Please observe the following points if you intend to carry loads on the roof:
● For safety reasons, only luggage racks and accessories supplied by SEAT
Official Services are recommended.
● It is essential that you follow the assembly instructions included with
the bars exactly, being especially careful to position front and rear luggage
compartment cover bars on the special housings on the longitudinal bars.
You must also respect their position according to the direction of travel indi-
cated in the assembly manual. Not following these instructions may dam-
age the bodywork.
● Pay special attention to the tightening torque of the attachment bolts
and check them following a short journey. If necessary, retighten the bolts
and check them at regular intervals.
● Distribute the load evenly. A maximum load of 40 kg only is permitted
for each roof rack system support bar, the load must be distributed evenly
along the entire length. However, the maximum load permitted for the en-
tire roof (including the support system) of 75 kg must not be exceeded nor
should the total weight of the vehicle be exceeded. See the Technical Data
section.
● When transporting heavy or large objects on the roof, any change in the
normal vehicle behaviour due to a change in the centre of gravity or an in-
creased wind resistance must be taken into account. For this reason, a suit-
able speed and driving style must be used.
● For those vehicles fitted with a sliding/tilting sunroof*, ensure that it
does not interfere with the load on the roof rack system when opened.
Page 173 of 294

171
Driving
Cruise speed* (Cruise control system)
Description
The CCS is able to maintain the set speed in the range from
approx. 30 km/h (19 mph) to 180 km/h (112 mph). Once the speed setting has been saved, you may take your foot off the ac-
celerator.
WARNING
It could be dangerous to use the cruise control system if it is not possible
to drive at constant speed.
● Do not use the cruise control system when driving in dense traffic, on
roads with lots of bends or on roads with poor conditions (with ice, slip-
pery surfaces, loose grit or gravel), as this could cause an accident.
● Always switch the cruise control system off after using it in order to
avoid involuntary use.
● It is dangerous to use a set speed which is too high for the current
road, traffic or weather conditions. Risk of accident.
Note
The cruise control cannot maintain a constant speed when descending
downhill. The vehicle will accelerate due to its own weight. Use the foot
brake to slow the vehicle. Switching the cruise control system on and off
Fig. 125 Turn signal and
main beam headlight lev-
er: switch and rocker
switch for the cruise con-
trol
Switching on the cruise control system
– Move the control ⇒ Fig. 125 A
to the left to
ON.
Switching off the cruise control system
– Move the control A
to the right to
OFF or turn the ignition off
when the vehicle is stationary.
When the cruise control is on and a speed is programmed, the lamp on
the instrument panel is lit. 1)
If the cruise control system is switched off, the symbol is switched off.
The system will also be deactivated completely when 1st gear is selected.*
1)
Depending on the model version
Safety FirstOperating instructionsPractical TipsTechnical Specifications
Page 185 of 294

183
Driving and the environment
Avoid short journeys
To reduce the consumption and emission of polluting exhaust gases, the
engine and the exhaust gas filtration systems should reach the optimum
operating temperature.
With the engine cold, fuel consumption is proportionally higher. The engine
does not warm up and fuel consumption does not normalise until having
driven approximately four kilometres (2.5 miles). This is why we recommend
avoiding short trips whenever possible.
Maintain the correct tyre pressures
Bear in mind that keeping the tyres at an adequate pressure saves fuel. If
the tyre pressure is just one bar (14.5 psi / 100 kPa) too low, fuel consump-
tion can increase by as much as 5%. Due to the greater rolling resistance,
under-inflation also increases tyre wear and impairs handling.
The tyre pressures should always be checked when the tyres are cold.
Do not use winter tyres all year round as they increase fuel consumption by
up to 10%.
Avoid unnecessary weight
Given that every kilo of extra weight will increase the fuel consumption, it is
advisable to always check the luggage compartment to make sure that no
unnecessary loads are being transported.
A roof rack is often left in place for the sake of convenience, even when it is
no longer needed. At a speed of 100 km/h (62 mph) and 120 km/h
(75 mph) your vehicle will use about 12% more fuel as a result of the extra
wind resistance caused by the roof rack even when it is not in use.
Save electricity
The engine activates the alternator, which produces electricity. With the
need for electricity, fuel consumption is also increased. Because of this, al-
ways turn off electrical components when you do not need them. Examples
of components that use a lot of electricity are: the fan at high speeds, the
rear window heating or the seat heaters*.
Note
● If you vehicle has Start-Stop, it is not recommended to switch this func-
tion off.
● It is recommended to close the windows when driving at more than
60 km/h (37 mph)
● Do not drive with your foot resting on the clutch pedal, as the pressure
can make the plate spin, more fuel will be used and it can burn the clutch
plate lining, causing a serious fault.
● Do not hold the vehicle on a hill with the clutch, use the foot brake or
hand brake, using the latter to start. The fuel consumption will be lower and
you will prevent the clutch plate from being damaged.
● On descents, use the engine brake, changing to the gear that is more
suitable for the slope. The fuel consumption will be lower and the brakes
will not suffer.
Environmental friendliness
Environmental protection is a top priority in the design, choice of materials
and manufacture of your new SEAT.
Constructive measures to encourage recycling
● Joints and connections designed for easy dismantling
● Modular construction to facilitate dismantling
● Increased use of single-grade materials.
● Plastic parts and elastomers are marked in accordance with ISO 1043,
ISO 11469 and ISO 1629.
Choice of materials
● Use of recycled materials.
● Use of compatible plastics in the same part if its components are not
easily separated.
Safety FirstOperating instructionsPractical TipsTechnical Specifications
Page 187 of 294

185
Driving and the environment
If the vehicle is supplied with a factory-fitted towing bracket it will already
have the necessary technical modifications and meet the statutory require-
ments for towing a trailer. If you wish to retrofit a towing bracket, consult
⇒ page 198.
Connectors
Your vehicle is fitted with a 12-pin connector for the electrical connection
between the trailer and the vehicle.
If the trailer has a 7-pin plug you will need to use an adapter cable. This is
available in any Technical Service.
Trailer weight/drawbar load
Never exceed the authorised trailer weight. If you do not load the trailer up
to the maximum permitted trailer weight, you can then climb correspond-
ingly steeper slopes.
The maximum trailer weights listed are only applicable for altitudes up to
1000 m above sea level. With increasing altitude the engine power and
therefore the vehicle climbing ability are impaired because of the reduced
air density. The maximum trailer weight has to be reduced accordingly. The
weight of the vehicle and trailer combination must be reduced by 10% for
every further 1000 m (or part thereof). The gross combination weight is the
actual weight of the laden vehicle plus the actual weight of the laden trailer.
When possible, operate the trailer with the maximum permitted drawbar
load on the ball joint of the towing bracket, but do not exceed the specified
limit.
The figures for trailer weights and drawbar loads that are given on the data
plate of the towing bracket are for certification purposes only. The correct
figures for your specific model, which may be lower than these figures for
the towing bracket, are given in the vehicle documentation or in ⇒ chap-
ter Technical Data.
Distributing the load
Distribute loads in the trailer so that heavy objects are as near to the axle as
possible. Loads carried in the trailer must be secured to prevent them mov-
ing. Tyre pressure
Set tyre pressure to the maximum permissible pressure shown on the stick-
er on the inside of the fuel tank flap. Set the tyre pressure of the trailer tyres
in accordance with the trailer manufacturer's recommendations.
Exterior mirrors
Check whether you can see enough of the road behind the trailer with the
standard rear vision mirrors. If this is not the case, you should have addi-
tional exterior mirrors fitted. Both exterior mirrors should be mounted on
hinged extension brackets. Adjust the mirrors to give sufficient vision to the
rear.
WARNING
Never transport people in a trailer. This could result in fatal accidents.
Note
● Towing a trailer places additional demands on the vehicle. We recom-
mend additional services between the normal inspection intervals if the ve-
hicle is used frequently for towing a trailer.
● Find out whether special regulations apply to towing a trailer in your
country.
Ball coupling of towing bracket*
The ball coupling is provided with instructions on fitting and removing the
ball coupling of the towing bracket.
Safety FirstOperating instructionsPractical TipsTechnical Specifications
Page 188 of 294

186Driving and the environment
WARNING
The towing bracket ball coupling must be stored securely in the luggage
compartment to prevent them being flung through the vehicle and caus-
ing injury.
Note
● By law, the ball coupling must be removed if a trailer is not being towed
if it obscures the number plate.
Driving tips
Driving with a trailer always requires extra care. Weight distribution
The weight distribution of a loaded trailer with an unladen vehicle is very
unfavourable. However, if this cannot be avoided, drive extra slowly to allow
for the unbalanced weight distribution.
Speed
The stability of the vehicle and trailer is reduced with increasing speed. For
this reason, it is advisable not to drive at the maximum permissible speed
in an unfavourable road, weather or wind conditions. This applies especially
when driving downhill.
You should always reduce speed immediately if the trailer shows the slight-
est sign of snaking. Never try to stop the “snaking” by increasing speed.
Always brake in due course. If the trailer has an overrun brake, apply the
brakes gently at first and then, firmly. This will prevent the jerking that can
be caused by locking of trailer wheels. Select a low gear in due course be-
fore going down a steep downhill. This enables you to use the engine brak-
ing to slow down the vehicle. Reheating
At very high temperatures and during prolonged slopes, driving in a low
gear and high engine speed, always monitor if the excessive coolant tem-
perature gauge is activated
⇒ page 75.
Electronic Stability Control*
The ESC* system helps to stabilise the trailer in case of skidding or rocking.
Page 266 of 294

264Description of specifications
Consumption values (l/100 km) and CO 2 emissions (g/km)
A
Urban consumption and CO 2 emissions
B Extra-urban consumption and CO 2 emissions
C Combined consumption and CO 2 emissions
Chassis number
The vehicle identification number can be read from outside the vehicle
through a viewer in the windscreen ⇒ Fig. 193. The viewer is located near
the lower corner of the windscreen. The chassis number is printed on the
right water drain channel. The water drain channel is located between the
suspension tower and the wing. To access the chassis number, open the
bonnet ⇒ page 206.
Information on fuel consumption
Fuel consumption and emissions of CO 2
The consumption and emission details shown on the vehicle
data sticker differ from one vehicle to another.
The vehicle fuel consumption and CO 2 emissions can be consulted on the
vehicle data sticker in the spare wheel well, inside the luggage compart-
ment and on the rear cover of the Maintenance Programme.
The fuel consumption and CO 2 emission values refer to the weight category
assigned to your vehicle according to the engine and gearbox combination,
as well as the specific equipment fitted, and is only used to compare be-
tween the different models.
The fuel consumption and CO 2 emissions do not depend only on the per-
formance of the vehicle, they can also differ from the established values de-
pending on other factors such as driving style, road conditions, traffic con-
ditions, environmental conditions, load and number of passengers. 5
Calculation of fuel consumption
The consumption values have been calculated based on measurements per-
formed or supervised by certified CE laboratories according to the latest ver-
sion of directives 715/2007/EC and 80/1268/CEE (for more information
consult the European Union Publications Office at EUR-Lex: © European Un-
ion, http://eur-lex.europa.eu/en/index.htm) and are valid for the kerb
weight indicated for the vehicle.
Note
In practice, and considering all the factors mentioned here, consumption
values can differ from those calculated in the current European regulations.