Page 228 of 294

226Checking and refilling levels
WARNING
● We recommend that you use only wheels and tyres which have been
approved by SEAT for your model. Failure to do so could impair vehicle
handling. Risk of accident.
● Avoid running the vehicle on tyres that are more than 6 years old. If
you have no alternative, you should drive slowly and with extra care at all
times.
● Never use old tyres or those with an unknown history of use.
● If wheel trims are retrofitted, you must ensure that the flow of air to
the brakes is not restricted. This could cause the brake system to over-
heat.
● All four wheels must be fitted with radial tyres of the same type, size
(rolling circumference) and the same tread pattern.
For the sake of the environment
Old tyres must be disposed of according to the laws in the country con-
cerned.
Note
● For technical reasons, it is not generally possible to use the wheels from
other vehicles. This can also apply to wheels of the same model. The use of
wheels or tyres which have not been approved by SEAT for use with your
model may invalidate the vehicle's type approval for use on public roads.
● If the spare tyre is not the same as the tyres that are mounted on the
vehicle (e.g. winter tyres) you should only use the spare tyre for a short peri-
od of time and drive with extra care. Refit the normal road wheel as soon as
possible. Wheel bolts
Wheel bolts must be tightened to the correct torque.
The design of wheel bolts is matched to the rims. If different wheel rims are
fitted, the correct wheel bolts with the right length and correctly shaped
bolt heads must be used. This ensures that wheels are fitted securely and
that the brake system functions correctly.
In certain circumstances, you should not use wheel bolts from a different
vehicle, even if it is the same model ⇒ page 196.
WARNING
If the wheel bolts are not tightened correctly, the wheel could become
loose while driving. Risk of accident.
● The wheel bolts must be clean and turn easily. Never apply grease or
oil to them.
● Use only wheel bolts which belong to the wheel.
● If the prescribed torque of the wheel bolts is too low, they could loos-
en whilst the vehicle is in motion. Risk of accident! If the tightening tor-
que is too high, the wheel bolts and threads can be damaged.
CAUTION
The prescribed tightening torque for wheel bolts for steel and alloy wheels
is 120 Nm.
Page 232 of 294

230If and when
If you have a puncture on one of the front wheels when using snow chains,
fit the compact temporary spare wheel in place of one of the rear wheels.
You can then attach the snow chains to the wheel taken from the rear and
use this wheel to replace the punctured front wheel.
WARNING
● The tyre pressures must be checked and corrected as soon as possi-
ble after fitting the temporary spare wheel.
● Do not drive faster than 80 km/h (50 mph), since higher speeds can
cause an accident.
● Avoid heavy acceleration, hard braking and fast cornering. Risk of ac-
cident.
● Never use more than one temporary spare wheel at the same time,
risk of accident.
● No other type of tyre (normal summer or winter tyre) may be fitted on
the compact temporary spare wheel rim.
Tyre repair kit*
The tyre repair kit (for vehicles not including a temporary
spare wheel) is stored under the floor panel in the luggage
compartment. In the event of a punctured tyre, your vehicle is equipped with the Tyre Mo-
bility System (tyre repair kit).
The tyre repair kit consists of a container with sealing product to repair the
puncture and a compressor to generate the required tyre pressure. The kit
will reliably seal punctures up to a size of about 4 mm caused by the pene-
tration of a foreign body into the tyre.
Note
● Seek professional assistance if the repair of a tyre puncture is not possi-
ble with the sealing product.
Wheel change Preparation work
What you must do before changing a wheel.
– If you have a flat tyre or puncture, park the vehicle as far away
from the flow of traffic as possible. Choose a location that is as
level as possible.
– All vehicle occupants should leave the vehicle. They should
wait in a safe area (for instance behind the roadside crash barri-
er).
– Switch the engine off. Switch the hazard warning lights on and
place the warning triangles in position.
– Apply the handbrake firmly.
– Engage the first gear , or put the selector lever to position P for
those vehicles with an automatic gearbox.
– If you are towing a trailer, unhitch it from your vehicle.
– Take the vehicle tools and the spare wheel out of the luggage
compartment.
Page 238 of 294

236If and when
What to do first
Certain steps must be taken before repairing a tyre.
–If you have a flat tyre or puncture, park the vehicle as far away
from the flow of traffic as possible.
– Apply the handbrake firmly.
– Engage first gear , or put the selector lever to position P.
– All occupants should leave the vehicle. They should wait in a
safe area (for instance behind the roadside crash barrier).
– Check whether a repair is possible using the Tyre Mobility Sys-
tem “General information and safety notes.”
– Unscrew inflation cap from the affected wheel.
– Take the tyre repair kit out of the luggage compartment.
WARNING
Switch on the hazard warning lights and place the warning triangles in
position. This is for your own safety and also warns other road users.
CAUTION
Take special care if you have to repair a tyre on a slope.
Note
● Please observe legal requirements when doing so.
● Remember to replace the sealing product as soon as possible. Tyre repair
The following sections describe the procedures for repairing
a tyre.
Using the sealing product
– The instructions on the container give detailed information on
how to use the sealing product.
Inflating the tyre.
– Remove the air compressor and hose from the container.
– Screw the retaining nut onto the valve.
– Plug the compressor cable into a 12 volt power socket.
– Turn on compressor and monitor the pressure shown on the
pressure gauge.
Completing the repair
– Remove the compressor hose from the valve.
– Fit the valve cap.
– Unplug the compressor from the socket.
– Return all tools to their proper storing location.
Note
The compressor should never be allowed to run for longer than 6 minutes.
Page 251 of 294
249
If and when
Note
Due to the difficulty of accessing fog light bulbs, have them replaced at a
Technical Service or specialised workshop.
Remove the bulb holder
Fig. 173 Front fog light
– Remove connector ⇒
Fig. 173 A
from the bulb.
– Turn bulb holder ⇒
Fig. 173 B
to the left and pull.
– Remove the bulb by pressing on the bulb holder and turning it
anticlockwise at the same time.
– Installation involves all of the above steps in reverse sequence.
– Check that the bulb works properly. Changing rear bulbs
Applies to the model: IBIZA / IBIZA SC
Summary of LED tail lights
LEDS
● Brake lights
● Side lights
Bulbs
● Rear fog light
● Reversing light
● Turn signal
Safety FirstOperating instructionsPractical TipsTechnical Specifications
Page 252 of 294
250If and when
Applies to the model: IBIZA SC
Tail lights
Fig. 174 Left tail light
Fig. 175 Right tail light
Turn signals
Side and brake
Position
A
BC
Retro-fog light (left tail light)
Reverse light (right tail light)
Note
In countries driving on the right (left-driving), the D and E headlights are
placed the other way round (retro-fog light on driver side and reverse light
on passenger side).
Applies to the model: IBIZA / IBIZA SC
Access to tail lights
Fig. 176 Access to tail
lights
– Open the rear lid.
– Turn the bolt in the direction of the arrow, by hand or with a
screwdriver ⇒
Fig. 176.
– Remove the tail light, by pulling it outwards.
D
E
Page 253 of 294

251
If and when
Applies to the model: IBIZA / IBIZA SC
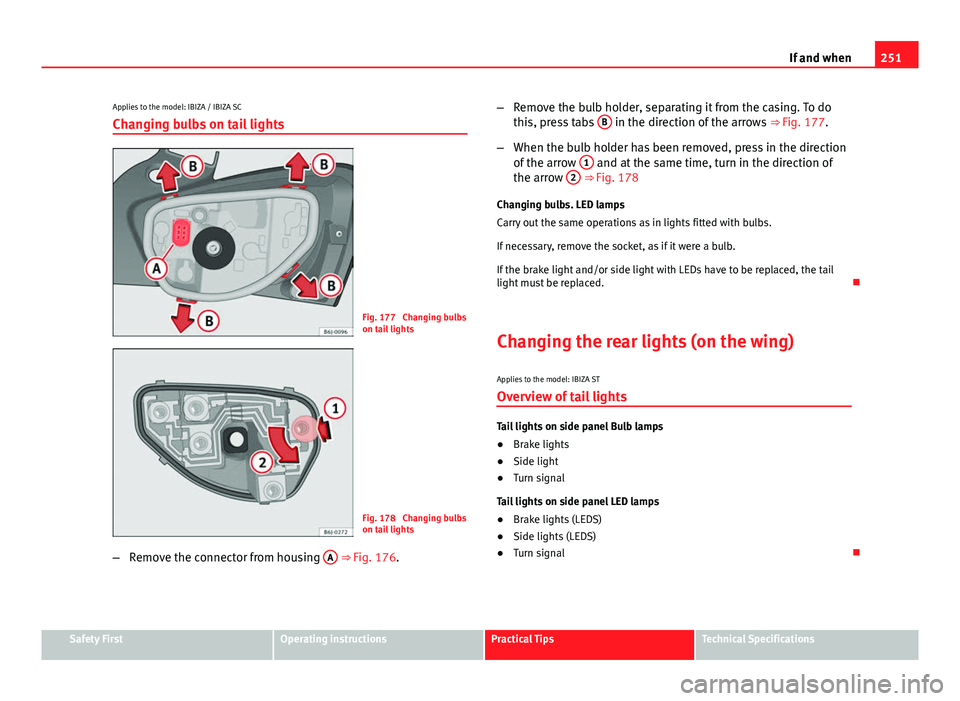
Changing bulbs on tail lights
Fig. 177 Changing bulbs
on tail lights
Fig. 178 Changing bulbs
on tail lights
– Remove the connector from housing A
⇒ Fig. 176.–
Remove the bulb holder, separating it from the casing. To do
this, press tabs B
in the direction of the arrows
⇒ Fig. 177.
– When the bulb holder has been removed, press in the direction
of the arrow 1
and at the same time, turn in the direction of
the arrow 2 ⇒ Fig. 178
Changing bulbs. LED lamps
Carry out the same operations as in lights fitted with bulbs.
If necessary, remove the socket, as if it were a bulb.
If the brake light and/or side light with LEDs have to be replaced, the tail
light must be replaced.
Changing the rear lights (on the wing) Applies to the model: IBIZA STOverview of tail lights
Tail lights on side panel Bulb lamps
● Brake lights
● Side light
● Turn signal
Tail lights on side panel LED lamps
● Brake lights (LEDS)
● Side lights (LEDS)
● Turn signal
Safety FirstOperating instructionsPractical TipsTechnical Specifications
Page 254 of 294
252If and when
Applies to the model: IBIZA STAccessing the side light bulbs
Fig. 179 Side lights
– Open the rear lid.
– Look for a lid with a grill behind the side lights.
– Remove the lid with a flat screwdriver, placing it in notch A
⇒ Fig. 179. Applies to the model: IBIZA ST
Changing bulbs
Fig. 180 Removing the
bulb holder
– Remove the bulb holder by pressing the clip B
⇒ Fig. 180 and
pulling outwards.
– Replace the faulty bulb, rotating it to the left and outwards.
– To refit follow the steps in reverse order, taking special care
when fitting the bulb holder.
Changing bulbs. LED lamps
Carry out the same operations as in lights fitted with bulbs.
If necessary, remove the socket, as if it were a bulb.
If the brake light and/or side light with LEDs have to be replaced, the tail
light must be replaced.
Page 256 of 294

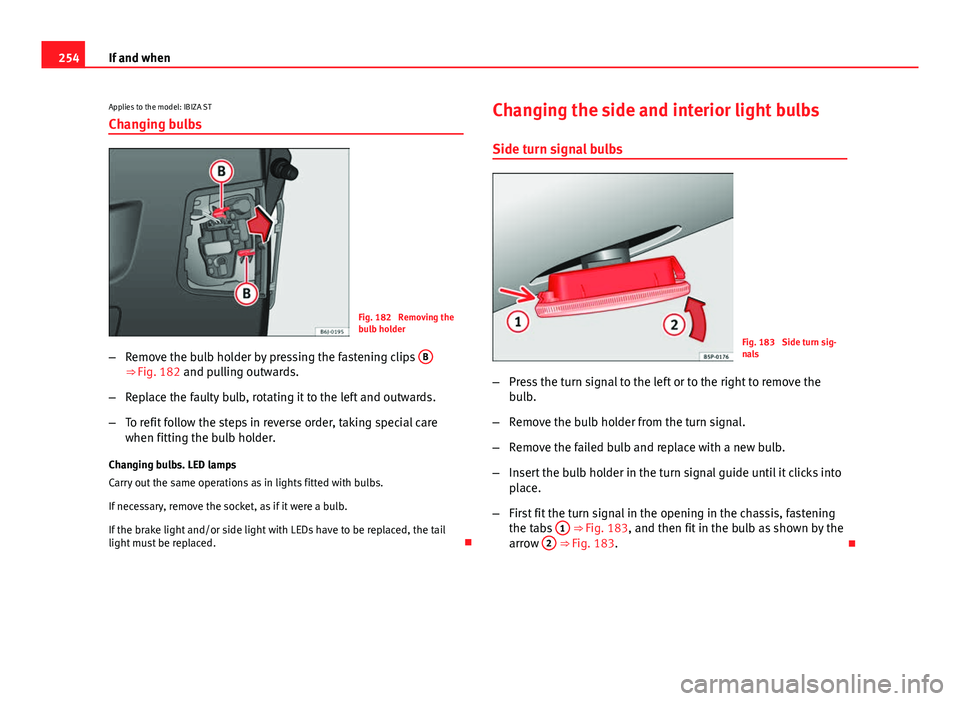
254If and when
Applies to the model: IBIZA STChanging bulbs
Fig. 182 Removing the
bulb holder
– Remove the bulb holder by pressing the fastening clips B
⇒ Fig. 182 and pulling outwards.
– Replace the faulty bulb, rotating it to the left and outwards.
– To refit follow the steps in reverse order, taking special care
when fitting the bulb holder.
Changing bulbs. LED lamps
Carry out the same operations as in lights fitted with bulbs.
If necessary, remove the socket, as if it were a bulb.
If the brake light and/or side light with LEDs have to be replaced, the tail
light must be replaced. Changing the side and interior light bulbs
Side turn signal bulbs
Fig. 183 Side turn sig-
nals
– Press the turn signal to the left or to the right to remove the
bulb.
– Remove the bulb holder from the turn signal.
– Remove the failed bulb and replace with a new bulb.
– Insert the bulb holder in the turn signal guide until it clicks into
place.
– First fit the turn signal in the opening in the chassis, fastening
the tabs 1
⇒ Fig. 183, and then fit in the bulb as shown by the
arrow 2 ⇒ Fig. 183.