2013 Seat Ibiza 5D ECO mode
[x] Cancel search: ECO modePage 139 of 294

137
Air conditioning
Air conditioning Heating
Controls
Fig. 102 Heating con-
trols on the dash panel
– Using the controls A
and C and with the switch B ⇒ Fig. 102
you can adjust the temperature, the air distribution and the
blower speed.
– Press the button D
to switch air recirculation mode on or off.
When the function is activated, a warning light on the button is
turned on.
Temperature
Switch A
adjusts temperature. The required temperature inside the vehicle
cannot be lower than the ambient temperature. Maximum heat output, which is needed to defrost the windows quickly, is only available when the
engine has reached its operating temperature.
Blower
The air flow can be set at four speeds with switch
B
. The blower should al-
ways be set at the lowest speed when driving slowly.
Air distribution
Control C
for setting the flow of air in the required direction.
– Air distribution towards the windscreen in order to demist. For safety
reasons, it is not recommended to switch air recirculation on.
– Air distribution to the upper body
– Air distribution to footwell
– Air distribution to the windscreen and the footwell.
Air recirculation mode
Air recirculation mode D
on (a lamp lights up in red) prevents strong
odours from the outside air from entering in the vehicle, for example when
passing through a tunnel or in a traffic jam ⇒
.
When the outside temperature is low, air recirculation mode improves heat-
ing performance by heating air from the interior instead of cold air from the
outside.
Safety FirstOperating instructionsPractical TipsTechnical Specifications
Page 144 of 294

142Air conditioning
● The outside temperature is lower than approximately +3 °C (+37 °F).
● The air conditioning system compressor has been temporarily switched
off because of an increased engine coolant temperature.
● The air conditioner fuse is faulty.
● Another fault in the vehicle. Have the air conditioning checked by a spe-
cialised workshop.
Air recirculation
Air recirculation mode prevents fumes or unpleasant smells
from coming from the outside.
When air recirculation mode is switched on (button ⇒ Fig. 106
with
warning lamp) strong odours in the outside air do not enter the vehicle inte-
rior, for example when passing through a tunnel or in a traffic jam.
When the outside temperature is low, air recirculation mode improves heat-
ing performance by heating air from the interior instead of cold air from the
outside.
When the outside temperature is high, air recirculation mode improves cool-
ing performance by cooling air from the interior instead of warm air from
outside.
For safety reasons, the air recirculation should not be switched on when the
air distribution control is set to the windscreen setting .
WARNING
In air recirculation mode, no cold air from the outside enters the vehicle
interior. If the air conditioner is switched off, the windows can quickly
mist over. Therefore, never leave the air recirculation mode switched on
for a long time (risk of accident).
Note
● When engaging reverse gear, the air recirculation is connected automat-
ically to prevent the entrance of exhaust gases in the vehicle on travelling
backwards. The control lamp on the button
does not light up.
● If the temperature control is turned to the coldest setting (blue point)
and the switch AC
is activated, the “Air recirculation” function is automati-
cally activated in order to cool the vehicle rapidly using less energy; its
function control lamp will light.
● If the function is not deactivated by pressing the button, this will deacti-
vate after approx. 20 min.
Economic use of the air conditioning
When the air conditioning is switched on, the compressor consumes engine
power and has influence on fuel consumption. Consider the following
points in order to have the system operating in the minimum possible time.
● If the vehicle interior has overheated due to an excessive solar radiation,
it is best to open the windows or doors to allow the hot air to escape.
● While in motion, the air conditioning should not be switched on if the
windows or the sunroof* are open.
Page 146 of 294

144Air conditioning
Automatic mode
In automatic mode air temperature, air flow and distribution
are automatically regulated so that a specified temperature
is attained as quickly as possible, and then maintained.
Switching on automatic mode
– Press the AUTO
button. The indication
⇒ Fig. 107 3 is dis-
played.
– Press keys 10
and 11 ⇒ Fig. 107 to adjust the desired tempera-
ture inside the vehicle. We recommend +22 °C (+72 °F).
A comfortable interior climate is quickly reached when a temperature of
+22 °C (+72 °F) is set in automatic mode. Therefore, we recommend you not
to change this adjustment, except as necessary to suit individual preferen-
ces or particular circumstances. It is possible to select interior temperatures
from +18 °C (+64 °F) to +29 °C (+86 °F). If a lower or higher temperature is
selected, LO or HI are respectively displayed on the screen. These are ap-
proximate temperatures which may slightly vary depending on the outside
conditions.
Climatronic maintains a constant temperature. To do so, it automatically
regulates the supplied air temperature, the blower speed and the air distri-
bution. The system also considers the sunlight radiation, so there is no
need for manual readjustment. Therefore, automatic mode almost always
provides the best comfort for the vehicle occupants throughout the year.
Automatic mode is switched off whenever an adjustment is made using the
buttons for air distribution or blower. The temperature continues to self-reg-
ulate. Manual mode
In manual mode the air temperature, flow, and the desired
air distribution can be adjusted.
Switching on manual mode
– Press one of the buttons ⇒ Fig. 107 14
to 16 or press the blow-
er control 8 and 9 down. The indicator is switched off 3.
Temperature
It is possible to select interior temperatures from +18 °C (+64 °F) to +29 °C
(+86 °F). These are approximate temperatures which may slightly vary de-
pending on the outside conditions.
If you select temperatures below +18 °C (+64 °F), the indication LO will ap-
pear on the screen. In this setting the system runs at maximum cooling out-
put and the temperature is not regulated.
If a temperature above +29 °C (+86 °F) is selected, the screen will show HI.
In this setting the system runs at maximum heating output and the temper-
ature is not controlled.
Blower
The blower can be adjusted with buttons 8
and 9 ⇒ Fig. 107. If the blow-
er is off (level 1 is not shown on the screen) and button 9 is pressed after
1 second, the Climatronic switches off.
Air distribution
The air distribution is adjusted using the buttons
, and . It is also
possible to open and close some of the air outlets separately.
Switching the air conditioning on and off
Pressing the button AC
the air cooling system can be switched off in order
to save fuel. The temperature continues to self-regulate. The set tempera-
ture can then only be reached if it is higher than the outside temperature.
Page 147 of 294

145
Air conditioning
Air recirculation mode
Air recirculation mode prevents fumes or unpleasant smells
from coming from the outside. – Press the button
to switch air recirculation mode on or off.
This is ON if the symbol ⇒ Fig. 107 is displayed on the
screen.
Air recirculation mode prevents strong odours in the ambient air from enter-
ing the vehicle interior, for example when passing through a tunnel or in a
traffic jam.
When the outside temperature is low, air recirculation mode improves heat-
ing performance by heating air from the interior instead of cold air from the
outside.
When the outside temperature is high, air recirculation mode improves cool-
ing performance by cooling air from the interior instead of warm air from
outside.
For safety reasons, the air recirculation should not be switched on when the
air distribution control is set to the windscreen setting .
WARNING
In air recirculation mode, no cold air from the outside enters the vehicle
interior. If the air conditioner is switched off, the windows can quickly
mist over. Therefore, never leave the air recirculation mode switched on
for a long time (risk of accident).
Note
When engaging reverse gear, the air recirculation is connected automatical-
ly to prevent the entrance of exhaust gases in the vehicle on travelling back-
wards. In this case the symbol
for air recirculation is not displayed. General notes
Pollution filter
The pollution filter (a combined particulate filter and active carbon filter)
serves as a barrier against impurities in the outside air, including dust and
pollen.
For the air conditioner to work with maximum efficiency, the pollution filter
must be replaced at the specified intervals in the Maintenance Programme.
If the filter loses efficiency prematurely due to use in areas reaching very
high pollution levels, the pollen filter must be changed more frequently
than stated in the Service Schedule.
CAUTION
● If you suspect that the air conditioner is damaged, switch it off with but-
ton AC
to prevent further damage and have it checked by a specialised
workshop.
● Repairs to the air conditioner require specialist knowledge and special
tools. Therefore, we recommend you to take the vehicle to a specialised
workshop.
Note
● If the humidity and temperature outside the vehicle are high, condensa-
tion can drip off the evaporator in the cooling system and so forming a pud-
dle underneath the vehicle. This is completely normal and there is no need
to suspect a leak.
● Keep the air intake slots in front of the windscreen free of snow, ice and
leaves to ensure heating and cooling are not impaired, and to prevent the
windows from misting over.
● The air from the vents flows through the vehicle interior and is extracted
by slots designed for this purpose. Therefore, do not cover these slots with
items of clothing or other objects.
Safety FirstOperating instructionsPractical TipsTechnical Specifications
Page 158 of 294
156Driving
Manual gearbox
Driving with a manual gearbox
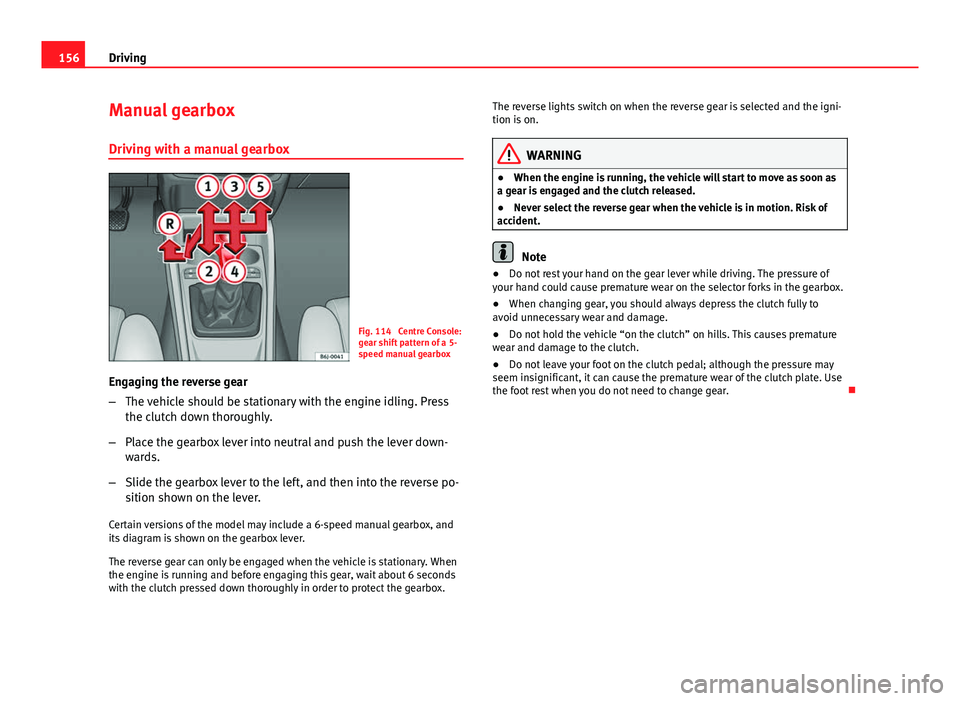
Fig. 114 Centre Console:
gear shift pattern of a 5-
speed manual gearbox
Engaging the reverse gear
– The vehicle should be stationary with the engine idling. Press
the clutch down thoroughly.
– Place the gearbox lever into neutral and push the lever down-
wards.
– Slide the gearbox lever to the left, and then into the reverse po-
sition shown on the lever.
Certain versions of the model may include a 6-speed manual gearbox, and
its diagram is shown on the gearbox lever.
The reverse gear can only be engaged when the vehicle is stationary. When
the engine is running and before engaging this gear, wait about 6 seconds
with the clutch pressed down thoroughly in order to protect the gearbox. The reverse lights switch on when the reverse gear is selected and the igni-
tion is on.
WARNING
● When the engine is running, the vehicle will start to move as soon as
a gear is engaged and the clutch released.
● Never select the reverse gear when the vehicle is in motion. Risk of
accident.
Note
● Do not rest your hand on the gear lever while driving. The pressure of
your hand could cause premature wear on the selector forks in the gearbox.
● When changing gear, you should always depress the clutch fully to
avoid unnecessary wear and damage.
● Do not hold the vehicle “on the clutch” on hills. This causes premature
wear and damage to the clutch.
● Do not leave your foot on the clutch pedal; although the pressure may
seem insignificant, it can cause the premature wear of the clutch plate. Use
the foot rest when you do not need to change gear.
Page 159 of 294

157
Driving
Automatic gearbox* Gearbox programmes
The automatic gearbox has got two gearbox programmes.
Fig. 115 Automatic gear-
box
Selecting the normal programme
– Put the selector lever into position D.
Selecting the sport programme
– Put the selector lever into position S.
If you select the normal programme, D, you will drive in the economy mode,
i.e. the programme is designed to reduce fuel consumption. The gearbox
changes up into a higher gear as soon as possible and down into a lower
gear as late as possible.
If you select the sport programme, S, you will drive in a sporty mode, i.e. a
programme in which shifts into high gears are postponed in order to use
the full power of the engine. Selector lever lock
The selector lever lock in position P or N prevents gears from
being engaged inadvertently, which would cause the vehicle
to move.
Fig. 116 Automatic gear-
box
Fig. 117 Automatic
gearbox: Instrument
panel display
Safety FirstOperating instructionsPractical TipsTechnical Specifications
Page 163 of 294

161
Driving
Changing gear in tiptronic mode
– Press the selector lever from position D to the right into the tip-
tronic selector gate.
– Lightly press the selector lever forward + to change up into high
gears.
– Lightly press the selector lever backwards - to change down into
low gears.
Changing gear with the steering wheel paddle levers*
– Press the right paddle lever +
towards the steering wheel to
change up ⇒ Fig. 120.
– Press the left paddle lever -
towards the steering wheel to
change down ⇒ Fig. 120.
Using the paddle levers on the steering wheel, you can access manual driv-
ing mode regardless of the pre-selected driving mode.
General information about driving in tiptronic mode
When accelerating, the automatic gearbox / DSG automatic gearbox goes
into a higher gear a little before the engine reaches its maximum permitted
revolutions.
If a lower gear is selected, the automatic gearbox / DSG automatic gearbox
will only change down when the engine cannot go over its maximum permit-
ted revolutions.
If tiptronic is selected whilst the vehicle is in motion and the automatic
gearbox / DSG automatic gearbox is in third gear and selector lever position
D, tiptronic mode will then also be in third gear. Changing gears in the normal or sport programme using the steering wheel
paddle levers
If the paddle levers
⇒ Fig. 120 are used in the normal or sport programme,
the system switches temporarily to tiptronic mode. To exit “tiptronic” mode
again, press the right paddle lever +
towards the steering wheel for approx-
imately one second. You will also leave tiptronic mode if the paddle levers
are not moved for a certain time.
Note
● The gear paddle levers on the steering wheel can be operated with the
selector lever in any position and with the vehicle in motion.
Selector lever positions
The selector lever positions and gears are shown on the in-
strument panel display.
Fig. 121 Automatic
gearbox: Instrument
panel display
Safety FirstOperating instructionsPractical TipsTechnical Specifications
Page 169 of 294

167
Driving
The front parking aid is an audible aid that warns against obstacles both
behind and in front of the vehicle ⇒ page 169.
Apart from the acoustic signals, when the vehicle is equipped with a porta-
ble navigator (PND), this visually displays information regarding front and/
or rear areas.
Rear parking aid
The parking aid system will use an audible warning to indi-
cate of the approach of any object towards the rear of the ve-
hicle. Description
The acoustic parking aid system will measure the distance between the rear
of the vehicle and any possible obstacle using four ultrasonic sensors loca-
ted on the rear bumper. The measuring range of the sensors starts approxi-
mately and depending on the nature of the obstacle at a distance of:
● side of the rear bumper: 0.6 m
● middle of the rear bumper: 1.6 m
Activation
The system is activated by engagement of the reverse gear. A brief audible
warning confirms the activation and correct function of the system.
Reverse gear
The distance warning will begin as soon as an obstacle is detected by the
system. The frequency of the bleeps emitted by the system will increase rap-
idly as the vehicle approaches the obstacle. After a distance lower than ap-
proximately 30 cm, a continuous signal sounds (stop signal). The driver
should not reverse any further. Models with a factory-fitted towing bracket: When the vehicle is less than
0.35 m away from the obstacle the warning tone will sound continuously.
The driver should then not reverse any further.
The warning tone volume decreases by 30% 3 seconds after it is triggered
if
the detected obstacle stays at a constant distance from the vehicle .
Provided that it is not in continuous mode, the tone on the parking aid sys-
tem stops when it detects a wall parallel to the vehicle.
Trailer towing
For vehicles factory-fitted with a towing bar, the parking aid system will not
be activated by the engagement of the reverse gear when pulling a trailer,
as the trailer's electric connector will be plugged into the vehicle.
Possible faults
If a continuous beep sounds for some seconds when the reverse gear is en-
gaged, this indicates that there is a fault in the parking aid system. If the
fault continues until the ignition is turned off, the audible warning of the
fault will not be emitted every time the system is reactivated (by engaging
the reverse gear). Thus, the system ready indication will not sound either.
Have the fault repaired by a Technical Service as soon as possible.
If there is no ready signal or no acoustic warning signal, then the parking
aid loudspeaker is faulty and may not warn of obstacles. To ensure that the
system works properly, the sensors must be kept clean and free of ice and
snow.
WARNING
● The sensors have blind spots in which obstacles may not be detected.
● Always look out for small children and animals because the system
will not always detect them. Always pay attention when reversing to
avoid accidents.
● The parking aid is not a replacement for driver awareness. The driver
must take full responsibility for parking and other manoeuvres.
Safety FirstOperating instructionsPractical TipsTechnical Specifications