2013 Seat Altea Freetrack fuel
[x] Cancel search: fuelPage 68 of 301

66Cockpit
If several priority 2 warning messages are detected at the same time, the
symbols are displayed one after the other for about 2 seconds at a time. Af-
ter a set time, the information text will disappear and the symbol will be
shown as a reminder at the side of the display.
Priority 2 warning messages will not be shown until all Priority 1 warning
messages have been dealt with!
Examples of priority 2 warning messages (yellow): 1)
● Fuel warning light with the information text PLEASE REFUEL.
● Windscreen washer fluid level symbol with the information message
ADD WINDSCREEN WASHER FLUID . Refill the windscreen washer tank
⇒ page 231.
1)
Depending on the version of the model.
Page 72 of 301

70Cockpit
TelephoneThis menu is only available in vehicles with radio
unit if the vehicle is fitted with the telephone func-
tion. In vehicles fitted with a radio navigation sys-
tem, this menu is available in the central unit (navi-
gator) ⇒ Booklet SEAT Media System.
Vehicle conditionThis menu displays current warning or information
texts: “Vehicle status menu”
This option flashes when one of these texts is dis-
played.
ConfigurationThis option allows the time, the speed warning when
using winter tyres, units, language, independent
heating, the Light and visibility menu and the Con-
venience menu to be reset.
a)
Only in vehicles fitted with a radio navigation system.
Note
For electronic and vehicle equipment one or more of these menus will be
displayed. Multifunction display menu (MFI)
The multifunction display (MFI) shows you information on
the journey and fuel consumption.
Fig. 48 Multifunction
display (MFI) instrument
panel display.
The multifunction display (MFI) has two automatic memories: 1 - Trip memo-
ry and 2 - Total memory . The selected memory is shown on the upper right
hand section of the display ⇒ Fig. 48 at all times.
Open the multifunction display menu Select the Multifunction display menu from the main menu
⇒ page 69
and press the OK
button on the windscreen wiper lever or the multi-
function lever*.
Selecting a memory To change from one memory to another, briefly press button A
⇒
Fig. 44
⇒ page 67 on the windscreen wiper lever or the OK button on
the multifunction lever ⇒ Fig. 45
⇒ page 67 while the ignition is switch-
ed on.
–
–
Page 73 of 301

71
Cockpit
Resetting a memory Select the memory where you wish to erase the values.
Hold down button A
on the windscreen wiper lever or the OK button
on the multifunction* steering wheel for at least two seconds.
The trip memory 1 collects the travel and consumption data from the mo-
ment the ignition is switched on until it is switched off. If the journey is con-
tinued within two hours of switching off the ignition, the new values will be
added to the existing trip recorder memory. The memory will automatically
be deleted if the journey is interrupted for more than two hours.
The total memory 2 collects the journey data for any number of individual
journeys (even if the ignition is switched off for longer than two hours) up to
a total of 19 hours and 59 minutes travel time or 1999 km (miles) distance
travelled. The memory will automatically be deleted if one of the named val-
ues is reached.
Memory indications
The following data can be viewed on the multifunction display using the
rocker switch B
⇒ Fig. 44 ⇒
page 67 on the windscreen wiper lever or by
pressing button or ⇒
Fig. 45 on the multifunction steering wheel*.
Personal selection of display
The driver can establish which displays are shown on the instrument panel
display as required:
● Select the submenu Multifunction Display Data from the Configuration
menu ⇒ page 72.
● The displays can be activated or deactivated individually by marking the
required option and pressing the OK
button on the windscreen wiper lever
or the multifunction steering wheel*.
Duration in h and min
The display shows the amount of time which has elapsed since the ignition
was switched on. –
– The maximum display value in both memories is 19 hours and 59 minutes.
The memory will automatically be deleted once this value has been
reached.
Current fuel consumption
in l/100 km or l/h
The display will show the current fuel consumption in litres/100 km whilst
the vehicle is in motion or in litres/hour when the vehicle is in a stationary
position with the engine running.
Using this display you can see how your driving style affects fuel consump-
tion.
Average consumption in l/100 km The average fuel consumption will be shown after a distance of approxi-
mately 100 metres has been travelled. Until then dashes will appear in the
display. The display will be updated every five seconds while the vehicle is
in motion. The amount of fuel used will not be shown.
Distance travelled in km (miles) The display shows the distance travelled since the ignition was switched on.
The maximum display value in both memories is 1999 km (miles). The
memory will automatically be deleted once this value has been reached.
Average speed in km/h (mph) The average speed will be shown after a distance of approximately 100 me-
tres has been travelled. Until then dashes will appear in the display. The
display will be updated every five seconds while the vehicle is in motion.
Speed warning at --- km/h (mph)
This function may help you to keep within the speed limits. Press the OK
button on the windscreen wiper lever
A or the multifunction steering
wheel* to select the current speed. The instrument panel display gives the
selected speed, for example, Speed warning 120 km/h. You have five sec-
onds to reset the speed between 30 km/h and 250 km/h using rocker
switch B
or buttons or on the multifunction steering wheel*. Press
the OK button or wait five seconds until the speed is stored and the
Safety FirstOperating InstructionsPractical TipsTechnical Specifications
Page 75 of 301

73
Cockpit
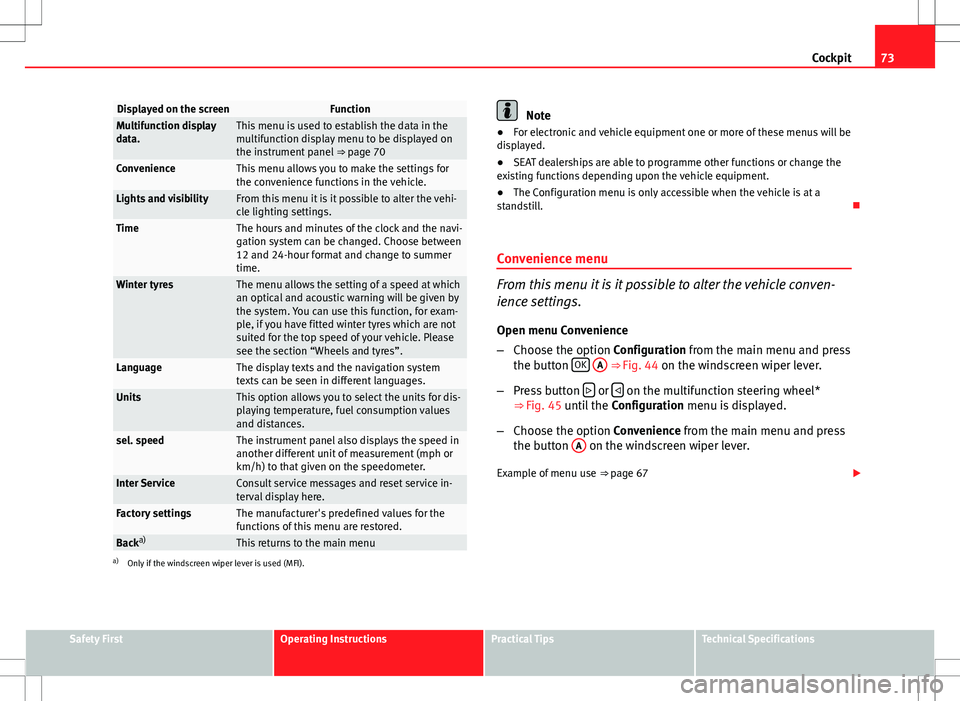
Displayed on the screenFunctionMultifunction display
data.This menu is used to establish the data in the
multifunction display menu to be displayed on
the instrument panel ⇒ page 70
ConvenienceThis menu allows you to make the settings for
the convenience functions in the vehicle.
Lights and visibilityFrom this menu it is it possible to alter the vehi-
cle lighting settings.
TimeThe hours and minutes of the clock and the navi-
gation system can be changed. Choose between
12 and 24-hour format and change to summer
time.
Winter tyresThe menu allows the setting of a speed at which
an optical and acoustic warning will be given by
the system. You can use this function, for exam-
ple, if you have fitted winter tyres which are not
suited for the top speed of your vehicle. Please
see the section “Wheels and tyres”.
LanguageThe display texts and the navigation system
texts can be seen in different languages.
UnitsThis option allows you to select the units for dis-
playing temperature, fuel consumption values
and distances.
sel. speedThe instrument panel also displays the speed in
another different unit of measurement (mph or
km/h) to that given on the speedometer.
Inter ServiceConsult service messages and reset service in-
terval display here.
Factory settingsThe manufacturer's predefined values for the
functions of this menu are restored.
Backa)This returns to the main menua)
Only if the windscreen wiper lever is used (MFI).
Note
● For electronic and vehicle equipment one or more of these menus will be
displayed.
● SEAT dealerships are able to programme other functions or change the
existing functions depending upon the vehicle equipment.
● The Configuration menu is only accessible when the vehicle is at a
standstill.
Convenience menu
From this menu it is it possible to alter the vehicle conven-
ience settings.
Open menu Convenience
– Choose the option Configuration from the main menu and press
the button OK
A ⇒ Fig. 44 on the windscreen wiper lever.
– Press button
or on the multifunction steering wheel*
⇒ Fig. 45 until the Configuration menu is displayed.
– Choose the option Convenience from the main menu and press
the button A
on the windscreen wiper lever.
Example of menu use ⇒ page 67
Safety FirstOperating InstructionsPractical TipsTechnical Specifications
Page 79 of 301

77
Cockpit
ItemSymbolMeaning of control and warning lampsFurther infor-
mation
1Fuel level / reserve⇒ page 79
2Coolant level / coolant temperature⇒ page 80
3Rear fog light switched on⇒ page 80
4 Turn signals in operation⇒ page 80
5Engine fault (petrol engine)⇒ page 81
Glow plug system (diesel engines)⇒ page 81
6Main beam switched on⇒ page 81
7Soot accumulation in the diesel engine
particulate filter⇒ page 81
8ABS system fault⇒ page 82
9Windscreen washer fluid level⇒ page 82
10Alternator fault⇒ page 83
11Fasten seat belts!⇒ page 19
12Brake pad worn⇒ page 83
13Tyre pressure⇒ page 83
14Airbag or belt tensioner system fault or
airbag disabled⇒ page 29
⇒ page 32
ItemSymbolMeaning of control and warning lampsFurther infor-
mation
15Bulb defective⇒ page 84
16Brake fluid required or
brake system fault⇒ page 84
17
Red:
Engine oil pressure
⇒ page 85Yellow:
If flashing: engine oil sensor faulty
If it remains lit: insufficient engine oil
18Handbrake on⇒ page 180
19Cruise speed activated (Cruise control)⇒ page 85
20Door open indicator⇒ page 86
21If it stays lit: ASR switched off⇒ page 87
⇒ page 87
⇒ page 167
22Electromechanical steering⇒ page 86
23Fault in the emission control system⇒ page 86
24If flashing: the Electronic Stability Con-
trol (ESC) is working or the ASR is work-
ing
If the following remain lit: ESC or ASR
faulty⇒ page 87
⇒ page 87
⇒ page 167
25Selector lever lock (automatic gearbox)⇒ page 88
Safety FirstOperating InstructionsPractical TipsTechnical Specifications
Page 80 of 301

78Cockpit
WARNING
● Failure to observe control lamps and warning messages can result in
serious personal injury or damage to your vehicle.
● The risk of an accident increases if your vehicle breaks down. Use a
warning triangle to draw the attention of other road users in order to pre-
vent danger to third parties.
● The engine compartment is a dangerous area! Before you open the
bonnet to work on the engine or in the engine compartment, you must
switch the engine off and allow it to cool to reduce the risk of scalding or
other injuries. Read and observe the relevant warnings ⇒ page 222.
Note
● The appropriate control lamp for a fault will light up in vehicles without
warning or information messages in the display.
● In vehicles with warning or information texts on the screen, the appro-
priate control lamp for a fault will light up and a warning or information
message will also appear on the screen.
Warning symbols
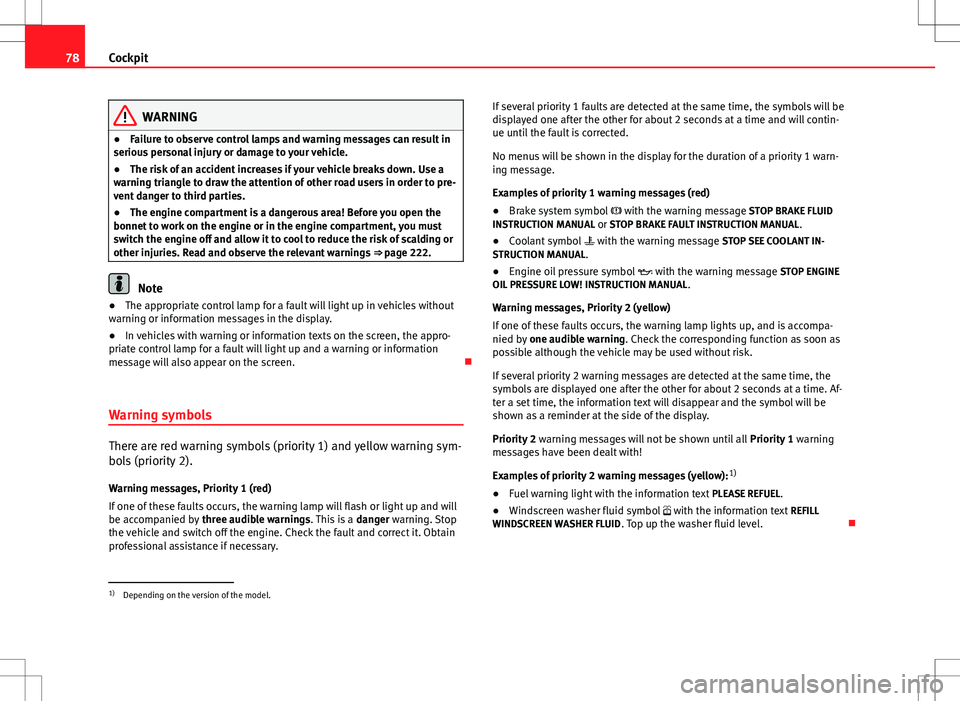
There are red warning symbols (priority 1) and yellow warning sym-
bols (priority 2).
Warning messages, Priority 1 (red)
If one of these faults occurs, the warning lamp will flash or light up and will
be accompanied by three audible warnings. This is a danger warning. Stop
the vehicle and switch off the engine. Check the fault and correct it. Obtain
professional assistance if necessary. If several priority 1 faults are detected at the same time, the symbols will be
displayed one after the other for about 2 seconds at a time and will contin-
ue until the fault is corrected.
No menus will be shown in the display for the duration of a priority 1 warn-
ing message.
Examples of priority 1 warning messages (red)
●
Brake system symbol with the warning message STOP BRAKE FLUID
INSTRUCTION MANUAL or STOP BRAKE FAULT INSTRUCTION MANUAL .
● Coolant symbol with the warning message STOP SEE COOLANT IN-
STRUCTION MANUAL.
● Engine oil pressure symbol with the warning message STOP ENGINE
OIL PRESSURE LOW! INSTRUCTION MANUAL .
Warning messages, Priority 2 (yellow)
If one of these faults occurs, the warning lamp lights up, and is accompa-
nied by one audible warning. Check the corresponding function as soon as
possible although the vehicle may be used without risk.
If several priority 2 warning messages are detected at the same time, the
symbols are displayed one after the other for about 2 seconds at a time. Af-
ter a set time, the information text will disappear and the symbol will be
shown as a reminder at the side of the display.
Priority 2 warning messages will not be shown until all Priority 1 warning
messages have been dealt with!
Examples of priority 2 warning messages (yellow): 1)
● Fuel warning light with the information text PLEASE REFUEL.
● Windscreen washer fluid symbol with the information text REFILL
WINDSCREEN WASHER FLUID . Top up the washer fluid level.
1)
Depending on the version of the model.
Page 81 of 301

79
Cockpit
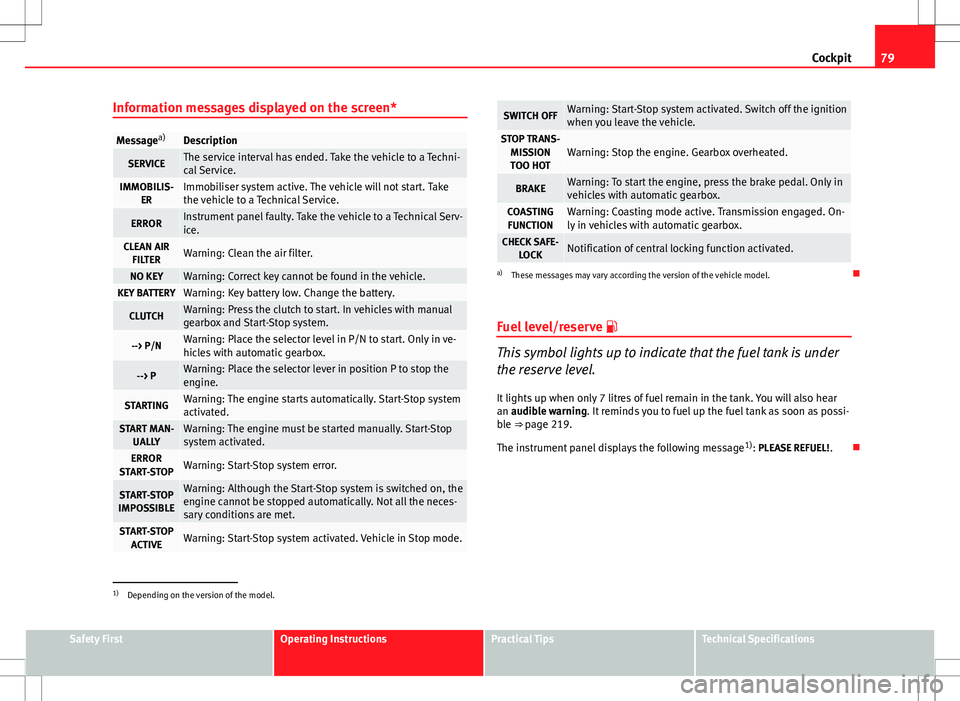
Information messages displayed on the screen*
Message a)Description
SERVICEThe service interval has ended. Take the vehicle to a Techni-
cal Service.
IMMOBILIS-
ERImmobiliser system active. The vehicle will not start. Take
the vehicle to a Technical Service.
ERRORInstrument panel faulty. Take the vehicle to a Technical Serv-
ice.
CLEAN AIRFILTERWarning: Clean the air filter.
NO KEYWarning: Correct key cannot be found in the vehicle.KEY BATTERYWarning: Key battery low. Change the battery.
CLUTCHWarning: Press the clutch to start. In vehicles with manual
gearbox and Start-Stop system.
--> P/NWarning: Place the selector level in P/N to start. Only in ve-
hicles with automatic gearbox.
--> PWarning: Place the selector lever in position P to stop the
engine.
STARTINGWarning: The engine starts automatically. Start-Stop system
activated.
START MAN- UALLYWarning: The engine must be started manually. Start-Stop
system activated.
ERROR
START-STOPWarning: Start-Stop system error.
START-STOP
IMPOSSIBLEWarning: Although the Start-Stop system is switched on, the
engine cannot be stopped automatically. Not all the neces-
sary conditions are met.
START-STOP ACTIVEWarning: Start-Stop system activated. Vehicle in Stop mode.
SWITCH OFFWarning: Start-Stop system activated. Switch off the ignition
when you leave the vehicle.
STOP TRANS-MISSIONTOO HOTWarning: Stop the engine. Gearbox overheated.
BRAKEWarning: To start the engine, press the brake pedal. Only in
vehicles with automatic gearbox.
COASTING FUNCTIONWarning: Coasting mode active. Transmission engaged. On-
ly in vehicles with automatic gearbox.
CHECK SAFE- LOCKNotification of central locking function activated.
a)These messages may vary according the version of the vehicle model.
Fuel level/reserve
This symbol lights up to indicate that the fuel tank is under
the reserve level.
It lights up when only 7 litres of fuel remain in the tank. You will also hear
an audible warning. It reminds you to fuel up the fuel tank as soon as possi-
ble ⇒ page 219.
The instrument panel displays the following message 1)
: PLEASE REFUEL! .
1)
Depending on the version of the model.
Safety FirstOperating InstructionsPractical TipsTechnical Specifications
Page 86 of 301

84Cockpit
Tyre pressure adjustment
Following the modification to tyre pressure or after changing one or more
wheels, the button ⇒ Fig. 50 must be kept pressed while the ignition is on
until an audible warning is heard and the warning lamp goes out.
If the wheels are under excessive load (for example, driving with a trailer or
heavy load), the tyre pressure must be increased to the recommended value
for a full load (see the sticker on the inside of the fuel flap). If the tyre moni-
tor system button is pressed down, the new tyre pressures are confirmed.
The tyre pressure control lamp lights up
If the tyre pressure of one or more wheels is much lower than the value set
by the driver, the tyre control warning lamp lights up ⇒
.
The tyre pressure control lamp flashes
If the tyre pressure control lamp flashes, this indicates a fault. Go to the
nearest specialised workshop.
WARNING
● When the tyre pressure control lamp lights up, reduce speed immedi-
ately and avoid any sudden manoeuvre or braking. Stop when possible,
and check the tyre pressure and status.
● The driver is responsible for maintaining correct tyre pressures. For
this reason, tyre pressure must be regularly checked.
● Under certain circumstances (for example, when driving in a sports-
like manner, in winter conditions or on a dirt track) the tyre control lamp
may light up or function incorrectly.
Note
If the battery is disconnected, the yellow warning lamp lights up after
turning the ignition on. This should turn off after a brief journey. Bulb defect
The warning lamp lights up when a bulb in the vehicle's ex-
terior lighting is defective.
The warning lamp lights up when a bulb in the vehicle's exterior lighting
(e.g. left-hand main beam) is defective.
The instrument panel displays the following message 1)
: LEFT FULL BEAM
FAULTY.
Brake system*
This warning lamp lights up if the brake fluid level is too low
or if there is a fault in the system.
This warning lamp lights up if
● the brake fluid level is too low ⇒ page 234.
The instrument panel displays the following message 1)
: STOP BRAKE FLUID
INSTRUCTION MANUAL.
● there is a fault in the brake system.
The instrument panel displays the following message 1)
: BRAKE SYSTEM
FAULT INSTRUCTION MANUAL.
This warning lamp can light up together with the ABS system warning lamp.
1)
Depending on the version of the model.