2013 Ram 1500 change time
[x] Cancel search: change timePage 5 of 196

WELCOME FROM CHRYSLER GROUP LLC
Congratulations on selecting your new Chrysler Group LLC vehicle. Be assured that it
represents precision workmanship, distinctive styling, and high quality - all essen-
tials that are traditional to our vehicles.
Your new Chrysler Group LLC vehicle has characteristics to enhance the driver's
control under some driving conditions. These are to assist the driver and are never a
substitute for attentive driving. They can never take the driver's place. Always drive
carefully.
Your new vehicle has many features for the comfort and convenience of you and your
passengers. Some of these should not be used when driving because they take your
eyes from the road or your attention from driving. Never text while driving or take your
eyes more than momentarily off the road.
This guide illustrates and describes the operation of features and equipment that are
either standard or optional on this vehicle. This guide may also include a description of
features and equipment that are no longer available or were not ordered on this vehicle.
Please disregard any features and equipment described in this guide that are not
available on this vehicle. Chrysler Group LLC reserves the right to make changes in
design and specifications and/or make additions to or improvements to its products
without imposing any obligation upon itself to install them on products previously
manufactured.
This User Guide has been prepared to help you quickly become acquainted with the
important features of your vehicle. It contains most things you will need to operate
and maintain the vehicle, including emergency information.
The DVD includes a computer application containing detailed owner's information
which can be viewed on a personal computer or MAC computer. The multimedia DVD
also includes videos which can be played on any standard DVD player (including the
Uconnect
®Touch-Screen Radios). Additional DVD operational information is located
on the back of the DVD sleeve.
For complete owner information, refer to your Owner's Manual on the DVD in the owner’s
kit provided at the time of new vehicle purchase. For your convenience, the information
contained on the DVD may also be printed and saved for future reference.
Chrysler Group LLC is committed to protecting our environment and natural re-
sources. By converting from paper to electronic delivery for the majority of the user
information for your vehicle, together we greatly reduce the demand for tree-based
products and lessen the stress on our environment.
INTRODUCTION/WELCOME
3
Page 28 of 196

TURN SIGNALS/WIPER/WASHER/HIGH BEAMS LEVER
Turn Signals/Lane Change Assist
• Tap the lever up or down once and the turn signal (right or left) will flash threetimes and automatically turn off.
Wipers
Intermittent, Low And High Operation
• Rotate the end of the lever to the first detent position for one of five intermittent settings, the second detent for low wiper operation and the third detent for high
wiper operation.
Washer Operation
• Push the end of the lever inward to the second detent and hold for as long as spray is desired.
Mist Feature
• When a single wipe to clear off road mist or spray from a passing vehicle is needed, push the washer knob, located on the end of the multifunction lever, inward to the
first detent and release. The wipers will cycle one time and automatically shut off.
High Beams
• Push the lever away from you to activate the high beams.
• A high beam symbol will illuminate in the cluster to indicate the high beams are on.
NOTE:
For safe driving, turn off the high beams when oncoming traffic is present to prevent
headlight glare and as a courtesy to other motorists.
OPERATING YOUR VEHICLE
26
Page 34 of 196

AIR SUSPENSION SYSTEM
• The air suspension system provides full time load leveling capability along withthe benefit of being able to adjust vehicle height by the push of a button.
• Automatic height changes will occur based on vehicle speed and the current vehicle height. The indicator lamps and EVIC messages will operate the same for
automatic changes and user requested changes.
Description
• Normal Ride Height (NRH) - This is the
standard position of the suspension
and is meant for normal driving.
• Off-Road 1 (OR1) (Raises the vehicle
approximately 1 in (26 mm) - This posi-
tion should be the primary position for
all off-road driving until Off Road 2
(OR2) is needed. A smoother and more
comfortable ride will result. To enter
OR1, press the “Up” button once from
the NRH position while the vehicle speed is below 35 mph (56 km/h). When in the
OR1 position, if the vehicle speed remains between 40 mph (64 km/h) and
50 mph (80 km/h) for greater than 20 seconds or if the vehicle speed exceeds
50 mph (80 km/h), the vehicle will be automatically lowered to NRH. Off-Road 1
may not be available due to vehicle payload, an EVIC message will be displayed
when this occurs. Refer to “Electronic Vehicle Information Center (EVIC)” in
“Understanding Your Instrument Panel” for further information.
• Off-Road 2 (OR2) (Raises the vehicle approximately 2 in (51 mm) -
This position is
intended for off-roading use only where maximum ground clearance is required.
To enter OR2, press the “Up” button twice from the NRH position or once from the
OR1 position while vehicle speed is below 20 mph (32 km/h). While in OR2, if the
vehicle speed exceeds 25 mph (40 km/h) the vehicle height will be automatically
lowered to OR1. Off-Road 2 may not be available due to vehicle payload, an EVIC
message will be displayed when this occurs. Refer to “Electronic Vehicle Information
Center (EVIC)” in “Understanding Your Instrument Panel” for further information.
• Aero Mode (Lowers the vehicle approximately .6 in (15 mm) – 1500 Models Only - This
position provides improved aerodynamics by lowering the vehicle. The vehicle will
automatically enter Aero Mode when the vehicle speed remains between 62 mph
(100 km/h) and 66 mph (106 km/h) for greater than 20 seconds or if the vehicle
speed exceeds 66 mph (106 km/h). The vehicle will return to NRH from Aero Mode
if the vehicle speed remains between 30 mph (48 km/h) and 35 mph (56 km/h) for
greater than 20 seconds or if the vehicle speed falls below 30 mph (48 km/h).
OPERATING YOUR VEHICLE
32
Page 39 of 196

Air Conditioning (A/C)
• If the air conditioning button is pressed while in AUTO mode, the system will exitAUTO mode and stay in A/C. The mode and blower will be set at the closest mode
and blower position that the system was operating in AUTO.
SYNC Temperature Soft-Key
• Touch the SYNC soft-key on the Uconnect
®Access radio to control the driver and
passenger temperatures simultaneously. Touch the SYNC soft-key a second time to
control the temperatures individually.
Air Recirculation
• Use recirculation for maximum A/C operation.
• For window defogging, turn the recirculation button off.
• If the Recirculation button is pushed while in the AUTO mode, the indicator light may flash three times to indicate the cabin air is being controlled automatically.
Heated Mirrors
• The mirrors are heated to melt frost or ice. This feature is activated whenever you turn on the defroster.
PARKSENSE® REAR PARK ASSIST
• If an object is detected behind the rear bumper while the vehicle is in REVERSE,a warning will display in the instrument cluster and a tone, that changes speed
depending on the distance of the object from the bumper, will sound.
Service The ParkSense® Rear Park Assist System
• When the ParkSense
®Rear Park Assist System is malfunctioning, the instrument
cluster will actuate a single chime, once per ignition cycle, and it will display the
“CLEAN PARK ASSIST SENSORS” or the “SERVICE PARK ASSIST SYSTEM”
message.
• If “CLEAN PARK ASSIST SENSORS” appears in the Electronic Vehicle Informa- tion Center (EVIC) and the rear fascia/bumper is clean and clear of snow, ice, mud,
dirt or other obstruction, see your authorized dealer.
• If “SERVICE PARK ASSIST SYSTEM” appears in the EVIC, see your authorized dealer.
Enable/Disable ParkSense®
• ParkSense
®can be enabled and disabled with a switch located in the switch bank
of the instrument panel or through the Customer-Programmable Features section
of the EVIC. When the switch is pressed to disable the system, the instrument
cluster will display the “PARK ASSIST SYSTEM OFF” message for approximately
five seconds.
OPERATING YOUR VEHICLE
37
Page 68 of 196

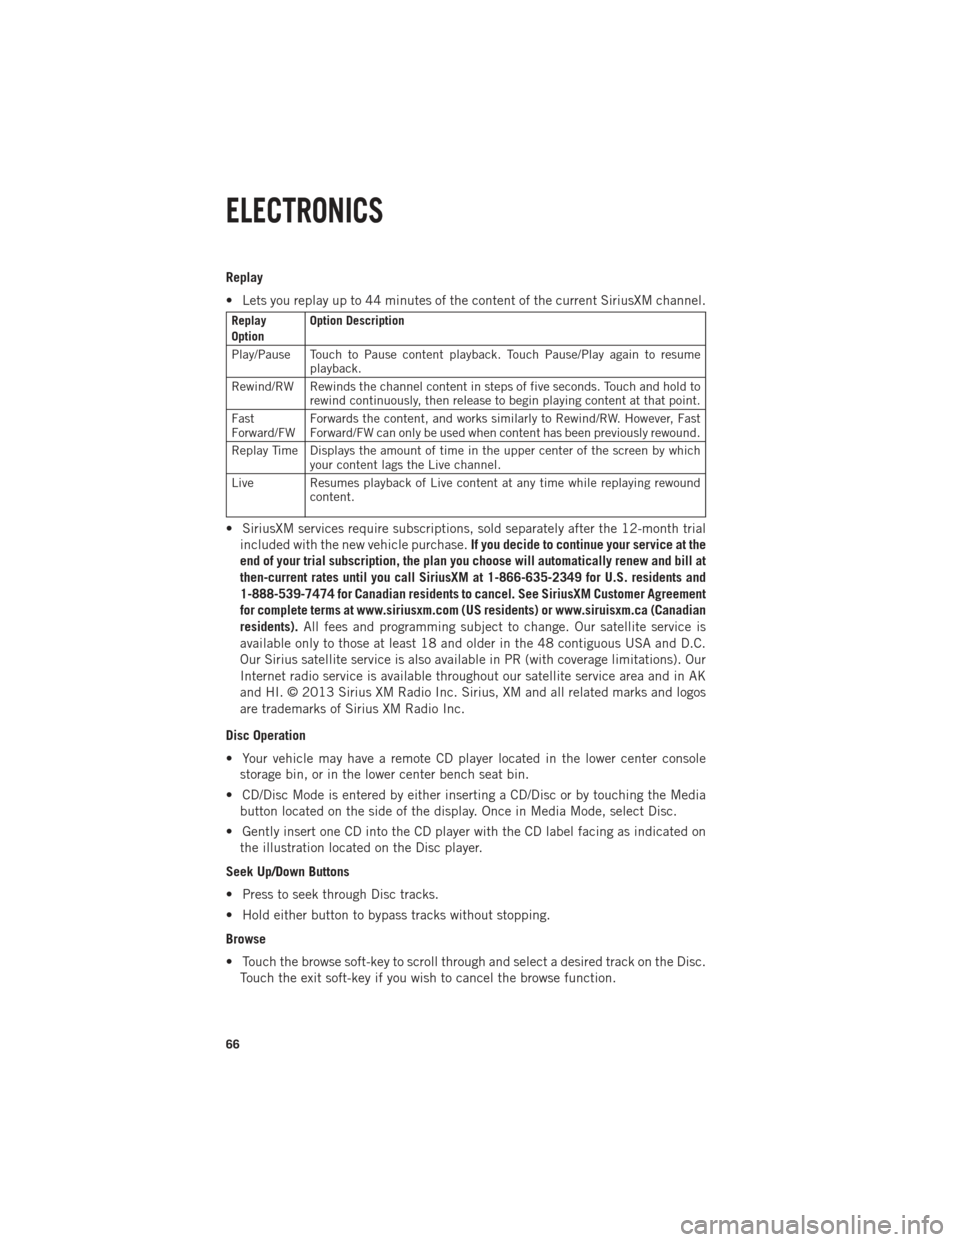
Replay
• Lets you replay up to 44 minutes of the content of the current SiriusXM channel.
Replay
OptionOption Description
Play/Pause Touch to Pause content playback. Touch Pause/Play again to resume playback.
Rewind/RW Rewinds the channel content in steps of five seconds. Touch and hold to rewind continuously, then release to begin playing content at that point.
Fast
Forward/FW Forwards the content, and works similarly to Rewind/RW. However, Fast
Forward/FW can only be used when content has been previously rewound.
Replay Time Displays the amount of time in the upper center of the screen by which your content lags the Live channel.
Live Resumes playback of Live content at any time while replaying rewound content.
• SiriusXM services require subscriptions, sold separately after the 12-month trial
included with the new vehicle purchase. If you decide to continue your service at the
end of your trial subscription, the plan you choose will automatically renew and bill at
then-current rates until you call SiriusXM at 1-866-635-2349 for U.S. residents and
1-888-539-7474 for Canadian residents to cancel. See SiriusXM Customer Agreement
for complete terms at www.siriusxm.com (US residents) or www.siruisxm.ca (Canadian
residents). All fees and programming subject to change. Our satellite service is
available only to those at least 18 and older in the 48 contiguous USA and D.C.
Our Sirius satellite service is also available in PR (with coverage limitations). Our
Internet radio service is available throughout our satellite service area and in AK
and HI. © 2013 Sirius XM Radio Inc. Sirius, XM and all related marks and logos
are trademarks of Sirius XM Radio Inc.
Disc Operation
• Your vehicle may have a remote CD player located in the lower center console storage bin, or in the lower center bench seat bin.
• CD/Disc Mode is entered by either inserting a CD/Disc or by touching the Media button located on the side of the display. Once in Media Mode, select Disc.
• Gently insert one CD into the CD player with the CD label facing as indicated on the illustration located on the Disc player.
Seek Up/Down Buttons
• Press to seek through Disc tracks.
• Hold either button to bypass tracks without stopping.
Browse
• Touch the browse soft-key to scroll through and select a desired track on the Disc. Touch the exit soft-key if you wish to cancel the browse function.
ELECTRONICS
66
Page 70 of 196

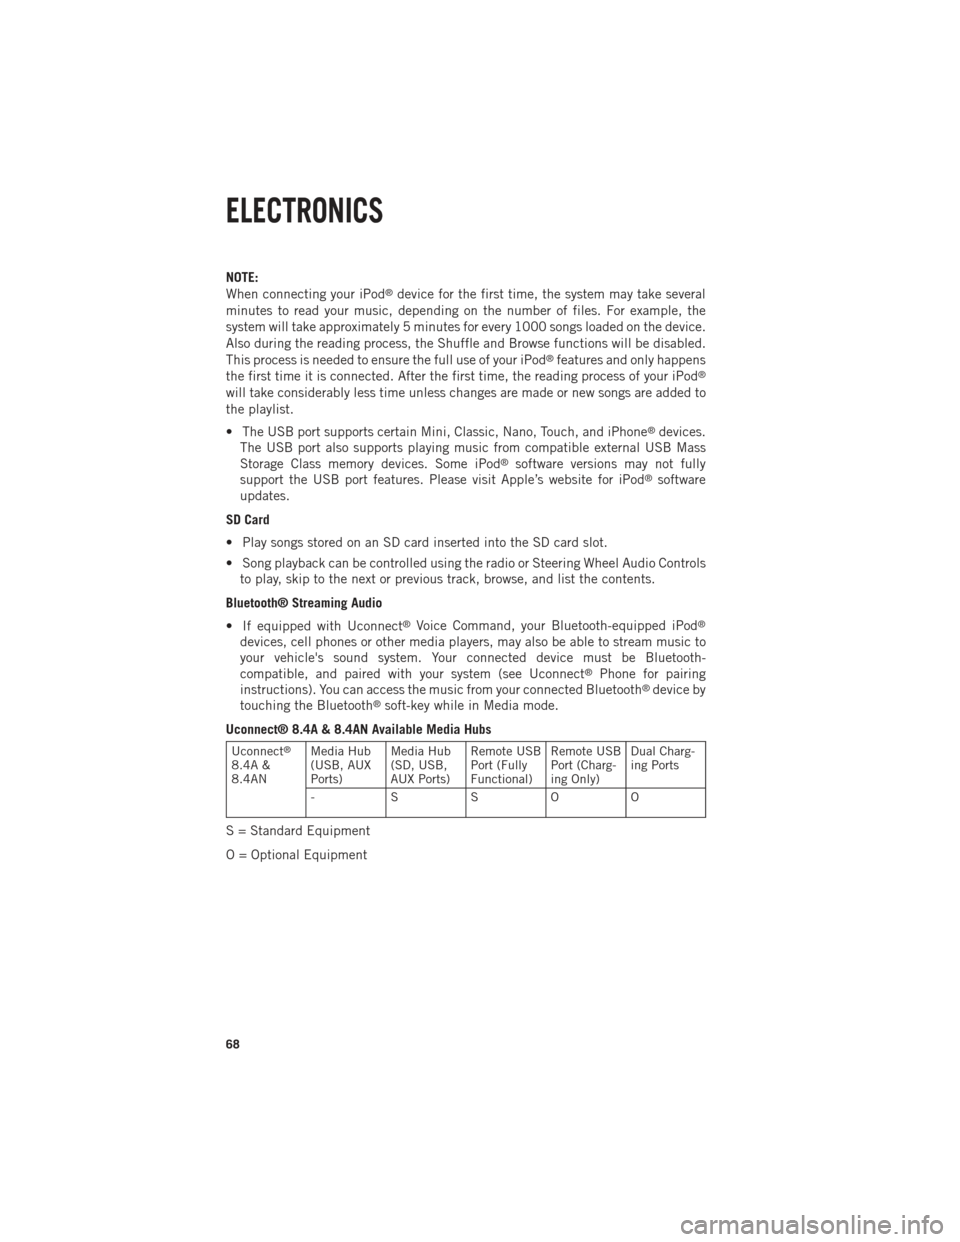
NOTE:
When connecting your iPod®device for the first time, the system may take several
minutes to read your music, depending on the number of files. For example, the
system will take approximately 5 minutes for every 1000 songs loaded on the device.
Also during the reading process, the Shuffle and Browse functions will be disabled.
This process is needed to ensure the full use of your iPod
®features and only happens
the first time it is connected. After the first time, the reading process of your iPod®
will take considerably less time unless changes are made or new songs are added to
the playlist.
• The USB port supports certain Mini, Classic, Nano, Touch, and iPhone
®devices.
The USB port also supports playing music from compatible external USB Mass
Storage Class memory devices. Some iPod
®software versions may not fully
support the USB port features. Please visit Apple’s website for iPod®software
updates.
SD Card
• Play songs stored on an SD card inserted into the SD card slot.
• Song playback can be controlled using the radio or Steering Wheel Audio Controls to play, skip to the next or previous track, browse, and list the contents.
Bluetooth® Streaming Audio
• If equipped with Uconnect
®Voice Command, your Bluetooth-equipped iPod®
devices, cell phones or other media players, may also be able to stream music to
your vehicle's sound system. Your connected device must be Bluetooth-
compatible, and paired with your system (see Uconnect
®Phone for pairing
instructions). You can access the music from your connected Bluetooth®device by
touching the Bluetooth®soft-key while in Media mode.
Uconnect® 8.4A & 8.4AN Available Media Hubs
Uconnect®
8.4A &
8.4AN Media Hub
(USB, AUX
Ports) Media Hub
(SD, USB,
AUX Ports)Remote USB
Port (Fully
Functional)Remote USB
Port (Charg-
ing Only)Dual Charg-
ing Ports
- SSOO
S = Standard Equipment
O = Optional Equipment
ELECTRONICS
68
Page 87 of 196

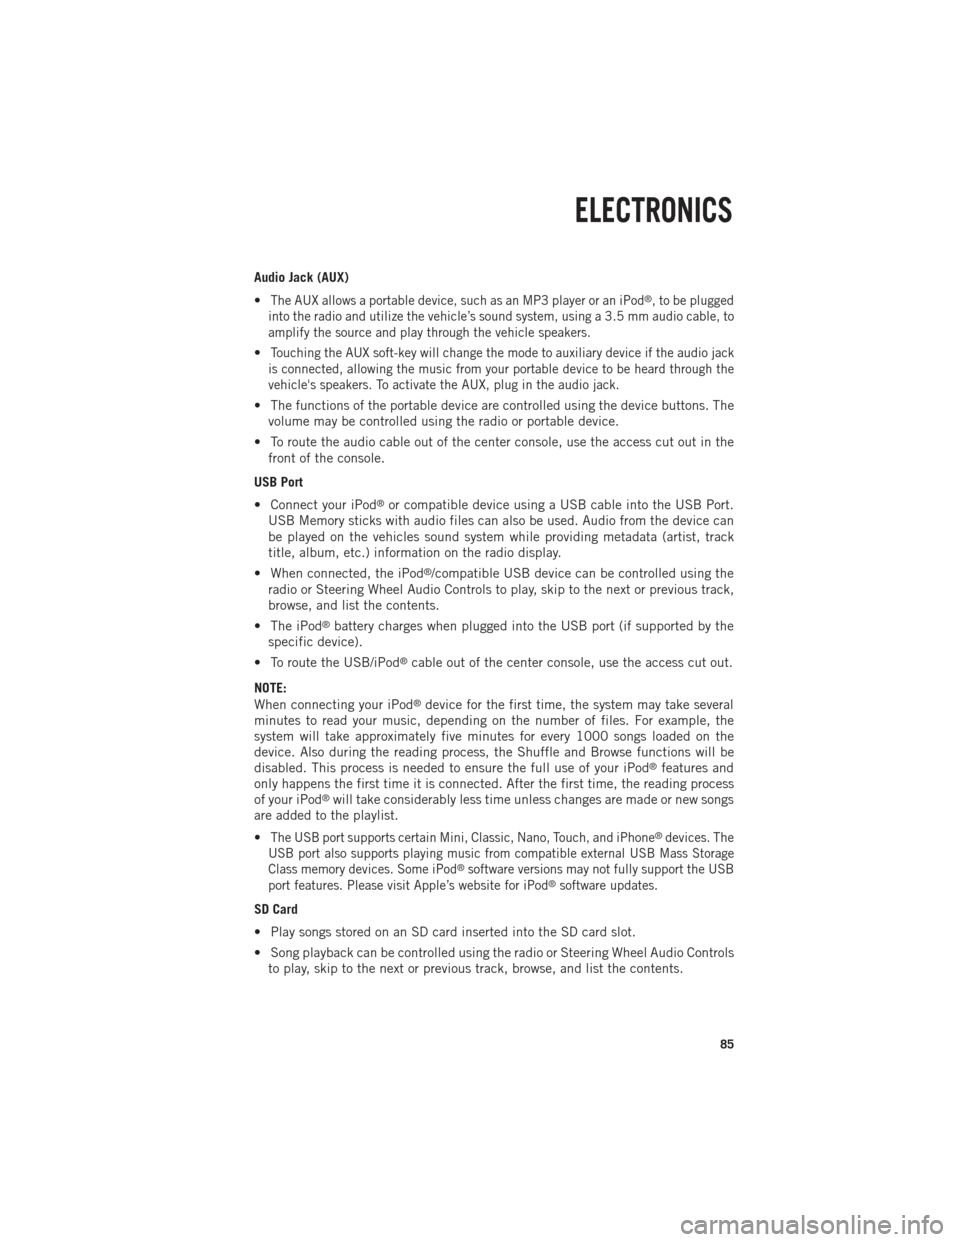
Audio Jack (AUX)
•
The AUX allows a portable device, such as an MP3 player or an iPod®, to be plugged
into the radio and utilize the vehicle’s sound system, using a 3.5 mm audio cable, to
amplify the source and play through the vehicle speakers.
•Touching the AUX soft-key will change the mode to auxiliary device if the audio jack
is connected, allowing the music from your portable device to be heard through the
vehicle's speakers. To activate the AUX, plug in the audio jack.
• The functions of the portable device are controlled using the device buttons. The volume may be controlled using the radio or portable device.
• To route the audio cable out of the center console, use the access cut out in the front of the console.
USB Port
• Connect your iPod
®or compatible device using a USB cable into the USB Port.
USB Memory sticks with audio files can also be used. Audio from the device can
be played on the vehicles sound system while providing metadata (artist, track
title, album, etc.) information on the radio display.
• When connected, the iPod
®/compatible USB device can be controlled using the
radio or Steering Wheel Audio Controls to play, skip to the next or previous track,
browse, and list the contents.
• The iPod
®battery charges when plugged into the USB port (if supported by the
specific device).
• To route the USB/iPod
®cable out of the center console, use the access cut out.
NOTE:
When connecting your iPod
®device for the first time, the system may take several
minutes to read your music, depending on the number of files. For example, the
system will take approximately five minutes for every 1000 songs loaded on the
device. Also during the reading process, the Shuffle and Browse functions will be
disabled. This process is needed to ensure the full use of your iPod
®features and
only happens the first time it is connected. After the first time, the reading process
of your iPod
®will take considerably less time unless changes are made or new songs
are added to the playlist.
•
The USB port supports certain Mini, Classic, Nano, Touch, and iPhone®devices. The
USB port also supports playing music from compatible external USB Mass Storage
Class memory devices. Some iPod
®software versions may not fully support the USB
port features. Please visit Apple’s website for iPod®software updates.
SD Card
• Play songs stored on an SD card inserted into the SD card slot.
• Song playback can be controlled using the radio or Steering Wheel Audio Controls to play, skip to the next or previous track, browse, and list the contents.
ELECTRONICS
85
Page 99 of 196

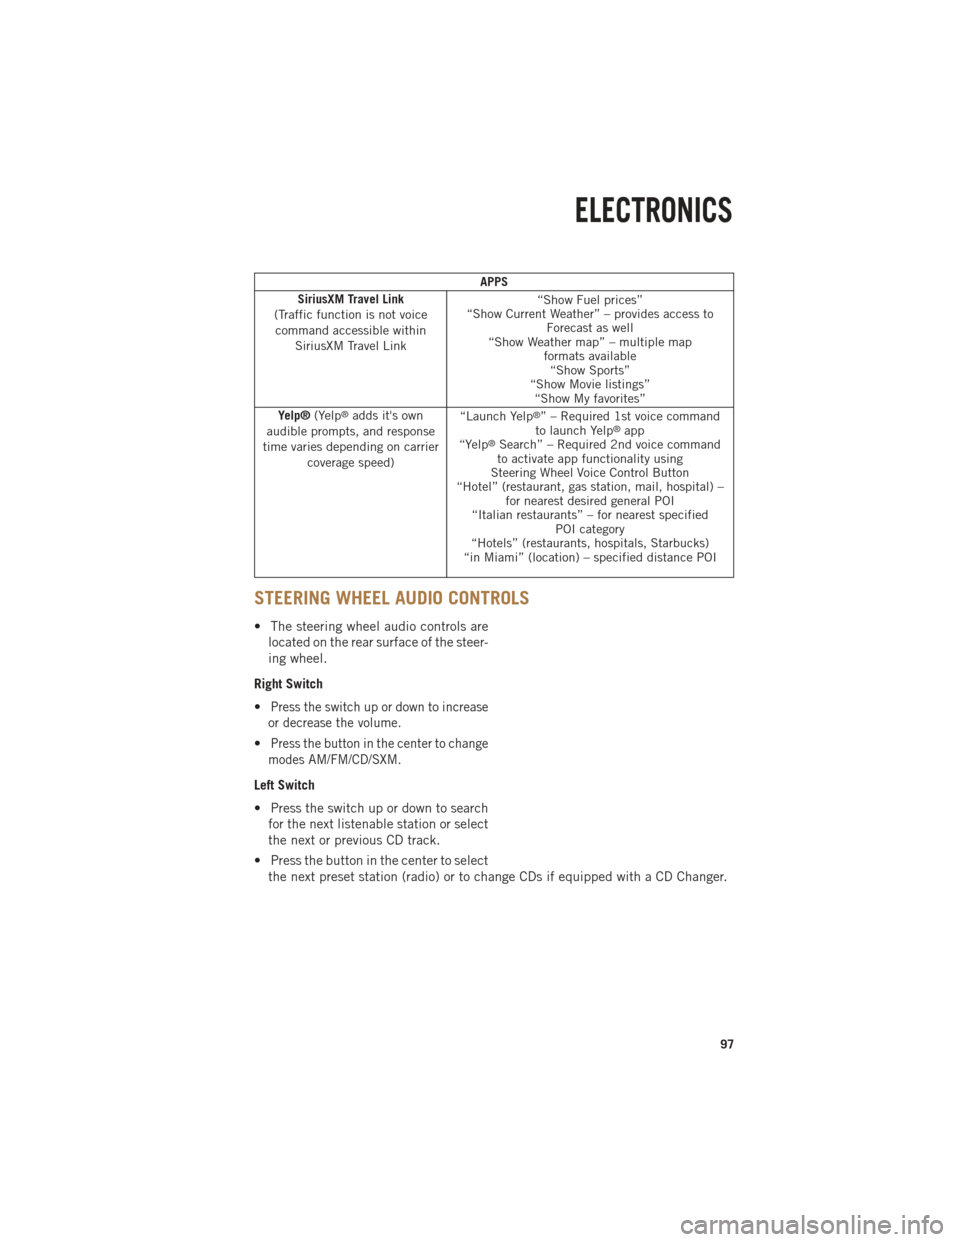
APPS
SiriusXM Travel Link
(Traffic function is not voice command accessible within SiriusXM Travel Link “Show Fuel prices”
“Show Current Weather” – provides access to Forecast as well
“Show Weather map” – multiple map formats available“Show Sports”
“Show Movie listings” “Show My favorites”
Yelp® (Yelp
®adds it's own
audible prompts, and response
time varies depending on carrier coverage speed) “Launch Yelp®” – Required 1st voice command
to launch Yelp®app
“Yelp®Search” – Required 2nd voice command
to activate app functionality using
Steering Wheel Voice Control Button
“Hotel” (restaurant, gas station, mail, hospital) – for nearest desired general POI
“Italian restaurants” – for nearest specified POI category
“Hotels” (restaurants, hospitals, Starbucks)
“in Miami” (location) – specified distance POI
STEERING WHEEL AUDIO CONTROLS
• The steering wheel audio controls are
located on the rear surface of the steer-
ing wheel.
Right Switch
•
Press the switch up or down to increase
or decrease the volume.
•Press the button in the center to change
modes AM/FM/CD/SXM.
Left Switch
• Press the switch up or down to search for the next listenable station or select
the next or previous CD track.
• Press the button in the center to select the next preset station (radio) or to change CDs if equipped with a CD Changer.
ELECTRONICS
97