2013 Peugeot Partner warning lamps
[x] Cancel search: warning lampsPage 83 of 236
81
Driving safely
SAFETY
4
DRIVING SAFELY
HORN
Press the centre of the steering wheel.
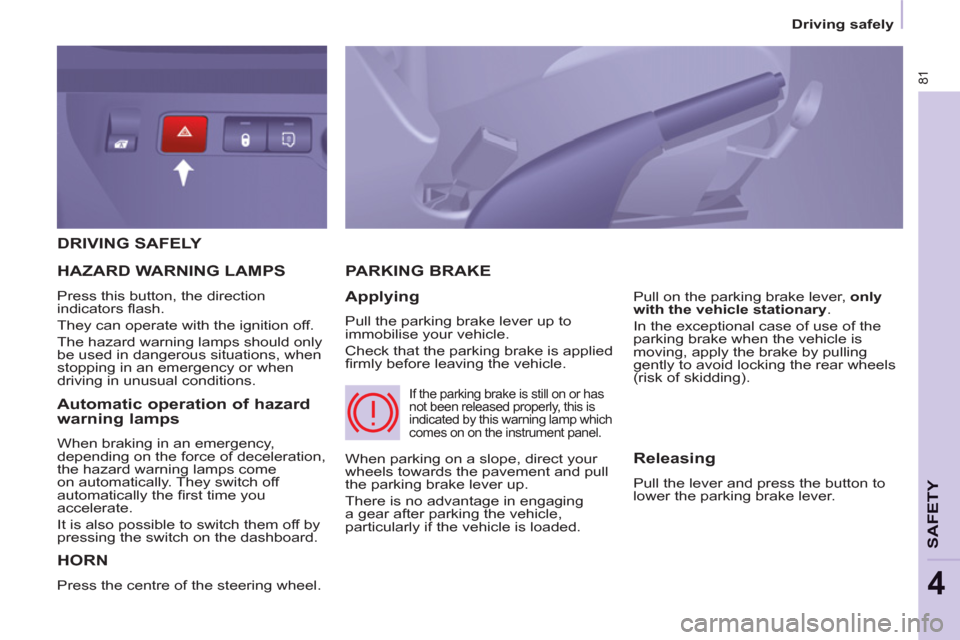
PARKING BRAKE
Applying
Pull the parking brake lever up to
immobilise your vehicle.
Check that the parking brake is applied
fi rmly before leaving the vehicle.
Pull on the parking brake lever, only
with the vehicle stationary
.
In the exceptional case of use of the
parking brake when the vehicle is
moving, apply the brake by pulling
gently to avoid locking the rear wheels
(risk of skidding).
HAZARD WARNING LAMPS
Press this button, the direction
indicators fl ash.
They can operate with the ignition off.
The hazard warning lamps should only
be used in dangerous situations, when
stopping in an emergency or when
driving in unusual conditions.
When parking on a slope, direct your
wheels towards the pavement and pull
the parking brake lever up.
There is no advantage in engaging
a gear after parking the vehicle,
particularly if the vehicle is loaded.
If the parking brake is still on or has
not been released properly, this is
indicated by this warning lamp which
comes on on the instrument panel.
Automatic operation of hazard
warning lamps
When braking in an emergency,
depending on the force of deceleration,
the hazard warning lamps come
on automatically. They switch off
automatically the fi rst time you
accelerate.
It is also possible to switch them off by
pressing the switch on the dashboard.
Releasing
Pull the lever and press the button to
lower the parking brake lever.
Page 86 of 236

ABS
ABS
84
Driving safely
(ABS - EBFD)
The ABS and EBFD (electronic brake
force distribution) systems improve the
stability and manoeuvrability of your
vehicle on braking, in particular on
poor or slippery surfaces.
The ABS prevents locking of the
wheels, the EBFD provides control of
the braking pressure wheel by wheel. If this warning lamp comes
on, accompanied by an
audible signal and a message
in the screen, it indicates a
malfunction of the ABS which
could result in a loss of control of the
vehicle on braking.
If this warning lamp comes
on, together with the brake
and STOP warning lamps,
accompanied by an audible
signal and a message in the
screen, it indicates a malfunction of
the electronic brake force distribution
which could result in a loss of control of
the vehicle on braking.
EMERGENCY BRAKING
ASSISTANCE SYSTEM
(EBA)
In an emergency, this system enables
the optimum braking pressure to be
reached more quickly, press the pedal
fi rmly without releasing it.
It is triggered by the speed at which the
brake pedal is activated.
This alters the resistance of the brake
pedal under your foot.
To prolong the operation of the
emergency braking assistance system:
keep your foot on the brake pedal.
Good practice
The anti-lock braking system comes
into operation automatically when
there is a risk of wheel lock. It does not
reduce the braking distance.
On very slippery surfaces (ice, oil,
etc...) the ABS may increase the
braking distance. When braking in
an emergency, do not hesitate to
press the brake pedal fi rmly, without
releasing the pressure, even on a
slippery surface, you will then be able
to continue to manoeuvre the vehicle
to avoid an obstacle.
Normal operation of the ABS may be
felt by slight vibration of the brake
pedal.
When changing wheels (tyres
and rims), ensure that these are
recommended by PEUGEOT.
Stop as soon as it is safe to do so.
In both cases, contact a PEUGEOT
dealer or a qualifi ed workshop.
Page 96 of 236

Airbags
94
Front airbags
The front airbags are fi tted in the
centre of the steering wheel for the
driver and in the dashboard for the
front passenger(s).
Deployment
They are deployed simultaneously,
unless the passenger's front airbag
has been deactivated, in the event of
a serious front impact applied to all or
part of the front impact zone A
in the
longitudinal centreline of the vehicle
on a horizontal plane directed from the
front towards the rear of the vehicle.
The front airbag infl ates between the
front occupant of the vehicle and the
dashboard to cushion their forward
movement.
Deactivation
Only the passenger's front airbag can
be deactivated:
- With the ignition switched off
,
insert the key into the passenger's
airbag deactivation switch
- turn it to the "OFF"
position,
- then remove the key keeping the
switch in the new position.
The airbag warning lamp
in the instrument panel
remains on while the airbag is
deactivated. If the two airbag warning lamps
are on continuously, do not install
a rear-facing child seat. Contact
a PEUGEOT or a qualifi ed
workshop.
Front airbag fault
To ensure the safety of your child,
it is essential to deactivate the
passenger airbag when you install
a rear-facing child seat on the front
passenger seat. Otherwise, the child
would risk being killed or seriously
injured if the airbag were to infl ate.
Reactivation
In the "OFF"
position, the passenger airbag
will not be deployed in the event of an impact.
As soon as the child seat is removed,
turn the airbag switch to the "ON"
position to reactivate the airbag
and thus ensure the safety of your
passenger in the event of an impact.
If this warning lamp comes
on, accompanied by an
audible signal and a message
in the screen, consult a
PEUGEOT dealer or a
qualifi ed workshop to have
the system checked.
Page 111 of 236

Levels
109
CHECK
S
6
LEVELS
Oil change
This must be carried out at the
intervals specifi ed and the viscosity
grade of the oil selected must fulfi l the
requirements in the manufacturer's
servicing schedule. Ask for advice from
a PEUGEOT dealer.
Remove the dipstick before fi lling.
Check the level after fi lling (never
exceed the max mark).
Refi t the oil fi ller cap before closing the
bonnet.
Changing the brake fluid
The brake fl uid must be changed at
the intervals stated, according to the
manufacturer's servicing schedule.
Use fl uids recommended by the
manufacturer, which fulfi l DOT4
standards.
The level must be between the MIN
and MAX marks on the reservoir.
If fl uid has to be added frequently,
this indicates a fault which must be
checked by a PEUGEOT dealer or
a qualifi ed workshop as soon as
possible.
Warning lamps
If you have to remove / refi t the
engine style cover, handle it with
care to avoid damaging the fi xing
clips.
Oil level
It is recommended that the oil level be
checked every 3 000 miles (5 000 km)
and topped up if necessary between oil
changes.
Check the level with the vehicle level,
engine cold, using the dipstick.
Dipstick
There are two marks on
the dipstick:
A
= maximum
If you fi ll past this mark,
consult a PEUGEOT
dealer or a qualifi ed
workshop.
B
= minimum
Never allow the level to
fall below this mark.
To maintain the reliability
of engines and emission
control systems, the use
of additives in engine oil
is prohibited.
Viscosity selection
In all cases, the oil selected must meet
the manufacturer's requirements.
These regular maintenance
operations will keep your vehicle
in good working order. Ask for
advice from a PEUGEOT dealer or
refer to the servicing and warranty
booklet in the handbook pack.
Checks using the warning
lamps in the instrument panel is
described in chapter 2, refer to the
"Instruments and controls" section.
Page 118 of 236

11 6
Battery
ECONOMY MODE
After the engine has stopped, with
the key in the ignition position, certain
functions (windscreen wiper, electric
windows, courtesy lamps, audio
equipment, etc.) can only be used for a
cumulative duration of thirty minutes, to
prevent discharging of the battery.
Once the thirty minutes are over, the
active functions are put on standby
and the battery warning lamp fl ashes
accompanied by a message in the
screen.
To resume the use of these functions
immediately, start the engine and let it
run for a few minutes.
The time available will then be double
the time for which the engine was left
running. However, this time will always
be between fi ve and thirty minutes.
A fl at battery will prevent the engine
from starting.
Page 132 of 236

Changing a fuse
130
PASSENGER COMPARTMENT FUSES
Fuses
F
Amperes
A
Allocation
1 - Spare
2 20 Heated seats
3 - Spare
4 15 Folding mirrors relay
5 15 Refrigeration equipment socket relay
TOWING / TOWBAR /
COACHBUILDERS / PLATFORM
CAB FUSES
The designations communicated are
an indication only as this additional
box relates to other information which
depends on the converter-coachbuilder
for which the handbook cannot be
used as a technical support.
Fuses
F
Amperes
A
Allocation
1 15 Spare
2 15 Ignition, generator operating relay
3 15 Trailer 12V supply
4 15 Permanent supply for the modifi ers
5 40 Hazard warning lamps
Page 228 of 236

142
Instruments and controls
ESC 85
Parking sensors 82-83
Electric mirrors 78
Headlamp beam height adjustment 50
Stop & Start 43-45
Starter, ignition 46
Wipers controls 51-52
Automatic wiping 51
Windscreen / headlamp wash 52, 110
Trip computer Section 9
Cruise control 53-55
Speed limiter 56-58
Lighting controls 48-50
Automatic illumination of
headlamps 49-50
Foglamps 49
LED daytime runing lamps 49
INSTRUMENTS AND CONTROLS
Dashboard, passenger
compartment fuses 128-130
Opening the bonnet 106
Parking brake,
handbrake 81
Instrument panels,
screens,
dials 27-28
Warning lamps,
indicator lamps 29-34
Indicators, gauge 35, 37-38
Setting the time in the instrument panel 28
Lighting dimmer 38
Gear shift indicator 39-40
Audio equipment steering
mounted controls Section 9
Steering wheel adjustment 42
Horn 81
Gearbox 39
Page 229 of 236

143
Instruments and controls
10
Rear view mirror 79
Toll cards, car park tickets 79
On-board technology Section 9
- Peugeot Connect Navigation (RT6)
- Peugeot Connect Sound
Controls
- central locking 26
- load space locking 26
- electric windows 80
- hazard warning lamps 81
Emergency or
assistance call Section 9
Electronic
gearbox 40-42
Heating, ventilation
- heating 59
- air conditioning 60
Digital air conditioning 61-62
Demisting/defrosting 63-64
"Grip control" 86-87
Courtesy lamps 72, 125
Cab fi ttings 70-71
- glove box,
- overhead storage,
- console,
- sun visor,
- bottle holder,
- bag holder,
- storage compartments under
seats,
- storage compartment.
Screens, display 27, Section 9
Setting the time
in the screen Section 9
Passenger's airbag
deactivation 93