Page 131 of 184

Child safety
12
9
SAFETY
5
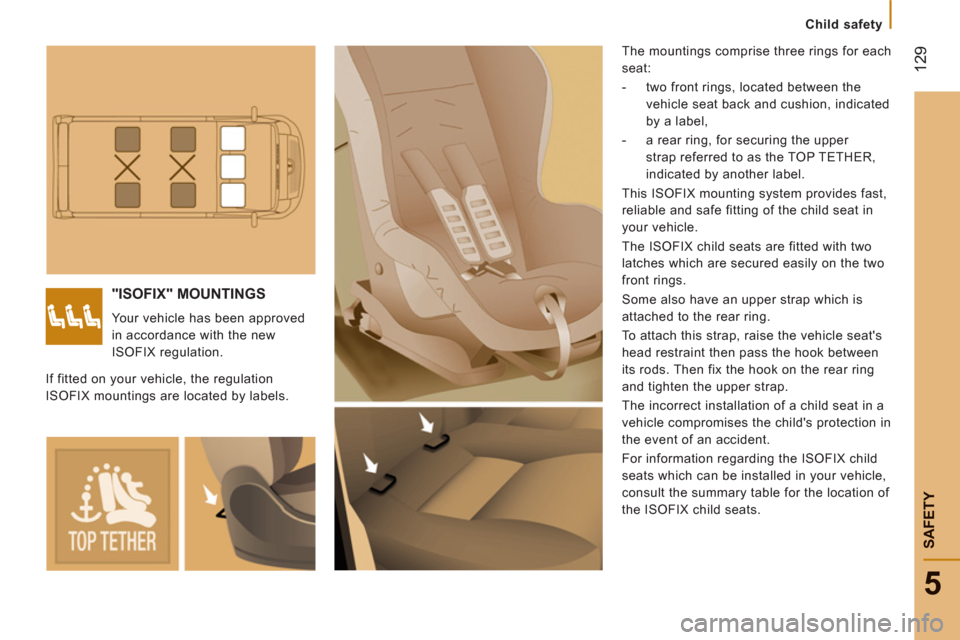
"ISOFIX" MOUNTINGS
Your vehicle has been approved
in accordance with the new
ISOFIX regulation. The mountings comprise three rings for each
seat:
- two front rings, located between the
vehicle seat back and cushion, indicated
by a label,
- a rear ring, for securing the upper
strap referred to as the TOP TETHER,
indicated by another label.
This ISOFIX mounting system provides fast,
reliable and safe fitting of the child seat in
your vehicle.
The ISOFIX child seats are fitted with two
latches which are secured easily on the two
front rings.
Some also have an upper strap which is
attached to the rear ring.
To attach this strap, raise the vehicle seat's
head restraint then pass the hook between
its rods. Then fix the hook on the rear ring
and tighten the upper strap.
The incorrect installation of a child seat in a
vehicle compromises the child's protection in
the event of an accident.
For information regarding the ISOFIX child
seats which can be installed in your vehicle,
consult the summary table for the location of
the ISOFIX child seats. If fitted on your vehicle, the regulation
ISOFIX mountings are located by labels.
Page 133 of 184

Child safety
131
SAFETY
5
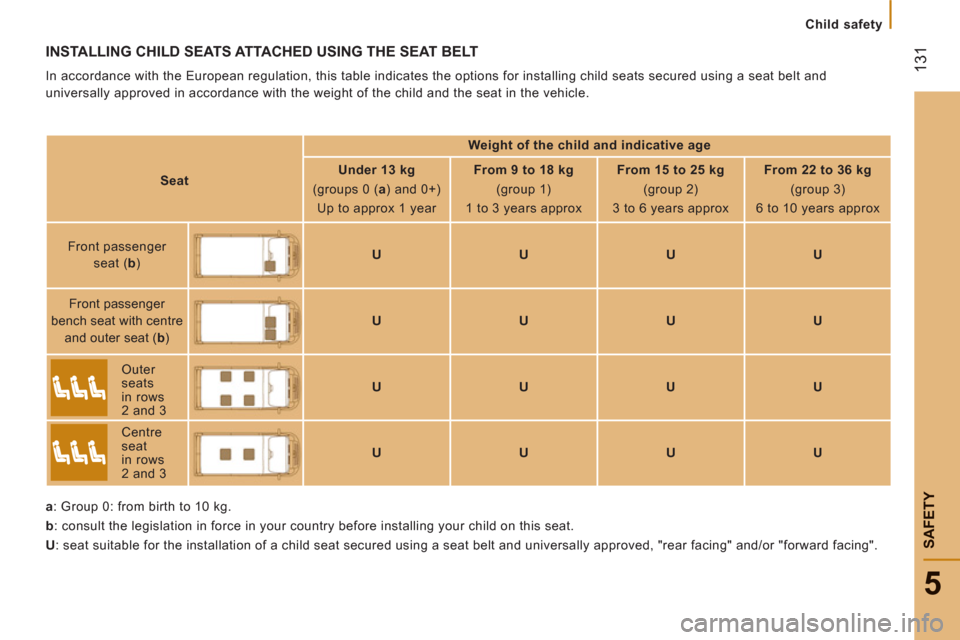
INSTALLING CHILD SEATS ATTACHED USING THE SEAT BELT
In accordance with the European regulation, this table indicates the options for installing child seats secured using a seat belt and
universally approved in accordance with the weight of the child and the seat in the vehicle.
Weight of the child and indicative age
Seat
Under 13 kg
(groups 0 ( a
) and 0+)
Up to approx 1 year
From 9 to 18 kg
(group 1)
1 to 3 years approx
From 15 to 25 kg
(group 2)
3 to 6 years approx
From 22 to 36 kg
(group 3)
6 to 10 years approx
Front passenger
seat ( b
)
U
U
U
U
Front passenger
bench seat with centre
and outer seat ( b
)
U
U
U
U
Outer
seats
in rows
2 and 3
U
U
U
U
Centre
seat
in rows
2 and 3
U
U
U
U
a
: Group 0: from birth to 10 kg.
b
: consult the legislation in force in your country before installing your child on this seat.
U
: seat suitable for the installation of a child seat secured using a seat belt and universally approved, "rear facing" and/or "forward facing".
Page 135 of 184
133
6
Towing a trailer
ACCESSORIE
STOWING A TRAILER, CARAVAN, BOAT, ETC...
For more information about weights, refer to
the administrative documents
(V5 registration document, ...)
Distribution of loads:
distribute the load in
the trailer so that the heaviest objects are as
close as possible to the axle and the nose
weight is close to the maximum authorised
without, however, exceeding it.
Driving advice
A towed vehicle must free wheel: gearbox in
neutral.
Page 137 of 184

Equipment
135
6
ACCESSORIE
S
ROOF BARS
To install the transverse roof bars, use the
fixings provided for this purpose. Refer to the "Dimensions" section
of chapter 9 for further information
regarding the length (L1 to L4) and the
height (H1 to H3) of the vehicle. Never exceed the maximum weight of
the vehicle when loaded (GVW).
OTHER ACCESSORIES
These accessories and parts, having been
tested and approved for reliability and
safety, are all adapted to your vehicle. A
wide recommended range and original parts
are offered.
Range of professionalequipment Maximum useful load on the roof bars: 100 kg
distributed, regardless of the type of vehicle.
The roof bars can only be installed on
the H1 and H2 vehicles. Parts and Service technical information
publishes an accessories catalogue offering
various equipment and fittings, such as:
Roof bars for short, medium and long
wheelbase (load retainers for all models).
Foot board, loading roller, step.
Towbar, 7/13 pin, 7/7 pin, 13 pin towbar
harness: trailer towbar which must be fitted
by the PEUGEOT network.
Roof bars for the various heights, additional
roof bar.
Separation partitions, protective fl oor, non-slip
fl oor.
Page 139 of 184
137
7
Opening the bonnet
CHECK
S
On the inside
This operation must only be carried out with
the vehicle stationary and the driver's door
open.
Pull the release lever on the side of the
dashboard towards you.
On the outside
Push the safety catch lever located above
the grille to the right and raise the bonnet.
To close
Lower the bonnet and release it at the end of
its travel. Check that the bonnet has latched.
OPENING THE BONNET
Bonnet stay
Unclip the stay and tilt it to insert it in the
first notch, then the second.
Before closing the bonnet, put the stay back
in its housing. If the bonnet is not closed
correctly, this warning lamp
comes on in the instrument panel.
Before doing anything under the
bonnet, switch off the ignition with the
key to avoid any risk of injury resulting from
an automatic change to START mode.
Page 143 of 184

Checks
14
1
CHECK
S
7
CHECKS
Air filter and passenger compartment filter
A clogged passenger compartment filter
may reduce the performance of the
air conditioning system and generate
undesirable odours. The replacement
intervals for these components are indicated
in the servicing booklet.
Depending on the environment (dusty
atmosphere...) and the use of the vehicle
(urban driving...), change them twice as
often if necessary, refer to the "Under the
bonnet" section of chapter 7.
Manual gearbox
Have the level checked in accordance with
the manufacturer's servicing schedule.
To check the main levels and certain
components, in accordance with the
manufacturer's servicing schedule, refer to
the pages of the servicing booklet which
correspond to your vehicle's engine.
Only use products recommended by
PEUGEOT or products of equivalent quality
and specification.
In order to optimise the operation of units as
important as the braking system, PEUGEOT
selects and offers specific products.
In order to avoid damaging the electrical
units, high pressure washing to clean the
engine compartment is strictly prohibited.
Parking brake
Where the parking brake travel is too great
or there is a reduction in the performance
of the system, the parking brake should be
adjusted, even between services.
Have the system checked by a PEUGEOT
dealer. Bleeding the water contained inthe Diesel filter
If this warning lamp comes on,
bleed the filter, otherwise bleed
regularly each time the engine oil
is changed.
To drain the water out, unscrew the bleed
screw or the water in Diesel sensor, located
at the base of the filter. Leave open until
all of the water has been drained out. Then
tighten the bleed screw or the water sensor.
HDi engines use advanced technology. All
work requires a special qualification which is
guaranteed by a PEUGEOT dealer.
Battery
At the start of winter, have your battery
checked by a PEUGEOT dealer.
Brake pads
Brake pad wear depends on the style of
driving, in particular for vehicles which are
used in town, over short distances. It may
be necessary to check the thickness of the
pads, even between services.
Unless there is a leak on the system, a drop
in the brake fluid level indicates that the
brake pads are worn.
Brake disc/drum wear status
For any information relating to checking
the brake disc/drum wear status, contact a
PEUGEOT dealer.
Oil filter
Change the filter regularly, in accordance
with the servicing schedule.
The presence of this label, in particular
with the Stop & Start system, indicates the
use of a specific 12 V lead-acid battery
with special technology and specification.
The involvement of a PEUGEOT dealer
or a qualified workshop is essential when
replacing or disconnecting the battery.
Page 148 of 184

14
6
Battery
The batteries contain harmful
substances such as sulphuric acid and
lead. They must be discarded in accordance
with the provisions of the law and must not,
in any circumstances, be discarded with
household waste.
Take used batteries to a special collection
point.
It is advisable to disconnect the
negative (-) terminal of the battery if the
vehicle is not to be used for a period of
more than one month.
The description of the battery charging
procedure is given as an indication only.
Before disconnecting the battery, you must
wait for 2 minutes after switching off the
ignition.
Never disconnect a terminal when the
engine is running.
Never charge a battery without first
disconnecting the terminals.
Close the windows and doors before
disconnecting the battery.
After every reconnection of the battery,
switch on the ignition and wait 1 minute
before starting to allow the electronic
systems to be initialised. If slight difficulties
are experienced after this, please contact
a PEUGEOT dealer.
If the battery has been disconnected
for some time, it may be necessary to
reinitialise the following functions:
- the display parameters (date, time,
language, distance unit and temperature
unit),
- the radio stations,
- the central locking.
Some settings are cleared and must be
reprogrammed, consult a PEUGEOT.
If your vehicle is fitted with a tachograph or
an alarm, disconnection of the negative (-)
terminal of the battery (located under the
floor on the left-hand side, in the cab) is
recommended if the vehicle is not to be used
for a period of more than 5 days.
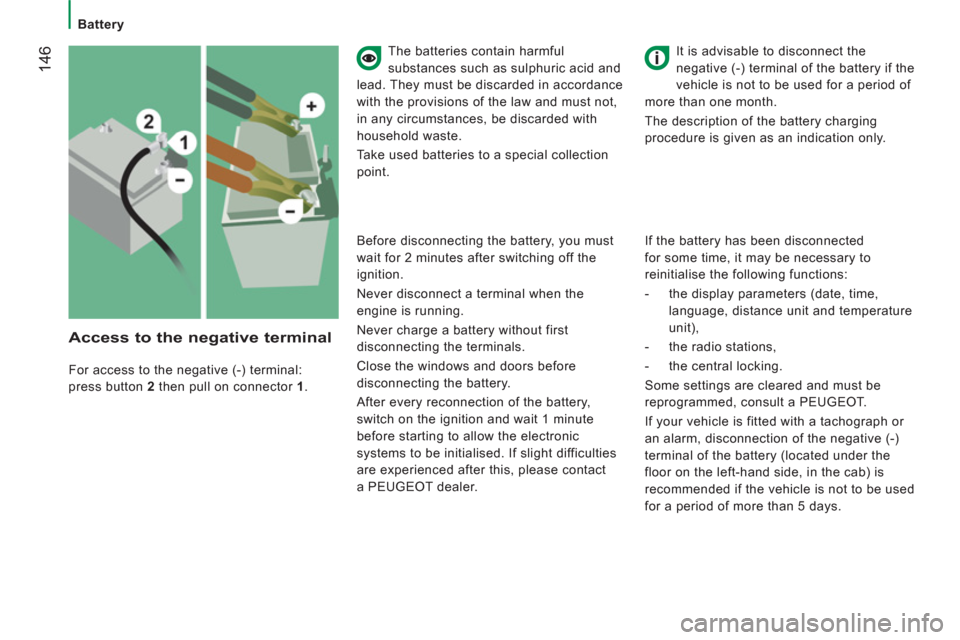
For access to the negative (-) terminal:
press button 2
then pull on connector 1
.
Access to the negative terminal
Page 151 of 184
Changing a wheel
14
9
QUICK HELP
8
4. OPERATING PROCEDURE
- Remove the trim using the screwdriver F
as a lever.
- Release the bolts using the
wheelbrace E
.
- Position the jack C
at one of the four
locations provided on the underbody
near the wheels.
3. SPARE WHEEL
The spare wheel retaining bolt is located
below the bumper on the right.
- Turn the bolt using the socket A
and the
ratchet wrench B
to release the wheel.
- Turn to the locking point, indicated by
an increase in the force required for the
manoeuvre.
- Take out the spare wheel using the
wrench.
- Unscrew the handle G
and remove the
support H
.
- Release the spare wheel and place it
near the wheel to be changed.
If you have a retractable foot board, the jack
must be positioned at 45°.
- Extend the jack using the ratchet
wrench B
until the wheel is a few
centimetres off the ground.
- Unscrew the bolts fully and change the
wheel.