Page 50 of 184

48
Steering mounted controls
AUTOMATIC ILLUMINATION OF HEADLAMPS
Activation
Turn the ring to this position.
The lamps are switched off
automatically when the ignition is
switched off.
Do not cover the sunshine sensor at
the top centre of the windscreen.
GUIDE-ME-HOME LIGHTING
Ignition off or key in the STOP position.
Within 2 minutes after switching off the
engine, position the ignition key in the
STOP position or remove it.
Pull the lighting stalk towards the steering
wheel.
The indicator lamp comes on in
the instrument panel.
Each action on the lighting stalk,
pulled towards the steering
wheel, prolongs the guide me home
lighting by 30 seconds up to approximately
3 minutes. When this time has elapsed, the
lamps are switched off automatically.
Deactivate this control by keeping the stalk
pulled towards the steering wheel for more
than 2 seconds.
If your vehicle is fitted with this function:
when you leave your vehicle, the dipped
beam headlamps remain on for the selected
duration (when leaving a car park for
example).
To set the sensitivity of the sensor,
refer to "Mode" in chapter 4
If your vehicle is fitted with this function, the
dipped beam headlamps are switched on
automatically if the light is poor.
In fog or snow, the sunshine sensor may
detect sufficient light. Therefore, the lamps
will not be switched on automatically. If
necessary, you must switch on the dipped
beam headlamps manually.
They are switched off when the light returns
to a sufficient level.
Page 51 of 184

49
3
EASE OF USE
and
COMFOR
T
Steering mounted controls
HEADLAMP BEAM
You are advised to adjust the height of the
headlamp beams in accordance with the
load in your vehicle.
This function works in the dipped and main
beam headlamps position.
Press these controls, located
on the dashboard, several times
in succession to adjust the
headlamps.
An indicator lamp on the screen
indicates the adjustment position
selected (0, 1, 2, 3).
PARKING LAMPS
This system enables you to leave the lamps
on when parked; with the ignition off, key in
the STOP position or key removed.
Move the ring on the lighting stalk to position
O then to dipped or main beam headlamps.
The warning lamp on the
instrument panel comes on.
The lamps will remain on while
you are parked.
Leaving the lighting on for long
periods may significantly reduce the state of
charge of your vehicle's battery.
Travelling abroad
If using your vehicle in a country
that drives on the other side of the road,
the headlamps must be adjusted to avoid
dazzling on-coming drivers.
Contact a PEUGEOT dealer or a qualified
workshop.
Page 52 of 184

50
Steering mounted controls
WIPER STALK
Slow continuous wiping: 2 notches downwards. Do not cover the rain sensor, located at
the top centre of the windscreen.
When washing the vehicle, switch off
the ignition or deactivate the automatic rain
sensitive wipers.
Screenwash and headlamp wash
Pull the stalk towards you, the wash-wipe
is accompanied by a timed operation the
wipers.
The headlamp wash is linked with the
screenwash, it is triggered if the dipped
beam headlamps are on.
Windscreen wipers
Wiping is only active when the ignition key is
in the RUNNING
position.
The stalk has five different positions:
Wipers off.
Intermittent wiping:
1 notch downwards.
In this position, four speeds can be selected
by turning the ring:
- very slow intermittent,
- slow intermittent,
- intermittent,
- fast intermittent.
Automatic rain sensitive windscreen
wipers
If your vehicle is fitted with this system, the
wiping speed is adapted automatically to the
intensity of the rainfall.
Automatic wiping: 1 notch downwards. This
is confi rmed by one wipe. Must be reactivated
each time the ignition is switched on.
In this position, the sensitivity of the rain
sensor can be increased by turning the ring.
Good practice
Check that the windscreen wiper blades can
operate freely when using the wipers in icy
weather.
Use the step in the front bumper, to remove
any accumulation of snow at the base of the
windscreen and on the blades.
To change the blades, refer to the
"Changing a wiper blade" section of
chapter 8.
To top up the levels, refer to the
"Levels" section of chapter 7. Fast continuous wiping: 3 notches
downwards.
Single wipe, pull the control towards the
steering wheel.
With Stop & Start, when the wiper
control stalk is in the fast wipe position,
the STOP mode is not available.
Page 80 of 184

Mirrors and windows
78
ELECTRIC WINDOWS
A.
Driver's electric window control
B.
Passenger's electric window control
You have two options:
Automatic operation
Press or pull control A/B
, beyond the point
of resistance: the window opens or closes
fully when the control is released.
Pressing the control again stops the
movement of the window.
Manual operation
Press or pull control A
, without passing the
point of resistance.
The window stops when you release the
control.
Good practice
Always remove the key from the ignition
when leaving the vehicle, even for a short
time.
If the electric windows meet an obstacle
during operation, you must reverse the
movement of the window. To do this, press
the control concerned.
When the driver operates the passenger
electric window controls, they must ensure
that no one is preventing correct closing of
the windows.
The driver must ensure that the passengers
use the electric windows correctly.
Be aware of children when operating the
windows.
Page 86 of 184
Reversing camera
84
REVERSING CAMERA
If your vehicle is fitted with this camera, it
is located at the rear of the van, next to the
third brake lamp.
It sends views to the screen installed
in the cab. This rear vision is an aid to
manoeuvring.
Screen
The camera sends the images to a 4 inch or
6.5 inch adjustable colour LCD which takes
the place of the interior rear view mirror.
Press the button and place the screen in the
required position.
Activation
With the key in the running position, unfold
the screen.
The camera comes into operation when
reverse gear is engaged and remains active
up to approximately 9 mph (15 km/h). It is
deactivated above 11 mph (18 km/h).
When a forward gear is engaged, the last image
remains displayed for approximately 5 seconds
then switches off.
Fold the screen.
Buttons
Brightness adjustment.
Back-lighting adjustment.
ON/OFF enables you to see rear
views without engaging reverse
gear.
Page 96 of 184
Audio equipment
94
Scroll the
display
Select
Display
Select
Display
Select
Display
Select
Display
Enables you
to…
Radio off
��
�� 00 MIN
��
�� 20 MIN Set the audio system play time after switching off the engine:
- 00 MIN to switch off immediately,
- 20 MIN to play for 20 minutes.
Place the key in the "MAR" running position to switch
the audio system back on.
��
��
System
reset NO
��
�� YES Restore factory settings.
- NO to not restore factory settings,
- YES to restore factory settings, "Resetting" is
displayed.
��
��
Page 105 of 184

103
Bluetooth hands-free system
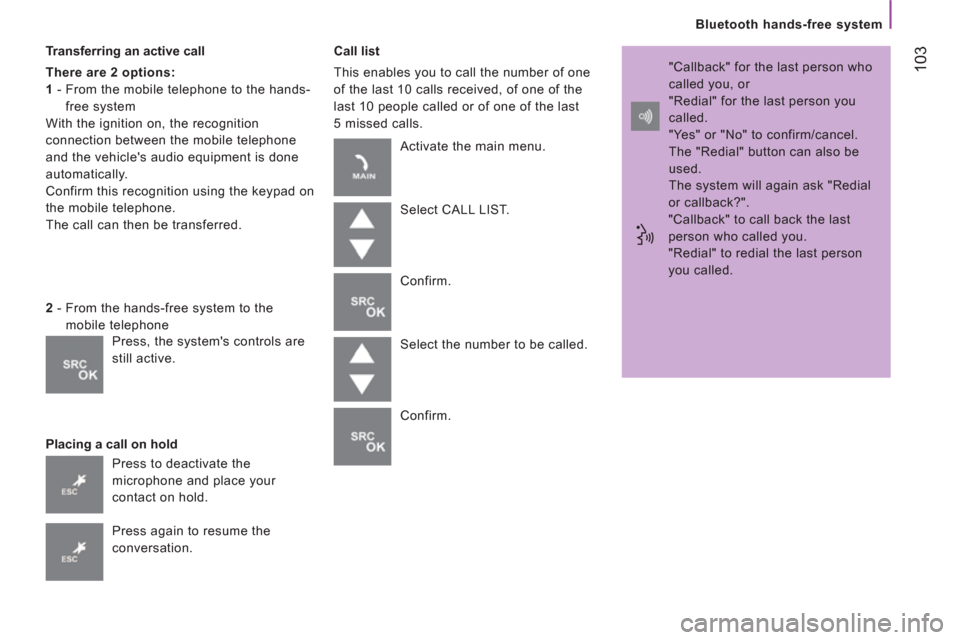
Transferring an active call
There are 2 options:
1
- From the mobile telephone to the hands-
free system
With the ignition on, the recognition
connection between the mobile telephone
and the vehicle's audio equipment is done
automatically.
Confirm this recognition using the keypad on
the mobile telephone.
The call can then be transferred.
Placing a call on hold
Call list
This enables you to call the number of one
of the last 10 calls received, of one of the
last 10 people called or of one of the last
5 missed calls.
2
- From the hands-free system to the
mobile telephone
Press to deactivate the
microphone and place your
contact on hold.
Press again to resume the
conversation. Activate the main menu.
Select CALL LIST.
Confirm.
Select the number to be called.
Confirm. "Callback" for the last person who
called you, or
"Redial" for the last person you
called.
"Yes" or "No" to confirm/cancel.
The "Redial" button can also be
used.
The system will again ask "Redial
or callback?".
"Callback" to call back the last
person who called you.
"Redial" to redial the last person
you called.
Press, the system's controls are
still active.
Page 106 of 184

104
Bluetooth hands-free system
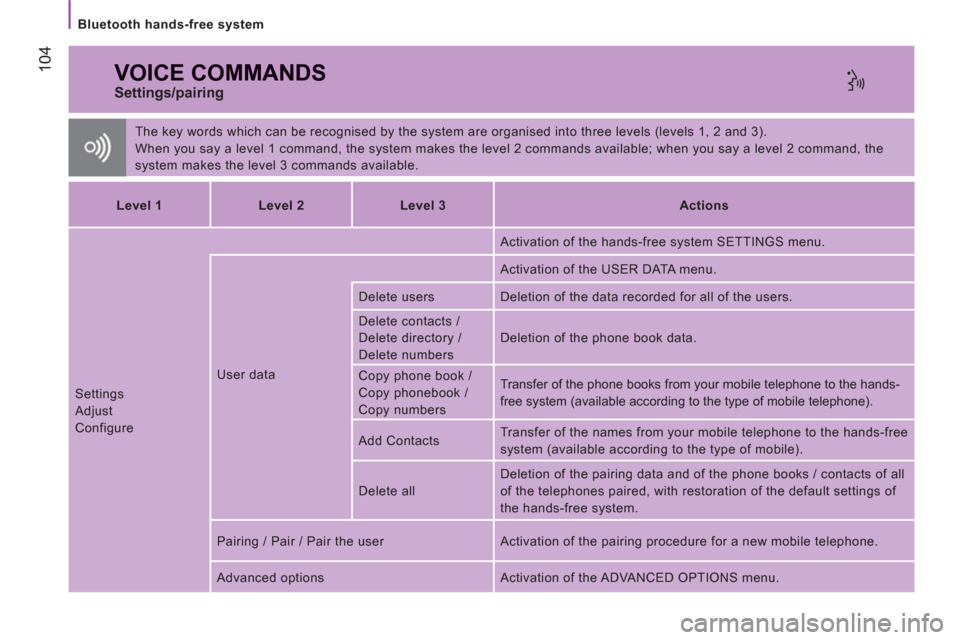
VOICE COMMANDS
The key words which can be recognised by the system are organised into three levels (levels 1, 2 and 3).
When you say a level 1 command, the system makes the level 2 commands available; when you say a level 2 command, the
system makes the level 3 commands available.
Settings/pairing
Level 1
Level 2
Level 3
Actions
Settings
Adjust
Configure User data Activation of the hands-free system SETTINGS menu.
Activation of the USER DATA menu.
Delete users Deletion of the data recorded for all of the users.
Delete contacts /
Delete directory /
Delete numbers Deletion of the phone book data.
Copy phone book /
Copy phonebook /
Copy numbers Transfer of the phone books from your mobile telephone to the hands-
free system (available according to the type of mobile telephone).
Add Contacts Transfer of the names from your mobile telephone to the hands-free
system (available according to the type of mobile).
Delete all Deletion of the pairing data and of the phone books / contacts of all
of the telephones paired, with restoration of the default settings of
the hands-free system.
Pairing / Pair / Pair the user Activation of the pairing procedure for a new mobile telephone.
Advanced options Activation of the ADVANCED OPTIONS menu.