2013 Peugeot Boxer window
[x] Cancel search: windowPage 79 of 184

Mirrors and windows
77
3
EASE OF USE
and
COMFOR
T
MIRRORS AND WINDOWS
MIRROR
S Door mirrors
These are divided into two zones:
A -
Upper mirror
B -
Lower mirror
The mirror glass is spherical in order to
widen the lateral field of vision. Objects
seen in the mirror are in reality closer than
they appear. Therefore, this must be taken
into account in order to assess the distance
correctly.
The shell incorporates the direction indicator
side repeater and the aerials, according to
the equipment available on board (GPS,
GSM, Radio, ...).
Electrical controls
The ignition switch must be in the MAR
position.
Turn the control to select the mirror zone.
1
Driver's mirror:
A1 -
Upper mirror
B1 -
Lower mirror
Then move the control in the direction of the
adjustment required.
2
Passenger mirror:
A2 -
Upper mirror
B2 -
Lower mirror
Then move the control in the direction of the
adjustment required.
Rear view mirror
The lever located on the lower edge moves
the mirror into two positions.
For the day position, the lever is pushed.
For the night position to prevent dazzle, pull
the lever towards you.
Electric folding
Press this control.
Defrosting the mirrors
Press the rear screen defrosting
button.
Page 80 of 184

Mirrors and windows
78
ELECTRIC WINDOWS
A.
Driver's electric window control
B.
Passenger's electric window control
You have two options:
Automatic operation
Press or pull control A/B
, beyond the point
of resistance: the window opens or closes
fully when the control is released.
Pressing the control again stops the
movement of the window.
Manual operation
Press or pull control A
, without passing the
point of resistance.
The window stops when you release the
control.
Good practice
Always remove the key from the ignition
when leaving the vehicle, even for a short
time.
If the electric windows meet an obstacle
during operation, you must reverse the
movement of the window. To do this, press
the control concerned.
When the driver operates the passenger
electric window controls, they must ensure
that no one is preventing correct closing of
the windows.
The driver must ensure that the passengers
use the electric windows correctly.
Be aware of children when operating the
windows.
Page 134 of 184

Child safety
132
ADVICE ON CHILD SEATS
The incorrect installation of a child seat in a
vehicle compromises the child's protection in
the event of an accident.
Remember to fasten the seat belts or the
child seat harnesses keeping the slack
in
relation to the child's body to a minimum
,
even for short journeys.
For optimum installation of the "forward
facing" child seat, ensure that the back of
the child seat is in contact with the back of
the vehicle's seat and that the head restraint
does not cause any discomfort.
If the head restraint has to be removed,
ensure that it is stored or attached securely
to prevent it from being thrown around the
vehicle in the event of sharp braking.
Children under the age of 10 must not travel
in the "forward facing" position on the front
passenger seat, unless the rear seats are
already occupied by other children, cannot
be used or are absent. Deactivate the passenger's airbag when a
"rear facing" child seat is installed on the
front seat.
Otherwise, the child would risk being
seriously injured or killed if the airbag were
to inflate.
As a safety precaution, do not leave:
- one or more children alone and
unsupervised in a vehicle,
- a child or an animal in a vehicle which
is exposed to the sun, with the windows
closed,
- the keys within reach of children inside
the vehicle.
To prevent accidental opening of the doors,
use the "Child Lock".
Take care not to open the rear windows by
more than one third.
To protect young children from the rays of
the sun, fit side blinds to the rear windows.
Installing a booster seat
The chest part of the seat belt must be
positioned on the child's shoulder without
touching the neck.
Ensure that the lap part of the seat belt
passes correctly over the child's thighs.
PEUGEOT recommends the use of a
booster seat which has a back, fitted with a
seat belt guide at shoulder level.
Crew cab
Do not install child seats, booster cushions
or carrycots on the rear seats of the cab.
Page 138 of 184

Equipment
136
Another range is also available, structured
around comfort, leisure and maintenance:
Anti-theft alarm, window etching, first aid
kit, high visibility safety jacket, rear parking
sensors, warning triangle, ...
Front seat covers compatible with aibags,
rubber mats, carpet mats, snow chains.
To prevent the mat from becoming caught
under the pedals:
- ensure that the mat and its fixings are
positioned correctly,
- never fit one mat on top of another. Audio equipment, hands-free system,
speakers, navigation, ... Trims, front mud flaps, rear mud flaps,
wooden floor, deflectors...
Installation of radiocommunication
transmitters
You are advised to contact a representative
of the PEUGEOT marque before installing
accessory radiocommunication transmitters
with external aerial on your vehicle.
The PEUGEOT Network will inform you of the
specifi cations (frequency waveband, maximum
output power, aerial position, specifi c
installation conditions) of the transmitters
which can be fi tted, in accordance with the
Motor Vehicle Electromagnetic Compatibility
Directive (2004/104/EC). Screenwash, interior and exterior cleaning
and maintenance products, replacement
bulbs, ...
The fitting of electrical equipment
or accessories which are not
recommended by Automobiles PEUGEOT
may result in the failure of your vehicle's
electronic system.
Please note this specific warning. You
are advised to contact a representative
of the Marque to be shown the range of
recommended equipment and accessories.
Depending on the country in which the
vehicle is sold or operated, it is compulsory
to have a high visibility safety jacket,
warning triangle and replacement bulbs
available in the vehicle.
Page 148 of 184

14
6
Battery
The batteries contain harmful
substances such as sulphuric acid and
lead. They must be discarded in accordance
with the provisions of the law and must not,
in any circumstances, be discarded with
household waste.
Take used batteries to a special collection
point.
It is advisable to disconnect the
negative (-) terminal of the battery if the
vehicle is not to be used for a period of
more than one month.
The description of the battery charging
procedure is given as an indication only.
Before disconnecting the battery, you must
wait for 2 minutes after switching off the
ignition.
Never disconnect a terminal when the
engine is running.
Never charge a battery without first
disconnecting the terminals.
Close the windows and doors before
disconnecting the battery.
After every reconnection of the battery,
switch on the ignition and wait 1 minute
before starting to allow the electronic
systems to be initialised. If slight difficulties
are experienced after this, please contact
a PEUGEOT dealer.
If the battery has been disconnected
for some time, it may be necessary to
reinitialise the following functions:
- the display parameters (date, time,
language, distance unit and temperature
unit),
- the radio stations,
- the central locking.
Some settings are cleared and must be
reprogrammed, consult a PEUGEOT.
If your vehicle is fitted with a tachograph or
an alarm, disconnection of the negative (-)
terminal of the battery (located under the
floor on the left-hand side, in the cab) is
recommended if the vehicle is not to be used
for a period of more than 5 days.
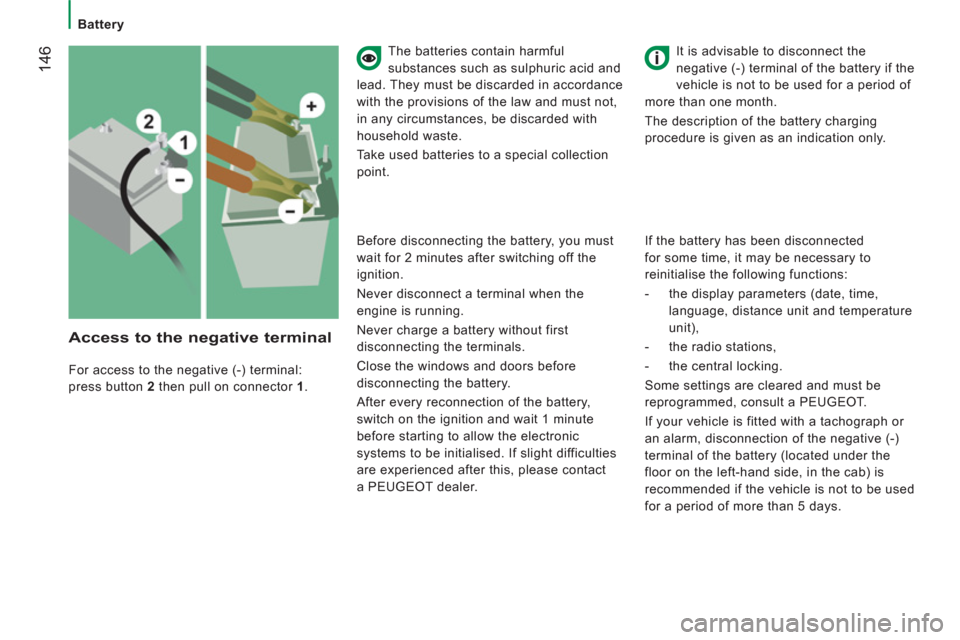
For access to the negative (-) terminal:
press button 2
then pull on connector 1
.
Access to the negative terminal
Page 160 of 184

Changing a fuse
158
DRIVER'S SIDE DASHBOARD FUSES
- Remove the bolts and tilt the box to access the fuses.
Fuses
A (amps)
Allocation
12
7.5
Right-hand dipped headlamp
13
7.5
Left-hand dipped headlamp
31
7.5
Relay supply
32
10
Cabin lighting
33
15
Rear 12 V socket
34
-
Not used
35
7.5
Reversing lamp - Water in Diesel fuel sensor
36
15
Central locking control - Battery
37
7.5
Brake lamp - Third brake lamp - Instrument panel
38
10
Relay supply
39
10
Radio - Diagnostic socket - Alarm siren - Programmable additional heating -
Air conditioning controls- Tachograph - Battery
40
15
Demisting: rear screen (left), driver's side door mirror
41
15
Demisting: rear screen (right), passenger's side door mirror
42
7.5
ABS control unit and sensor - ASR sensor - ESP sensor - Brake lamps switch
43
30
Windscreen wiper motor
44
20
Cigarette lighter - 12 V socket
45
7.5
Door controls
46
-
Not used
47
20
Driver's electric window motor
48
20
Passenger's electric window motor
49
7.5
Audio equipment - Instrument panel controls - Driver's side electric window
50
7.5
Airbags and pre-tensioners unit
51
7.5
Tachograph - Cruise control - Air conditioning controls
52
7.5
Optional relay supply
53
7.5
Instrument panel - Rear foglamp
Page 177 of 184

17
5
Instruments and controls
10
VISUAL SEARCH
INSTRUMENTS AND CONTROLS
Instrument panels, screens, speedometer 30
Warning lamps, indicator lamps 31-37
Indicators, gauge 38-39
Lighting controls 47
Automatic illumination of headlamps 48
Guide-me-home lighting 48
Parking lamps 49
Opening the bonnet 137
Fuses 157-160
Mode, vehicle confi guration 79-82
Programmable
additional heating 62-64
Additional heating,
rear air conditioning 60-61
Pneumatic suspension 86
Stop & Start 43-45
Headlamp beam height adjustment 49
Lighting dimmer 39
Setting the time 81
Front/rear wipers 50
Screenwash/headlamp wash 50
Trip computer - MODE 79-82
Starter, ignition switch 41
Hill start 42
Cruise control 51-53
Fixed speed limiter 118
Steering wheel, reach adjustment 40
Horn 115
Instruments and controls 8
Electric windows, mirrors 77-78
Locking the load space 29
Page 179 of 184

17
7
Interior
10
VISUAL SEARCH
Seat belts 119-120
Airbags 122-124
Deactivating the passenger airbag 123
Parking brake,
handbrake 114
Seats, adjustments 65-66
Seat with variable damping 66
2-seat bench 67
Tools, jack 148
Child seats 125-132
Rear view mirror 77
Cab courtesy lamp 74, 155
Changing a courtesy lamp bulb 155
Courtesy lamps 76, 155
12 volt socket 75
Battery (+), charging,
starting 145-147
Earth point (-) 138
Fuses in the right hand door pillar 159
Load space 75-76
●
stowing rings,
●
load retainer,
●
roof box,
●
trims,
●
inspection lamp.
Seats / rear bench seats 68-69
Rear heating /
air conditioning 60-61
Reversing camera 84-85
Sliding side windows 76
ISOFIX mountings 129-130
Crew cab 70
Accessories 135-136