Page 36 of 340

34
Instruments and controls
*
According to country.
CHECK (vehicle autotest)
Automatic CHECK
With the key in the ignition on position, all of the
warning lamps for the functions tested are displayed.They are switched off after a few seconds. At the same time, an automatic CHECK(vehicle autotest) is carried out.
In the presence of a fault
A "minor" fault has been detected: the warning
lamp(s) are displayed then go off.You can star t your vehicle; however, contact a
PEUGEOT dealer or a qualified workshop assoon as possible.
A "major" fault has been detected: theassociated warning lamps(s) remain onaccompanied by the STOP or SERVICE
warning lamp.
Do not star t your vehicle. Call a PEUGEOT dealer or a qualified
wor
kshop without delay.
Manual CHECK
Pressing the "CHECK"
button on theinstrument panel star ts the manual CHECK(vehicle autotest).
This function enables you to recall at any time(with the key in the ignition on position or with
the engine running), the aler ts present.
The passenger's airbag deactivated warning lamp * remains on while the airbag is deactivated.
With the engine running and the vehiclemoving, the instrument panel displays
the
warning lamps (in the event of a fault). I
f no "major" fault is found, you can star t your
vehicle.
Lighting dimmer control
With the headlamps on, press button Bto
increase the brightness of the instruments
and controls and the interior mood lighting or button Ato reduce it.
As soon as the lighting reaches the required
level of brightness, release the button.
Page 37 of 340

1
35
Instruments and controls
Service indicator
More than 1 800 miles (3 000 km)remain before the next service is due
When the ignition is switched on, no ser vice information appears in the screen. S
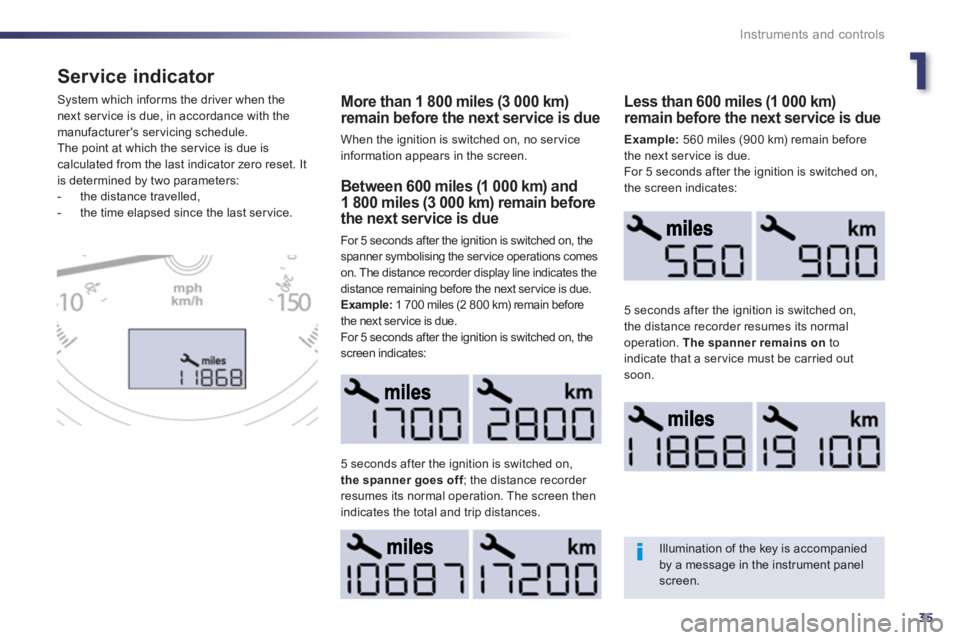
ystem which informs the driver when the next ser vice is due, in accordance with themanufacturer's servicing schedule.
The point at which the ser vice is due is calculated from the last indicator zero reset. It
is determined by two parameters:
- the distance travelled,
- the time elapsed since the last ser vice. Between 600 miles (1 000 km) and1 800 miles (3 000 km) remain before the next service is due
For 5 seconds after the ignition is switched on, the
spanner symbolising the ser vice operations comes
on. The distance recorder display line indicates the
distance remaining before the next ser vice is due.
Example:1 700 miles (2 800 km) remain before
the next service is due.
For 5 seconds after the ignition is switched on, the screen indicates:
5 seconds a
fter the ignition is switched on,the spanner goes off; the distance recorder fresumes its normal operation. The screen thenindicates the total and trip distances.
Less than 600 miles (1 000 km) remain before the next service is due
Example:560 miles (900 km) remain before
the next service is due.
For 5 seconds after the i
gnition is switched on,
the screen indicates:
5 seconds after the i
gnition is switched on,
the distance recorder resumes its normal operation. The spanner remains on
toindicate that a service must be carried out soon.
Illumination of the key is accompaniedby a message in the instrument panel screen.
Page 38 of 340

36
Instruments and controls
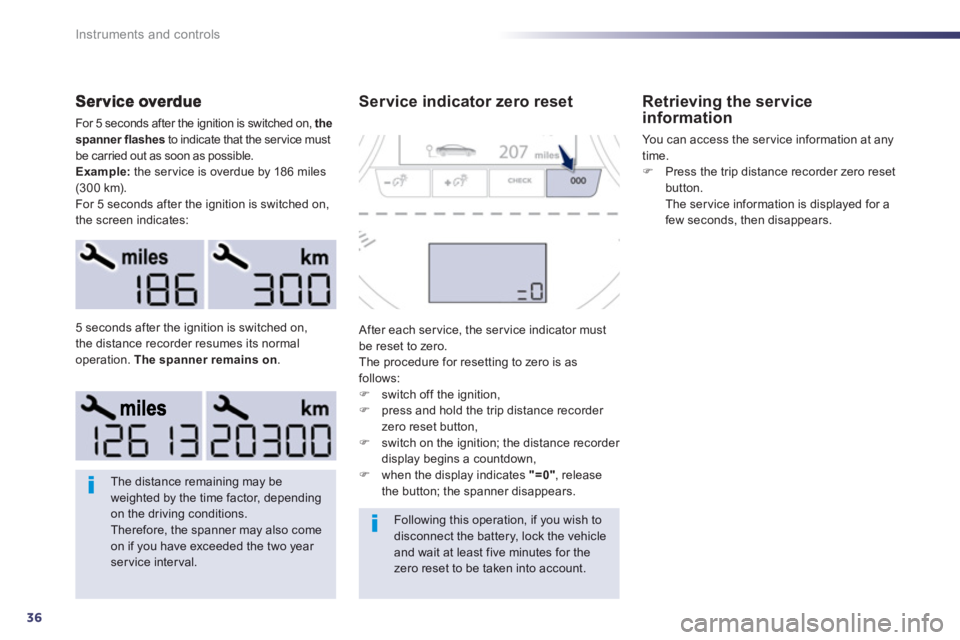
For 5 seconds after the ignition is switched on, the
spanner flashesto indicate that the service must
be carried out as soon as possible.
Example:the ser vice is overdue by 18 6 miles(300 km).
For 5 seconds after the ignition is switched on,
the screen indicates:
The distance remaining may be weighted by the time factor, dependingon the driving conditions.
Therefore, the spanner may also come
on if you have exceeded the two year service interval.
Following this operation, if you wish to disconnect the battery, lock the vehicle and wait at least five minutes for the zero reset to be taken into account. 5 seconds a
fter the ignition is switched on,
the distance recorder resumes its normal
operation. The spanner remains on.
Service indicator zero reset
After each ser vice, the ser vice indicator mustbe reset to zero.
The procedure for resetting to zero is as
follows: F switch off the ignition,F
press and hold the trip distance recorder
zero reset button,
F switch on the ignition; the distance recorder
display begins a countdown, F when the display indicates "=0", release
the button; the spanner disappears.
Retrieving the serviceinformation
You can access the ser vice information at any
time.
F Press the trip distance recorder zero reset button.
The ser vice information is displayed for a
few seconds, then disappears.
Page 39 of 340

1
37
Instruments and controls
Engine oil level indicator
Oil level incorrect
This is indicated by a message in the
instrument panel screen.
I
f the low oil level is confirmed by a check usingthe dipstick, the level must be topped up to
avoid damage to the engine.
Oil level indicator fault
This is indicated by a message in the instrument panel screen. Contact a PEUGEOT
dealer or a qualified workshop.
Dipstick
Refer to the "Checks" section to locate the
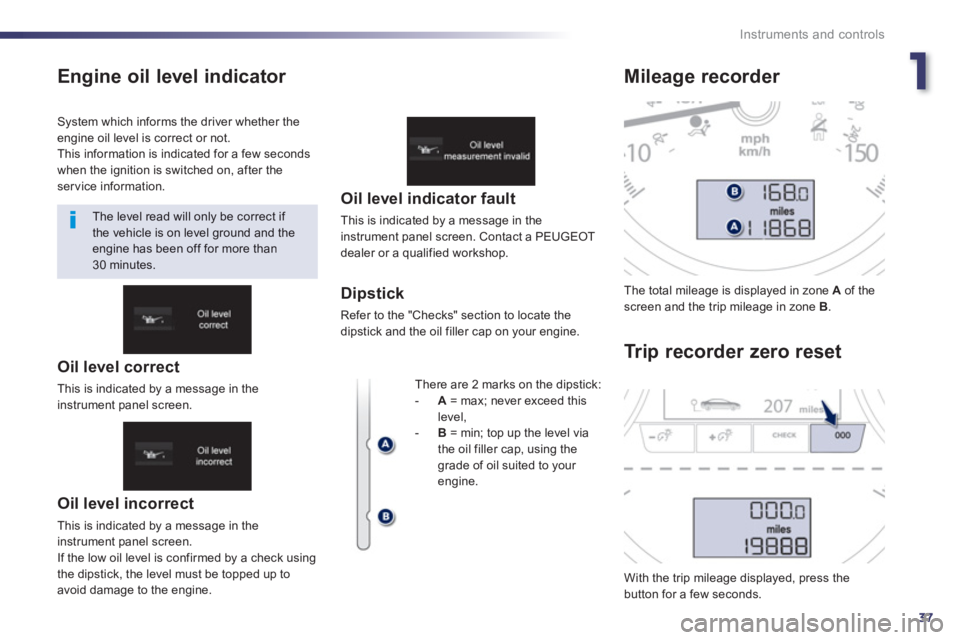
dipstick and the oil filler cap on your engine. The total milea
ge is displayed in zone Aof thescreen and the trip mileage in zone B.
With the trip milea
ge displayed, press the button for a few seconds.
Mileage recorder
Tr i
p recorder zero reset
System which informs the driver whether theengine oil level is correct or not.
This information is indicated for a few seconds
when the ignition is switched on, after theservice information.
The level read will only be correct if
the vehicle is on level ground and the engine has been off for more than30 minutes.
There are 2 marks on the dipstick:
-A
= max; never exceed this level,-B
= min; top up the level via
the oil filler cap, using thegrade of oil suited to your engine.
Oil level correct
This is indicated by a message in theinstrument panel screen.
Page 40 of 340
38
Instruments and controls
System which provides current information concerning the trip (range, fuel consumption…).
Tr i p c o m p u t e r
Instrument panel screen
Information displa
y
F
Press the steering mounted control
todisplay the various trip computer tabs in succession.
- Th
e current information tab with:
●
the range,
●
the current fuel consumption,
●
the
Stop & Start time counter.
-
The trip "1"tab with:
●
the average speed,
for the first trip,
●
the average fuel consumption,
●
the distance travelled.
-
The trip "2"
tab with:
●
the average speed,
for the second trip,
●
the average fuel consumption,
●
the distance travelled.
F
Or on the end of the wiper stalk.
Page 41 of 340

1
39
Instruments and controls
Tr ip reset
If dashes are displayed continuously while driving in place of the digits,contact a PEUGEOT dealer or aqualified workshop.
This function is only displayed from20 mph (30 km/h).
This value may vary following a change in the style of driving or the relief, resulting in a significant change in the current fuel consumption.
Trip computer, a few definitions…
Range
(miles or km)This indicates the distance
which can still be travelled with
the fuel remaining in the tank
in relation to the average fuel consumption over the last fewmiles (kilometres) travelled.
When the ran
ge falls below 20 miles (30 km),
dashes are displayed. After filling with at least 5 litres of fuel, the range is recalculated and is
displayed when it exceeds 60 miles (10 0 km).
Current fuel
consumption
(mpg or l/100 km or km/l)This is the average fuel consumption
during the last few seconds.
Average fuel consumption
(mpg or l/100 km or km/l)
This is the average fuelconsumption since the last tripcomputer zero reset.
Average speed
(mph or km/h)
This is the average speed calculated
since the last trip computer zero reset
(ignition on).
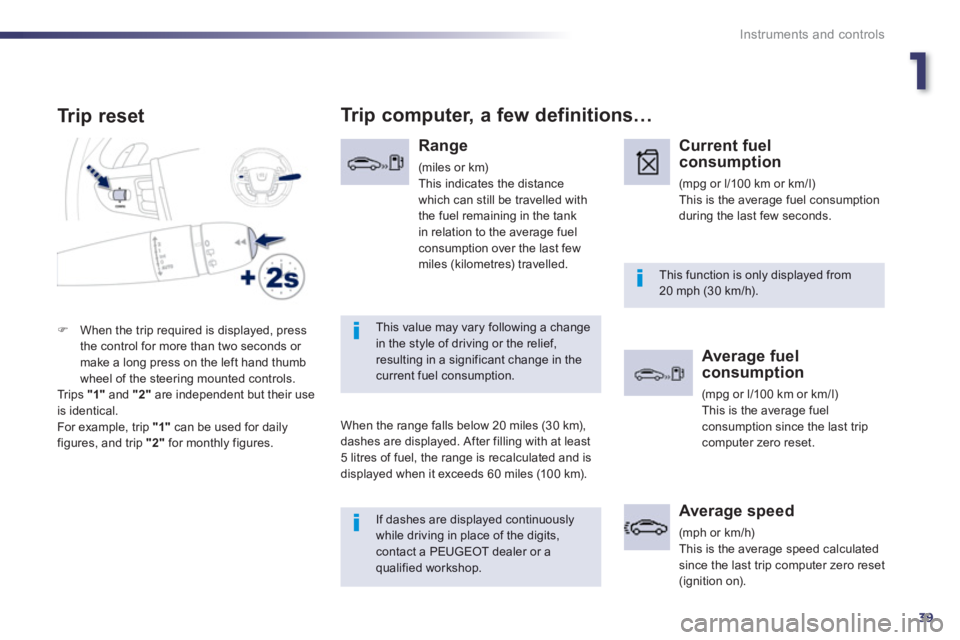
F When the trip required is displayed, press
the control for more than two seconds or make a long press on the left hand thumb
wheel of the steering mounted controls.
Trips "1"
and "2"are independent but their useis identical.
For example, trip "1"
can be used for daily figures, and trip "2"
for monthly figures.
Page 43 of 340
1
41
Instruments and controls
Setting the date and time
Audio system / Bluetooth
Press MENU.
Using the arrows, select " Personalisation-configuration
" and confirm.
Using the arrows, select " Display configuration
" and confirm.
Usin
g the arrows, select " Date and timeadjustment " and confirm.
Select the settin
g to be modified. Confirm
by pressing OK, then make the change andconfirm again to save the modification.
Adjust the settings one by one, confirming by
pressing the OK
button. Next select the " OK"
tab on the screen then confirm to exit from the"Date and time adjustment" menu.
Page 44 of 340
42
Instruments and controls
Peugeot Connect Navigation (RT6)
Press SETUPto display the "Configuration
"menu.
Select "Display configuration
" and confirm.
Select " Set date and time" and confirm.
Select " Synchronize the minutes with GPS
" so that setting the minutesis done automatically by satellite reception.
Select the setting to adjust.
Confirm by pressing OK, then adjust the setting
and confirm again to save the modification.
Adjust the settings one by one.
Then select "OK
" on the screen and confirm tosave the settings.