2013 Peugeot 508 ECO mode
[x] Cancel search: ECO modePage 70 of 340
68
Comfort
Electric adjustments
Switch on the ignition or star t the engine if the vehicle has gone into economy mode.
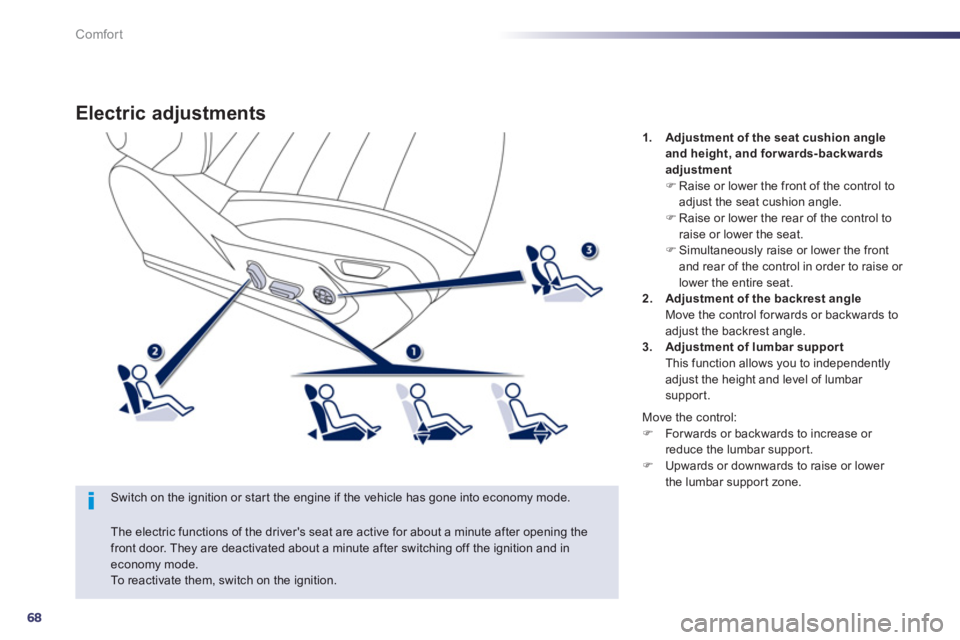
1.Adjustment of the seat cushion angleand height, and forwards-backwards
adjustmentFRaise or lower the front of the control to adjust the seat cushion angle. FRaise or lower the rear of the control to raise or lower the seat.FSimultaneously raise or lower the frontand rear of the control in order to raise or lower the entire seat. 2.Adjustment of the backrest angle Move the control forwards or backwards to adjust the backrest angle. 3. Adjustment of lumbar support This function allows you to independentlyadjust the height and level of lumbar support.
The electric functions of the driver's seat are active for about a minute after opening the
front door. They are deactivated about a minute after switching off the ignition and in economy mode. To reactivate them, switch on the ignition.
M
ove the control:F
Forwards or backwards to increase or reduce the lumbar suppor t. F
Upwards or downwards to raise or lower
the lumbar suppor t zone.
Page 92 of 340
90
Comfort
Dual-zone digital air conditioning
Automatic operation
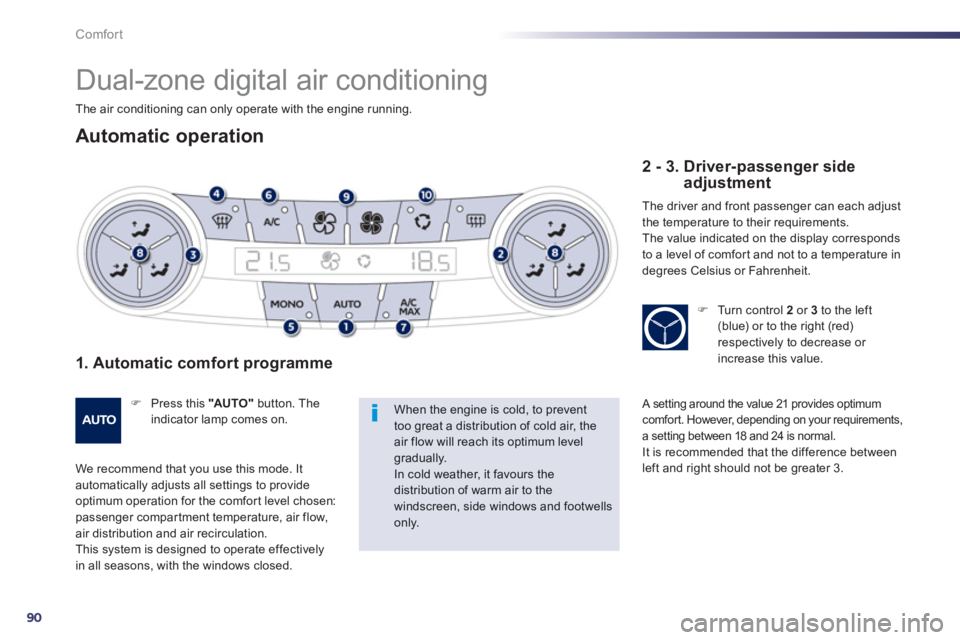
1. Automatic comfort programme
F
Press this "AU TO "button. Theindicator lamp comes on.
We recommend that you use this mode. It automatically adjusts all settings to provide
optimum operation for the comfor t level chosen: passenger compar tment temperature, air flow, air distribution and air recirculation.
This system is designed to operate effectivelyin all seasons, with the windows closed.
When the engine is cold, to prevent too great a distribution of cold air, the air flow will reach its optimum levelgradually. In cold weather, it favours the distribution of warm air to the windscreen, side windows and footwells only.
2 - 3. Driver-passenger side adjustment
The driver and front passenger can each adjust
the temperature to their requirements.
The value indicated on the display corresponds
to a level of comfor t and not to a temperature in
degrees Celsius or Fahrenheit.
FTurn control 2or 3to the left(blue) or to the right (red) respectively to decrease or increase this value.
A setting around the value 21 provides optimum comfort. However, depending on your requirements,
a setting between 18 and 24 is normal. It is recommended that the difference between
left and right should not be greater 3. The air conditionin
g can only operate with the engine running.
Page 93 of 340
3
91
Comfort
On entering the vehicle, if the interior temperature is much colder or warmer than the comfort value, there is noneed to change the value displayed in order to obtain the comfort required.The system corrects the differencein temperature automatically and asquickly as possible.
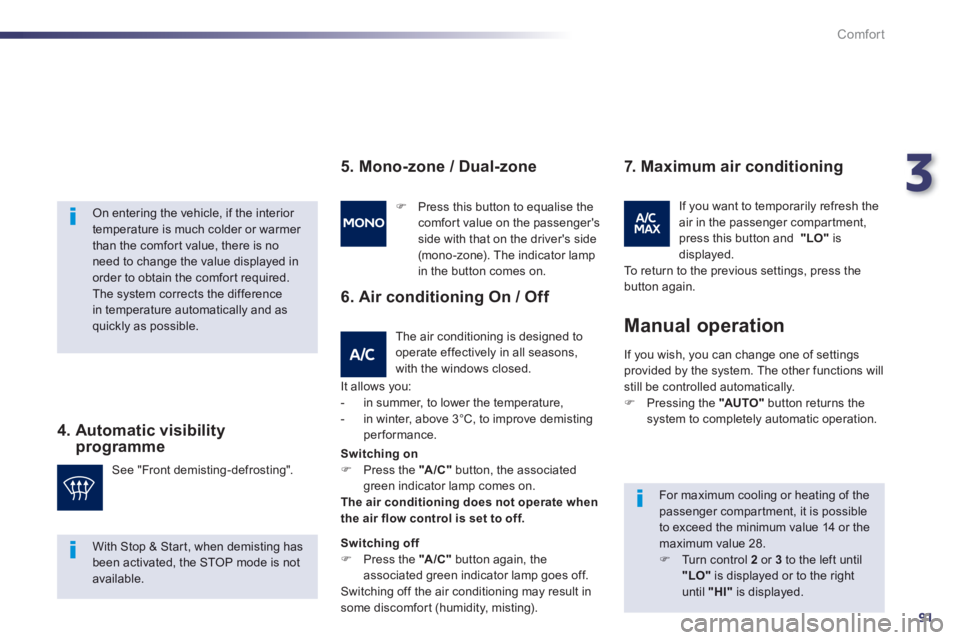
4. Automatic visibility programme
For maximum cooling or heating of thepassenger compartment, it is possibleto exceed the minimum value 14 or themaximum value 28.F
Turn control 2or 3
to the left until "LO"is displayed or to the right
until "HI"
is displayed. See "Front demistin
g-defrosting".
F
Press this button to equalise thecomfort value on the passenger's
side with that on the driver's side (mono-zone). The indicator lamp in the button comes on.
I
f you wish, you can change one of settings
provided by the system. The other functions will still be controlled automatically.F Pressing the "AUTO"
button returns the system to completely automatic operation.
Manual operation
5. Mono-zone / Dual-zone
The air conditioning is designed to operate effectively in all seasons,
with the windows closed.
6. Air conditioning On / Off
It allows you:
- in summer, to lower the temperature,
- in winter, above 3°C, to improve demistin
gperformance.
7. Maximum air conditioning
If you want to temporarily refresh theair in the passenger compartment,
press this button and "LO"isdisplayed.
To return to the previous settings, press the
button again.
With Stop & Start, when demisting has been activated, the STOP mode is notavailable.Switchin
g on
FPress the "A/C"button, the associated green indicator lamp comes on.The air conditioning does not operate when
the air flow control is set to off.
Switching offFPress the "A/C"
button again, the
associated green indicator lamp goes off.Switching off the air conditioning may result in
some discomfort (humidity, misting).
Page 95 of 340
3
93
Comfort
Quad-zone digital air conditioning
Automatic operation
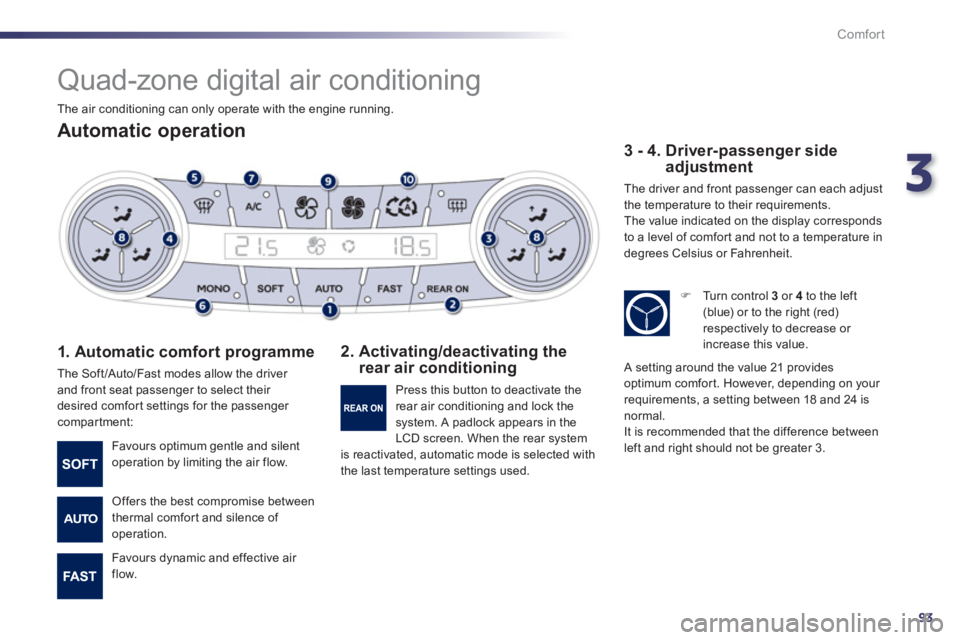
1. Automatic comfort programme
The Soft/Auto/Fast modes allow the driver
and front seat passenger to select their
desired comfor t settings for the passenger compartment:
2. Activating/deactivating the rear air conditioning
3 - 4. Driver-passenger side
adjustment
The driver and front passenger can each adjust
the temperature to their requirements.
The value indicated on the display corresponds
to a level of comfor t and not to a temperature in
de
grees Celsius or Fahrenheit.
Favours optimum gentle and silent
operation by limiting the air flow.
Offers the best compromise between
thermal comfort and silence of
operation.
Favours d
ynamic and effective air
flow. Pr
ess this button to deactivate the
rear air conditioning and lock thesystem. A padlock appears in the
L
CD screen. When the rear system is reactivated, automatic mode is selected with
the last temperature settings used.
F
Turn control 3
or 4
to the left (blue) or to the right (red)respectively to decrease or
increase this value.
A setting around the value 21 providesoptimum comfort. However, depending on your
requirements, a setting between 18 and 24 is
normal.
It is recommended that the difference between
left and right should not be greater 3.
The air conditionin
g can only operate with the engine running.
Page 98 of 340
96
Comfort
Adjusting the rear passenger comfort level
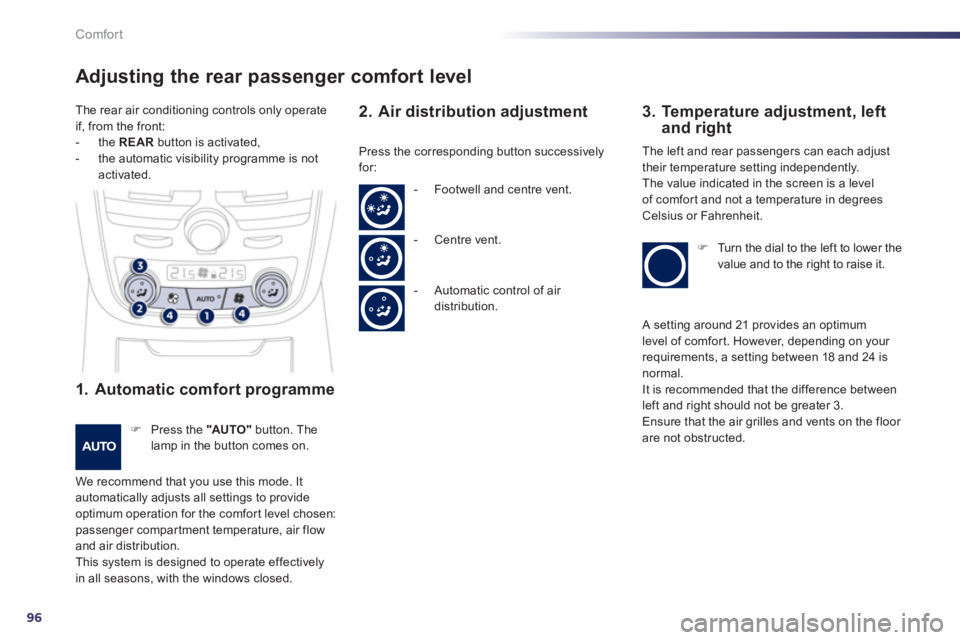
1. Automatic comfort programme
F Press the "AUTO"button. The lamp in the button comes on.
We recommend that you use this mode. It automatically adjusts all settings to provide
optimum operation for the comfor t level chosen: passenger compar tment temperature, air flowand air distribution.
This system is designed to operate effectivelyin all seasons, with the windows closed.
2. Air distribution adjustment
3. Temperature adjustment, leftand right
Press the corresponding button successively
f
or: The le
ft and rear passengers can each adjust
their temperature setting independently.
The value indicated in the screen is a level
of comfor t and not a temperature in degreesCelsius or Fahrenheit.
FTurn the dial to the left to lower the
value and to the right to raise it.
- F
ootwell and centre vent.
-
Centre vent.
- A
utomatic control of air distribution.
The rear air conditionin
g controls only operate
if, from the front:
- th
e REARbutton is activated,
- the automatic visibilit
y programme is notactivated.
A setting around 21 provides an optimum
level of comfor t. However, depending on your
requirements, a setting between 18 and 24 isnormal.
It is recommended that the difference between
left and right should not be greater 3.
Ensure that the air grilles and vents on the floor are not obstructed.
Page 102 of 340
100
Comfort
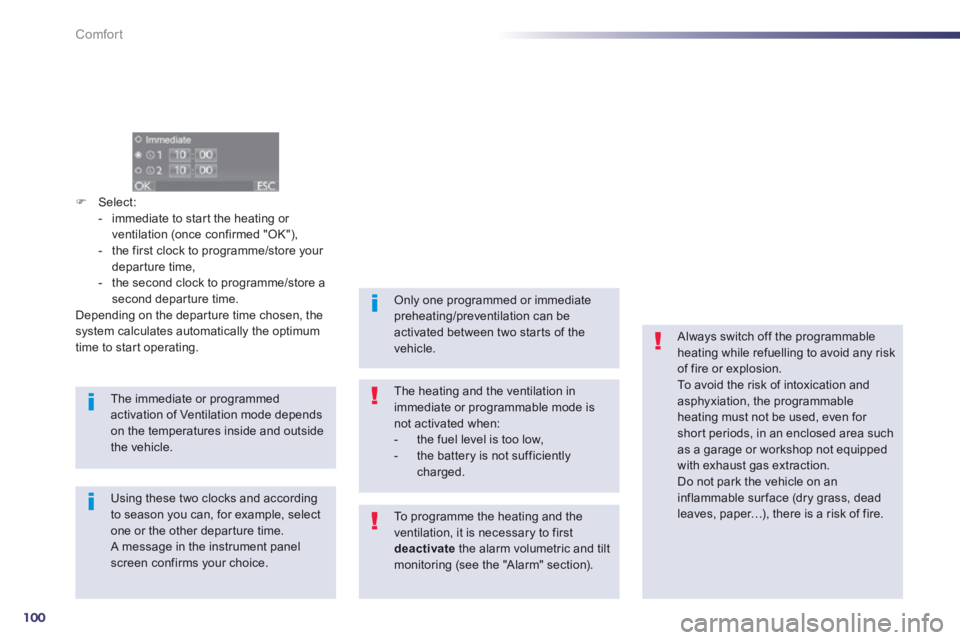
FSelect:
- immediate to star t the heating or
ventilation (once confirmed "OK"),
- the first clock to programme/store your departure time,
- the second clock to programme/store a
second depar ture time.
Depending on the depar ture time chosen, the system calculates automatically the optimum
time to star t operating.
The immediate or programmedactivation of Ventilation mode depends on the temperatures inside and outsidethe vehicle.
Always switch off the programmableheating while refuelling to avoid any riskof fire or explosion.
To avoid the risk of intoxication andasphyxiation, the programmable heating must not be used, even for shor t periods, in an enclosed area such as a garage or workshop not equipped with exhaust gas extraction.
Do not park the vehicle on an inflammable surface (dry grass, dead leaves, paper
Page 105 of 340
4
103
Driving
It is recommended that you do not apply the parking brake in very cold conditions (ice) and during towing
(breakdown, caravan...). Deactivate theautomatic functions and release theparking brake manually.
Before leaving the vehicle, check that parking brake warning lamps in the instrument panel and the control lever Aare on, not flashing.
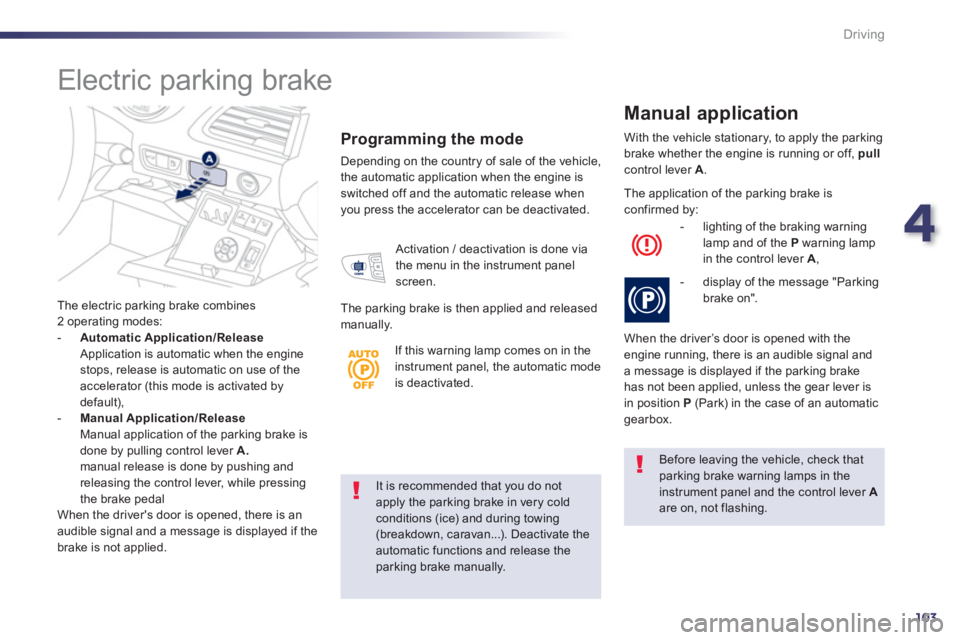
The electric parking brake combines
2 operating modes:
-
Automatic Application/Release Application is automatic when the engine stops, release is automatic on use of the accelerator (this mode is activated by
default), -Manual Application/Release Manual application of the parking brake is done by pulling control lever A. manual release is done by pushing and releasing the control lever, while pressing
the brake pedal
When the driver's door is opened, there is an
audible si
gnal and a message is displayed if the
brake is not applied.
Programming the mode
Depending on the country of sale of the vehicle,
the automatic application when the engine is switched off and the automatic release whenyou press the accelerator can be deactivated. With the vehicle stationary, to apply the parking
brake whether the en
gine is running or off, pull
control lever A
.
Manual application
Activation / deactivation is done via
the menu in the instrument panel
screen.
The parkin
g brake is then applied and released
manually. The application o
f the parking brake isconfirmed by:
- li
ghting of the braking warning lamp and of the Pwarning lamp
in the control lever A,
- displa
y of the message "Parking brake on".
When the driver’s door is opened with the
engine running, there is an audible signal and
a message is displayed if the parking brake
has not been applied, unless the gear lever is in position P(Park) in the case of an automatic gearbox.
Electric parking brake
If this warning lamp comes on in the instrument panel, the automatic modeis deactivated.
Page 118 of 340
116
Driving
Manual operation
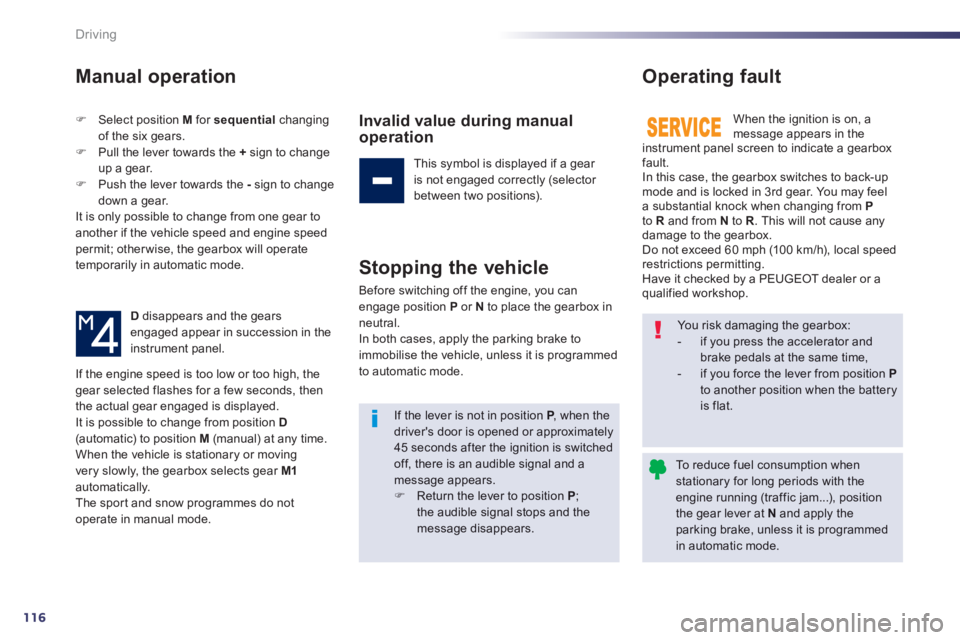
FSelect position M for sequentialchanging
of the six gears.FPull the lever towards the + sign to change
up a gear. FPush the lever towards the -
sign to change
down a gear.
It is only possible to change from one gear to another if the vehicle speed and engine speedpermit; otherwise, the gearbox will operate
temporarily in automatic mode.
D disappears and the gears engaged appear in succession in the
instrument panel.
Invalid value during manual operation
This symbol is displayed if a gear
is not engaged correctly (selector
between two positions).
Stopping the vehicle
Before switching off the engine, you can engage position P
or Nto place the gearbox in
neutral.
In both cases, apply the parking brake to
immobilise the vehicle, unless it is programmed
to automatic mode.
Operating fault
When the ignition is on, amessage appears in the
instrument panel screen to indicate a gearboxfault.
In this case, the gearbox switches to back-up mode and is locked in 3rd gear. You may feel
a substantial knock when changing from Pto Rand from N to R
. This will not cause any
damage to the gearbox.
Do not exceed 60 mph (10 0 km/h), local speed
restrictions permitting.
Have it checked by a PEUGEOT dealer or a qualified workshop.
If the en
gine speed is too low or too high, the gear selected flashes for a few seconds, then
the actual gear engaged is displayed.
It is possible to change from position D(automatic) to position M (manual) at any time.When the vehicle is stationary or movingvery slowly, the gearbox selects gear M1automatically.
The spor t and snow programmes do not
operate in manual mode.
You risk damaging the gearbox:
- if you press the accelerator and brake pedals at the same time,
- if you force the lever from position Pto another position when the batteryis flat.If the lever is not in position P
, when the Pdriver's door is opened or approximately 45 seconds after the ignition is switchedoff, there is an audible signal and a message appears. FReturn the lever to position P;the audible signal stops and themessage disappears.
To reduce fuel consumption when stationary for long periods with the engine running (traffic jam...), positionthe gear lever at Nand apply theparking brake, unless it is programmed in automatic mode.