Page 174 of 340

172
Safety
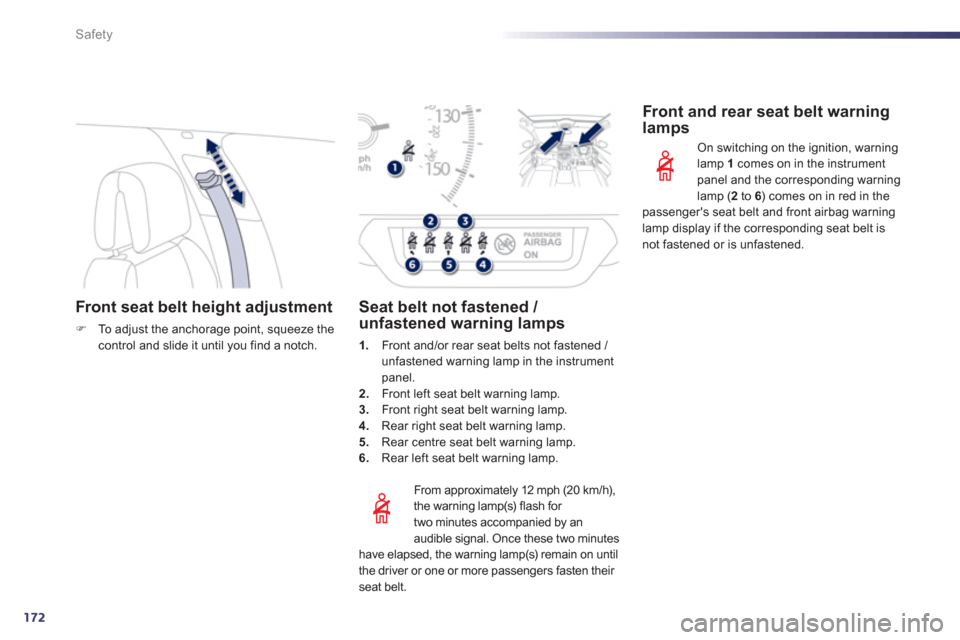
Front seat belt height adjustment
FTo a djust the anchorage point, squeeze thecontrol and slide it until you find a notch.
From approximatel
y 12 mph (20 km/h),
the warning lamp(s) flash for
two minutes accompanied by an
audible si
gnal. Once these two minutes
have elapsed, the warning lamp(s) remain on until
the driver or one or more passengers fasten their seat belt.
Seat belt not fastened / unfastened warning lamps
1.Front and/or rear seat belts not fastened / unfastened warning lamp in the instrument
panel.
2. Front left seat belt warning lamp.3.
Front right seat belt warning lamp.4.Rear right seat belt warning lamp.
5.Rear centre seat belt warning lamp.
6. Rear left seat belt warning lamp.
Front and rear seat belt warning lamps
On switching on the ignition, warninglamp 1
comes on in the instrument
panel and the corresponding warning lamp (2 to 6) comes on in red in thepassenger's seat belt and front airbag warninglamp display if the corresponding seat belt isnot fastened or is unfastened.
Page 178 of 340

176
Safety
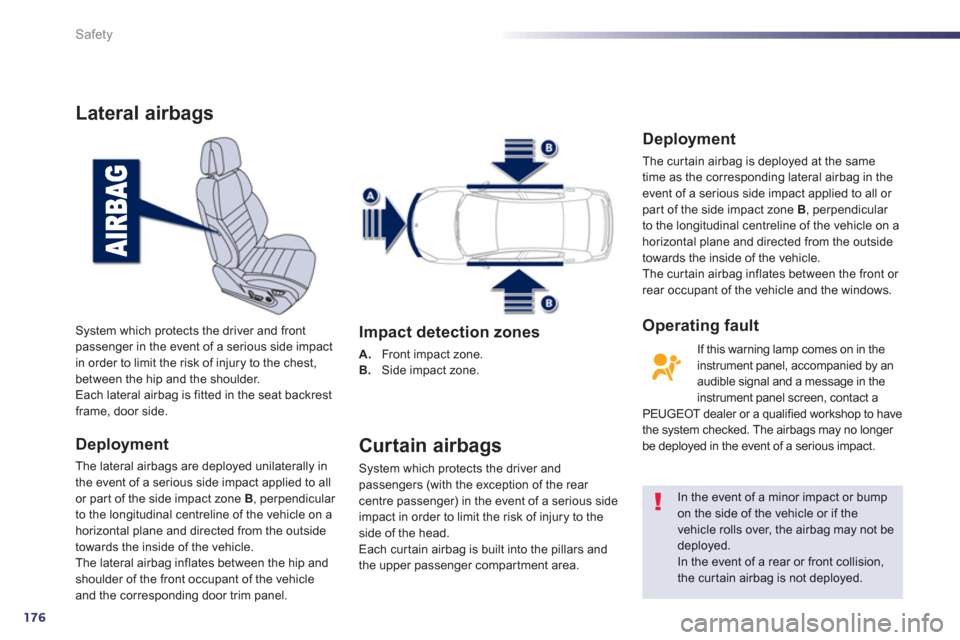
Lateral airbags
Deployment
The lateral airbags are deployed unilaterally in
the event of a serious side impact applied to all
or par t of the side impact zone B, perpendicular
to the longitudinal centreline of the vehicle on a horizontal plane and directed from the outside
towards the inside of the vehicle.
The lateral airbag inflates between the hip andshoulder of the front occupant of the vehicle and the corresponding door trim panel.
System which protects the driver and frontpassenger in the event of a serious side impact
in order to limit the risk of injury to the chest,
between the hip and the shoulder.
Each lateral airba
g is fitted in the seat backrest frame, door side.
Impact detection zones
A.
Front impact zone.
B. Side impact zone.
Curtain airbags
System which protects the driver and
passengers (with the exception of the rear centre passenger) in the event of a serious side
impact in order to limit the risk of injury to the side of the head.
Each curtain airbag is built into the pillars and
the upper passenger compar tment area.
In the event of a minor impact or bump on the side of the vehicle or if the vehicle rolls over, the airbag may not be
deployed.
In the event of a rear or front collision, the cur tain airbag is not deployed.
Deployment
The cur tain airbag is deployed at the same
time as the corresponding lateral airbag in the event of a serious side impact applied to all or par t of the side impact zone B, perpendicular
to the longitudinal centreline of the vehicle on a horizontal plane and directed from the outside
towards the inside of the vehicle.
The cur tain airbag inflates between the front or
rear occupant of the vehicle and the windows.
If this warnin
g lamp comes on in theinstrument panel, accompanied by an
audible signal and a message in the instrument panel screen, contact a
PEUGEOT dealer or a qualified workshop to have
the system checked. The airbags may no longer
be deployed in the event of a serious impact.
Operating fault
Page 191 of 340
8
189
Practical information
Fitting a wheel
Fitting the "space-saver"spare wheel
If your vehicle is fitted with alloy wheels, when tightening the bolts on fitting, it is normal to notice that the washers
do not come into contact with the "space-saver" spare wheel. The wheel is secured by the conical surface of each bolt.
After changing a wheel
To store the punctured wheel in the boot correctly, first remove the central cover. When using the "space-saver" typespare wheel, do not exceed 50 mph(80 km/h). Have the tightening of the bolts and thepressure of the spare wheel checkedby a PEUGEOT dealer or a qualified workshop without delay. Have the punctured wheel repaired and refitted to the vehicle as soon as possible.
List of operations
F
Put the wheel in place on the hub. F
Screw in the bolts fully by hand.F
Pre-tighten the security bolt using the
wheelbrace 1fitted with the security socket 4.4F Pre-tighten the other bolts using the
wheelbrace 1only.
Page 202 of 340

200
Practical information
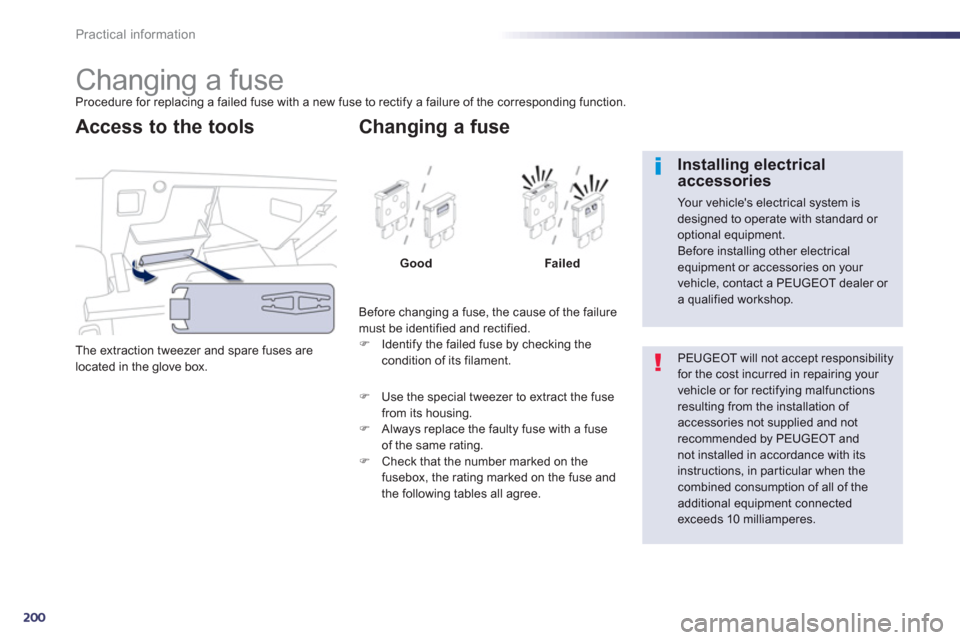
Changing a fuse Procedure for replacing a failed fuse with a new fuse to rectify a failure of the corresponding function.
The extraction tweezer and spare
fuses are
located in the glove box.
Access to the tools
Before changing a fuse, the cause of the failure
must be identified and rectified. F Identify the failed fuse by checking thecondition of its filament.
Changing a fuse
Good Failed
F
Use the special tweezer to extract the fuse from its housing.F
Always replace the faulty fuse with a fuse of the same rating.F
Check that the number marked on thefusebox, the rating marked on the fuse and
the following tables all agree.
PEUGEOT will not accept responsibilityfor the cost incurred in repairing your vehicle or for rectifying malfunctions resulting from the installation of accessories not supplied and not
recommended by PEUGEOT andnot installed in accordance with its instructions, in par ticular when thecombined consumption of all of the additional equipment connectedexceeds 10 milliamperes.
Installing electricalaccessories
Your vehicle's electrical system isdesigned to operate with standard or optional equipment.
Before installing other electrical equipment or accessories on your vehicle, contact a PEUGEOT dealer or a qualified workshop.
Page 205 of 340
8
203
Practical information
Engine compartment
fuses
Fuse N°
Rating (A)Functions
F20 15
Front / rear screenwash pump.
F2
120 Headlamp wash pump.
F2215 Horn.
F2
315 Right-hand main beam headlamp.
F2
415 Left-hand main beam headlamp.
F27 5
Le
ft hand lamp mask.
F2
85 Right hand lamp mask. The fusebox is placed in the engine compartment near the battery.
Access to the fuses
F
Unclip the cover. F
Change the fuse (see corresponding paragraph).F
When you have finished, close the cover carefully to ensure correct sealing of thefusebox.
Page 208 of 340

206
Practical information
The batteries contain harmful substancessuch as sulphuric acid and lead. They must be disposed of in accordance with regulations and must not, in anycircumstances, be discarded with household waste.
Take used remote control batteries andvehicle batteries to a special collection point.
Do not reverse the polarity and use only a 12 V charger.
Do not disconnect the terminals whilethe engine is running.
Do not charge the batteries without disconnecting the terminals first. Do not push the vehicle to star t the engine if it is fitted with the 6 -speed electronic gearbox system or an automatic gearbox.
It is advisable to disconnect the 12 Vbattery if the vehicle is to be left unusedfor more than one month.
Before disconnecting the battery
Wait 2 minutes after switching off the ignitionbefore disconnecting the 12 V battery.
Close the windows and the doors beforedisconnecting the battery.
Following reconnection of thebattery
Following reconnection of the 12 V battery,
switch on the ignition and wait 1 minute before
star ting to permit initialisation of the electronic
systems. However, if problems remain followingthis operation, contact a PEUGEOT dealer or a
qualified workshop.
Referring to the corresponding section, you
must yourself reinitialise:
- the remote control key,
- the panoramic sunroof blind,
- the GPS satellite navigation system.
Load reduction mode
System which manages the use of cer tain
functions according to the level of charge
remaining in the battery.
When the vehicle is bein
g driven, the load
reduction function temporarily deactivates certain functions, such as the air conditioning,
the heated rear screen...
The deactivated functions are reactivated
automatically as soon as conditions permit.
Page 210 of 340
208
Practical information
Changing a wiper blade
wiper blade
F
Within one minute after switching off
the ignition, operate the wiper stalk to
position the wiper blades vertically on the
windscreen.
Removing
F
Raise the corresponding wiper arm. F
Unclip the wiper blade and remove it.
Fitting
F
Put the corresponding new wiper blade inplace and clip it.
F
Fold down the wiper arm carefully.
After fitting a front wiper
blade
F
Switch on the ignition.F
Operate the wiper stalk again to park the
wiper blades.
Page 215 of 340
8
213
Practical information
Fitting roof bars
Maximum authorised weight on the roof rack, for a loading height not exceeding 40 cm (with the exception of bicycle carriers):
- Saloon: 70
kg
- SW: 100
kg
If the height exceeds 40 cm, adapt thespeed of the vehicle to the profile of the road to avoid damaging the roof barsand the fixings on the roof.
Be sure to refer to national legislation in order to comply with the regulations for transporting objects which are longer than the vehicle.
- Saloon: there are retainin
g pins in the door
apertures.
When fittin
g transverse roof bars, take care to position them correctly:
- SW: there are markin
gs on each of the
longitudinal bars.
Use accessories recommended by PEUGEOT obser ving themanufacturer's recommendations and fitting instructions so as to avoid the risk of damaging the body (deformation, scratches, ...).