2013 Peugeot 508 Hybrid height
[x] Cancel search: heightPage 85 of 340
3
83
Comfort
Warning triangle (stowing)
Before leaving your vehicle to set up and install the triangle, put on your high visibility vest.
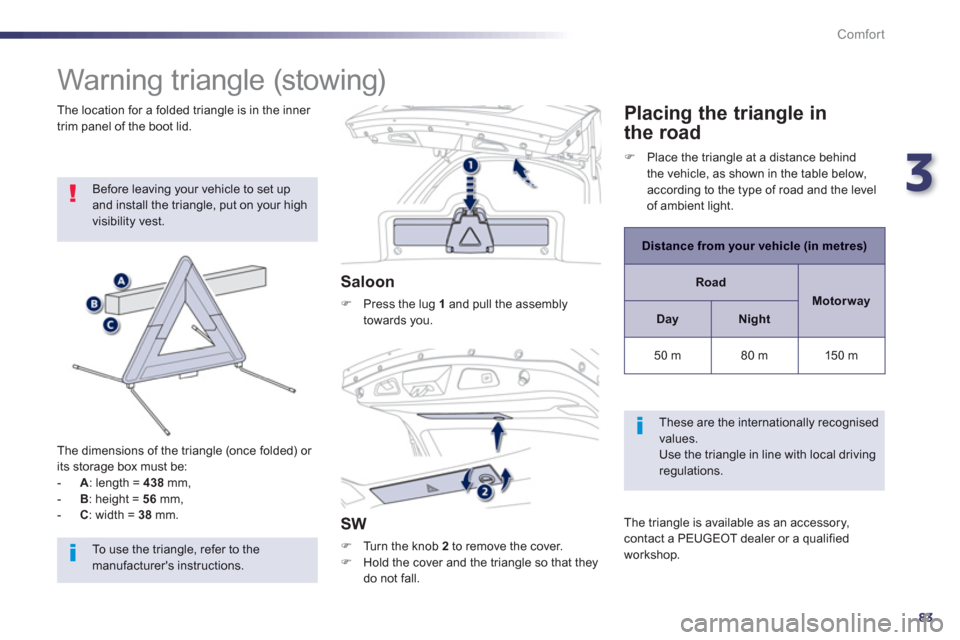
The dimensions o
f the triangle (once folded) or its storage box must be:
-
A
: length = 438mm,
-
B: height = 56
mm,
- C: width = 38mm.
Saloon
FPress the lug 1and pull the assembly
towards you.
SW
FTurn the knob 2 to remove the cover.FHold the cover and the triangle so that theydo not fall.
The location for a folded trian
gle is in the inner
trim panel of the boot lid.Placing the triangle in
t
he road
Distance from your vehicle (in metres)
Road
Motorway
DayNight
50 m 80 m
150 m
These are the internationally recognisedvalues.
Use the triangle in line with local driving regulations.
The trian
gle is available as an accessory, contact a PEUGEOT dealer or a qualified
workshop.
F Place the triangle at a distance behindthe vehicle, as shown in the table below,
according to the type of road and the level
of ambient light.
To use the triangle, refer to themanufacturer's instructions.
Page 127 of 340
4
125
Driving
Head-up display
System which projects various information onto
a smoked strip in the field of vision of the driver so that they do not have to take their eyes off
the road.
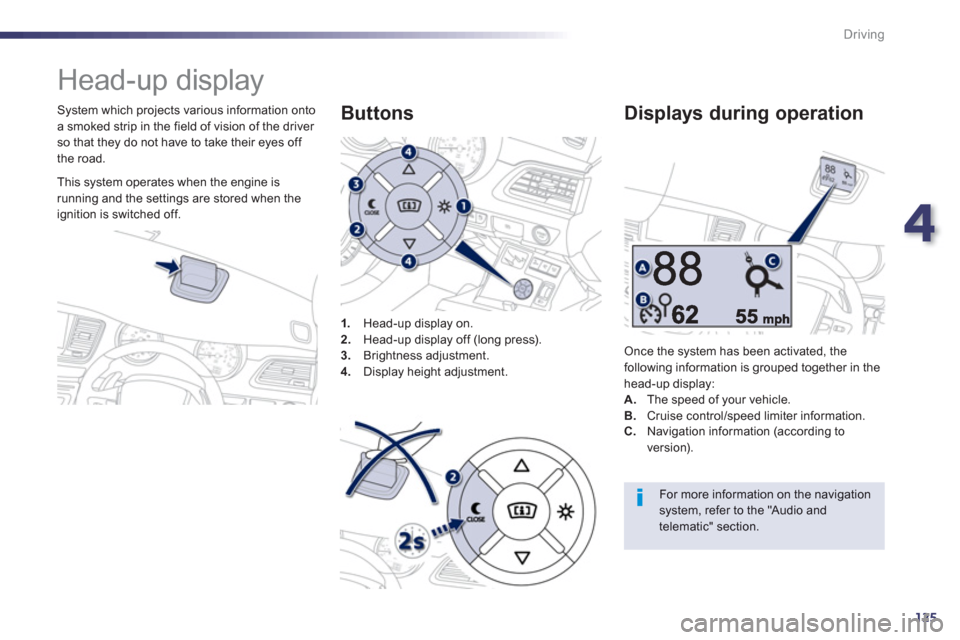
1
.Head-up display on. 2. Head-up display off (long press).3.
Brightness adjustment. 4.
Display height adjustment.
Buttons
Once the system has been activated, thefollowing information is grouped together in the
head-up display:A.The speed of your vehicle. B. Cruise control/speed limiter information.
Displays during operation
C.
Navigation information (according to
version).
For more information on the navigation system, refer to the "Audio andtelematic" section.
This system operates when the engine is
running and the settings are stored when the
i
gnition is switched off.
Page 128 of 340
126
Driving
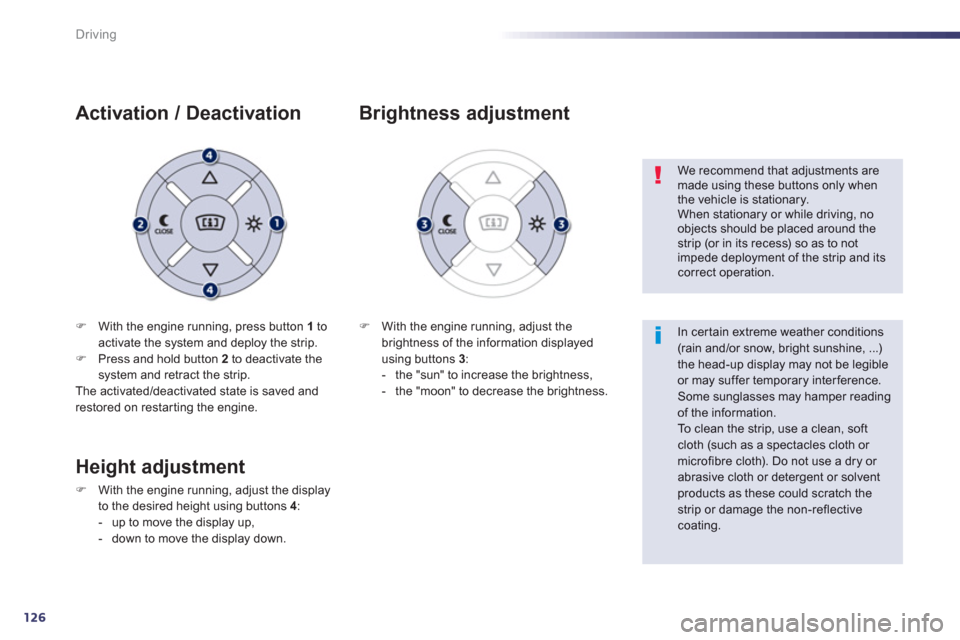
FWith the engine running, press button 1 toactivate the system and deploy the strip. FPress and hold button 2
to deactivate the
system and retract the strip.
The activated/deactivated state is saved and restored on restar ting the engine.
Activation / Deactivation
F With the engine running, adjust the
brightness of the information displayedusing buttons 3 :
- the "sun" to increase the brightness,
- the "moon" to decrease the brightness.
Brightness adjustment
We recommend that adjustments aremade using these buttons only whenthe vehicle is stationary.
When stationary or while driving, noobjects should be placed around thestrip (or in its recess) so as to not impede deployment of the strip and itscorrect operation.
In certain extreme weather conditions (rain and/or snow, bright sunshine, ...) the head-up display may not be legibleor may suffer temporary interference. Some sunglasses may hamper readingof the information.
To clean the strip, use a clean, soft cloth (such as a spectacles cloth or microfibre cloth). Do not use a dry or abrasive cloth or detergent or solventproducts as these could scratch thestrip or damage the non-reflectivecoating.
Height adjustment
FWith the engine running, adjust the display
to the desired height using buttons 4 :
- up to move the display up,
- down to move the display down.
Page 146 of 340
144
Visibility
Manual adjustment
of halogen
headlamps
Automatic adjustment of xenon
headlamps
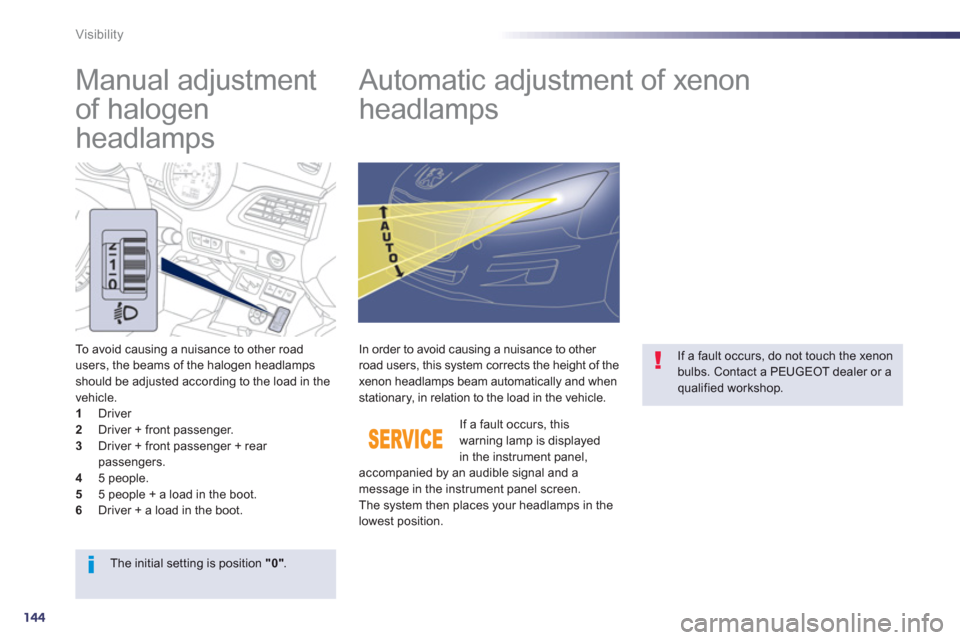
To avoid causing a nuisance to other road
users, the beams of the halogen headlamps should be adjusted according to the load in the
vehicle.1 Driver 2
Driver + front passenger.3
Driver + front passenger + rear passengers.4
5 people.5
5 people + a load in the boot. 6
Driver + a load in the boot. If a fault occurs
, this warning lamp is displayedin the instrument panel,
accompanied by an audible signal and a
message in the instrument panel screen.
The s
ystem then places your headlamps in the lowest position.
In order to avoid causing a nuisance to other road users, this system corrects the height of the
xenon headlamps beam automatically and when
stationary, in relation to the load in the vehicle.
If a fault occurs, do not touch the xenonbulbs. Contact a PEUGEOT dealer or a qualified workshop.
The initial setting is position "0".
Page 159 of 340
6
157./..
Child safety
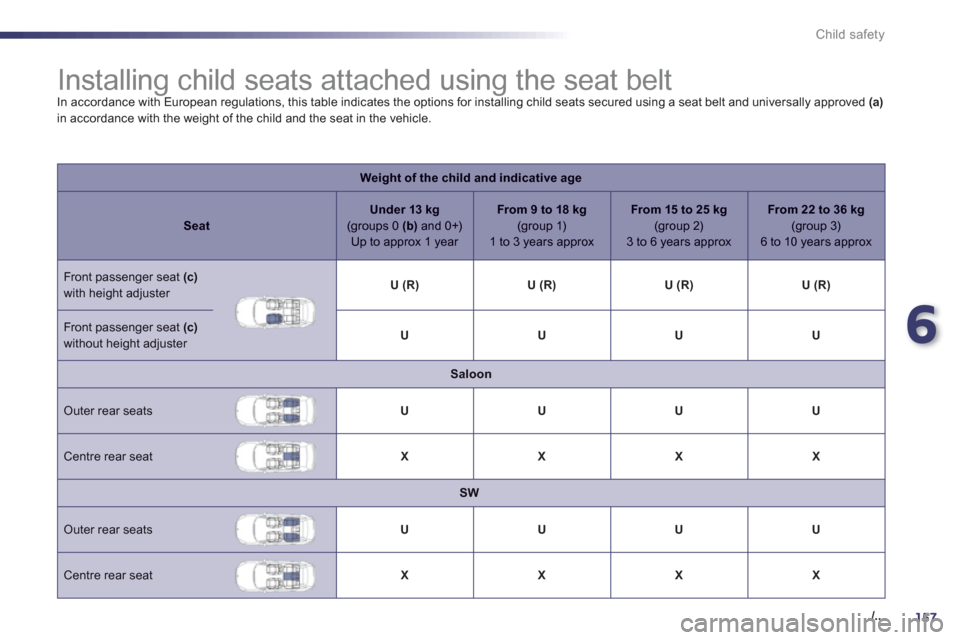
Installing child seats attached using the seat belt
In accordance with European regulations, this table indicates the options for installing child seats secured using a seat belt and universally approved (a)in accordance with the weight of the child and the seat in the vehicle.
Weight of the child and indicative age
SeatUnder 13 kg
(groups 0(
b )and 0+)Up to approx 1 year
From 9 to 18 kg(group 1)1 to 3 years approx
From 15 to 25 kg
(group 2)3 to 6 years approx
From 22 to 36 kg(group 3) 6 to 10 years approx
Front passenger seat(
c )with height adjuster U (R)U (R)U (R)U (R)
Front passenger seat (c)without height adjuster UUUU
Saloon
Outer rear seats UUUU
Centre rear seat XXXX
SW
Outer rear seats UUUU
Centre rear seat XXXX
Page 174 of 340
172
Safety
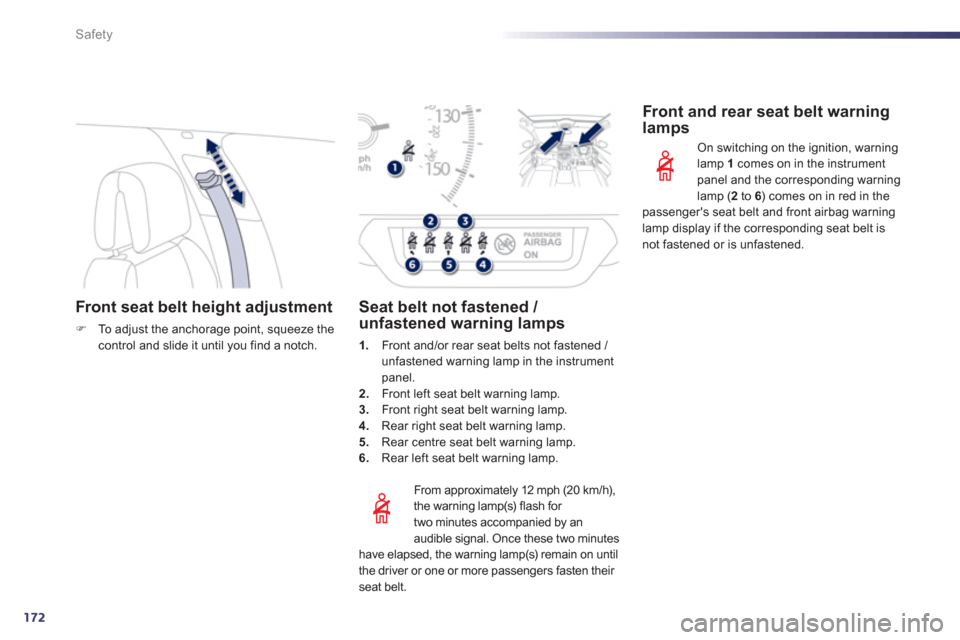
Front seat belt height adjustment
FTo a djust the anchorage point, squeeze thecontrol and slide it until you find a notch.
From approximatel
y 12 mph (20 km/h),
the warning lamp(s) flash for
two minutes accompanied by an
audible si
gnal. Once these two minutes
have elapsed, the warning lamp(s) remain on until
the driver or one or more passengers fasten their seat belt.
Seat belt not fastened / unfastened warning lamps
1.Front and/or rear seat belts not fastened / unfastened warning lamp in the instrument
panel.
2. Front left seat belt warning lamp.3.
Front right seat belt warning lamp.4.Rear right seat belt warning lamp.
5.Rear centre seat belt warning lamp.
6. Rear left seat belt warning lamp.
Front and rear seat belt warning lamps
On switching on the ignition, warninglamp 1
comes on in the instrument
panel and the corresponding warning lamp (2 to 6) comes on in red in thepassenger's seat belt and front airbag warninglamp display if the corresponding seat belt isnot fastened or is unfastened.
Page 215 of 340
8
213
Practical information
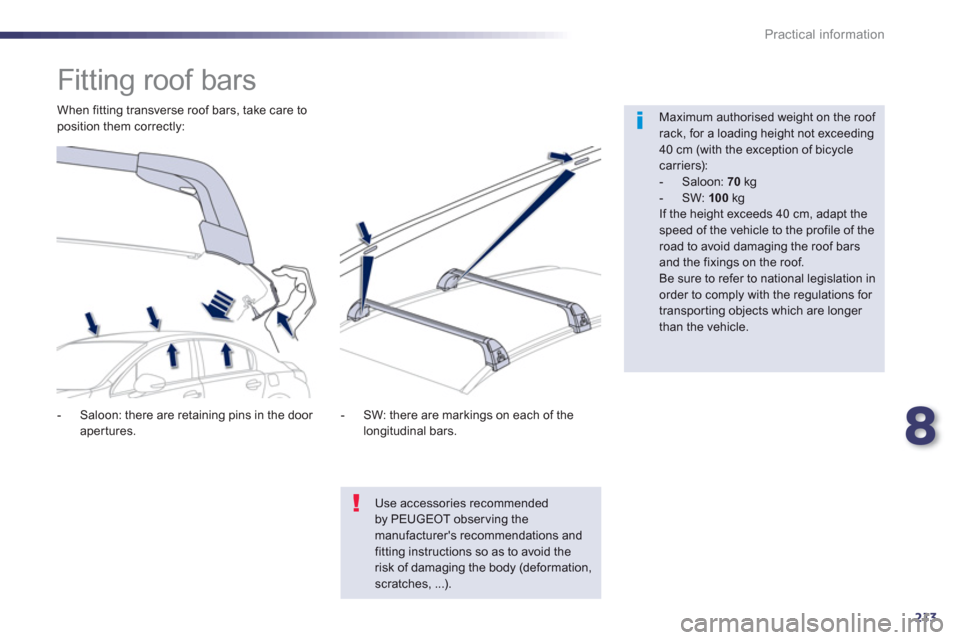
Fitting roof bars
Maximum authorised weight on the roof rack, for a loading height not exceeding 40 cm (with the exception of bicycle carriers):
- Saloon: 70
kg
- SW: 100
kg
If the height exceeds 40 cm, adapt thespeed of the vehicle to the profile of the road to avoid damaging the roof barsand the fixings on the roof.
Be sure to refer to national legislation in order to comply with the regulations for transporting objects which are longer than the vehicle.
- Saloon: there are retainin
g pins in the door
apertures.
When fittin
g transverse roof bars, take care to position them correctly:
- SW: there are markin
gs on each of the
longitudinal bars.
Use accessories recommended by PEUGEOT obser ving themanufacturer's recommendations and fitting instructions so as to avoid the risk of damaging the body (deformation, scratches, ...).
Page 329 of 340
.
327 Alphabetical index
Accessories ..................................................214Accessory socket, 12 volt ...............................77Adjusting headlamps .................................... 144Adjusting head restraints..........................67,70Adjusting seat belt height..............................172Adjusting the steering wheel...........................76Airbags............................................................32Airbags, curtain .....................................176,177Airbags, front.........................................174,177Airbags, lateral......................................176,177Air conditioning.........................................20, 89Air conditioning, digital........................87,90, 98Air conditioning, manual...........................87, 88Air conditioning, quad-zone...............93, 96, 98Air filter..........................................................r225Air flow............................................................20Air vents ..........................................................86Alarm ...............................................................53Anti-theft........................................................102Armrest............................................................77Armrest, rear...................................................r78Assistance call......................................166,240Audible warning............................................166Audio streaming (Bluetooth).........284,310,312Audio system (radio).....................................297Automatic illumination
of headlamps .......................................137, 141Automatic operation of hazard
warning lamps.............................................165Automatic rain sensitive
windscreen wipers..............................147,149Auxiliary socket.............................................309
Backup switching off.....................................f102Battery..................................................204, 225Battery, charging ...........................................204Battery, remote control.............................50-52Blind................................................................61Bluetooth (hands-free)..........................267, 311Bluetooth (telephone)....................................267Boot...........................................................57-59Boot (opening).................................................46Brake discs ....................................................226Brake lamps ..........................................196,197Brake pads ....................................................226Brakes...........................................................226
Capacity, fuel tank..........................................64CD.................................................................304CD MP3 ................................................305, 306Central locking................................................47Changing a bulb ....................191, 196,197, 199Changing a fuse............................................200Changing a wheel.................................184,185Changing a wiper blade........................150,208Changing the date.....................................41,42Changing the remote control battery........50, 51Changing the time.....................................41,42Checking levels .....................................222-224Checking the engine oil level ..........................37Checking tyre pressures (using the kit) ........178Checks ..................................219-221, 225, 226Children.........................................157, 161,162Child seats ...........................153,154,156,159Child seats, conventional......................156, 157Closing the boot..............................................57Closing the doors............................................47
Date (setting).............................................41,42Daytime running lamps.........139, 191,193, 195Deactivating ESP ..........................................170Deactivating the passenger airbag ...............174
Deadlocking ....................................................48Defrosting........................................................98Diesel..............................................................25Diesel additive level......................................224Diesel engine pre-heat warning lamp.............25Dimensions ...................................................236Dipped beam ..................................136,191-193Dipstick ....................................................37, 222Directional lighting ................................ 145, 146Direction indicators........140,165, 191,195-197Driving positions (memorising).......................69Dynamic emergency braking........................103Dynamic stability control (DSC)........27, 30, 170
AB
C
D
Connectors, audio ...........................79, 307, 309Coolant level ...........................................33,223Coolant temperature indicator........................r33Courtesy lamps.............................................151Cruise control........................................127,130Cup holder.......................................................r77
Eco-driving.....................................................20Eco-driving (advice)........................................20Economical driving .........................................20Economy mode .............................................207
E