Page 188 of 364

PRACTICAL INFORMATION
186
Beware of discharges of fl uid.
The expiry date of the fl uid is
indicated on the cartridge.
The sealant cartridge is designed for
single use; even if only partly used, it
must be replaced.
After use, do not discard the car-
tridge into the environment, take it to
an authorised waste disposal site or
a PEUGEOT dealer.
Do not forget to obtain a new sealant
cartridge, available from PEUGEOT
dealers or from a qualifi ed workshop.
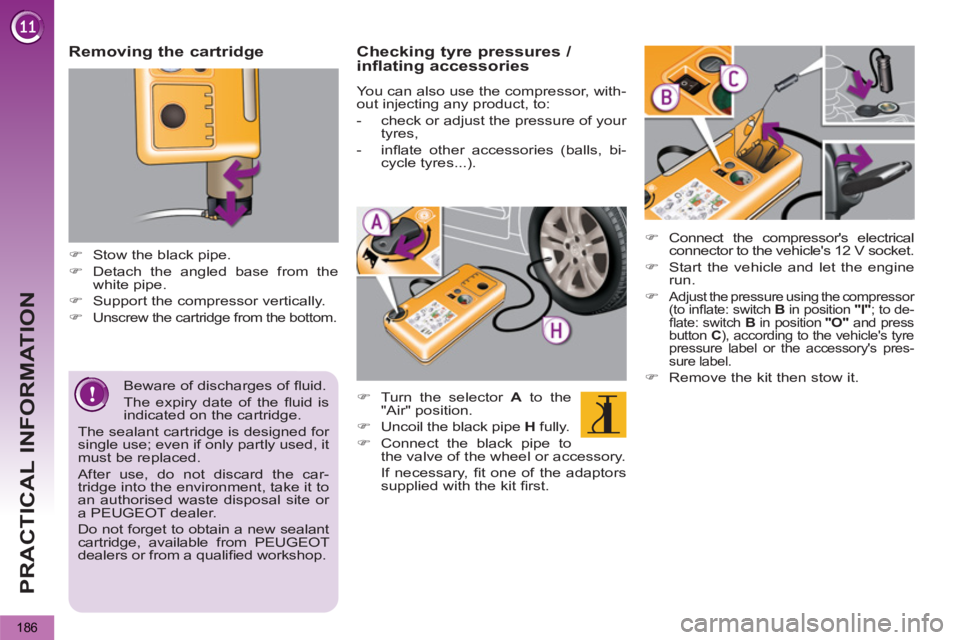
Removing the cartridge
�)
Stow the black pipe.
�)
Detach the angled base from the
white pipe.
�)
Support the compressor vertically.
�)
Unscrew the cartridge from the bottom.
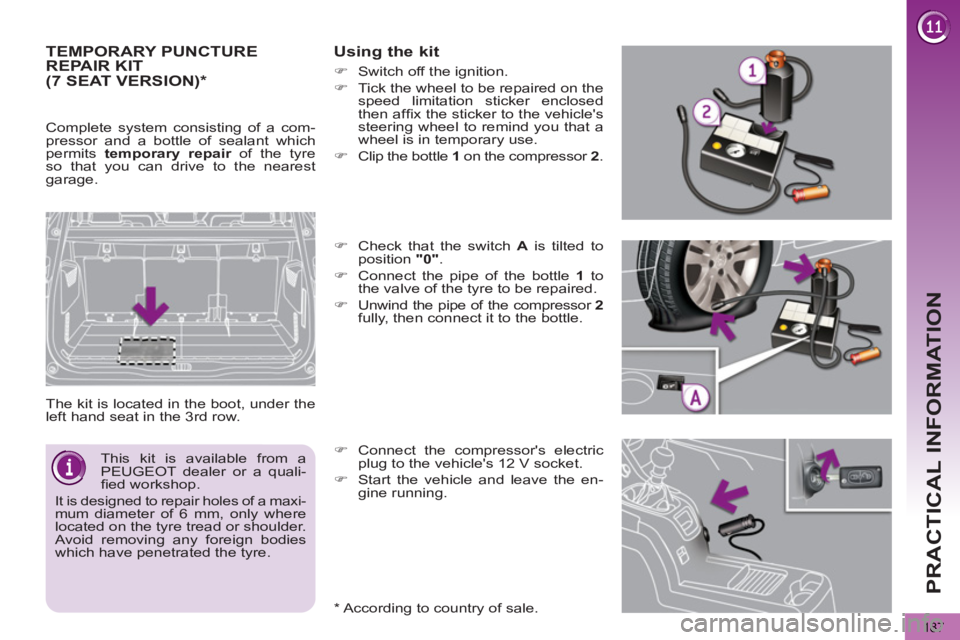
Checking tyre pressures /
inflating accessories
You can also use the compressor, with-
out injecting any product, to:
- check or adjust the pressure of your
tyres,
- infl ate other accessories (balls, bi-
cycle tyres...).
�)
Turn the selector A
to the
"Air" position.
�)
Uncoil the black pipe H
fully.
�)
Connect the black pipe to
the valve of the wheel or accessory.
If necessary, fi t one of the adaptors
supplied with the kit fi rst.
�)
Connect the compressor's electrical
connector to the vehicle's 12 V socket.
�)
Start the vehicle and let the engine
run.
�)
Adjust the pressure using the compressor
(to infl ate: switch B
in position "I"
; to de-
fl ate: switch B
in position "O"
and press
button C
), according to the vehicle's tyre
pressure label or the accessory's pres-
sure label.
�)
Remove the kit then stow it.
Page 189 of 364

PRACTICAL INFORMATION
187
TEMPORARY PUNCTURE REPAIR KIT
The kit is located in the boot, under the
left hand seat in the 3 rd row.
Using the kit
*
According to country of sale.
�)
Connect the compressor's electric
plug to the vehicle's 12 V socket.
�)
Start the vehicle and leave the en-
gine running.
This kit is available from a
PEUGEOT dealer or a quali-
fi ed workshop.
It is designed to repair holes of a maxi-
mum diameter of 6 mm, only where
located on the tyre tread or shoulder.
Avoid removing any foreign bodies
which have penetrated the tyre.
(7 SEAT VERSION) *
Complete system consisting of a com-
pressor and a bottle of sealant which
permits temporary repair
of the tyre
so that you can drive to the nearest
garage.
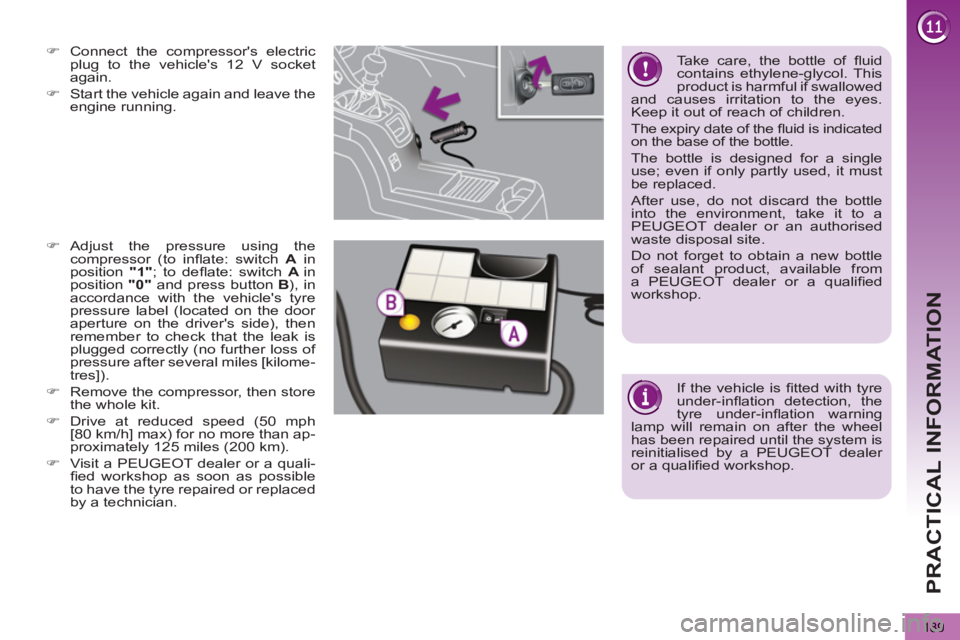
�)
Check that the switch A
is tilted to
position "0"
.
�)
Connect the pipe of the bottle 1
to
the valve of the tyre to be repaired.
�)
Unwind the pipe of the compressor 2
fully, then connect it to the bottle.
�)
Switch off the ignition.
�)
Tick the wheel to be repaired on the
speed limitation sticker enclosed
then affi x the sticker to the vehicle's
steering wheel to remind you that a
wheel is in temporary use.
�)
Clip the bottle 1
on the compressor 2
.
Page 190 of 364
PRACTICAL INFORMATION
188
�)
Switch on the compressor by tilting
the switch A
to position "1"
until the
tyre pressure reaches 2.0 bars.
�)
Remove the compressor and store
the bottle in the plastic bag, supplied
in the kit, to avoid staining your ve-
hicle with traces of fl uid.
�)
Drive immediately for approximate-
ly two miles (three kilometres), at
reduced speed (between 10 and
35 mph [20 and 60 km/h]), to plug
the puncture.
�)
Stop to check the repair and the
pressure.
If this pressure has not been
reached after approximately
fi ve to ten minutes, the tyre can-not be repaired; contact a PEUGEOT
or a qualifi ed workshop to have your
vehicle repaired.
�)
Connect the compressor pipe di-
rectly to the valve of the repaired
wheel.
Page 191 of 364

PRACTICAL INFORMATION
189
�)
Connect the compressor's electric
plug to the vehicle's 12 V socket
again.
�)
Start the vehicle again and leave the
engine running.
�)
Adjust the pressure using the
compressor (to infl ate: switch A
in
position "1"
; to defl ate: switch A
in
position "0"
and press button B
), in
accordance with the vehicle's tyre
pressure label (located on the door
aperture on the driver's side), then
remember to check that the leak is
plugged correctly (no further loss of
pressure after several miles [kilome-
tres]).
�)
Remove the compressor, then store
the whole kit.
�)
Drive at reduced speed (50 mph
[80 km/h] max) for no more than ap-
proximately 125 miles (200 km).
�)
Visit a PEUGEOT dealer or a quali-
fi ed workshop as soon as possible
to have the tyre repaired or replaced
by a technician.
If the vehicle is fi tted with tyre
under-infl ation detection, the
tyre under-infl ation warning
lamp will remain on after the wheel
has been repaired until the system is
reinitialised by a PEUGEOT dealer
or a qualifi ed workshop.
Take care, the bottle of fl uid
contains ethylene-glycol. This
product is harmful if swallowed
and causes irritation to the eyes.
Keep it out of reach of children.
The expiry date of the fl uid is indicated
on the base of the bottle.
The bottle is designed for a single
use; even if only partly used, it must
be replaced.
After use, do not discard the bottle
into the environment, take it to a
PEUGEOT dealer or an authorised
waste disposal site.
Do not forget to obtain a new bottle
of sealant product, available from
a PEUGEOT dealer or a qualifi ed
workshop.
Page 192 of 364

PRACTICAL INFORMATION
190
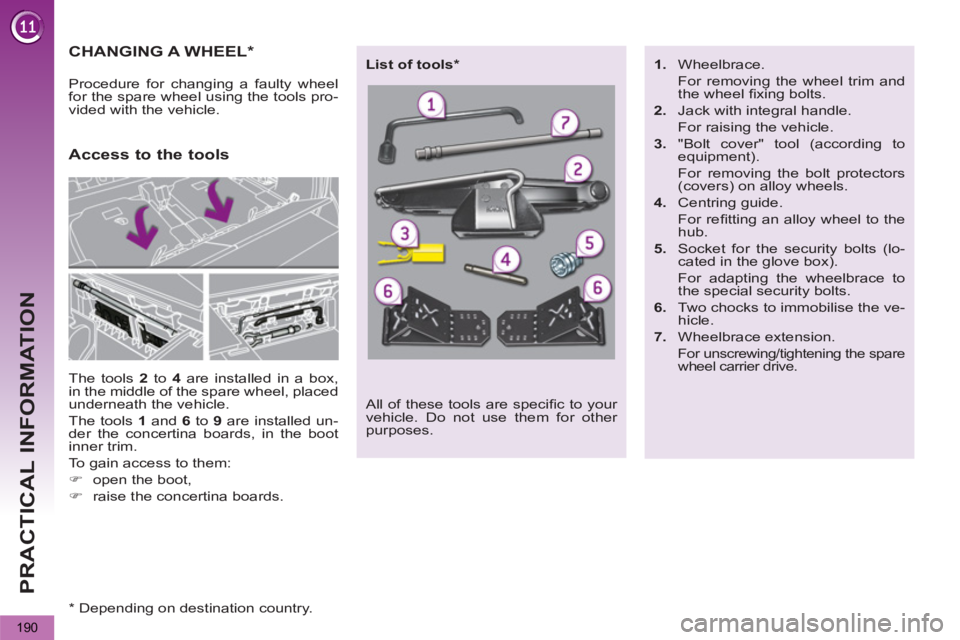
CHANGING A WHEEL *
The tools 2
to 4
are installed in a box,
in the middle of the spare wheel, placed
underneath the vehicle.
The tools 1
and 6
to 9
are installed un-
der the concertina boards, in the boot
inner trim.
To gain access to them:
�)
open the boot,
�)
raise the concertina boards.
Access to the tools
Procedure for changing a faulty wheel
for the spare wheel using the tools pro-
vided with the vehicle.
All of these tools are specifi c to your
vehicle. Do not use them for other
purposes.
List of tools *
1.
Wheelbrace.
For removing the wheel trim and
the wheel fi xing bolts.
2.
Jack with integral handle.
For raising the vehicle.
3.
"Bolt cover" tool (according to
equipment).
For removing the bolt protectors
(covers) on alloy wheels.
4.
Centring guide.
For refi tting an alloy wheel to the
hub.
5.
Socket for the security bolts (lo-
cated in the glove box).
For adapting the wheelbrace to
the special security bolts.
6.
Two chocks to immobilise the ve-
hicle.
7.
Wheelbrace extension.
For unscrewing/tightening the spare
wheel carrier drive.
*
Depending on destination country.
Page 193 of 364
PRACTICAL INFORMATION
191
Other accessories
Wheel with trim
When removing the wheel
,
detach the trim fi rst using the
wheelbrace 1
pulling at the valve
passage hole.
When refi tting the wheel
, refi t the
trim starting by placing its notch fac-
ing the valve and press around its
edge with the palm of your hand.
8.
Removable towing eye.
Refer to "Electric parking brake"
in the "Driving" section.
Refer to the paragraph "Towing
the vehicle".
9.
Electric parking brake emergency
release control.
Page 194 of 364
PRACTICAL INFORMATION
Access to the spare wheel *
The spare wheel is supported by a
cable-driven carrier underneath the ve-
hicle.
Taking out the wheel
�)
Raise the concertina board to reveal
the spare wheel carrier drive nut.
�)
Turn this drive nut fully clockwise, us-
ing the wheelbrace 1
and the exten-
sion 7
, to unwind the carrier cable.
�)
Detach the wheel/box assembly
from the rear of the vehicle.
�)
Remove the hook with its connection
plate to release the wheel/box as-
sembly, as shown in the illustration.
�)
Pull out the wheel to gain access to
the box.
�)
Slide the box cover to the centre
and remove it to gain access to the
other tools.
*
Depending on destination country.
Page 195 of 364
PRACTICAL INFORMATION
193
Tyre under-infl ation
detection
The spare wheel is not fi tted
with a sensor. The punctured wheel
must be repaired by a PEUGEOT
dealer or a qualifi ed workshop.
Putting the wheel back in place
�)
Store the tools used in the box and
close the cover.
�)
Position the box on the ground and
centre the spare wheel on it.
�)
Pass the hook with its connection
plate into the wheel then the box, as
illustrated.
�)
Raise the wheel/box assembly under-
neath the vehicle by turning the car-
rier drive nut anticlockwise using the
wheelbrace 1
and the extension 7
.
�)
Tighten fully and check that the
wheel is horizontally fl ush against
the fl oor.