2013 PEUGEOT 308 CC mirror
[x] Cancel search: mirrorPage 63 of 268

4
61
ACCESS
Unlocking and partial opening of the
boot Press this button for more than two seconds to un-
lock the boot. The boot
opens slightly.
This action unlocks the vehicle fi rst. Press the open padlock
once to unlock the driver's
door only.
Selective unlocking using the
remote control
REMOTE CONTROL KEY
System which permits central unlock-
ing and locking of the vehicle using the
lock or from a distance, as well as of the
interior storage compartments (glove
box and front armrest). It is also used to
locate and start the vehicle, as well as
providing protection against theft.
Unfolding the key
First press this button to unfold the
key.
Unlocking the vehicle
The direction indicators fl ash for a few
seconds.
The central unlocking also unlocks the
glove box and the front armrest com-
partment.
According to version, the door mirrors
unfold, the alarm is deactivated. Press the open padlock to
unlock the vehicle.
Complete unlocking using the key
Turn the key forward in the driver's door lock to unlock the vehicle.
Complete unlocking using the
remote control
Press the open padlock again to un-lock the passenger's door and the
boot.
The direction indicators fl ash for a few
seconds.
Depending on version, the door mirrors
unfold, the alarm is deactivated.
The complete or selective
unlocking parameter is set
via the vehicle confi gura-
tion menu.
Complete unlocking is acti-
vated by default.
Page 64 of 268

4
!
i
i
62
ACCESS
Folding the key
First press this button to fold the key.
If you do not press the button when fold-
ing the key, there is a risk of damage to
the mechanism. Deadlocking renders the exterior
and interior door controls inopera-
tive.
It also deactivates the manual cen-
tral control button.
Therefore, never leave anyone
inside the vehicle when it is dead-
locked.
If one of the doors or the boot is still
open, the central locking does not
take place.
If a door or the boot is not opened
after unlocking the vehicle, the
v ehicle will lock itself again auto-
matically after thirty seconds but
without reactivating the alarm. Deadlocking using the remote
control
Deadlocking using the key
The folding and unfolding of the
door mirrors using the remote
control can be deactivated by a
PEUGEOT dealer or a qualifi ed
workshop.
Press the closed padlock to lock the vehicle com-
pletely.
Press the closed padlock again within fi ve seconds
to deadlock the vehicle.
Locking the vehicle
Press the closed padlock to lock the vehicle com-
pletely.
Normal locking using the key
Turn the key rearward in the driver's door lock to lock the vehicle com-
pletely.
Normal locking using the remote
control
The direction indicators come on for a
few seconds.
Depending on version, the door mirrors
fold, the alarm is activated.
The direction indicators come on for a
few seconds.
The central locking also locks the glove
box and the front armrest compartment.
Depending on version, the door mirrors
fold, the alarm is activated.
Turn the key rearwards in the driv-er's door lock to lock the vehicle
completely.
Turn the key rearwards again within fi ve seconds to deadlock the vehicle.
Page 81 of 268

5
!
AUTO
79
VISIBILITY
Automatic illumination of headlamps
When a low level of ambient light is de-
tected by a sunshine sensor, the num-
ber plate lamps, sidelamps and dipped
beam headlamps are switched on auto-
matically, without any action on the part
of the driver. They can also come on if
rain is detected, at the same time as
automatic operation of the windscreen
wipers.
As soon as the brightness returns to a
suffi cient level or after the windscreen
wipers are switched off, the lamps are
switched off automatically.
Activation
Turn the ring to the "AUTO" posi-
tion. The activation of the function
is accompanied by the display of a
message in the screen.
Deactivation
Turn the ring to another position. Deactivation of the function is ac-
companied by the display of a mes-
sage in the screen. In fog or snow, the sunshine sen-
sor may detect suffi cient light. In
this case, the lighting will not come
on automatically.
Do not cover the sunshine sensor,
coupled with the rain sensor and
located in the centre of the wind-
screen behind the rear view mirror;
the associated functions would no
longer be controlled.
Operating fault
Automatic "guide-me-home"
lighting
When the automatic illumination of
headlamps function is activated (light-
ing control stalk in the "
AUTO " posi-
tion), under low ambient light the dipped
beams headlamps come on automati-
cally when the ignition is switched off.
In the event of a malfunction of
the sunshine sensor, the lighting
comes on, this warning lamp is
displayed in the instrument panel
and/or a message appears in the screen,
accompanied by an audible signal.
Contact a PEUGEOT dealer or a qualifi ed
workshop.
Programming Activation or deactivation,
as well as the duration of
the guide-me-home light-
ing, is set in the vehicle
confi guration menu.
Page 82 of 268

5
ii
!
80
VISIBILITY
EXTERIOR WELCOME LIGHTING
The remote switching on of the lighting
and side spotlamps makes your approach
to the vehicle easier in poor light. It is acti-
vated in accordance with the light intensity
detected by the brightness sensor.
Switching on
Press the open padlock on the re-mote control.
The dipped beam headlamps and the sidelamps come on, as well as
the side spotlamps, located in the
exterior mirrors; your vehicle is also
unlocked.
The welcome lighting duration is
associated with and identical to
that of the automatic guide-me-
home lighting.
MANUAL ADJUSTMENT OF HALOGEN HEADLAMPS
Initial setting is position "0" .
To avoid dazzling other road users, the
height of the halogen bulb headlamps
must be adjusted according to the load
in the vehicle.
0.
1 or 2 people in the front seats.
-. 3 people.
1. 4 people.
-. Intermediate setting.
2. 4 people + maximum authorised
loads.
-. Intermediate setting.
3. Driver + maximum authorised loads.
Switching off
The exterior welcome lighting switches
off automatically after a set time, when
the ignition is switched on or on locking
the vehicle.
AUTOMATIC ADJUSTMENT OF XENON HEADLAMPS
Do not touch the xenon headlamp
bulbs.
Contact a PEUGEOT dealer or a
qualifi ed workshop.
In order to avoid causing a nuisance to
other road users, this system corrects
the height of the xenon headlamp beams
automatically and when stationary, in re-
lation to the load in the vehicle.
If a malfunction occurs, this
warning lamp is displayed on
the instrument panel, accom-
panied by an audible signal and
a message in the screen.
The system then places your headlamps
in the lowest position.
Page 85 of 268

5
!
i
83
VISIBILITY
Screenwash/headlamp wash low In the case of vehicles fi tted
with headlamp washers, when
the minimum level of the res-
ervoir is reached, this warning
lamp and/or the service warning lamp
is displayed in the instrument panel, ac-
companied by an audible signal and a
message in the screen.
Next time you stop, fi ll the screenwash /
headlamp wash fl uid reservoir.
The warning lamp is displayed when
the ignition is switched on, or every time
the stalk is operated, until the reservoir
is fi lled. Automatic rain sensitive
windscreen wipers
The windscreen wipers operate automati-
cally, without any action on the part of the
driver, if rain is detected (sensor behind
the rear view mirror), adapting their speed
to the intensity of the rainfall.
Activation
This is controlled manually by the driver
by pushing the stalk downwards to the
"AUTO" position.
It is accompanied by a message in the
screen.
Do not cover the rain sensor, linked
with the sunshine sensor and locat-
ed in the centre of the windscreen
behind the rear view mirror.
Switch off the automatic rain sen-
sitive wipers when using an auto-
matic car wash.
In winter, to avoid damaging the
wiper blades, it is advisable to wait
until the windscreen is completely
clear of ice before activating the
automatic rain sensitive wipers. The automatic rain sensitive wipers
must be reactivated if the ignition has
been off for more than one minute, by
pushing the stalk downwards.
Switching off
This is controlled manually by the driver
by moving the stalk upwards then re-
turning it to position "0" .
It is accompanied by a message in the
screen. Operating fault
If an automatic wiping malfunction oc-
curs, the wipers will operate in intermit-
tent mode.
Have it checked by a PEUGEOT dealer
or a qualifi ed workshop.
Page 89 of 268
6
87
FITTINGS
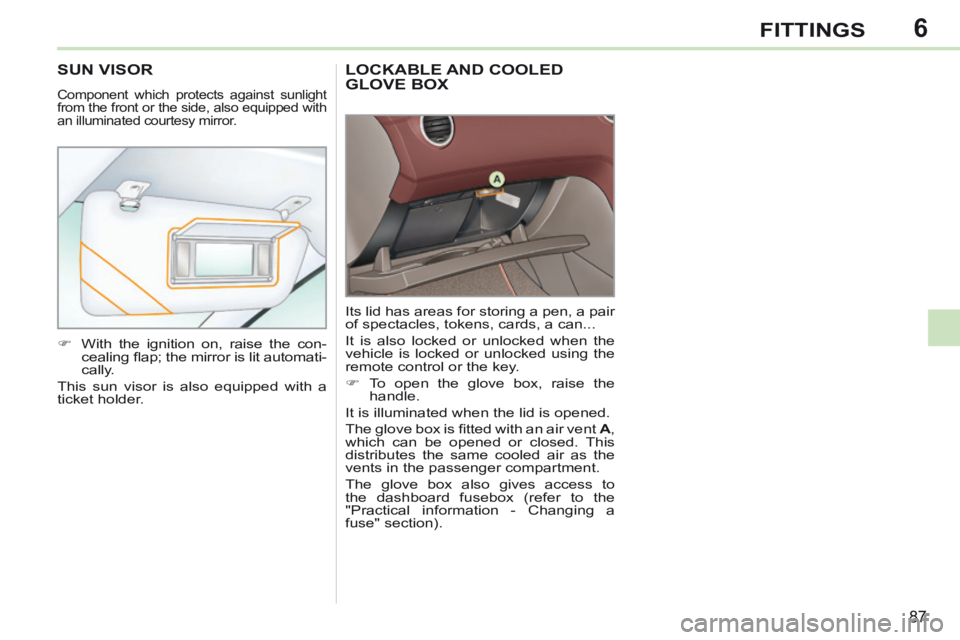
LOCKABLE AND COOLED GLOVE BOX
Its lid has areas for storing a pen, a pair
of spectacles, tokens, cards, a can...
It is also locked or unlocked when the
vehicle is locked or unlocked using the
remote control or the key.
To open the glove box, raise the handle.
It is illuminated when the lid is opened.
The glove box is fi tted with an air vent A ,
which can be opened or closed. This
distributes the same cooled air as the
vents in the passenger compartment.
The glove box also gives access to
the dashboard fusebox (refer to the
"Practical information - Changing a
fuse" section).
SUN VISOR
Component which protects against sunlight
from the front or the side, also equipped with
an illuminated courtesy mirror.
With the ignition on, raise the con- cealing fl ap; the mirror is lit automati-
cally.
This sun visor is also equipped with a
ticket holder.
Page 154 of 268
10
152
PRACTICAL INFORMATION
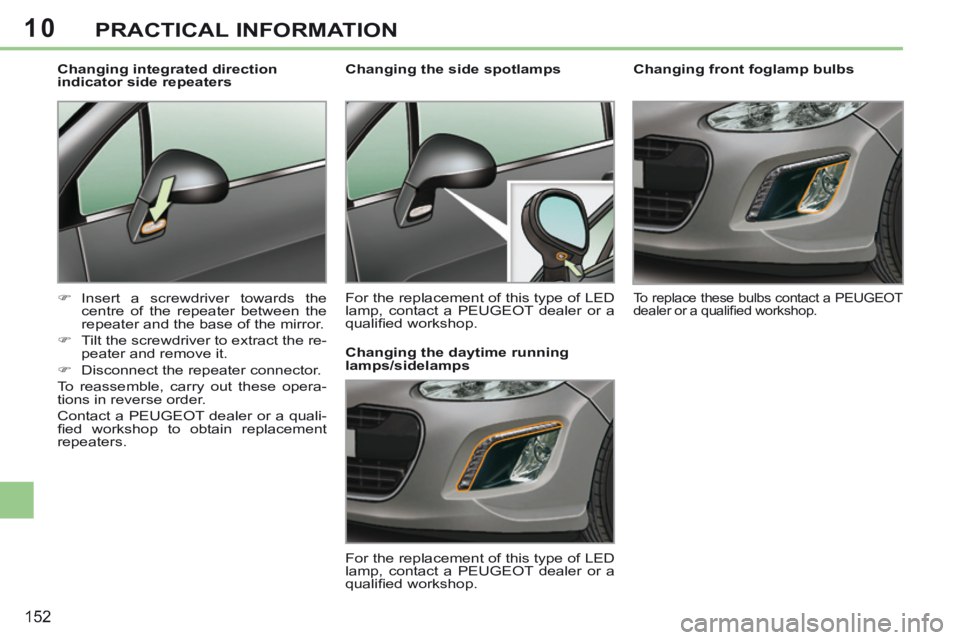
Changing front foglamp bulbs
To replace these bulbs contact a PEUGEOT
dealer or a qualifi ed workshop.
Changing the side spotlamps
For the replacement of this type of LED
lamp, contact a PEUGEOT dealer or a
qualifi ed workshop.
Changing integrated direction
indicator side repeaters
Insert a screwdriver towards the
centre of the repeater between the
repeater and the base of the mirror.
Tilt the screwdriver to extract the re- peater and remove it.
Disconnect the repeater connector.
To reassemble, carry out these opera-
tions in reverse order.
Contact a PEUGEOT dealer or a quali-
fi ed workshop to obtain replacement
repeaters. Changing the daytime running
lamps/sidelamps
For the replacement of this type of LED
lamp, contact a PEUGEOT dealer or a
qualifi ed workshop.
Page 158 of 268

10
156
PRACTICAL INFORMATION
Dashboard fuses
The fusebox is located in the lower left
of the dashboard.
Access to the fuses
refer to the paragraph "Access to the tools". Fuse tables
Fuse N° Rating Functions
F1 - Not used.
F2 30 A Locking and deadlocking earth.
F3 5 A Airbags and pretensioners control unit.
F4 10 A Clutch pedal and dual-function brake switches,
electrochromatic rear view mirror, air conditioning,
steering wheel angle sensor, automatic gearbox,
switching and protection unit.
F5 30 A Front one-touch electric windows, folding mirrors
supply.
F6 30 A Rear one-touch electric windows, exterior door
opening controls.
F7 5 A Front and rear courtesy lamps, map reading lamps,
sun visor lighting, glove box lighting.
F8 20 A
Audio equipment, audio/telephone, multifunction screen,
tyre under-infl ation detection, interior storage compartments.
F9 30 A Front 12 V socket, cigarette lighter.
F10 15 A Steering mounted controls, alarm siren, alarm
control unit.
F 11 15 A Low current ignition switch.