2013 NISSAN VERSA SEDAN reset
[x] Cancel search: resetPage 4 of 22
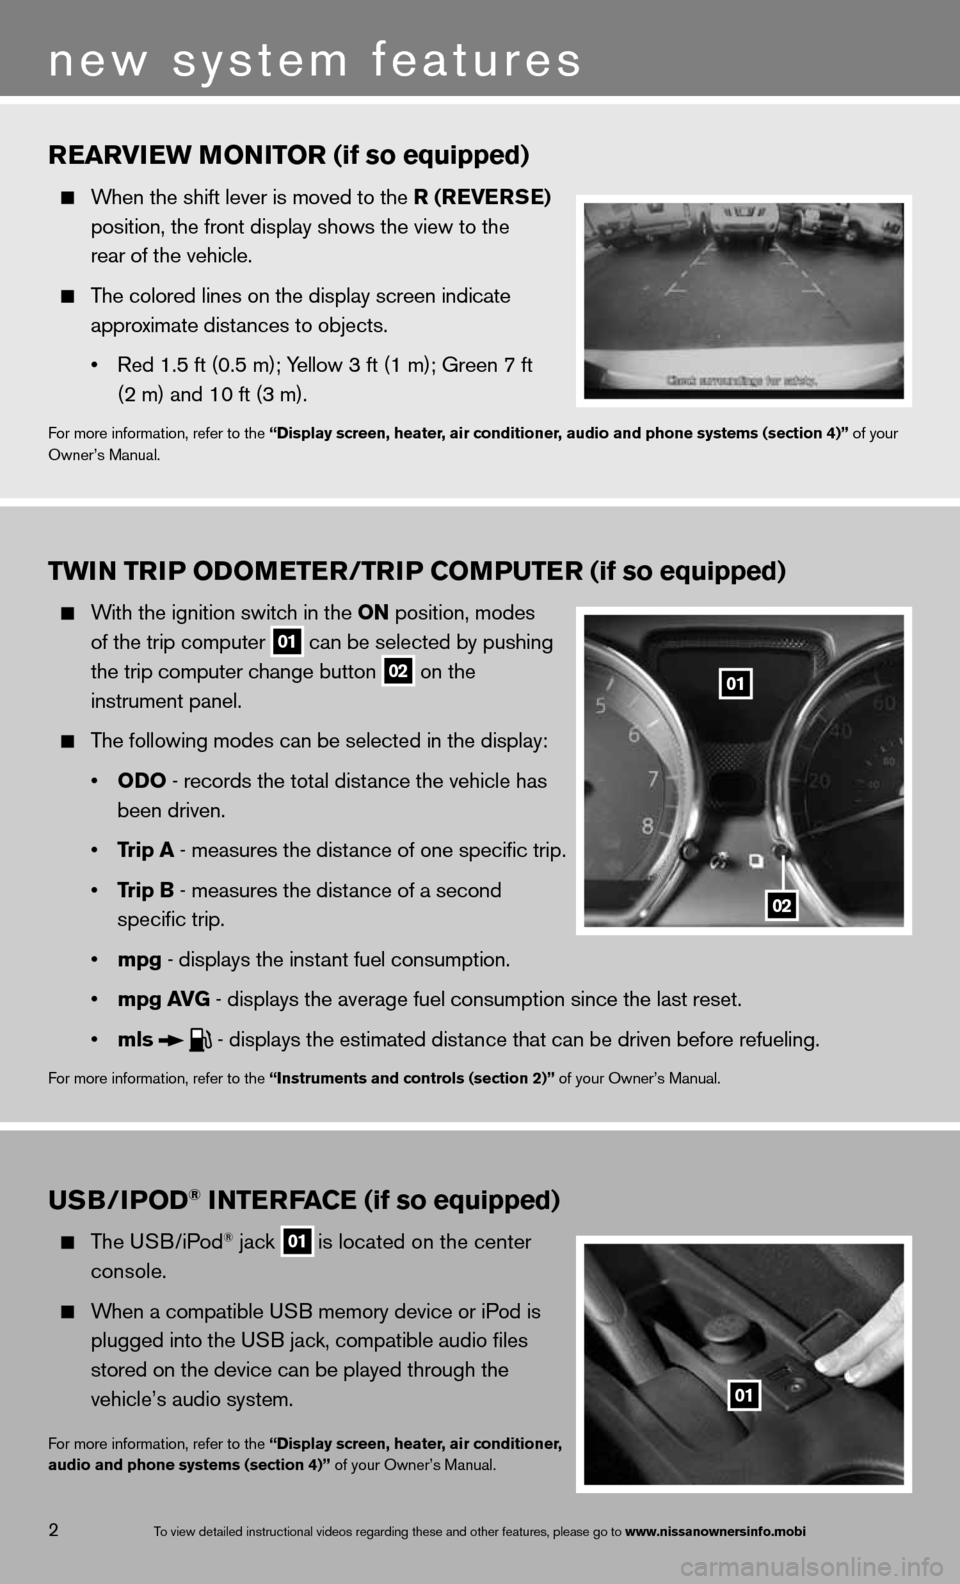
TwiN Tri P oDoMeTer /TriP CoMPuTer (if so equipped)
With the ignition switch in the oN position, modes
of the trip computer
01 can be selected by pushing
the trip computer change button
02 on the
instrument panel.
The following modes can be selected in the display:
• oD o - records the total distance the vehicle has
been driven.
• Trip a - measures the distance of one specific trip.
• Trip B - measures the distance of a second
specific trip.
• mpg - displays the instant fuel consumption.
• mpg av G - displays the average fuel consumption since the last reset.
• mls
- displays the estimated distance that can be driven before refueling.
for more information, refer to the “instruments and controls (section 2)” of your Owner’s Manual.
rearview M oNiTor (if so equipped)
When the shift lever is moved to the r (reverSe )
position, the front display shows the view to the
rear of the vehicle.
The colored lines on the display screen indicate
approximate distances to objects.
• Red 1.5 ft (0.5 m); Yellow 3 ft (1 m); Green 7 ft
(2 m) and 10 ft (3 m).
for more information, refer to the “Display screen, heater, air conditioner, audio and phone systems (section 4)” of your
Owner’s Manual.
u SB/iPo D® iNTerFa Ce (if so equipped)
The u SB/iPod® jack
01 is located on the center
console.
When a compatible USB memory device or iPod is
plugged into the USB jack, compatible audio files
stored on the device can be played through the
vehicle’s audio system.
for more information, refer to the “Display screen, heater, air conditioner,
audio and phone systems (section 4)” of your Owner’s Manual.
2
new system features
01
02
01
To view detailed in\fstructional videos\f regarding these a\fnd other features\f \fplease go to www.nissanownersin\hfo.mobi
Page 5 of 22
3
essential information
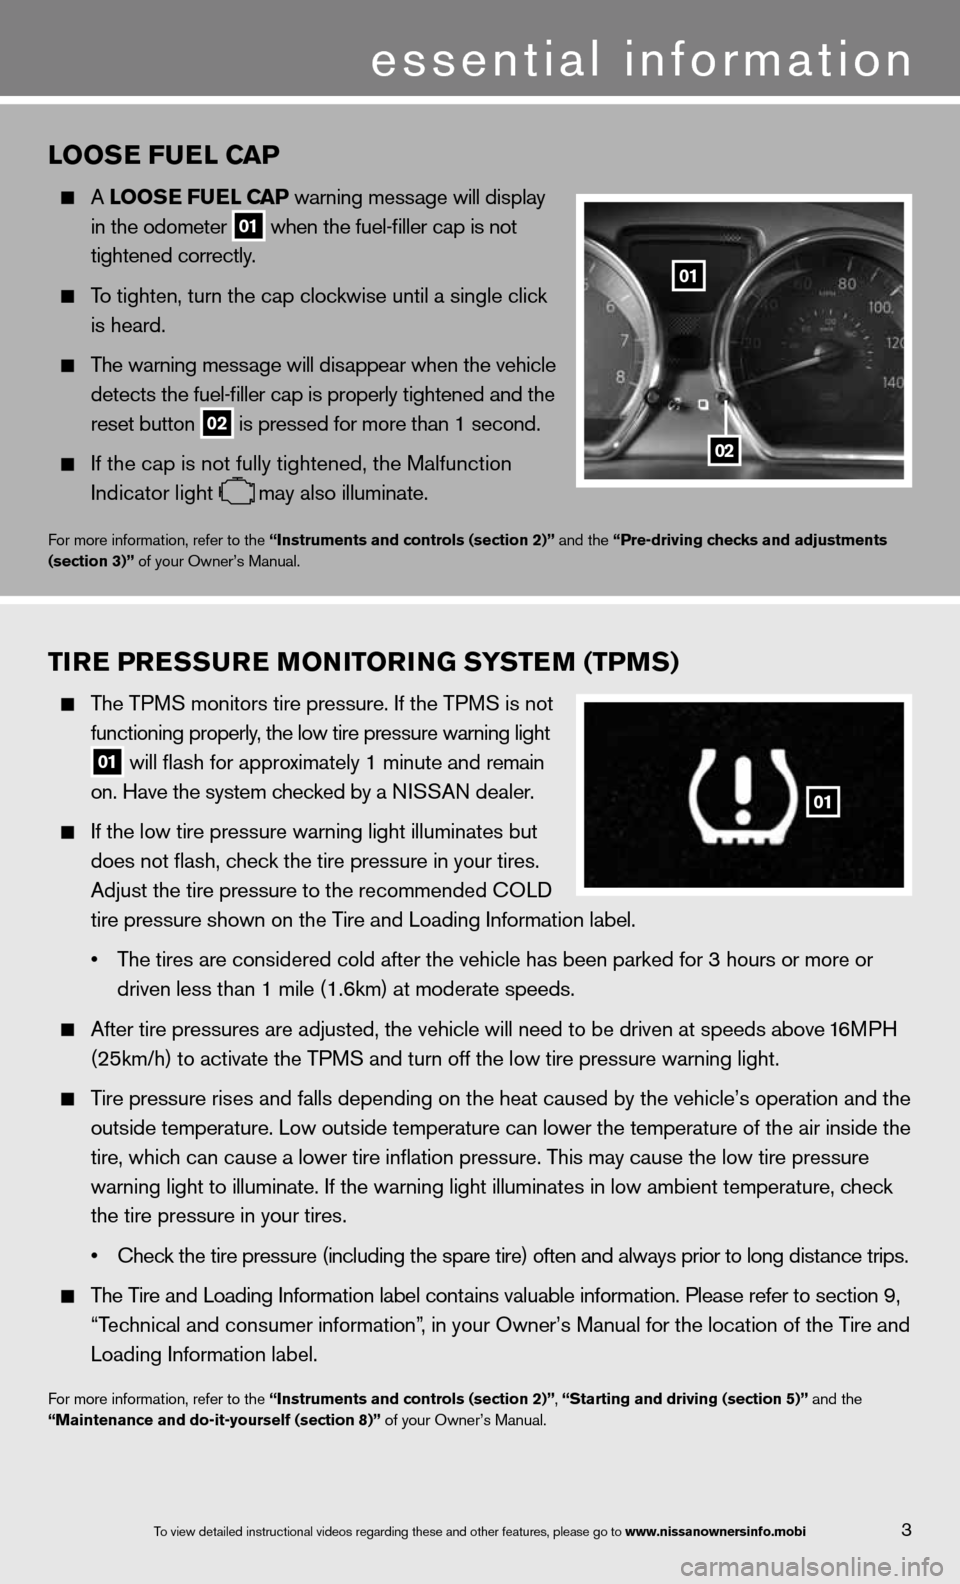
looSe Fuel C aP
A looS e Fuel CaP warning message will display
in the odometer
01 when the fuel-filler cap is not
tightened correctly.
To tighten, turn the cap clockwise until a single click
is heard.
The warning message will disappear when the vehicle
detects the fuel-filler cap is properly tightened and the
reset button
02 is pressed for more than 1 second.
if the cap is not fully tightened, the Malfunction
indicator light
may also illuminate.
for more information, refer to the “instruments and controls (section 2)” and the “Pre-driving checks and adjustments
(section 3)” of your Owner’s Manual.
Tire Pre SSure M oNiTori NG SYSTe M (TPMS)
The TPMS monitors tire pressure. if the TPMS is not
functioning properly, the low tire pressure warning light
01 will flash for approximately 1 minute and remain
on. Have the system checked by a N ISSAN dealer.
If the low tire pressure warning light illuminates but
does not flash, check the tire pressure in your tires.
Adjust the tire pressure to the recommended c OLd
tire pressure shown on the Tire and Loading Information label.
• The tires are considered cold after the vehicle has been parked for 3 hours or more or
driven less than 1 mile (1.6km) at moderate speeds.
After tire pressures are adjusted, the vehicle will need to be driven at speeds above 16MPH
(25km/h) to activate the TPMS and turn off the low tire pressure warning light.
Tire pressure rises and falls depending on the heat caused by the vehicle’s operation and the
outside temperature. Low outside temperature can lower the temperature o\
f the air inside the
tire, which can cause a lower tire inflation pressure. This may cause the low tire pressure
warning light to illuminate. If the warning light illuminates in low ambient temperature, check
the tire pressure in your tires.
• check the tire pressure (including the spare tire) often and always prior \
to long distance trips.
The Tire and Loading Information label contains valuable information. Please refer to section 9,
“Technical and consumer information”, in your Owner’s Manual for the location of the Tire and
Loading Information label.
for more information, refer to the “instruments and controls (section 2)”, “Starting and driving (section 5)” and the
“Maintenance and do-it-yourself (section 8)” of your Owner’s Manual.
01
02
01
To view detailed in\fstructional videos\f regarding these a\fnd other features\f \fplease go to www.nissanownersin\hfo.mobi
Page 10 of 22
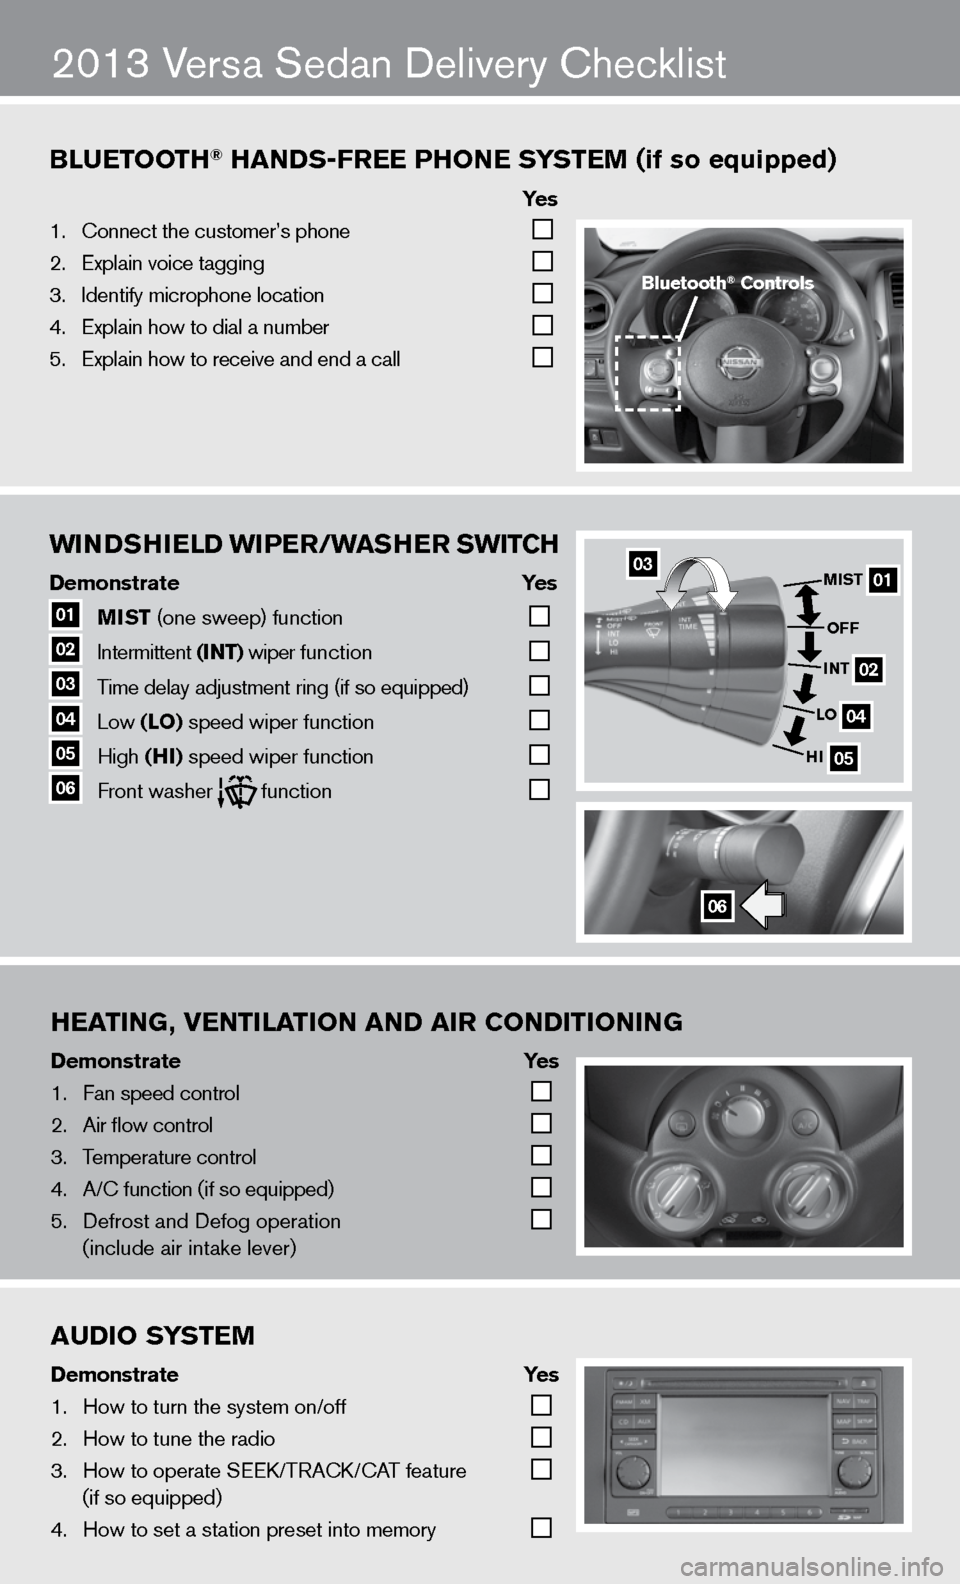
wiNDSHielD wiPer/waSHer Swi TCH
Demonstrate Yes
01 MiST
(one sweep) function
02 intermittent
(iNT) wiper function
03 Time delay adjustment ring (if so equipped)
04 Low
(lo) speed wiper function
05 High
(Hi) speed wiper function 06 front washer function
Bluetooth\f han\bs-free Phone s
ystem (if so equipped)
ye s
1. \bonnect the custome\fr’s phone
2. Explain voice tagg\fing
3. Identify microphone \flocation
4. Explain how to dia\fl a number
5. Explain how to rec\feive and end a cal\fl
heating, Ventilation an\b air Con\bitioning
Demonstrate ye s
1. Fan speed control
2. Air flow control
3. Temperature control\f
4. A/\b function (if so \fequipped)
5. Defrost and Defog o\fperation
(include air intak\fe lever)
2013 Versa Sedan delivery checklist
Bluetooth\f Controls
0301
02
04
05
MiST
oFF
i NT
lo
Hi
06
au\bio system
\bemonstrate yes
1. How to turn the sys\ftem on/off
2. How to tune the ra\fdio
3. How to operate SEE\fK/TRA\bK/\bAT feature
(if so equipped)
4. How to set a stati\fon preset into mem\fory
Page 13 of 22
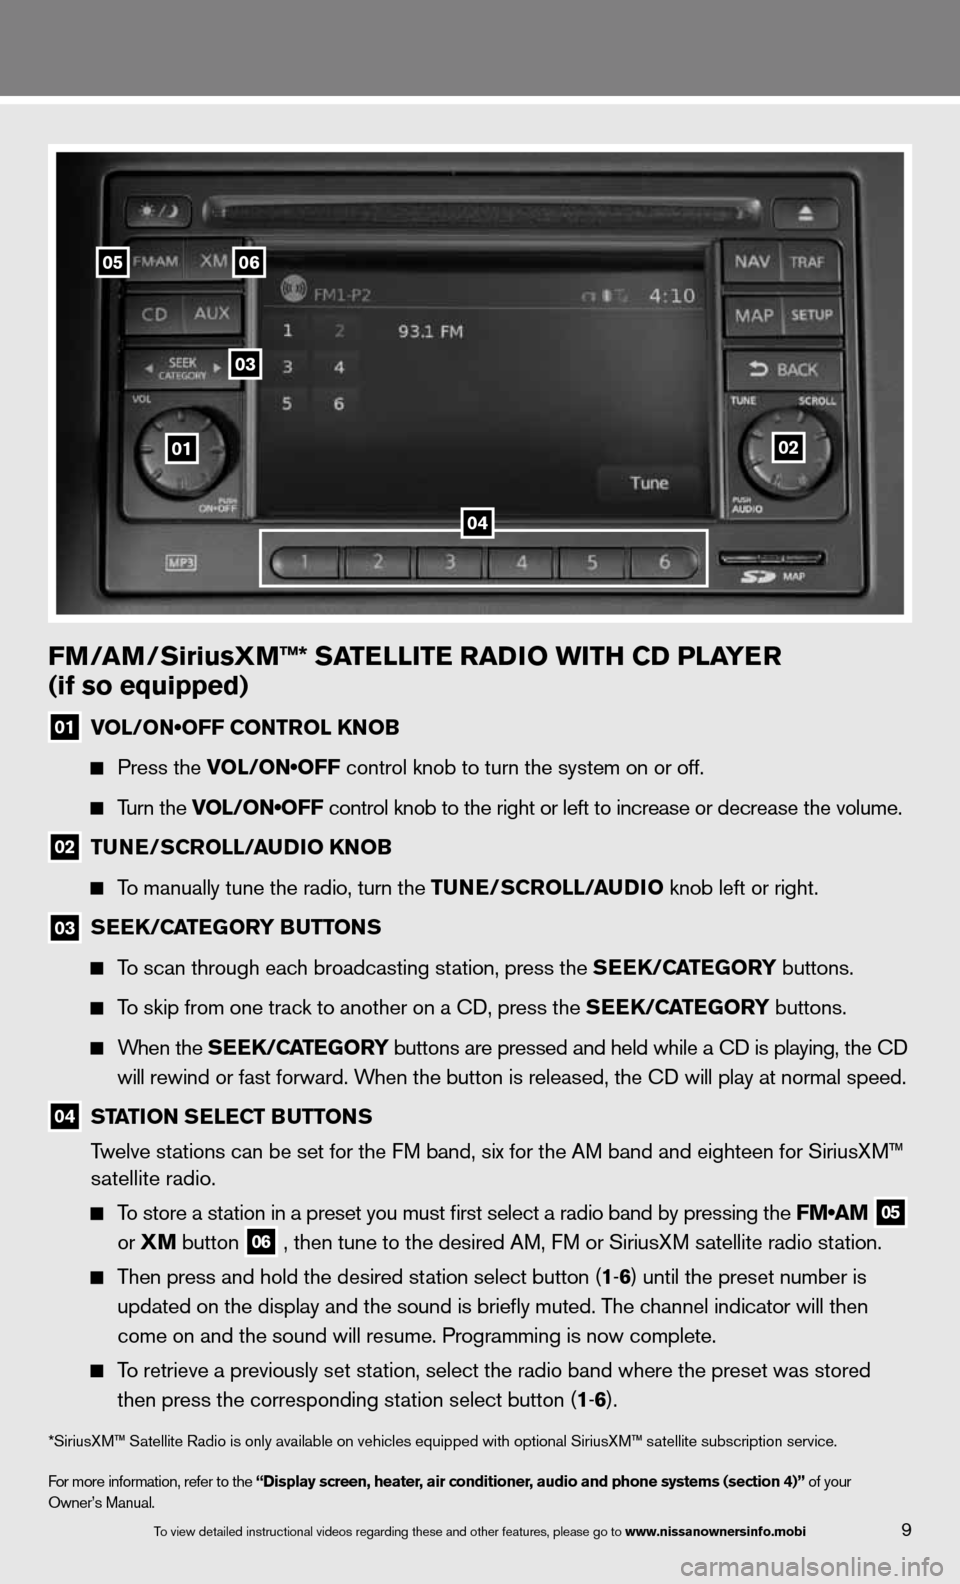
FM/aM/SiriusXM™* Sa TelliTe raDio wiTH CD Pla Yer
(if so equipped)
01 VOL/ON•OFF CONTROL KNOB
Press the VOL/ON•OFF control knob to turn the system on or off.
Turn the VOL/ON•OFF control knob to the right or left to increase or decrease the volume.
02 Tu
Ne/SCroll/ auDio KN oB
To manually tune the radio, turn the Tu Ne/SCroll/ auDio knob left or right.
03
S
ee K/C aTe Gor Y B uTT oNS
To scan through each broadcasting station, press the S eeK/C aTe Gor Y buttons.
To skip from one track to another on a cd, press the S eeK/C aTe Gor Y buttons.
When the S eeK/C aTe Gor Y buttons are pressed and held while a CD is playing, the CD
will rewind or fast forward. When the button is released, the CD will play at normal speed.
04 ST
aTioN S eleCT B uTToNS
Twelve stations can be set for the FM band, six for the AM band and eighteen for SiriusXM™
satellite radio.
To store a station in a preset you must first select a radio band by pressing the FM•AM
05
or
XM button
06 , then tune to the desired AM, f
M or SiriusXM satellite radio station.
Then press and hold the desired station select button (1 -6 ) until the preset number is
updated on the display and the sound is briefly muted. The channel indicator will then
come on and the sound will resume. Programming is now complete.
To retrieve a previously set station, select the radio band where the preset was stored
then press the corresponding station select button (1 -6 ).
*SiriusXM™ Satellite Radio is only available on vehicles equipped with optional SiriusXM™ satellite subscription service.
for more information, refer to the “Display screen, heater, air conditioner, audio and phone systems (section 4)” of your
Owner’s Manual.
01
05
03
06
02
04
9To view detailed in\fstructional videos\f regarding these a\fnd other features\f \fplease go to www.nissanownersin\hfo.mobi
Page 14 of 22
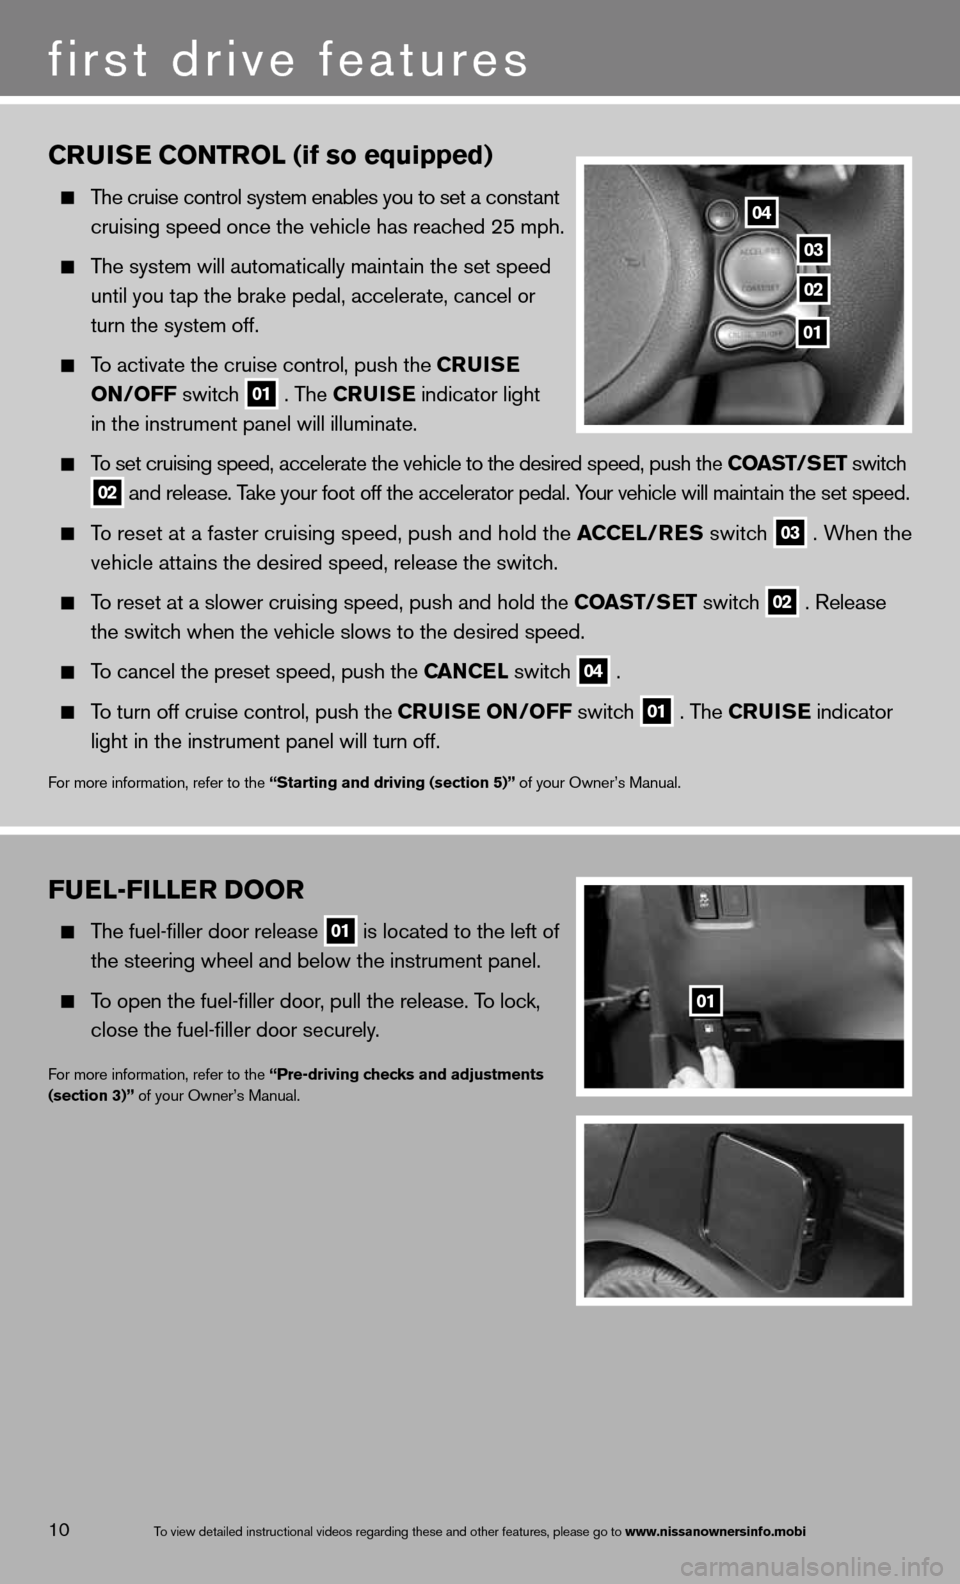
Fuel-Filler Door
The fuel-filler door release
01 is located to the left of
the steering wheel and below the instrument panel.
To open the fuel-filler door, pull the release. To lock,
close the fuel-filler door securely.
for more information, refer to the “Pre-driving checks and adjustments
(section 3)” of your Owner’s Manual.
01
C rui Se C oNT rol (if so equipped)
The cruise control system enables you to set a constant
cruising speed once the vehicle has reached 25 mph.
The system will automatically maintain the set speed
until you tap the brake pedal, accelerate, cancel or
turn the system off.
To activate the cruise control, push the C ruiSe
oN/oFF switch
01 . The C
ruiSe indicator light
in the instrument panel will illuminate.
To set cruising speed, accelerate the vehicle to the desired speed, push \
the CoaST/S eT switch
02 and release. Take your foot off the accelerator pedal. Your vehicle will maintain the set speed.
To reset at a faster cruising speed, push and hold the a CCel/reS switch
03 . When the
vehicle attains the desired speed, release the switch.
To reset at a slower cruising speed, push and hold the CoaST/S eT switch
02 . Release
the switch when the vehicle slows to the desired speed.
To cancel the preset speed, push the C aNCel switch
04 .
To turn off cruise control, push the Crui Se oN/oFF switch
01 . The C
ruiSe indicator
light in the instrument panel will turn off.
for more information, refer to the “Starting and driving (section 5)” of your Owner’s Manual.
04
03
02
01
10
first drive features
To view detailed in\fstructional videos\f regarding these a\fnd other features\f \fplease go to www.nissanownersin\hfo.mobi