2013 NISSAN VERSA SEDAN manual radio set
[x] Cancel search: manual radio setPage 137 of 331
4 Display screen, heater, air conditioner,
audio and phone systems
Control panel buttons — color screen with
Navigation System (if so equipped)..................4-2
How to use the touch screen ....................4-3
How to use the BACK button ....................4-5
How to use the SETUP button ...................4-5
button...................................4-8
RearView Monitor (if so equipped) ...................4-8
How to read the displayed lines ..................4-9
Difference between predicted and actual
distances ......................................4-9
Adjusting the screen ........................... 4-12
Operating tips ................................. 4-12
Vents . .......................................... 4-13
Heater and air conditioner (manual)
(if so equipped) .................................. 4-14
Controls ...................................... 4-14
Heater operation .............................. 4-15
Air conditioner operation (if so equipped) ........4-16
Air flow charts ................................. 4-17
Servicing air conditioner (if so equipped) ............4-21
Audio system .................................... 4-21
Radio ........................................ 4-21
FM radio reception ............................ 4-21AM radio reception
............................ 4-22
Satellite radio reception (if so equipped) . . . ......4-22
Audio operation precautions ....................4-22
FM/AM radio with compact disc (CD) player
(Type A) (if so equipped) .......................4-31
FM/AM radio with compact disc (CD) player
(Type B) (if so equipped) .......................4-34
FM/AM/SAT radio with compact disc (CD)
player (if so equipped) ......................... 4-38
USB interface (models with Navigation
System) ...................................... 4-44
iPod®* player operation without Navigation
System (if so equipped) ........................ 4-46
iPod®* player operation with Navigation
System (if so equipped) ........................ 4-49
CD care and cleaning .......................... 4-51
Steering wheel switch for audio control
(if so equipped) ............................... 4-52
Antenna ...................................... 4-52
Car phone or CB radio ............................ 4-53
Bluetooth® Hands-Free Phone System
(if so equipped) .................................. 4-54
Regulatory Information ......................... 4-55
Using the system .............................. 4-56
Page 169 of 331
Press the SEEKoror TUNE
orbutton to adjust the Bass, Treble, Fade
and Balance to the desired level. Fade adjusts
the sound level between the front and rear speak-
ers and Balance adjusts the sound between the
right and left speakers.
Once you have adjusted the sound quality to the
desired level, press the MENU button repeatedly
until the radio or CD display reappears. If no
action is taken, the radio or CD display will auto-
matically reappear after approximately 10 sec-
onds.
Clock set
If the clock is not displayed with the ignition
switch in the ACC or ON position, you need to
select the CLK-ON mode. Press the MENU but-
ton repeatedly until CLK-OFF mode is displayed.
Use the TUNE/FF-REW/FOLDER button to en-
able CLK-ON mode.
1. Press the MENU button repeatedly until “Clock:” appears. The hours will begin flash-
ing.
2. Press the SEEK button
oror
the TUNE button
orto adjust
the hours.
3. Press the MENU button again. The minutes will begin flashing. 4. Press the SEEK button
oror
the TUNE button
orto adjust
the minutes.
5. Press the MENU button again to exit the clock set mode.
If no action is taken, the display will return to the
regular clock display after 10 seconds.
FM/AM radio operation
FM·AM button:
Press the FM·AM button to change the band as
follows:
AM →FM1 →FM2 →AM
If another audio source is playing when the
FM·AM button is pressed, the audio source play-
ing will automatically be turned off and the last
radio station played will begin playing.
The FM stereo indicator (ST) illuminates during
FM stereo reception. When the stereo broadcast
signal is weak, the radio automatically changes
from stereo to monaural reception.
TUNE button (Tuning):
Press the TUNE button
orfor
manual tuning.
SEEK tuning:
Press the SEEK button
orto tune
from low to high or high to low frequencies and to
stop at the next broadcasting station.
SCAN tuning:
Press the SCAN button to stop at each broad-
casting station for 5 seconds. Pressing the but-
ton again during this 5 second period will stop
SCAN tuning and the radio will remain tuned to
that station. If the SCAN button is not pressed
within 5 seconds, SCAN tuning moves to the
next station.
1 to 6 Station memory operations:
Twelve stations can be set for the FM band (6 for
FM1, 6 for FM2) and six stations can be set for
the AM band.
1. Choose the radio band AM, FM1 or FM2 using the AM·FM select button.
2. Tune to the desired station using manual, SEEK or SCAN tuning. Press and hold any
of the desired station memory buttons (1 –
6) until a beep sound is heard.
3. The channel indicator will then come on and the sound will resume. Programming is now
complete.
4-32Display screen, heater, air conditioner, audio and phone systems
Page 173 of 331
TUNE button (Tuning):
Press the TUNE/FF-REW/FOLDER
button
orfor manual tuning.
SEEK tuning:
Press the SEEK/TRACK button
orto tune from low to high or high to low frequen-
cies and to stop at the next broadcasting station.
SCAN tuning:
Press the SCAN/RPT button to stop at each
broadcasting station for 5 seconds. Pressing the
button again during this 5 second period will stop
SCAN tuning and the radio will remain tuned to
that station. If the SCAN/RPT button is not
pressed within 5 seconds, SCAN tuning moves
to the next station.
1 to 6 Station memory operations:
Twelve stations can be set for the FM band (6 for
FM1, 6 for FM2) and six stations can be set for
the AM band. 1. Choose the radio band AM, FM1 or FM2 using the AM·FM select button.
2. Tune to the desired station using manual, SEEK or SCAN tuning. Press and hold any
of the desired station memory buttons (1 –
6) until a beep sound is heard. 3. The channel indicator will then come on and
the sound will resume. Programming is now
complete.
4. Other buttons can be set in the same man- ner.
If the battery cable is disconnected or if the fuse
opens, the radio memory will be canceled. In that
case, reset the desired stations.
DISP/TEXT button:
When the DISP/TEXT button is pressed while in
FM radio mode, the radio display will change as
follows:
Frequency →PTY →PS →Frequency
Compact disc (CD) player operation
If the radio is already operating, it automatically
turns off and the compact disc begins to play.
CD button:
When the CD button is pressed with the system
off and the compact disc loaded, the system will
turn on and the compact disc will start to play.
When the CD button is pressed with a compact
disc loaded and the radio playing, the radio will
automatically be turned off and the compact disc
will start to play. DISP/TEXT button:
When the DISP/TEXT button is pressed while a
CD is playing, the display will change as follows:
CD:
Track number
→Disc title →Song title →Track
number
CD with MP3 or WMA:
Track number →Folder title →Album title →
Artist →Song title →Track number
TUNE/FF-REW/FOLDER
(Reverse or Fast Forward)
button:
CD:
When the TUNE/FF-REW/FOLDER button
(fast forward) or(reverse) is
pressed while the compact disc is playing, the
compact disc plays at an increased speed while
reversing or fast forwarding. When the button is
released, the compact disc returns to normal play
speed.
4-36Display screen, heater, air conditioner, audio and phone systems
Page 178 of 331
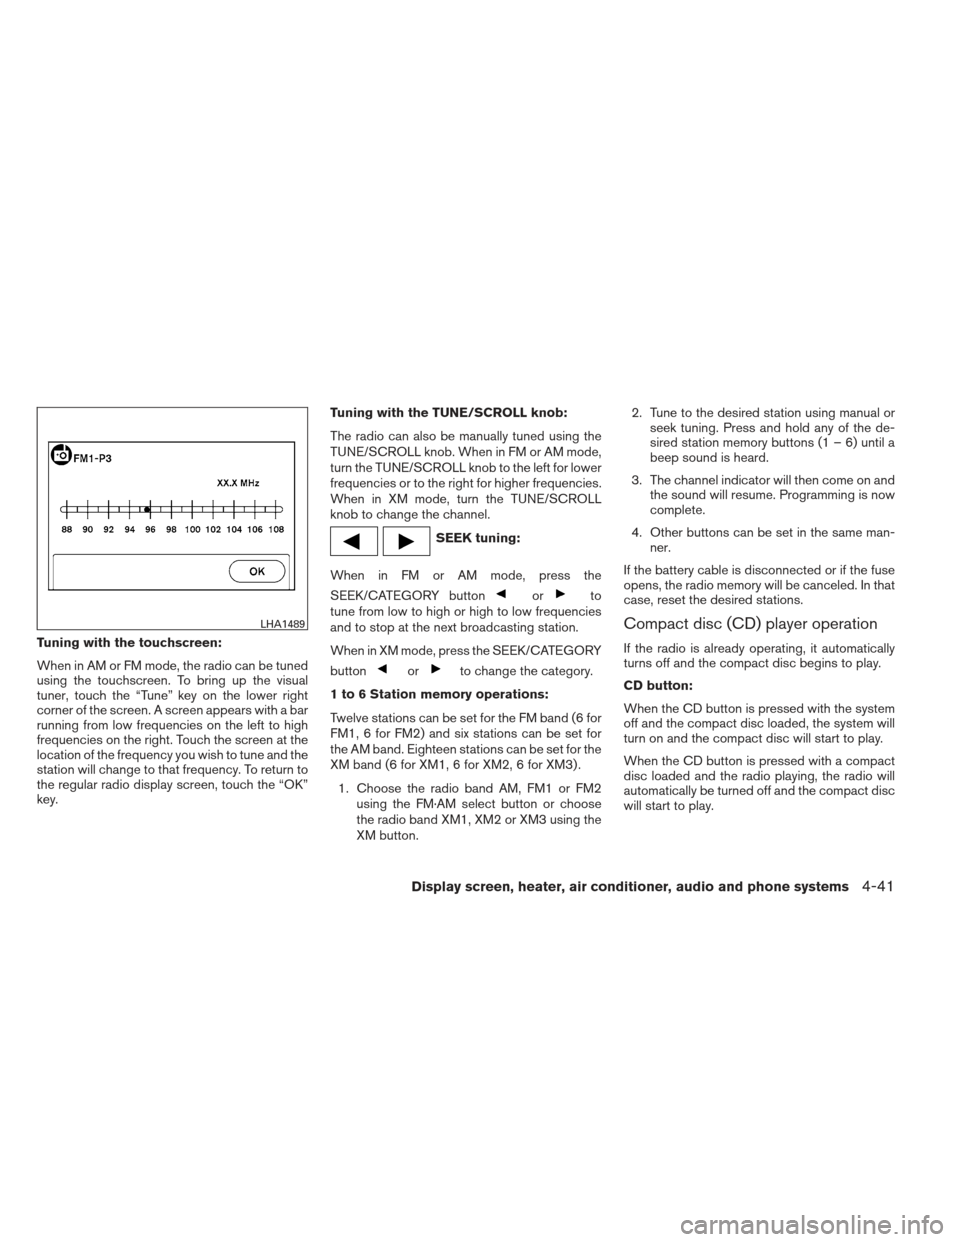
Tuning with the touchscreen:
When in AM or FM mode, the radio can be tuned
using the touchscreen. To bring up the visual
tuner, touch the “Tune” key on the lower right
corner of the screen. A screen appears with a bar
running from low frequencies on the left to high
frequencies on the right. Touch the screen at the
location of the frequency you wish to tune and the
station will change to that frequency. To return to
the regular radio display screen, touch the “OK”
key.Tuning with the TUNE/SCROLL knob:
The radio can also be manually tuned using the
TUNE/SCROLL knob. When in FM or AM mode,
turn the TUNE/SCROLL knob to the left for lower
frequencies or to the right for higher frequencies.
When in XM mode, turn the TUNE/SCROLL
knob to change the channel.
SEEK tuning:
When in FM or AM mode, press the
SEEK/CATEGORY button
orto
tune from low to high or high to low frequencies
and to stop at the next broadcasting station.
When in XM mode, press the SEEK/CATEGORY
button
orto change the category.
1 to 6 Station memory operations:
Twelve stations can be set for the FM band (6 for
FM1, 6 for FM2) and six stations can be set for
the AM band. Eighteen stations can be set for the
XM band (6 for XM1, 6 for XM2, 6 for XM3) . 1. Choose the radio band AM, FM1 or FM2 using the FM·AM select button or choose
the radio band XM1, XM2 or XM3 using the
XM button. 2. Tune to the desired station using manual or
seek tuning. Press and hold any of the de-
sired station memory buttons (1 – 6) until a
beep sound is heard.
3. The channel indicator will then come on and the sound will resume. Programming is now
complete.
4. Other buttons can be set in the same man- ner.
If the battery cable is disconnected or if the fuse
opens, the radio memory will be canceled. In that
case, reset the desired stations.
Compact disc (CD) player operation
If the radio is already operating, it automatically
turns off and the compact disc begins to play.
CD button:
When the CD button is pressed with the system
off and the compact disc loaded, the system will
turn on and the compact disc will start to play.
When the CD button is pressed with a compact
disc loaded and the radio playing, the radio will
automatically be turned off and the compact disc
will start to play.
LHA1489
Display screen, heater, air conditioner, audio and phone systems4-41
Page 192 of 331
the ignition switch is placed in the ON position with
the previously connected cellular phone turned on
and carried in the vehicle.
You can connect up to 5 different Bluetooth®
cellular phones to the in-vehicle phone module.
However, you can talk on only one cellular phone
at a time.
Before using the Bluetooth® Hands-Free Phone
System, refer to the following notes.● Set up the wireless connection between a
cellular phone and the in-vehicle phone
module before using the hands-free phone
system.
●
Some Bluetooth® enabled cellular phones may
not be recognized by the in-vehicle phone mod-
ule. Please visit www.nissanusa.com/bluetooth
for a recommended phone list and connecting
instructions.
● You will not be able to use a hands-free
phone under the following conditions:
– Your vehicle is outside of the cellular ser- vice area.
– Your vehicle is in an area where it is difficult to receive a cellular signal; such
as in a tunnel, in an underground parking
garage, near a tall building or in a moun-
tainous area. – Your cellular phone is locked to prevent it
from being dialed.
● When the radio wave condition is not ideal
or ambient sound is too loud, it may be
difficult to hear the other person’s voice dur-
ing a call.
● Do not place the cellular phone in an area
surrounded by metal or far away from the
in-vehicle phone module to prevent tone
quality degradation and wireless connection
disruption.
● While a cellular phone is connected through
the Bluetooth® wireless connection, the
battery power of the cellular phone may dis-
charge quicker than usual. The Bluetooth®
Hands-Free Phone System cannot charge
cellular phones.
● If the hands-free phone system seems to be
malfunctioning, see “Troubleshooting guide”
later in this section. You can also visit
www.nissanusa.com/bluetooth for trouble-
shooting help.
● Some cellular phones or other devices may
cause interference or a buzzing noise to
come from the audio system speakers. Stor-
ing the device in a different location may
reduce or eliminate the noise. ●
Refer to the cellular phone Owner’s Manual
regarding the telephone charges, cellular
phone antenna and body, etc.
REGULATORY INFORMATION
FCC Regulatory information
– CAUTION: To maintain compliance with FCC’s RF exposure guidelines, use only the
supplied antenna. Unauthorized antenna,
modification, or attachments could damage
the transmitter and may violate FCC regula-
tions.
– Operation is subject to the following two con- ditions:
1. This device may not cause interference and
2. this device must accept any interference, including interference that may cause unde-
sired operation of the device.
IC Regulatory information
– Operation is subject to the following two con- ditions: (1) this device may not cause interfer-
ence, and (2) this device must accept any
interference, including interference that may
cause undesired operation of the device.
– This Class B digital apparatus meets all re- quirements of the Canadian Interference-
Causing Equipment Regulations.
Display screen, heater, air conditioner, audio and phone systems4-55
Page 212 of 331
Some examples are:
– Facilities or electric devices using similar radiofrequencies are near the vehicle.
– If a transmitter set to similar frequencies is being used in or near the vehicle.
– If a computer (or similar equipment) or a DC/AC converter is being used in or near the
vehicle.
FCC Notice:
For USA:
This device complies with Part 15 of the
FCC Rules. Operation is subject to the fol-
lowing two conditions: 1. This device may not cause harmful in-
terference, and
2. This device must accept any interfer-
ence received, including interference
that may cause undesired operation.
Note: Changes or modification not ex-
pressly approved by the party respon-
sible for compliance could void the us-
er’s authority to operate the
equipment. For Canada:
This device complies with RSS-210 of In-
dustry Canada. Operation is subject to the
following two conditions:
1. This device may not cause interfer-
ence, and
2. This device must accept any interfer-
ence, include interference that may
cause undesired operation of the de-
vice.
3. The term “IC:” before the radio certifi-
cation number only signifies that In-
dustry Canada technical specifications
were met.
AVOIDING COLLISION AND
ROLLOVER
WARNING
Failure to operate this vehicle in a safe
and prudent manner may result in loss of
control or an accident.
Be alert and drive defensively at all times. Obey
all traffic regulations. Avoid excessive speed,
high speed cornering, or sudden steering ma-
neuvers, because these driving practices could
cause you to lose control of your vehicle. As with
any vehicle, loss of control could result in a collision with other vehicles or objects or
cause the vehicle to roll over, particularly if
the loss of control causes the vehicle to
slide sideways.
Be attentive at all times, and
avoid driving when tired. Never drive when under
the influence of alcohol or drugs (including pre-
scription or over-the-counter drugs which may
cause drowsiness) . Always wear your seat belt
as outlined in the “Safety – Seats, seat belts and
supplemental restraint system” section of this
manual, and also instruct your passengers to do
so.
Seat belts help reduce the risk of injury in colli-
sions and rollovers. In a rollover crash, an
unbelted or improperly belted person is
significantly more likely to be injured or
killed than a person properly wearing a
seat belt.
OFF-ROAD RECOVERY
If the right side or left side wheels unintentionally
leave the road surface, maintain control of the
vehicle by following the procedure below. Please
note that this procedure is only a general guide.
The vehicle must be driven as appropriate based
on the conditions of the vehicle, road and traffic.
1. Remain calm and do not overreact.
2. Do not apply the brakes.
Starting and driving5-5