Page 126 of 331
SymptomPossible CauseRemedy
When starting the engine The key warning light in the instrument
panel blinks in green. The battery charge is low.
Replace the battery with a new one. See
“Battery replacement” in the “Maintenance
and do-it-yourself” section.
When pushing the request switch or the
LOCK button on the Intelligent Key to the
lock the door The outside chime sounds for a few sec-
onds and all the doors unlock.
The Intelligent Key is inside the trunk. Be sure to carry the Intelligent Key with you.
The Intelligent Key is inside the vehicle. Be sure to carry the Intelligent Key with you.
A door is not closed securely.
Close the doors securely.
Pre-driving checks and adjustments3-23
Page 128 of 331
WARNING
●Do not drive with the trunk lid open. This
could allow dangerous exhaust gases
to be drawn into the vehicle. See “Ex-
haust gas” in the “Starting and driving”
section of this manual.
● Closely supervise children when they
are around cars to prevent them from
playing and becoming locked in the
trunk where they could be seriously in-
jured. Keep the car locked, with the rear
seatback and trunk lid securely latched
when not in use, and prevent children’s
access to car keys.
KEY OPERATION
To open the trunk lid, turn the key clockwise. To
close the trunk lid, lower and push the trunk lid
down securely.
OPENING THE TRUNK LID
To open the trunk, unlock it with one of the
following operations:
● Unlock the trunk using the key.
● Pull up on the opener lever (if so equipped)
located on the floor next to the driver’s seat.
● Press the button on the Intelligent Key.
● Push the
�Arelease switch.
LPD2036LPD2114
TRUNK LID
Pre-driving checks and adjustments3-25
Page 129 of 331
OPENER OPERATION (if so
equipped)
WARNING
●Do not drive with the trunk lid open. This
could allow dangerous exhaust gases
to be drawn into the vehicle. See “Ex-
haust gas” in the “Starting and driving”
section of this manual. ●
Closely supervise children when they
are around cars to prevent them from
playing and becoming locked in the
trunk where they could be seriously in-
jured. Keep the car locked, with the rear
seatback and trunk lid securely latched
when not in use, and prevent children’s
access to car keys.
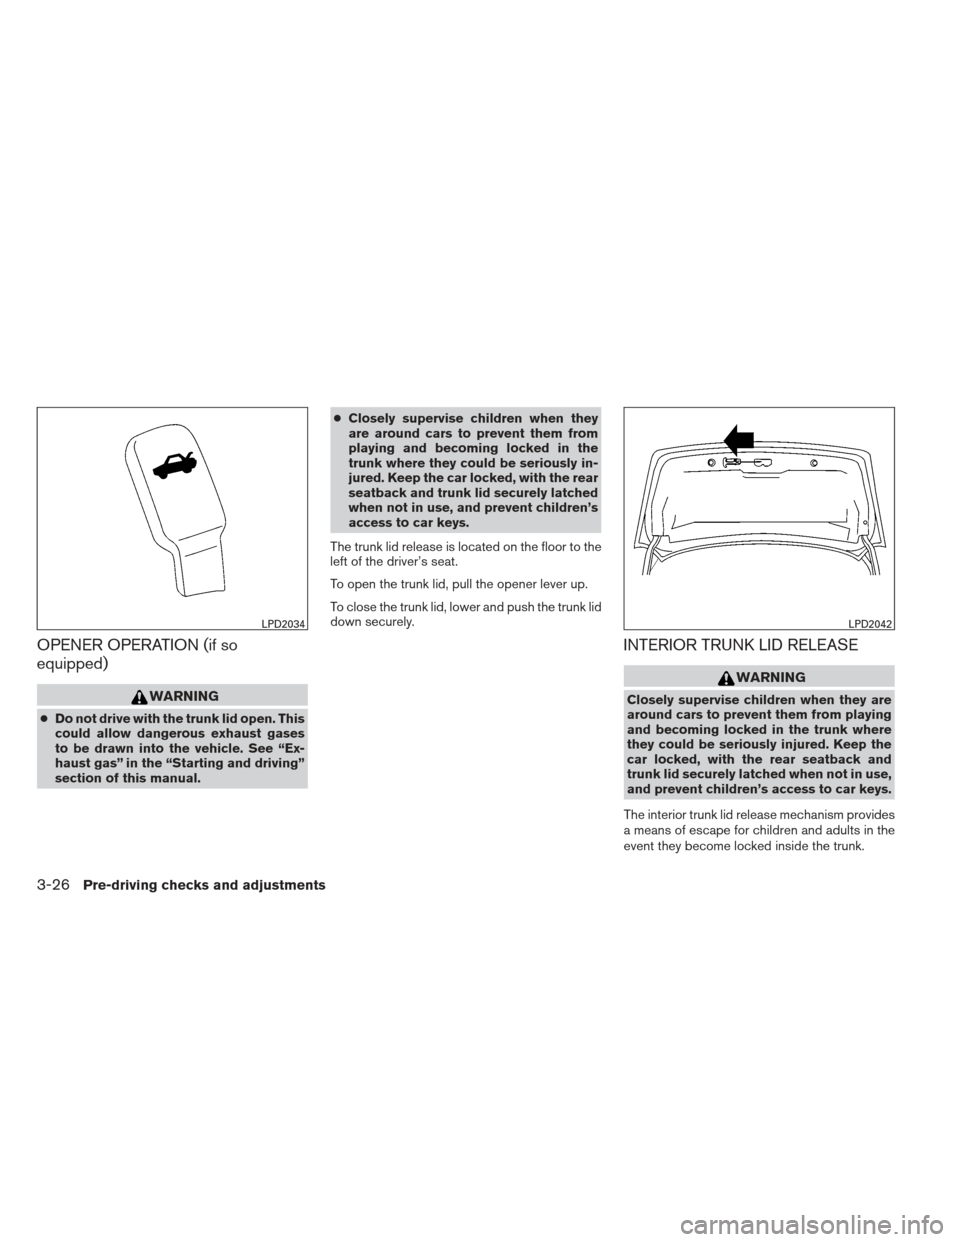
The trunk lid release is located on the floor to the
left of the driver’s seat.
To open the trunk lid, pull the opener lever up.
To close the trunk lid, lower and push the trunk lid
down securely.
INTERIOR TRUNK LID RELEASE
WARNING
Closely supervise children when they are
around cars to prevent them from playing
and becoming locked in the trunk where
they could be seriously injured. Keep the
car locked, with the rear seatback and
trunk lid securely latched when not in use,
and prevent children’s access to car keys.
The interior trunk lid release mechanism provides
a means of escape for children and adults in the
event they become locked inside the trunk.
LPD2034LPD2042
3-26Pre-driving checks and adjustments
Page 140 of 331
9. Power button/Volume control knob
*For Navigation system control buttons, refer to
the separate Navigation System Owner’s
Manual.
When you use this system, make sure the engine
is running.
If you use the system with the engine not
running (ignition ON or ACC) for a long
time, it will discharge the battery, and the
engine will not start.
Reference symbols:
“Example” — Words marked in quotes refer to a
key shown only on the display. These keys can be
selected by touching the screen.
HOW TO USE THE TOUCH
SCREEN
CAUTION
● The glass display screen may break if it
is hit with a hard or sharp object. If the
glass screen breaks, do not touch it.
Doing so could result in an injury. ●
To clean the display, never use a rough
cloth, alcohol, benzine, thinner or any
kind of solvent or paper towel with a
chemical cleaning agent. They will
scratch or deteriorate the panel.
● Do not splash any liquid such as water
or car fragrance on the display. Contact
with liquid will cause the system to
malfunction.
To help ensure safe driving, some functions can-
not be operated while driving.
The on-screen functions that are not available
while driving will be “grayed out” or muted.
Park the vehicle in a safe location and then oper-
ate the navigation system.
WARNING
● ALWAYS give your full attention to
driving.
● Avoid using vehicle features that could
distract you. If distracted, you could
lose control of your vehicle and cause
an accident.
Touch screen operation
Selecting the item:
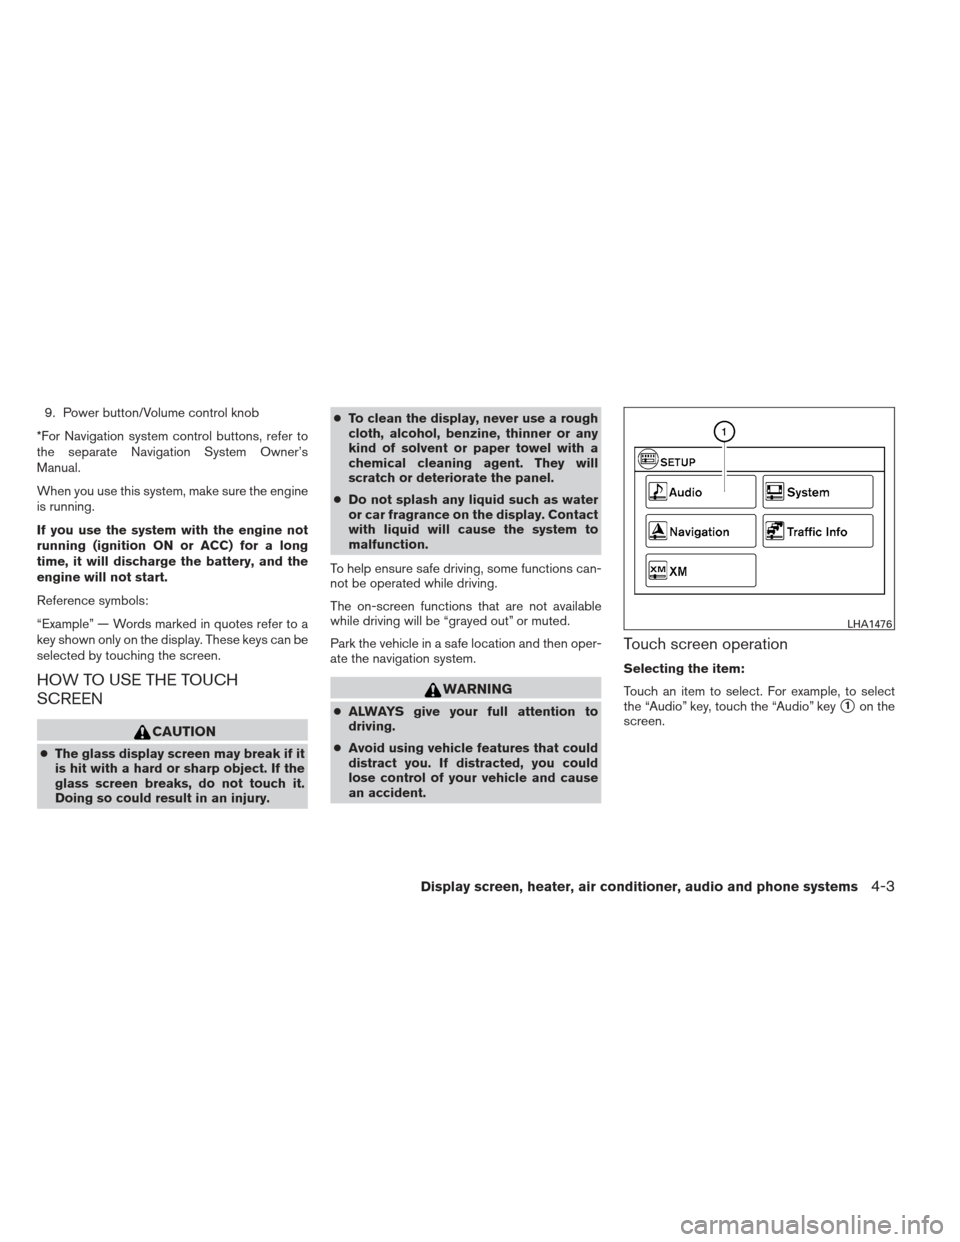
Touch an item to select. For example, to select
the “Audio” key, touch the “Audio” key
�1on the
screen.
LHA1476
Display screen, heater, air conditioner, audio and phone systems4-3
Page 141 of 331
Adjusting the item:
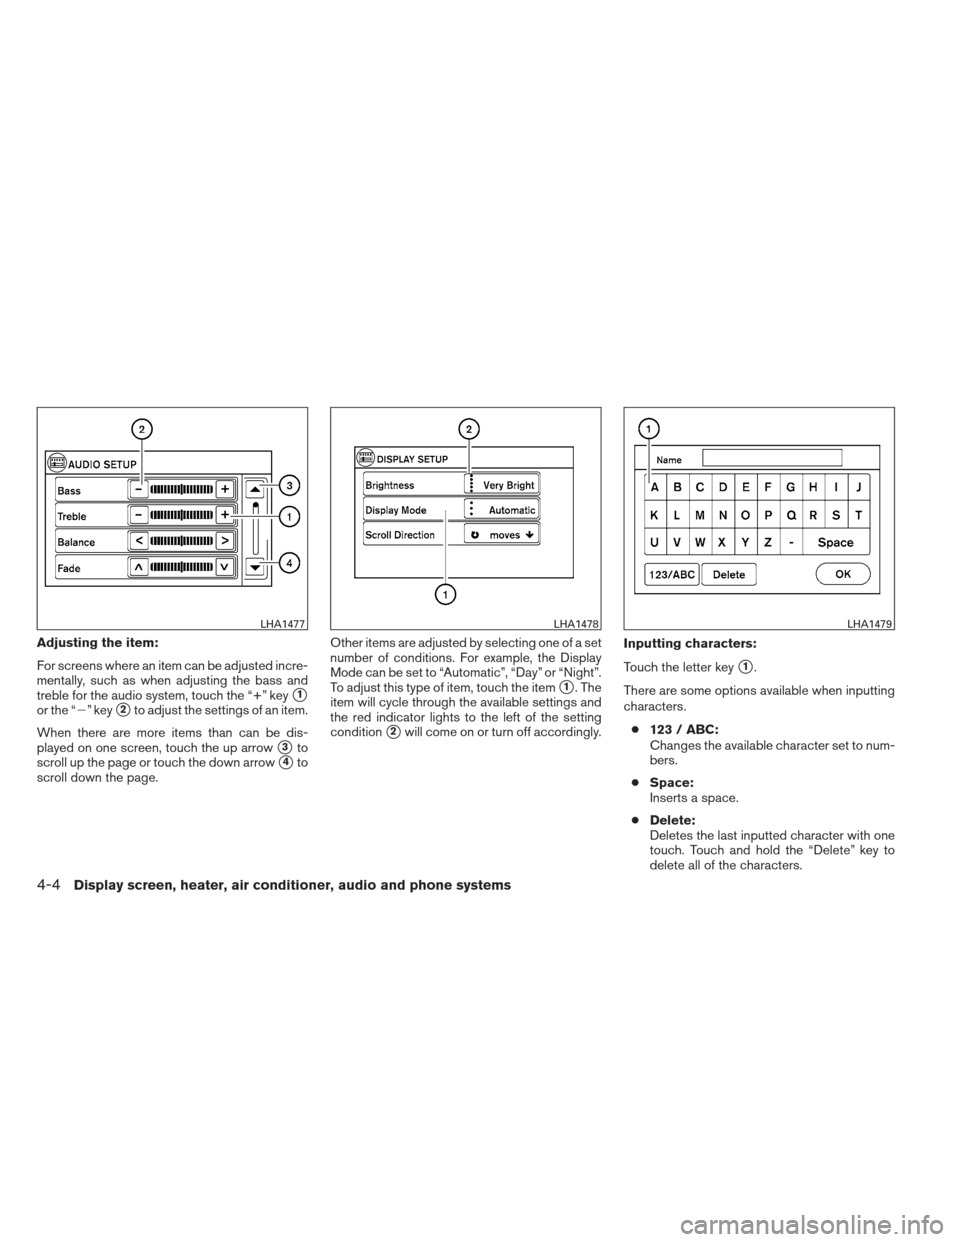
For screens where an item can be adjusted incre-
mentally, such as when adjusting the bass and
treble for the audio system, touch the “+” key
�1
or the “�” key�2to adjust the settings of an item.
When there are more items than can be dis-
played on one screen, touch the up arrow
�3to
scroll up the page or touch the down arrow
�4to
scroll down the page. Other items are adjusted by selecting one of a set
number of conditions. For example, the Display
Mode can be set to “Automatic”, “Day” or “Night”.
To adjust this type of item, touch the item
�1. The
item will cycle through the available settings and
the red indicator lights to the left of the setting
condition
�2will come on or turn off accordingly. Inputting characters:
Touch the letter key
�1.
There are some options available when inputting
characters. ● 123 / ABC:
Changes the available character set to num-
bers.
● Space:
Inserts a space.
● Delete:
Deletes the last inputted character with one
touch. Touch and hold the “Delete” key to
delete all of the characters.
LHA1477LHA1478LHA1479
4-4Display screen, heater, air conditioner, audio and phone systems
Page 143 of 331
System setup
Select the “System” key to select and/or adjust
various functions of the system. A screen with
additional options will appear.Display:
Select the “Display” key to adjust the appearance
of the display. The following settings can be
adjusted:
Brightness
The brightness of the display can be set to Very
Bright, Bright, Default, Dark or Very Dark. Touch
the “Brightness” key to cycle through the options.
Display Mode
The display can be adjusted to fit the level of
lighting in the vehicle. Touch the “Display Mode”
key to cycle through the options. “Day” and“Night” modes are suited for the respective times
of day, while “Automatic” controls the display
automatically.
Scroll Direction
The direction that menus scroll can be adjusted.
Choose either “up” or “down”.
LHA1481LHA1482
4-6Display screen, heater, air conditioner, audio and phone systems
Page 144 of 331
Clock:
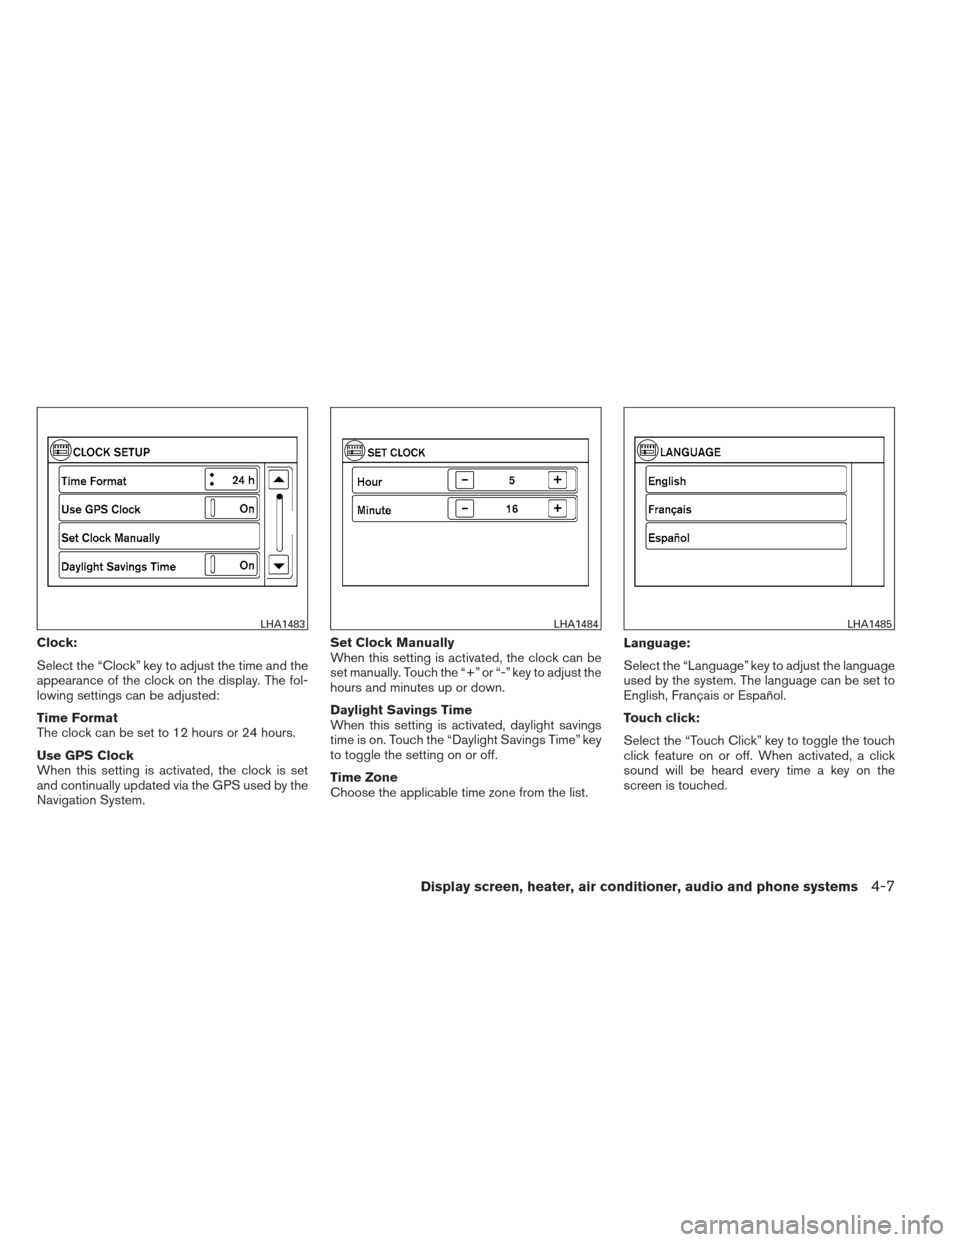
Select the “Clock” key to adjust the time and the
appearance of the clock on the display. The fol-
lowing settings can be adjusted:
Time Format
The clock can be set to 12 hours or 24 hours.
Use GPS Clock
When this setting is activated, the clock is set
and continually updated via the GPS used by the
Navigation System.Set Clock Manually
When this setting is activated, the clock can be
set manually. Touch the “+” or “-” key to adjust the
hours and minutes up or down.
Daylight Savings Time
When this setting is activated, daylight savings
time is on. Touch the “Daylight Savings Time” key
to toggle the setting on or off.
Time Zone
Choose the applicable time zone from the list.
Language:
Select the “Language” key to adjust the language
used by the system. The language can be set to
English, Français or Español.
Touch click:
Select the “Touch Click” key to toggle the touch
click feature on or off. When activated, a click
sound will be heard every time a key on the
screen is touched.
LHA1483LHA1484LHA1485
Display screen, heater, air conditioner, audio and phone systems4-7
Page 145 of 331
Beep tones:
Select the “Beep Tones” key to toggle the beep
tones feature on or off. When activated, a beep
sound will be heard when a pop-up message
appears on the screen or a button on the unit
(such as the
button) is pressed and held
for two seconds.
Reset all settings/memory:
Select the “Reset All Settings/Memory” key to
return all settings to default and to clear the
memory.
Traffic setup
Refer to the separate Navigation System Own-
er’s Manual for information regarding this item.
BUTTON
To change the display brightness, press
the
button. Pressing the button again will
change the display to the day or the night display.
If no operation is performed within 5 seconds, the
display will return to the previous display.
Press and hold the
button for more than
two seconds to turn the display off. Press the
button again to turn the display on. When the shift selector is shifted into the R
(Reverse) position, the monitor display shows a
rearward view from the vehicle.
WARNING
●
The system is designed as an aid to the
driver in detecting large stationary ob-
jects to help avoid damaging the ve-
hicle. The system will not detect small
objects below the bumper, and may not
detect objects close to the bumper or
on the ground.
● The RearView Monitor is a convenience
but it is not a substitute for proper back-
ing. Always turn and check that it is safe
to do so before backing up. Always
back up slowly.
● Objects viewed in the RearView Moni-
tor differ from actual distance because
a wide-angle lens is used.
● Make sure that the trunk is securely
closed when backing up.
● Underneath the bumper and the corner
areas of the bumper cannot be viewed
on the RearView Monitor because of its
monitoring range limitation. ●
Do not put anything on the rearview
camera. The rearview camera is in-
stalled beside the license plate light.
● When washing the vehicle with high-
pressure water, be sure not to spray it
around the camera. Otherwise, water
may enter the camera unit causing wa-
ter condensation on the lens, a mal-
function, fire or an electric shock.
● Do not strike the camera. It is a preci-
sion instrument. Otherwise, it may mal-
function or cause damage resulting in a
fire or an electric shock.
CAUTION
There is a plastic cover over the camera.
Do not scratch the cover when cleaning
dirt or snow from the cover.
REARVIEW MONITOR (if so
equipped)
4-8Display screen, heater, air conditioner, audio and phone systems