2013 NISSAN TITAN display
[x] Cancel search: displayPage 2 of 26
*See your Owner’s Manual for information.
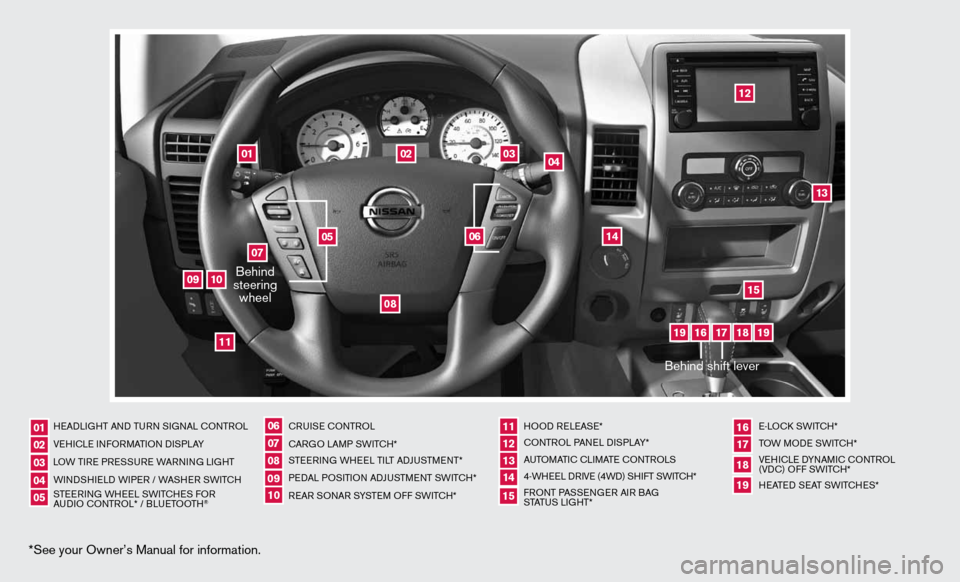
HeAd LiGHT And Tu Rn S iG nAL c OnTROL
V e H icL e inf ORMAT iOn diSPLAY
LOW T iRe PRe SSuRe WARnin G LiGHT
W ind SHieL d W iPeR / WASHeR SW iT c H
STee Rin G WH eeL SW iTc HeS fOR
A udi O c OnTROL* / BLueTOOTH
® cR
uiSe cOn TROL
c ARGO LAMP SW iTc H*
ST eeRin G WHeeL T iLT AdJu STMen T*
P ed AL POS iTiOn Ad Ju STM enT SW iTc H*
R eAR SO nAR SYSTe M Off SW iTc H* HOO
d ReLeAS e*
cOn TROL PA neL diSPLAY*
A uTOMATic c LiMATe c OnTROLS
4-WH eeL d RiVe (4Wd) SH ifT SWiTc H*
f RO nT PASS enGeR Ai R BAG
STATu S LiGHT* e-LO
ck SW iTc H*
TOW MOde SWiTcH*
Ve Hic Le d YnAM ic cOnTROL
(Vdc) O ff SWiTc H*
H eATed S eAT SWiTc HeS*
0102030405
0607080910
11 12131415
16 171819
01
02
04
03
12
14
13
15
05
06
09
08
07
1011
16
17
18
19
19Behind shift lever
Behind
steering wheel
Page 3 of 26
TABLe Of cOnTenTS
NEW SYSTEM FEATURES
u SB/iPod® interface (if so equipped) .............................. 2
ESSENTIAL INFORMATION
Loose fuel cap . . . . . . . . . . . . . . . . . . . . . . . . . . . . . . . . . . . .\
. . . . . . . . . . . . 3
Tire Pressure Monitoring System (TPMS) ...........................3
Wide Open door (king cab models only) .......................... 4
FIRST D RIvE FEATURES
Remote k eyless entry System (if so equipped) ...................... 5
Opening the Tailgate ............................................ 5
Power Seat Adjustments (if so equipped) ...........................5
Automatic drive Positioner (if so equipped) ......................... 6
Outside Mirror control Switch (if so equipped) . . . . . . . . . . . . . . . . . . . . . . 6
Starting/Stopping the engine ..................................... 6
Headlight control Switch ........................................ 7
Windshield Wiper/Washer Switch ................................. 8
Automatic climate controls (if so equipped) ........................ 8
f M/AM/SiriusXM™ Satellite Radio with cd Player (if so equipped) .... 10
cruise control (if so equipped) .................................. 11
Power Outlets (if so equipped) .................................. 11
fuel-filler door ................................................ 12
S YSTEM GUIDE
Vehicle information display (if so equipped) ........................13
Bluetooth
® Hands-free Phone System (if so equipped) ...............13
System Operating Tips ...................................... 13
Bluetooth
® System without navigation (if so equipped) . . . . . . . . . . .14
Bluetooth® System with navigation (if so equipped) ..............15
navigation System (if so equipped) ...............................17
HomeLink
® universal Transceiver (if so equipped) ...................18
• A cellular telephone should not be used for any purpose while
driving so full attention may be given to vehicle operation.
• Always wear your seat belt.
• Supplemental air bags do not replace proper seat belt usage.
• Children 12 and under should always ride in the rear seat
properly secured in child restraints or seat belts according to
their age and weight.
• Do not drink and drive.
f or more information, refer to the “Safety –– Seats, seat belts and
supplemental restraint system (section 1)”, “Monitor, climate, audio,
phone and voice recognition systems (section 4)” and the “Starting
and driving (section 5)” of your Owner’s Manual.
Additional information about your vehicle is also available in your Owner’s Manual, navigation System Owner’s Manual and at www.nissanusa.com.
To view detailed
instructional videos, go to
www.nissanownersinfo.mobi/2013/titan or snap this barcode with an appropriate barcode reader.
Page 4 of 26
USB/iPod® INTERFACE (if so equipped)
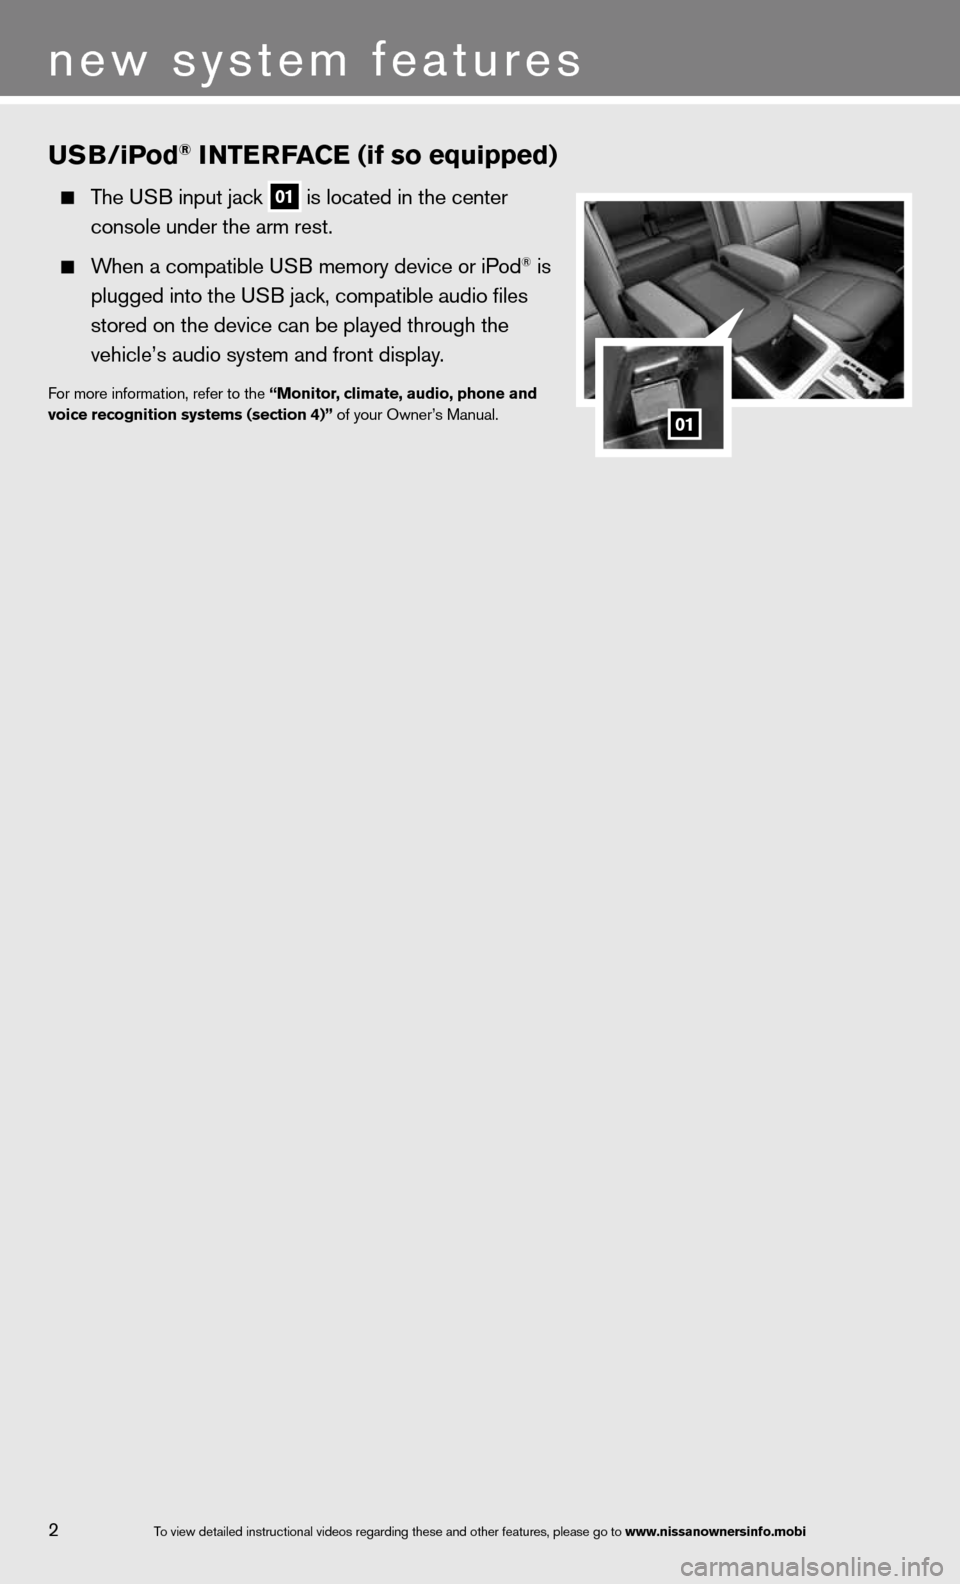
The u SB input jack 01 is located in the center
console under the arm rest.
When a compatible u SB memory device or iPod® is
plugged into the u SB jack, compatible audio files
stored on the device can be played through the
vehicle’s audio system and front display.
for more information, refer to the “Monitor, climate, audio, phone and
voice recognition systems (section 4)” of your Owner’s Manual.
2
new system features
01
To view detailed in\fstructional videos\f regarding these a\fnd other features\f \fplease go to www.nissanownersin\hfo.mobi
Page 5 of 26
TIRE PRESSURE MONITORING SYSTEM (TPMS)
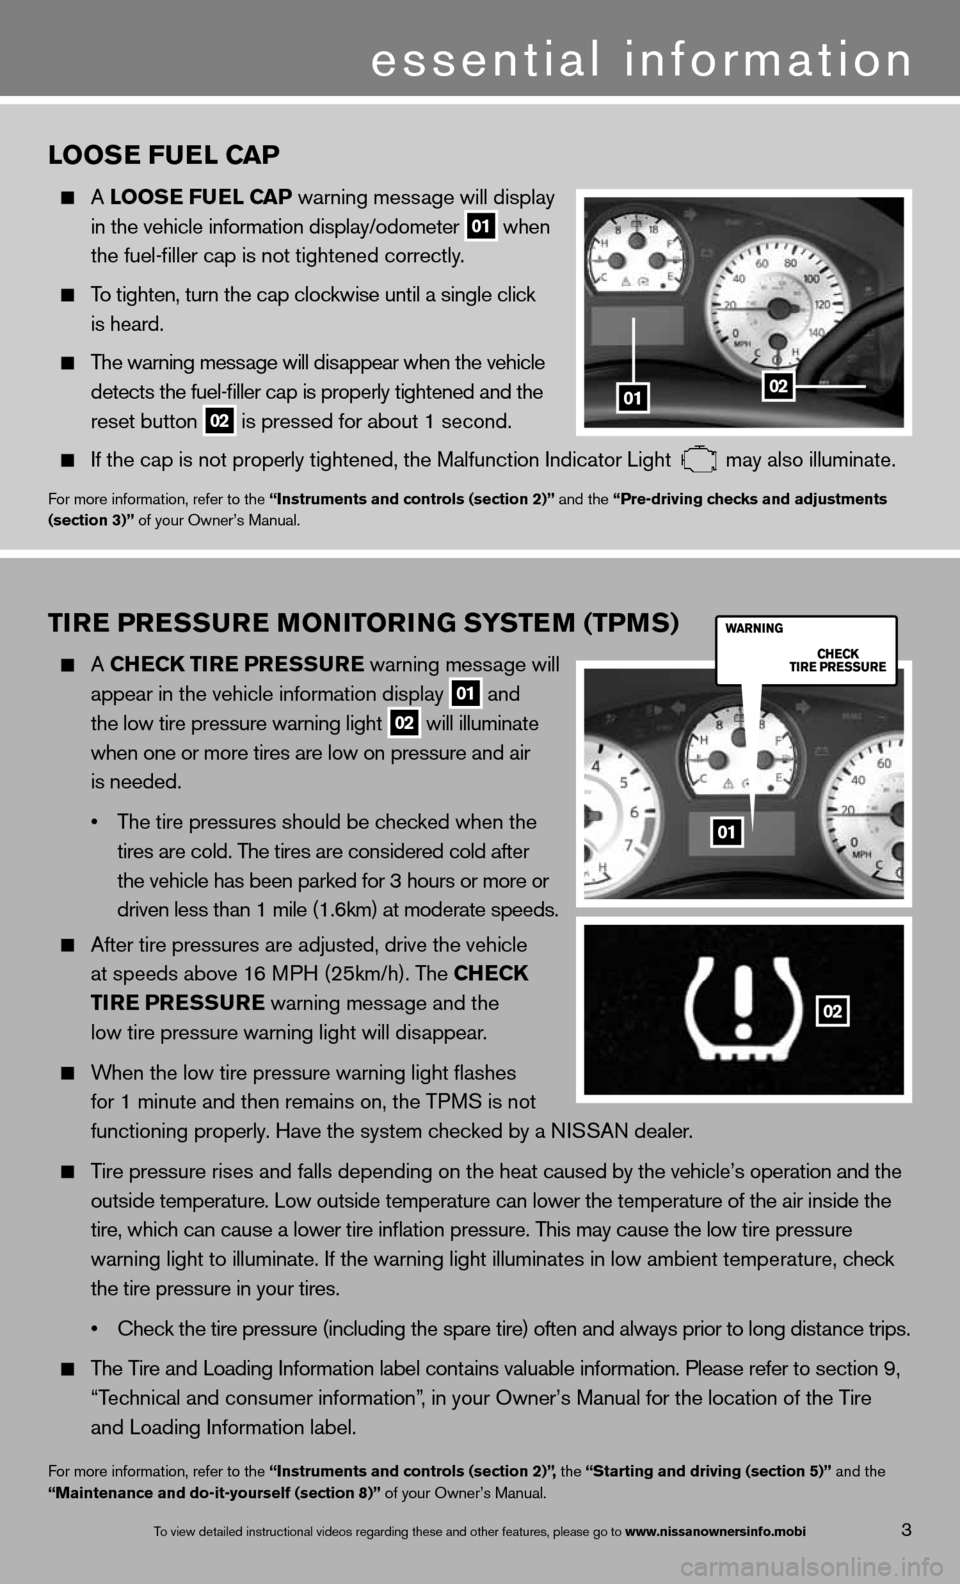
A ChEC k TIRE PRESSURE warning message will
appear in the vehicle information display
01 and
the low tire pressure warning light 02 will illuminate
when one or more tires are low on pressure and air
is needed.
• The tire pressures should be checked when the
tires are cold. The tires are considered cold after
the vehicle has been parked for 3 hours or more or
driven less than 1 mile (1.6km) at moderate speeds.
After tire pressures are adjusted, drive the vehicle
at speeds above 16 MPH (25km/h). The Ch ECk
TIRE PRESSURE warning message and the
low tire pressure warning light will disappear.
When the low tire pressure warning light flashes
for 1 minute and then remains on, the TPMS is not
functioning properly. Have the system checked by a ni SSAn dealer.
Tire pressure rises and falls depending on the heat caused by the vehicle’s operation and the
outside temperature. Low outside temperature can lower the temperature o\
f the air inside the
tire, which can cause a lower tire inflation pressure. This may cause the low tire pressure
warning light to illuminate. if the warning light illuminates in low ambient temperature, check
the tire pressure in your tires.
• Check the tire pressure (including the spare tire) often and always prior to long distance trips.
The Tire and Loading information label contains valuable information. Please refer to section 9,
“Technical and consumer information”, in your Owner’s Manual for the location of the Tire
and Loading information label.
for more information, refer to the “Instruments and controls (section 2)”, the “Starting and driving (section 5)” and the
“Maintenance and do-it-yourself (section 8)” of your Owner’s Manual.
LOOSE FUEL CAP
A LOOSE FUEL CAP warning message will display
in the vehicle information display/odometer
01 when
the fuel-filler cap is not tightened correctly.
To tighten, turn the cap clockwise until a single click
is heard.
The warning message will disappear when the vehicle
detects the fuel-filler cap is properly tightened and the
reset button
02 is pressed for about 1 second.
if the cap is not properly tightened, the Malfunction indicator Light may also illuminate.
f
or more information, refer to the “Instruments and controls (section 2)” and the “Pre-driving checks and adjustments
(section 3)” of your Owner’s Manual.
01
02
3
essential information
To view detailed in\fstructional videos\f regarding these a\fnd other features\f \fplease go to www.nissanownersin\hfo.mobi
0102
01
Page 14 of 26
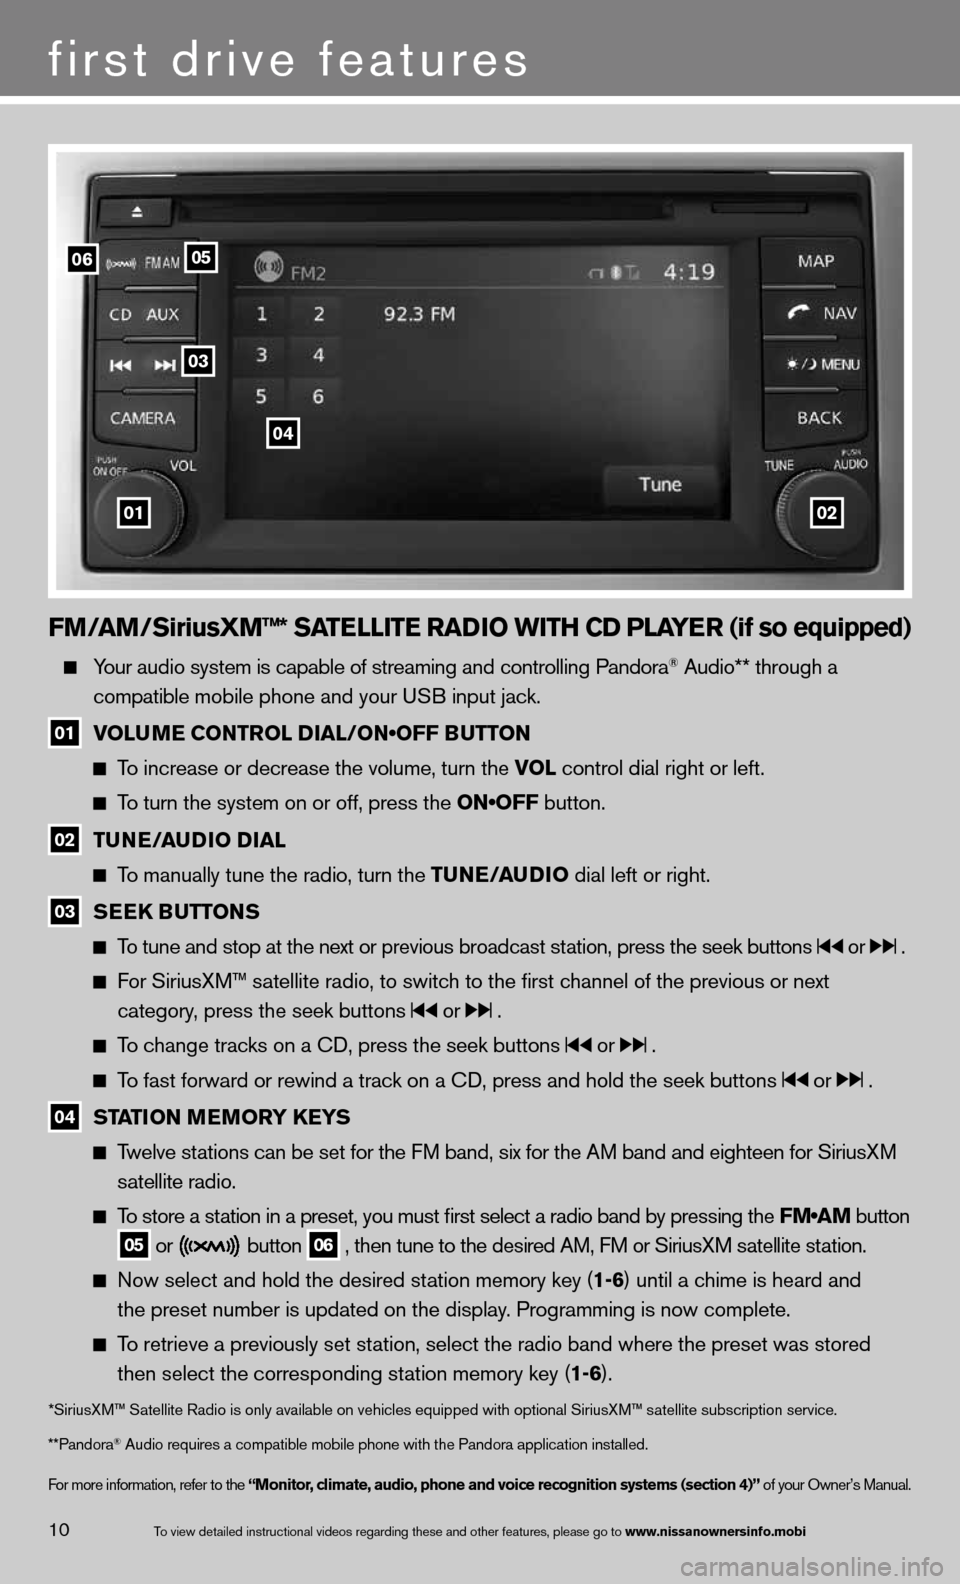
FM/AM/SiriusXM™* SATELLITE RADIO WITh CD PLAYER (if so equipped)
Your audio system is capable of streaming and controlling Pandora® Audio** through a
compatible mobile phone and your u SB input jack.
01 VOLUME CONTROL DIAL/ON•OFF BUTTON
To increase or decrease the volume, turn the vOL control dial right or left.
To turn the system on or off, press the ON•OFF button.
02 TUNE/AUDIO DIAL
To manually tune the radio, turn the TUNE/AUDIO dial left or right.
03 SEEk
BUTTONS
To tune and stop at the next or previous broadcast station, press the seek buttons or .
For SiriusXM™ satellite radio, to switch to the first channel of the previous or next
category, press the seek buttons
or .
To change tracks on a cd, press the seek buttons or .
To fast forward or rewind a track on a cd, press and hold the seek buttons or .
04 STATION MEMORY k
EYS
Twelve stations can be set for the FM band, six for the AM band and eighteen for SiriusXM
satellite radio.
To store a station in a preset, you must first select a radio band by pressing the \
FM•AM button
05 or button
06 , then tune to the desired AM, f
M or SiriusXM satellite station.
now select and hold the desired station memory key (1-6) until a chime is heard and
the preset number is updated on the display. Programming is now complete.
To retrieve a previously set station, select the radio band where the preset was stored
then select the corresponding station memory key (1-6).
*SiriusXM™ Satellite Radio is only available on vehicles equipped with optional Siri\
usXM™ satellite subscription service.
**Pandora
® Audio requires a \fcompatible mobile \fphone with the Pan\fdora application i\fnstalled.
for more information, refer to the “Monitor, climate, audio, phone and voice recognition systems (section 4)” of your Owner’s Manual.
first drive features
10To view detailed in\fstructional videos\f regarding these a\fnd other features\f \fplease go to www.nissanownersin\hfo.mobi
0102
06
03
04
05
Page 15 of 26
11To view detailed in\fstructional videos\f regarding these a\fnd other features\f \fplease go to www.nissanownersin\hfo.mobi
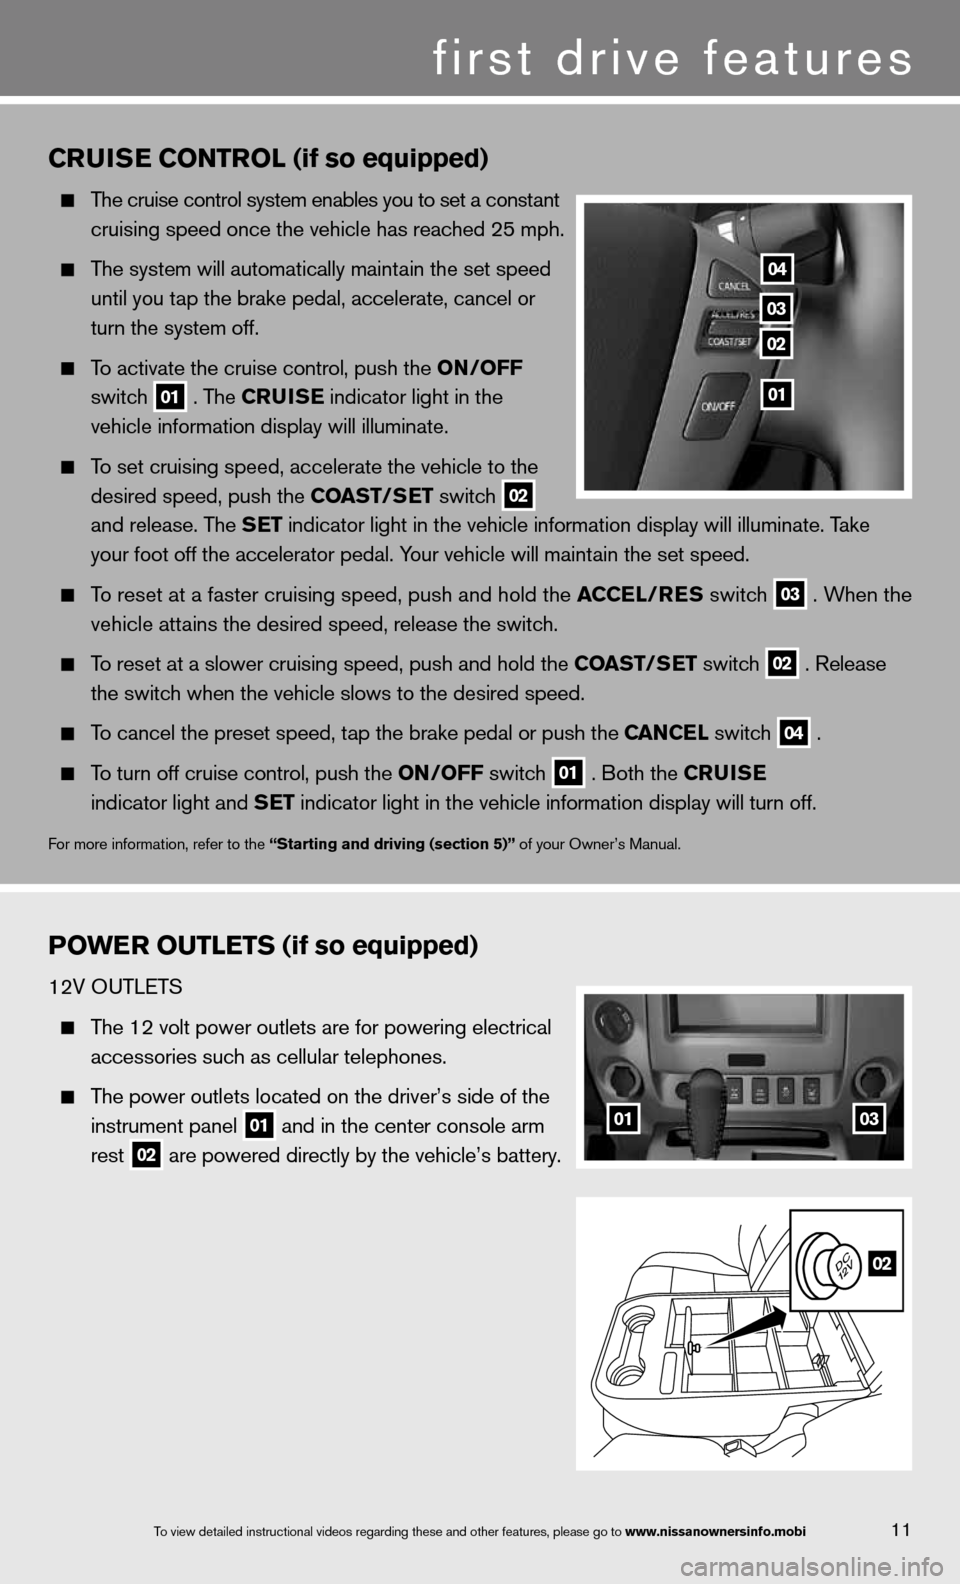
CRUISE CONTROL (if so equipped)
The cruise control system enables you to set a constant
cruising speed once the vehicle has reached 25 mph.
The system will automatically maintain the set speed
until you tap the brake pedal, accelerate, cancel or
turn the system off.
To activate the cruise control, push the ON/OFF
switch
01 . The CRUISE
indicator light in the
vehicle information display will illuminate.
To set cruising speed, accelerate the vehicle to the
desired speed, push the COAST/SET switch
02
and release. The SET indicator light in the vehicle information display will illuminate. Take
your foot off the accelerator pedal. Your vehicle will maintain the set speed.
To reset at a faster cruising speed, push and hold the ACCEL/RES switch
03 . When the
vehicle attains the desired speed, release the switch.
To reset at a slower cruising speed, push and hold the COAST/SET switch
02 . Release
the switch when the vehicle slows to the desired speed.
To cancel the preset speed, tap the brake pedal or push the CANCEL switch
04 .
To turn off cruise control, push the ON/OFF switch
01 . Both the CRUISE
indicator light and SET indicator light in the vehicle information display will turn off.
for more information, refer to the “Starting and driving (section 5)” of your Owner’s Manual.
POWER OUTLETS (if so equipped)
12V OuTLeTS
The 12 volt power outlets are for powering electrical
accessories such as cellular telephones.
The power outlets located on the driver’s side of the
instrument panel
01 and in the center console arm
rest
02 are powered directly by the vehicle’s battery.
04
03
02
01
0103
02
first drive features
Page 17 of 26
Bluetooth\f han\bs-free Phone system (if so equipped)
With an overhead m\ficrophone and soun\fd
transmitted throug\fh the audio system \fspeakers\f
the Bluetooth
® Hands-free Phone S\fystem utilizes
Bluetooth wireless\f technology and voi\fce recognition
to provide hands-fr\fee cellular phone \fcommunication.
A cellular telepho\fne should not be u\fsed while driving
so full attention m\fay be given to vehi\fcle operation*.
SYSTEM OPERATING TIPS
\blose all windows. \fSurrounding noises\f may interfere
with system operati\fon and performance.\f
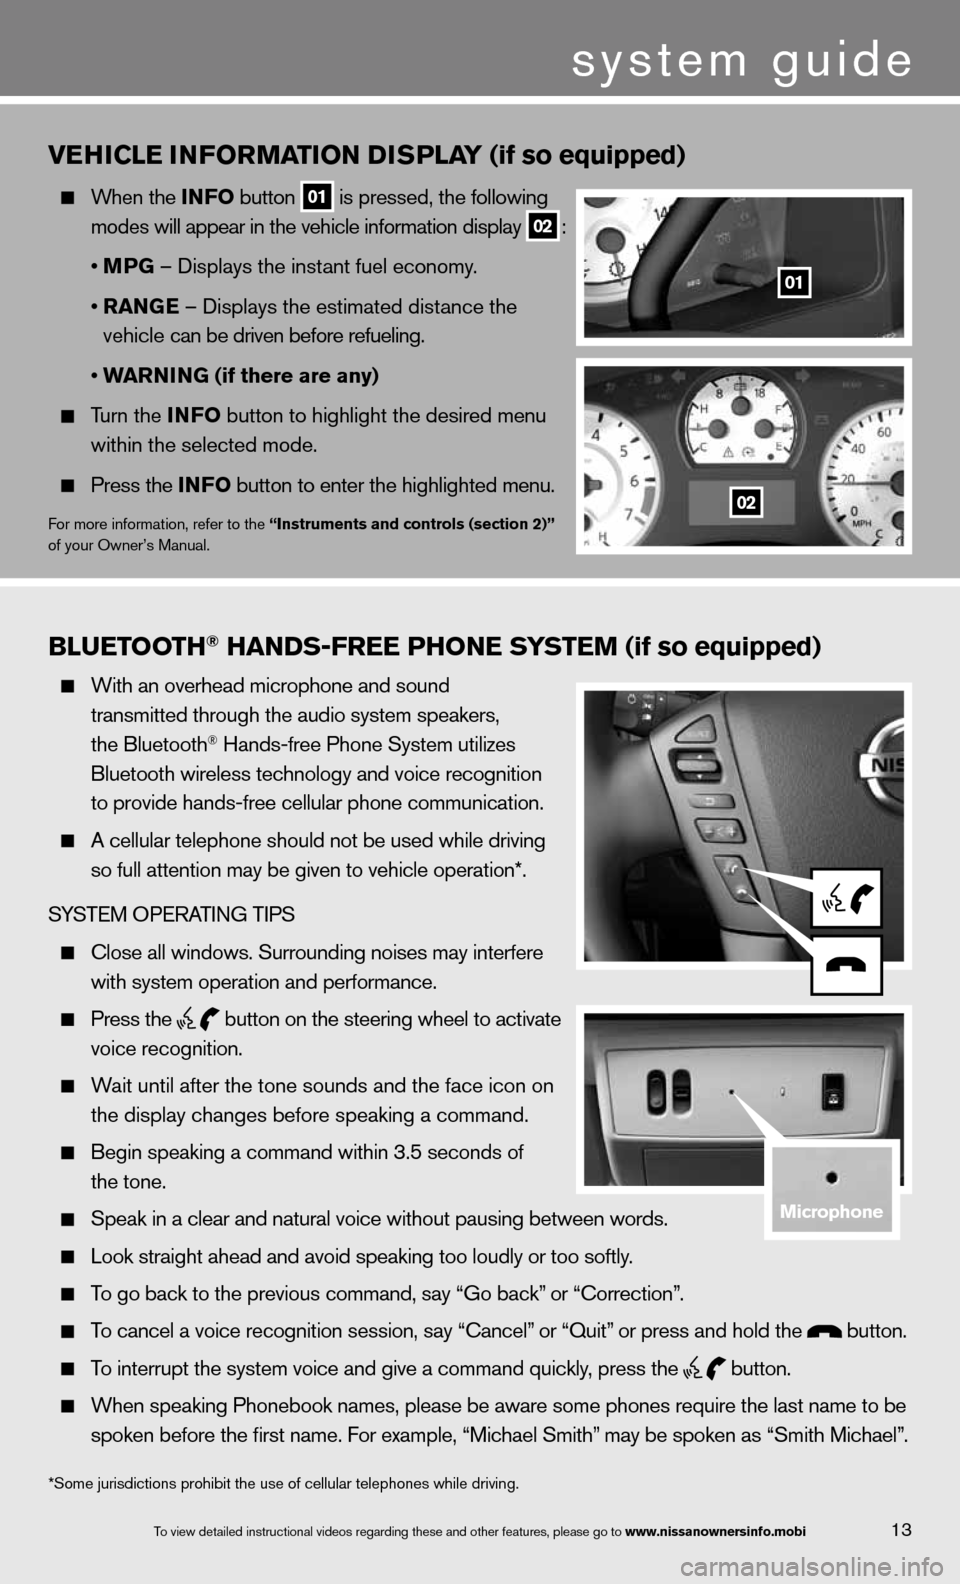
Press the
button on the stee\fring wheel to acti\fvate
voice recognition.
Wait until after the\f tone sounds and t\fhe face icon on
the display changes\f before speaking a \fcommand.
Begin speaking a c\fommand within 3.5 s\feconds of
the tone.
Speak in a clear a\fnd natural voice w\fithout pausing bet\fween words.
Look straight ahea\fd and avoid speaki\fng too loudly or to\fo softly.
To go back to the p\frevious command\f sa\fy “Go back” or “\borrection”.
To cancel a voice r\fecognition session\f\f say “\bancel” or “Quit” or press and hold\f the button.
To interrupt the sys\ftem voice and give\f a command quickly\f press the
button.
When speaking Phon\febook names\f please\f be aware some pho\fnes require the la\fst name to be
spoken before the fi\frst name. For examp\fle\f “Michael Smith”\f may be spoken as “\fSmith Michael”.
vEhICLE INFORMATION DISPLAY (if so equipped)
When the INFO button
01 is pressed, the following
modes will appear in the vehicle information display
02 :
• MPG – displays the instant fuel economy.
• RANGE – displays the estimated distance the
vehicle can be driven before refueling.
• WARNING (if there are any)
Turn the INFO button to highlight the desired menu
within the selected mode.
Press the INFO button to enter the highlighted menu.
for more information, refer to the “Instruments and controls (section 2)”
of your Owner’s Manual.
system guide
13To view detailed in\fstructional videos\f regarding these a\fnd other features\f \fplease go to www.nissanownersin\hfo.mobi
*Some jurisdictions prohibit the use of cellular telephones while drivin\
g.
01
02
microphone
Page 20 of 26
To view detailed in\fstructional videos\f regarding these a\fnd other features\f \fplease go to www.nissanownersin\hfo.mobi
system guide
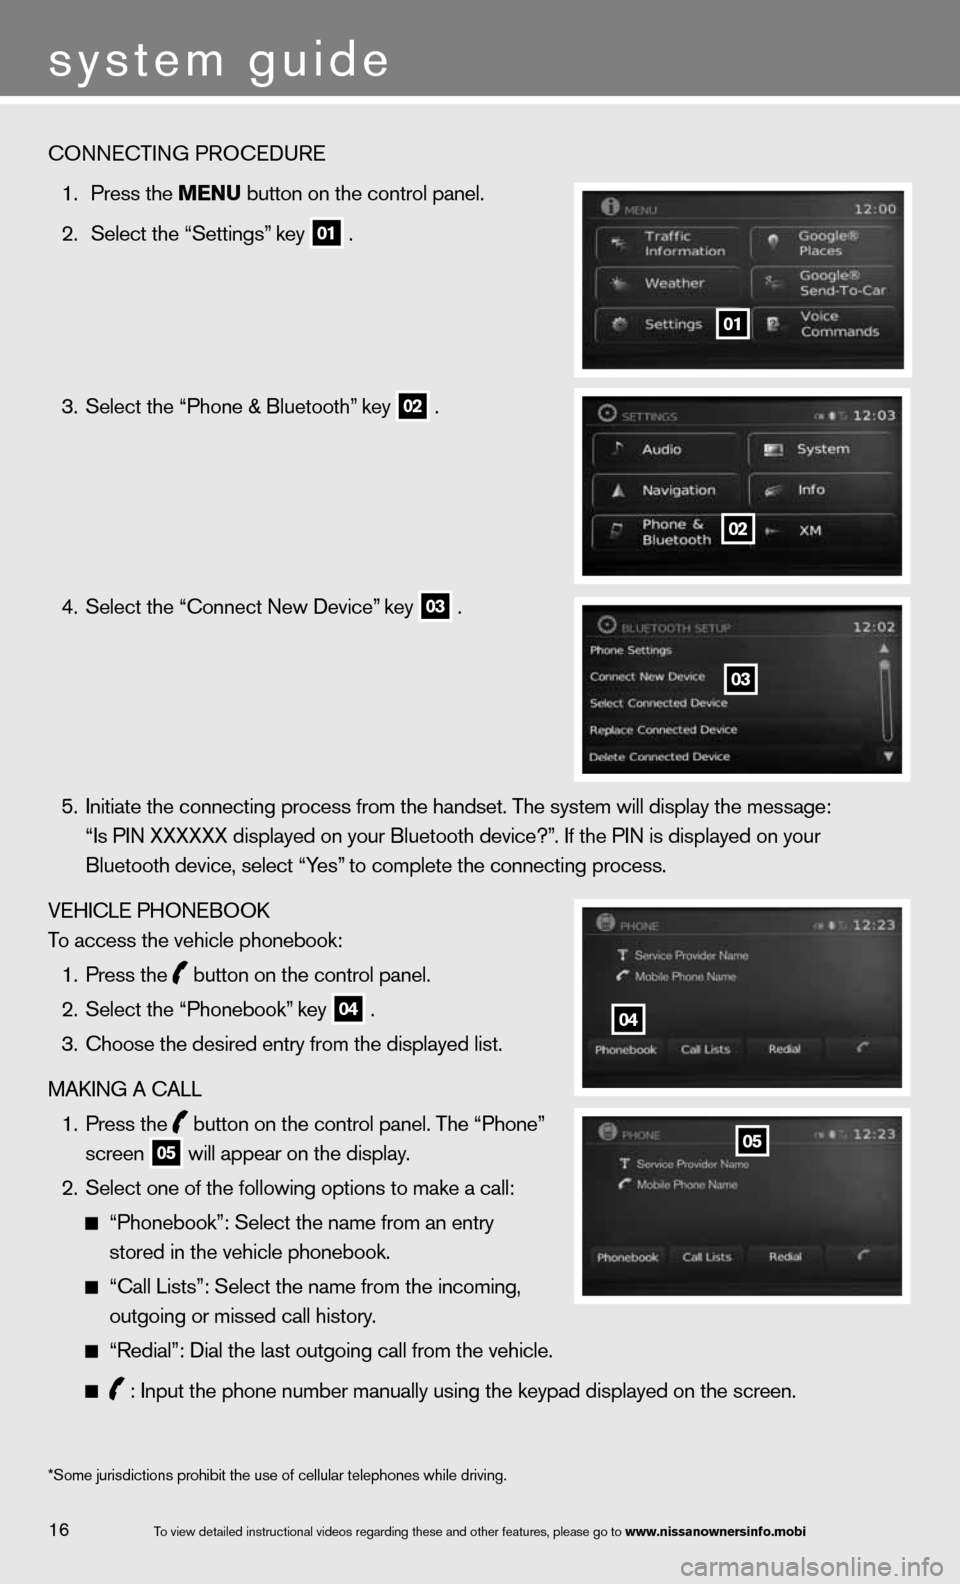
\bONNE\bTING PRO\bEDURE\f
1. Press the menu button on the cont\frol panel.
2. Select the “Settin\fgs” key
01 .
3. Select the “Phone \f& Bluetooth” key
02 .
4. Select the “\bonnect\f New Device” key
03 .
5. Initiate the conne\fcting process from \fthe handset. The sys\ftem will display th\fe message:
“Is PIN XXXXXX dis\fplayed on your Bluet\footh device?”. If the PIN is dis\fplayed on your
Bluetooth device\f s\felect “Yes” to complete the c\fonnecting process.
VEHI\bLE PHONEBOOK
To access the vehic\fle phonebook:
1. Press the
button on the cont\frol panel.
2. Select the “Phoneb\fook” key
04 .
3. \bhoose the desired \fentry from the displ\fayed list.
MAKING A \bALL
1. Press the
button on the cont\frol panel. The “Phone”
screen
05 will appear on the\f display.
2. Select one of the f\following options t\fo make a call:
“Phonebook”: Selec\ft the name from an \fentry
stored in the vehi\fcle phonebook.
“\ball Lists”: Selec\ft the name from the\f incoming\f
outgoing or missed\f call history.
“Redial”: Dial the\f last outgoing cal\fl from the vehicle.\f
: Input the phone \fnumber manually usi\fng the keypad displ\fayed on the screen.
01
*Some jurisdiction\fs prohibit the use\f of cellular teleph\fones while driving\f.
02
03
04
05
16