Page 81 of 458

2 Instruments and controls
Instrument panel...................................2-2
Meters and gauges ................................2-4
Speedometer and odometer . . ...................2-5
Tachometer ....................................2-6
Engine coolant temperature gauge ...............2-6
Fuel gauge ....................................2-7
Engine oil pressure gauge (if so equipped) ........2-7
Voltmeter (if so equipped) .......................2-8
Automatic transmission fluid temperature
gauge (if so equipped) ..........................2-8
Compass display (if so equipped) ...................2-9
Compass display .............................. 2-10
Warning/indicator lights and audible reminders ......2-13
Checking bulbs ............................... 2-13
Warning lights ................................ 2-13
Indicator lights ................................ 2-18
Audible reminders ............................. 2-20
Vehicle Information Display (if so equipped) .........2-21
How to use the Vehicle Information Display .......2-21
Security systems (if so equipped) ..................2-25
Vehicle security system (if so equipped) ..........2-25
NISSAN vehicle immobilizer system
(if so equipped) ............................... 2-26Windshield wiper and washer switch
...............2-27
Switch operation .............................. 2-27
Rear window and outside mirror (if so equipped)
defroster switch .................................. 2-28
Headlight and turn signal switch ....................2-30
Headlight control switch ........................ 2-30
Daytime running light system (Canada only) ......2-32
Instrument brightness control ...................2-33
Turn signal switch ............................. 2-33
Fog light switch (if so equipped) ................2-33
Horn ............................................ 2-34
Cargo lamp switch (if so equipped) .................2-34
Heated seats (if so equipped) ......................2-34
Vehicle Dynamic Control (VDC) off switch ...........2-36
Electronic locking rear differential (E-Lock) system
switch (if so equipped) ............................ 2-36
Power inverter switch (if so equipped) ..............2-37
Rear
sonar system off switch (if so equipped) ........2-38
Tow mode switch ................................. 2-38
Power outlets .................................... 2-39
12v Outlets ................................... 2-39
120v outlet (if so equipped) ....................2-40
Storage ......................................... 2-42
Page 82 of 458
 . ..................2-43
Center armrest storage (if so equipped) ..........2-44
Glove box ............................")
Instrument panel storage trays..................2-42
Console box (if so equipped) . ..................2-43
Center armrest storage (if so equipped) ..........2-44
Glove box .................................... 2-45
Sunglasses holder (if so equipped) ..............2-45
Map pockets .................................. 2-46
Seatback pocket (if so equipped) ...............2-46
Overhead console (if so equipped) ..............2-46
Cup holders .................................. 2-47
Grocery hooks (if so equipped) .................2-50
Lockable bedside storage compartment
(if so equipped) ............................... 2-50
Windows ........................................ 2-51
Power windows (if so equipped) ................2-51
Manual windows (if so equipped) ................2-53
Rear sliding window (if so equipped) ............2-53
Rear power window switch (if so equipped) ......2-54 Moonroof (if so equipped)
......................... 2-54
Automatic moonroof ........................... 2-54
Interior light ...................................... 2-56
Console light (if so equipped) ...................2-57
Personal lights (if so equipped) ....................2-57
Map lights (if so equipped) ........................2-58
HomeLink� universal transceiver (if so equipped) .....2-58
Programming HomeLink� .......................2-59
Programming HomeLink� for Canadian
customers and gate openers ....................2-60
Operating the HomeLink� universal
transceiver .................................... 2-60
Programming trouble-diagnosis .................2-61
Clearing the programmed information ............2-61
Reprogramming a single HomeLink� button......2-61
If your vehicle is stolen ......................... 2-61
Page 83 of 458
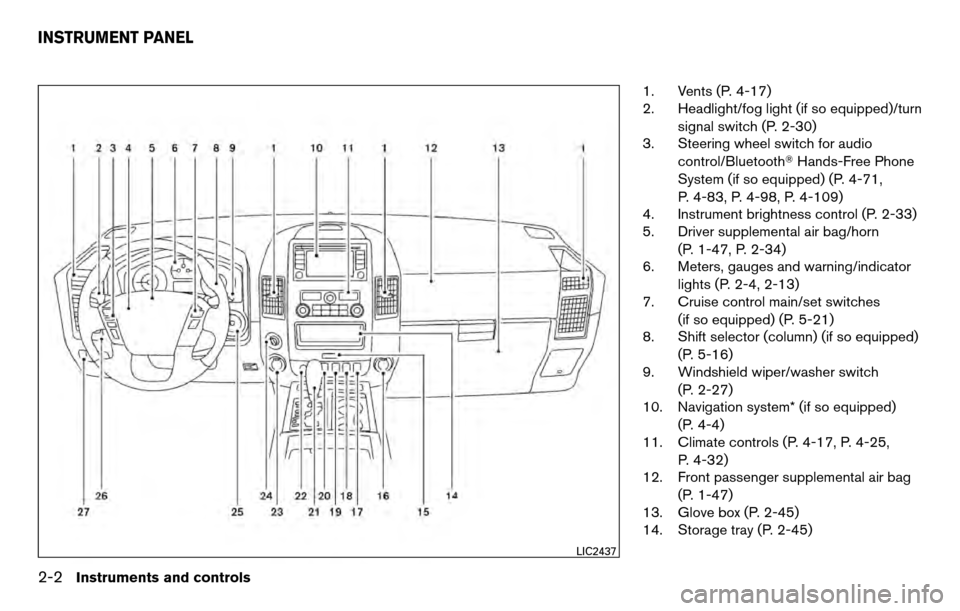
1. Vents (P. 4-17)
2. Headlight/fog light (if so equipped)/turnsignal switch (P. 2-30)
3. Steering wheel switch for audio
control/Bluetooth� Hands-Free Phone
System (if so equipped) (P. 4-71,
P. 4-83, P. 4-98, P. 4-109)
4. Instrument brightness control (P. 2-33)
5. Driver supplemental air bag/horn
(P. 1-47, P. 2-34)
6. Meters, gauges and warning/indicator
lights (P. 2-4, 2-13)
7. Cruise control main/set switches
(if so equipped) (P. 5-21)
8. Shift selector (column) (if so equipped)
(P. 5-16)
9. Windshield wiper/washer switch
(P. 2-27)
10. Navigation system* (if so equipped)
(P. 4-4)
11. Climate controls (P. 4-17, P. 4-25,
P. 4-32)
12. Front passenger supplemental air bag
(P. 1-47)
13. Glove box (P. 2-45)
14. Storage tray (P. 2-45)
LIC2437
INSTRUMENT PANEL
2-2Instruments and controls
Page 86 of 458
1. Speedometer
2. Odometer/twin trip display
3. Change button
SPEEDOMETER AND ODOMETER
Speedometer
The speedometer indicates vehicle speed.
Odometer/Twin trip odometer
The odometer/twin trip odometer is displayed
when the ignition switch is placed in the ON
position.
The odometer records the total distance the ve-
hicle has been driven.The twin trip odometer records the distance of
individual trips.
Changing the display:
Pushing the change button changes the display
as follows:
Trip
→
Trip→Odometer only
Elapsed time, driving distance and average
speed information is also available for vehicles
with a navigation system. Refer to “Control panel
buttons” in the “Display screen, heater, air condi-
tioner, audio and phone systems”.
Resetting the trip odometer:
Pushing the change button for more than 1 sec-
ond resets the currently displayed trip odometer
to zero.
WIC1244WIC1245
Instruments and controls2-5
Page 102 of 458
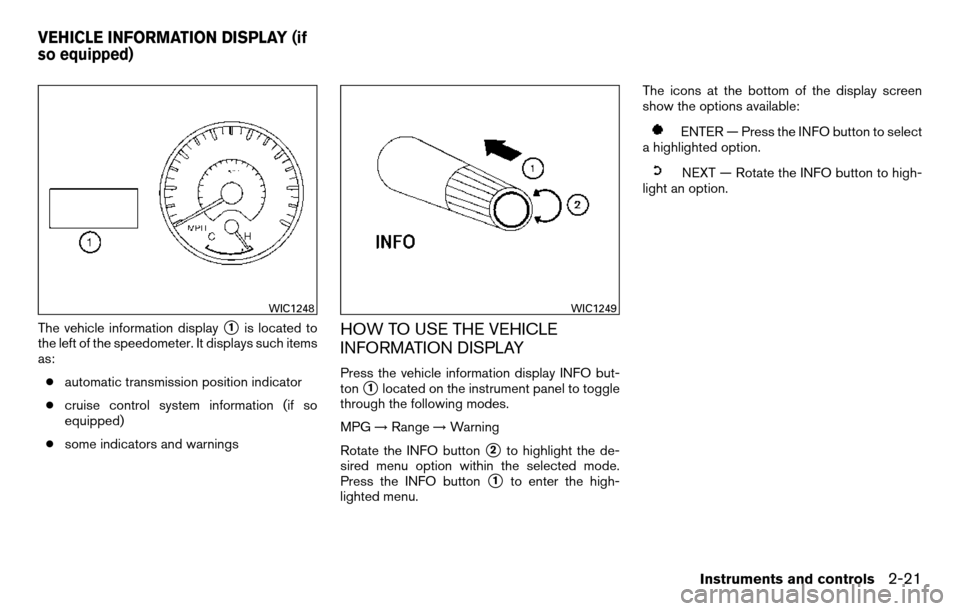
The vehicle information display�1is located to
the left of the speedometer. It displays such items
as:
● automatic transmission position indicator
● cruise control system information (if so
equipped)
● some indicators and warningsHOW TO USE THE VEHICLE
INFORMATION DISPLAY
Press the vehicle information display INFO but-
ton
�1located on the instrument panel to toggle
through the following modes.
MPG →Range →Warning
Rotate the INFO button
�2to highlight the de-
sired menu option within the selected mode.
Press the INFO button
�1to enter the high-
lighted menu. The icons at the bottom of the display screen
show the options available:
ENTER — Press the INFO button to select
a highlighted option.
NEXT — Rotate the INFO button to high-
light an option.
WIC1248WIC1249
VEHICLE INFORMATION DISPLAY (if
so equipped)
Instruments and controls2-21
Page 111 of 458
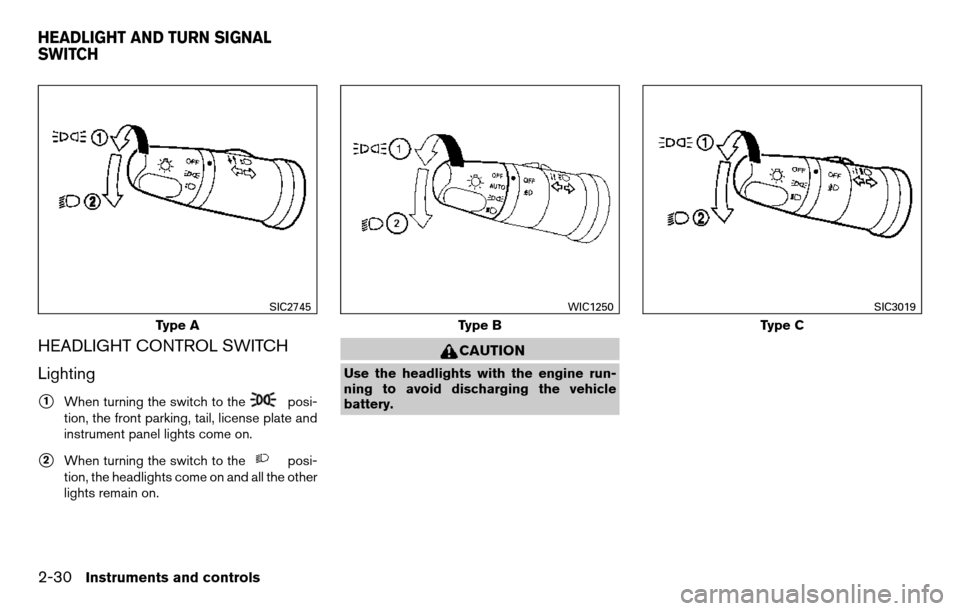
HEADLIGHT CONTROL SWITCH
Lighting
�1When turning the switch to theposi-
tion, the front parking, tail, license plate and
instrument panel lights come on.
�2When turning the switch to theposi-
tion, the headlights come on and all the other
lights remain on.
CAUTION
Use the headlights with the engine run-
ning to avoid discharging the vehicle
battery.
Type A
SIC2745
Type B
WIC1250
Type C
SIC3019
HEADLIGHT AND TURN SIGNAL
SWITCH
2-30Instruments and controls
Page 112 of 458

The autolight system allows the headlights to be
set so they turn on and off automatically. The
autolight system can:● Turn on the headlights, front parking, tail,")
Autolight system (if so equipped)
The autolight system allows the headlights to be
set so they turn on and off automatically. The
autolight system can:● Turn on the headlights, front parking, tail,
license plate and instrument panel lights au-
tomatically when it is dark.
● Turn off all the lights when it is light.
● Keep all the lights on for a period of time after
you place the ignition switch in the OFF
position and all doors are closed. To turn on the autolight system:
1. Turn the headlight switch to the AUTO posi- tion
�1.
2. Place the ignition switch in the ON position.
3. The autolight system automatically turns the headlights on and off.
Initially, if the ignition switch is placed in the OFF
position and a door is opened and left open, the
headlights remain ON for a period of time. If
another door is opened while the headlights are
on, then the timer is reset.
To turn the autolight system off, turn the switch to
the OFF,
,orposition. Be sure you do not put anything on top of
the autolight sensor
�1located on the top
side of the instrument panel. The autolight
sensor controls the autolight; if it is cov-
ered, the autolight sensor reacts as if it is
dark out and the headlights will illuminate.
If this occurs while parked with the engine
off and the ignition switch placed in the ON
position, your vehicle’s battery could be-
come discharged.
WIC1251LIC0836
Instruments and controls2-31
Page 114 of 458
 .
Turn the control to adjust the br")
INSTRUMENT BRIGHTNESS
CONTROL
The instrument brightness control operates when
the headlight control switch is in
the
,or AUTO position (with auto-
lights activated) .
Turn the control to adjust the brightness of instru-
ment panel lights when driving at night.
TURN SIGNAL SWITCH
Turn signal
�1Move the lever up or down to signal the
turning direction. When the turn is com-
pleted, the turn signals cancel automatically.
Lane change signal
�2To signal a lane change, move the lever up or
down to the point where the indicator light
begins to flash, but the lever does not latch.
The turn signal will flash three times automati-
cally.
FOG LIGHT SWITCH (if so equipped)
To turn the fog lights on, turn the headlight switch
to the
position, then turn the fog light
switch to the
position.
To turn the fog lights on with the headlight switch
in the AUTO position (if so equipped) , the head-
lights must be on, then turn the fog light switch to
the
position.
To turn the fog lights off, turn the fog light switch
to the OFF position.
The headlights must be on and the low beams
selected for the fog lights to operate. The fog
lights automatically turn off when the high beam
headlights are selected.
WIC1506WIC1253WIC1254
Instruments and controls2-33