Page 143 of 372
VANITY MIRRORS
To access the vanity mirror, pull the sun visor
down and flip open the mirror cover. Some vanity
mirrors are illuminated and turn on when the
mirror cover is open.
CARD HOLDER (driver’s side only)
To access the card holder, pull the sun visor
down and slide card in the card holder
�A.Donot
view information while operating the vehicle.
REARVIEW MIRROR (if so equipped)
The night position�1reduces glare from the
headlights of vehicles behind you at night.
Use the day position
�2when driving in daylight
hours.
WARNING
Use the night position only when neces-
sary, because it reduces rear view clarity.
LPD2101LPD2120WPD0126
MIRRORS
3-30Pre-driving checks and adjustments
Page 144 of 372

The inside mirror is designed so that it automati-
cally dims according to the intensity of the head-
lights of the vehicle following you. The aut")
AUTOMATIC ANTI-GLARE
REARVIEW MIRROR (if so equipped)
The inside mirror is designed so that it automati-
cally dims according to the intensity of the head-
lights of the vehicle following you. The automatic
anti-glare feature is activated when the ignition
switch is in the ON position.NOTE:
Do not hang any objects over the sensors
�1or apply glass cleaner to the sensors.
Doing so will reduce the sensitivity of the
sensors, resulting in improper operation.
The indicator light will illuminate when the auto-
matic anti-glare feature is operating.
With the ignition switch in the ON position, press
the
button as described:
● To turn off the anti-glare feature, press and
hold the
button for 3-6 seconds. The
indicator light will turn off.
● To turn on the anti-glare feature, press and
hold the
button for 3-6 seconds
again. The indicator light will turn on.
For more information about the compass
�2and
compass features (if so equipped) , refer to
“Compass display” in the “Instruments and con-
trols” section of this manual.
OUTSIDE MIRRORS
The outside mirror remote control will operate
only when the ignition switch is in the ACC or ON
position.
Move the small switch
�1to select the right or left
mirror. Adjust each mirror to the desired position
using the large switch
�2.
LPD0446LPD0237
Pre-driving checks and adjustments3-31
Page 151 of 372
Touch screen operation
Selecting the item:
Touch an item to select. For example, to select
the “Audio” key, touch the “Audio” key
�1on the
screen. Adjusting the item:
For screens where an item can be adjusted incre-
mentally, such as when adjusting the bass and
treble for the audio system, touch the “+” key�1
or the “�” key�2to adjust the settings of an item.
When there are more items than can be dis-
played on one screen, touch the up arrow
�3to
scroll up the page or touch the down arrow
�4to
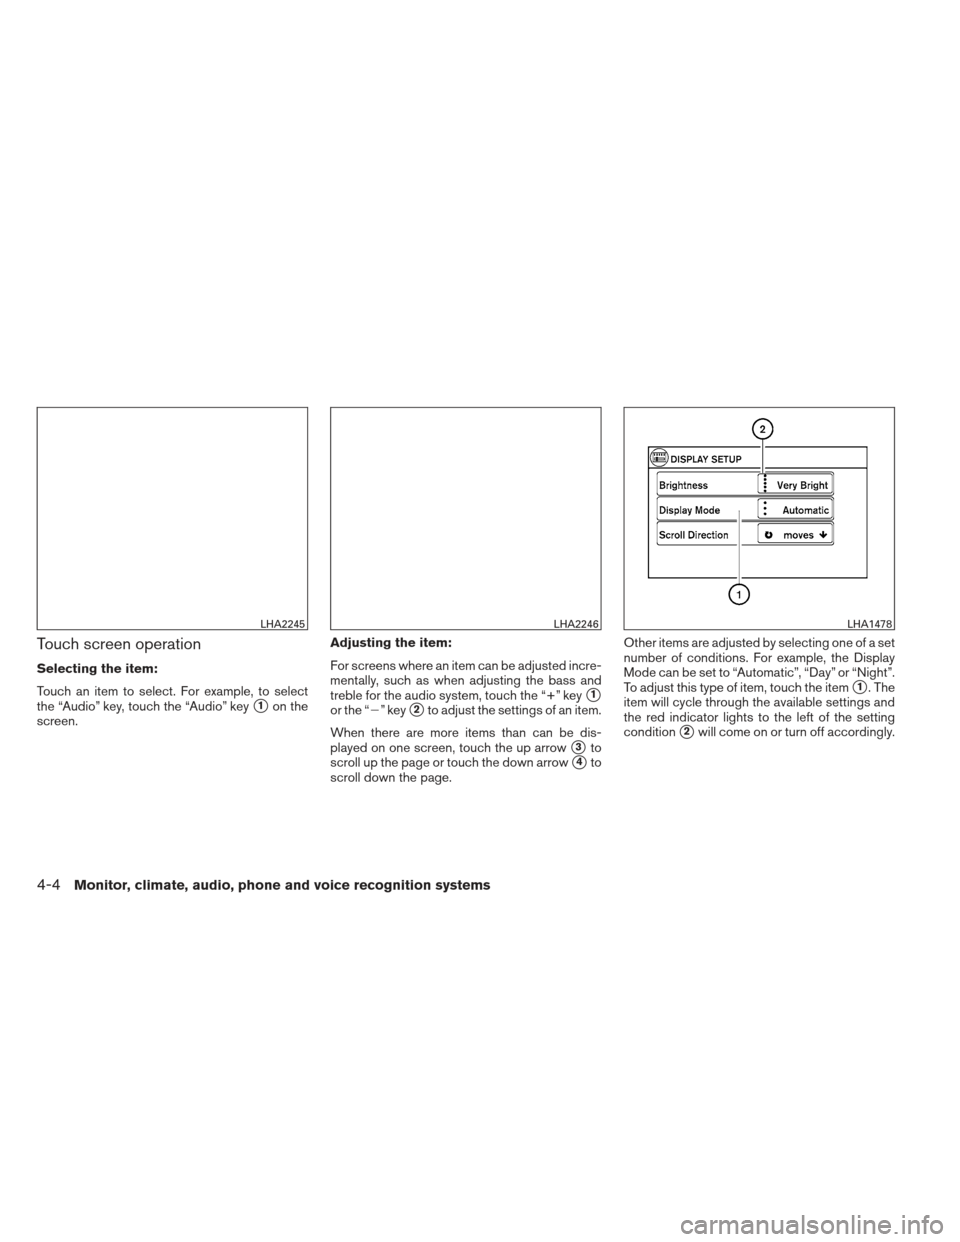
scroll down the page. Other items are adjusted by selecting one of a set
number of conditions. For example, the Display
Mode can be set to “Automatic”, “Day” or “Night”.
To adjust this type of item, touch the item
�1. The
item will cycle through the available settings and
the red indicator lights to the left of the setting
condition
�2will come on or turn off accordingly.
LHA2245LHA2246LHA1478
4-4Monitor, climate, audio, phone and voice recognition systems
Page 154 of 372

Display:
Select the “Display” key to adjust the appearance
of the display. The following settings can be
adjusted:
Brightness
The brightness of the display can be set to Very
Bright, Bright, Default, Dark or Very Dark. Touch
the “Brightness” key to cycle through the options.
Display Mode
The display can be adjusted to fit the level of
lighting in the vehicle. Touch the “Display Mode”
key to cycle through the options. “Day” and“Night” modes are suited for the respective times
of day, while “Automatic” controls the display
automatically.
Scroll Direction
The direction that menus scroll can be adjusted.
Choose either “up” or “down”.
Clock Settings:
Select the “Clock Settings” key to adjust the time
and the appearance of the clock on the display.
The following settings can be adjusted:
Time Format
The clock can be set to 12 hours or 24 hours.
Date Format
Select from five possible formats of displaying
the day, month and year.
LHA1482LHA2250
Monitor, climate, audio, phone and voice recognition systems4-7
Page 155 of 372

Clock Mode
Select the mode for the clock. “Auto” uses the
system’s GPS to automatically maintain the time.
“Manual” allows you to set the clock using the
“Set Clock Manually” key. “Time Zone” maintains
the time based upon the zone selected when
selecting the “Time Zone” key.Set Clock Manually
When this setting is activated, the clock can be
set manually. Touch the “+” or “-” keys to adjust
the hours, minutes, day, month and year up or
down. “Clock Mode” must be set to “Manual” for
this option to be available.
Daylight Savings Time
When this setting is activated, daylight savings
time is on. Touch the “Daylight Savings Time” key
to toggle the setting on or off.
Time Zone
Choose the applicable time zone from the list.Language:
Select the “Language” key to adjust the language
used by the system. The language can be set to
English, Français or Español.
Touchscreen click:
Select the “Touchscreen Click” key to toggle the
touchscreen click feature on or off. When acti-
vated, a click sound will be heard every time a key
on the screen is touched.
System Beeps:
Select the “System Beeps” key to toggle the
system beep tones feature on or off. When acti-
vated, a beep sound will be heard when a pop-up
LHA2251LHA2252
4-8Monitor, climate, audio, phone and voice recognition systems
Page 156 of 372
 is pressed
and held for two seconds.
Reset all settings/memory:
Select the “Reset All Settings/Memory” key to
return all")
message appears on the screen or a button on
the unit (such as the
button) is pressed
and held for two seconds.
Reset all settings/memory:
Select the “Reset All Settings/Memory” key to
return all settings to default and to clear the
memory.
Info
For information about the “Info” key, see the
separate Navigation System Owner’s Manual.
XM
For XM setup, refer to “Audio system” in this
section.
BUTTON
To change the display brightness, press
the
button. Pressing the button again will
change the display to the day or the night display.
If no operation is performed within 5 seconds, the
display will return to the previous display.
Press and hold the
button for more than
two seconds to turn the display off. Press the
button again to turn the display on. When the shift selector is shifted into the R
(Reverse) position, the monitor display shows a
rearward view from the vehicle.
WARNING
●
The system is designed as an aid to the
driver in detecting large stationary ob-
jects to help avoid damaging the ve-
hicle. The system will not detect small
objects below the bumper, and may not
detect objects close to the bumper or
on the ground.
● The RearView Monitor is a convenience
but it is not a substitute for proper back-
ing. Always turn and check that it is safe
to do so before backing up. Always
back up slowly.
● Objects viewed in the RearView Moni-
tor differ from actual distance because
a wide-angle lens is used.
● Make sure that the trunk is securely
closed when backing up.
● Do not put anything on the rearview
camera. The rearview camera is in-
stalled beside the license plate light. ●
When washing the vehicle with high-
pressure water, be sure not to spray it
around the camera. Otherwise, water
may enter the camera unit causing wa-
ter condensation on the lens, a mal-
function, fire or an electric shock.
● Do not strike the camera. It is a preci-
sion instrument. Otherwise, it may mal-
function or cause damage resulting in a
fire or an electric shock.
CAUTION
There is a plastic cover over the camera.
Do not scratch the cover when cleaning
dirt or snow from the cover.
REARVIEW MONITOR (if so
equipped)
Monitor, climate, audio, phone and voice recognition systems4-9
Page 160 of 372
ADJUSTING THE SCREEN
The procedure for adjusting the quality of the
screen differs depending on the type of screen
present on the vehicle.
For vehicles without Navigation System:1. Press the ENTER/SETTING button.
2. Turn the TUNE-SCROLL knob to highlight the “Brightness” or “Contrast” key.
3. Press the ENTER/SETTING button. 4. Adjust the level using the TUNE-SCROLL
knob and then press the ENTER/SETTING
button to apply the adjustment.
● Do not adjust the Brightness or Contrast of
the RearView Monitor while the vehicle is
moving.
For vehicles with Navigation System:1. Press the MENU button.
2. Select the “Settings” key.
3. Select the “System” key.
4. Select the “Display” key.
5. Touch the “Brightness key and adjust the level to the desired setting.
● Do not adjust the display of the RearView
Monitor while the vehicle is moving.
Without Navigation System
LHA2254
With Navigation System
LHA1482
Monitor, climate, audio, phone and voice recognition systems4-13
Page 161 of 372

OPERATING TIPS
CAUTION
●Do not use alcohol, benzine or thinner
to clean the camera. This will cause
discoloration. To clean the camera,
wipe with a cloth dampened with a di-
luted mild cleaning agent and then wipe
with a dry cloth.
● Do not damage the camera as the moni-
tor screen may be adversely affected.
● When the shift selector is shifted to R (Re-
verse) , the monitor screen automatically
changes to the RearView Monitor mode.
However, the radio can be heard.
● It may take some time until the RearView
Monitor is displayed after the shift selector
has been shifted to R (Reverse) . Objects
may be distorted momentarily until the Rear-
View Monitor screen is displayed com-
pletely. When the shift selector is returned to
a position other than R (Reverse) , it may take
some time until the screen changes. Objects
on the screen may be distorted until they are
completely displayed.
● When the temperature is extremely high or
low, the screen may not clearly display ob-
jects. This is not a malfunction. ●
When strong light directly enters the cam-
era, objects may not be displayed clearly.
● Vertical lines may be seen in objects on the
screen. This is due to strong reflected light
from the bumper. This is not a malfunction.
● The screen may flicker under fluorescent
light. This is not a malfunction.
● The colors of objects on the RearView Moni-
tor may differ somewhat from those of the
actual object.
● When the contrast of objects is low at night,
pressing the SETTING button or MENU but-
ton may not change the brightness.
● Objects on the monitor may not be clear in a
dark place or at night.
● If dirt, rain or snow attaches to the camera,
the RearView Monitor may not display ob-
jects. Clean the camera.
● Do not use body wax on the camera window.
If body wax does get on the camera window,
wipe off the wax with a clean cloth damp-
ened with mild detergent diluted with water.
4-14Monitor, climate, audio, phone and voice recognition systems