2013 NISSAN QASHQAI wheel nuts
[x] Cancel search: wheel nutsPage 212 of 297
Downloaded from www.Manualslib.com manuals search engine Never allow passengers to stay in the vehicle
while it is on the jack.
Remove all loads before lifting the vehicle with
the jack.
Make sure to block the wheel diagonally op-
posite the flat tyre as described earlier in this
section.
CAUTION
The jack should be used on firm, level ground.
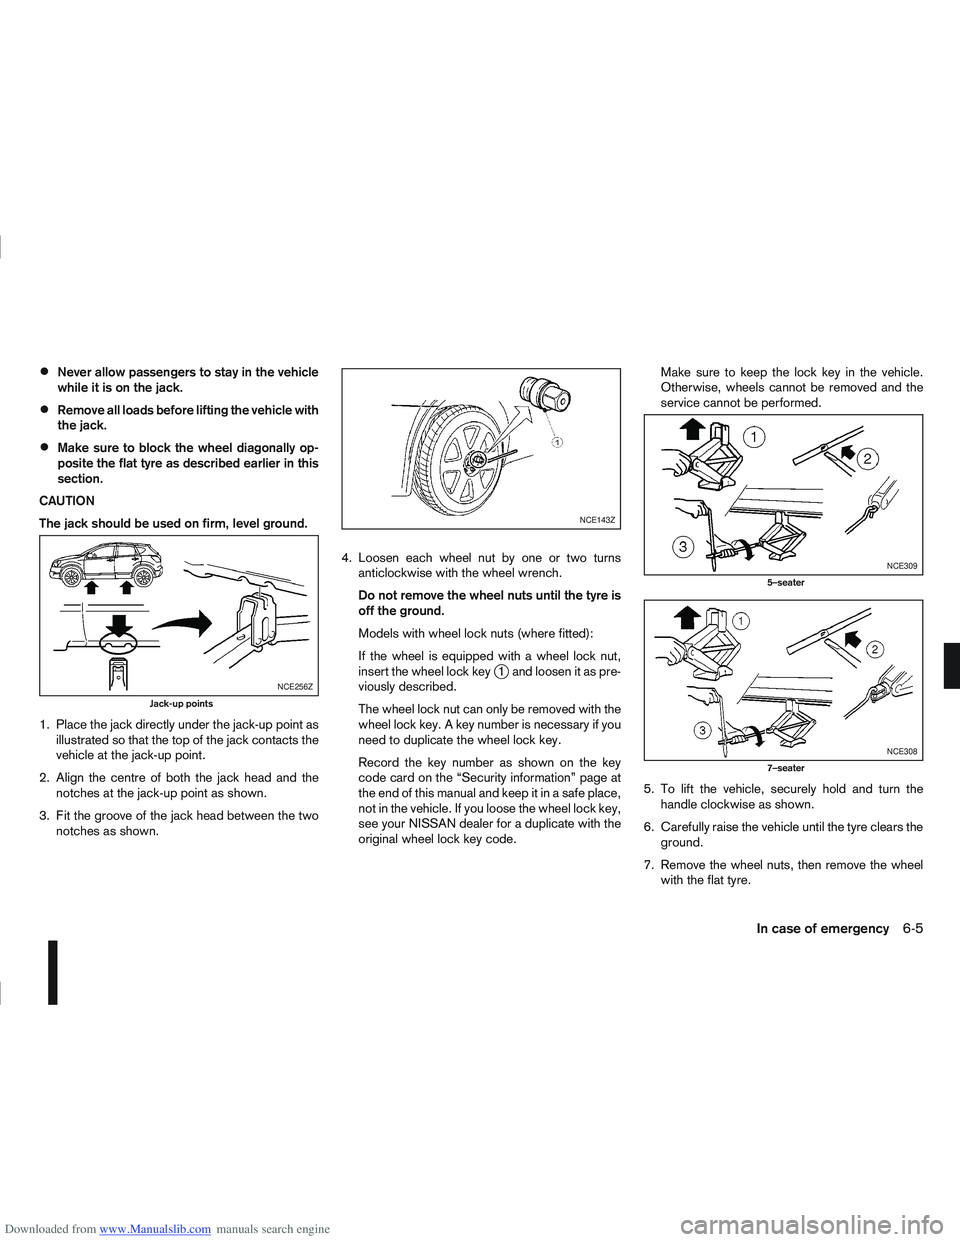
1. Place the jack directly under the jack-up point as illustrated so that the top of the jack contacts the
vehicle at the jack-up point.
2. Align the centre of both the jack head and the notches at the jack-up point as shown.
3. Fit the groove of the jack head between the two notches as shown. 4. Loosen each wheel nut by one or two turns
anticlockwise with the wheel wrench.
Do not remove the wheel nuts until the tyre is
off the ground.
Models with wheel lock nuts (where fitted):
If the wheel is equipped with a wheel lock nut,
insert the wheel lock key
j1 and loosen it as pre-
viously described.
The wheel lock nut can only be removed with the
wheel lock key. A key number is necessary if you
need to duplicate the wheel lock key.
Record the key number as shown on the key
code card on the “Security information” page at
the end of this manual and keep it in a safe place,
not in the vehicle. If you loose the wheel lock key,
see your NISSAN dealer for a duplicate with the
original wheel lock key code. Make sure to keep the lock key in the vehicle.
Otherwise, wheels cannot be removed and the
service cannot be performed.
5. To lift the vehicle, securely hold and turn the handle clockwise as shown.
6. Carefully raise the vehicle until the tyre clears the ground.
7. Remove the wheel nuts, then remove the wheel with the flat tyre.NCE256Z
Jack-up points
NCE143Z
NCE309
5–seater
NCE308
7–seater
In case of emergency6-5
Page 213 of 297

Downloaded from www.Manualslib.com manuals search engine CAUTION
The wheel is heavy. Be sure that your feet are
clear of the wheel and use gloves as necessary
to avoid injury.
Installing the wheel
WARNING
The temporary use spare tyre is designed for
emergency use. See “Spare tyre” earlier in
this section.
Never use wheel nuts other than those pro-
vided with your vehicle. Incorrect wheel nuts
or improperly tightened wheel nuts may cause
the wheel to become loose or come off. This
could cause an accident.
Never use oil or grease on the wheel studs or
nuts. This may cause the wheel nuts to be-
come loose.
jATighten
jB Loosen
jC Bevelled face
1. Clean any mud or dirt from the surface between the wheel and the hub.
2. Carefully fit the wheel and tighten the wheel nuts with your fingers. Check that all the wheel nuts
contact the wheel surface horizontally and on the
bevelled side.
Models with wheel lock nut (where fitted):
Insert the wheel lock key into the wheel lock nut
and tighten into the wheel finger tight.
3. With the wheel wrench, tighten the wheel nuts alternately and evenly in the sequence as illus-
trated (
j1-j5 ) until they are tight.
4. Lower the vehicle slowly until the tyre touches the ground.
5. Tighten the wheel nuts securely using the wheel wrench in the sequence as illustrated.
6. Lower the vehicle completely.
7. Install the wheel cover (where fitted). NOTE
Before installation, align NISSAN logo (centre
cap) with the wheel nuts/or perpendicular to
valve hole (where fitted), to correctly align to
the centre.
As soon as possible, tighten the wheel nuts to
the specified torque with a torque wrench. Wheel nut tightening torque:
113 (12 kg-m, 83 ft-lb)
WARNING
Retighten the wheel nuts after the vehicle has
been driven for 1,000 km (600 miles) (also in
cases of a flat tyre, etc.).
The wheel nuts must be kept tightened to specifica-
tion at all times. It is recommended that the wheel
nuts be tightened to specification at each mainte-
nance interval.
Adjust the tyre pressure to the COLD pressure.
COLD pressure is the tyre pressure as measured
after the vehicle has been parked for three hours or
more or driven for less than 1.6 km (1 mile).
COLD tyre pressures are shown on the tyre placard
affixed to the driver’s side centre pillar.
Stowing the wheel and tools
WARNING
Always make sure that the wheel, subwoofer
(where fitted), jack and tools are properly stored
after each use. Such items can become danger-
ous projectiles in an accident or sudden stop.
5–seater
1. Securely store the wheel with the flat tyre, the jack and the tools in the specified storage areas.
See “Getting the tools and spare wheel” earlier
in this section(for 5–seater).NCE287Z
6-6In case of emergency
Page 214 of 297

Downloaded from www.Manualslib.com manuals search engine 2. Store the subwoofer (where fitted) as it was origi-nally installed.
3. Install the retainer and replace the floor cover.
7–seater
1. Store the tools in the specified areas.
2. Firmly pull down the third row seat and make sure it locks into the locking latches on both sides
under the seat.
3. Place the seatback of the third row seat in the upright position
j1 . For details, see “Folding 3rd
row (7-seater)” in the “1. Safety — seats, seat
belts and supplemental restraint system” section.
4. Store the wheel with flat tyre vertically in the boot
j2.
5. Store the other items in following order: Tonneau cover (where fitted)
j3→ Floor coverj4→ Centre floor board and the two side floor
boardsj5.
Wheel lock nuts (where fitted)
In order to prevent theft, the specially designed
wheel lock nut is installed to each wheel. The wheel
lock nut cannot be removed with the commonly used
tools.
When removing tyres, use the lock key provided
with your vehicle.
Removing the wheel lock nut:
1. Insert the wheel lock key
j1 to the wheel lock
nut.
2. To remove the wheel lock nut, turn the wheel lock key anticlockwise using the wheel wrench.
CAUTION
Do not use a power tool to remove the wheel
lock nuts.
When installing the wheel, tighten the wheel
lock nuts to the same tightening torque as the normal wheel nuts. For details, see “Chang-
ing flat tyre (Models with spare wheel, where
fitted)” earlier in this section.
NOTE
The wheel lock nut has an individual code.
A wheel lock key with other than the indi-
vidual code cannot remove the wheel lock
nut. If you lose the wheel lock key, contact
a NISSAN dealer for a duplicate with the
original wheel lock key code.
Record the key number as shown on the
key code card on the “Security informa-
tion” page at the end of this manual and
keep it in a safe place, not in the vehicle.
When you ask for a service at a NISSAN
dealer or qualified workshop, make sure
to keep the lock key in the vehicle. Other-
wise, wheels cannot be removed and the
service cannot be performed.
REPAIRING FLAT TYRE (Models with
emergency tyre puncture repair kit,
where fitted)
The emergency tyre puncture repair kit is supplied
with the vehicle instead of a spare tyre. This repair
kit must be used for temporarily fixing a minor tyre
puncture. After using the repair kit, see a NISSAN
dealer or qualified workshop as soon as possible for
tyre inspection and repair/replacement.
NCE306
NCE143Z
In case of emergency6-7
Page 234 of 297
Downloaded from www.Manualslib.com manuals search engine Lights*:
Clean the headlights on a regular basis. Make sure
that the headlights, stop lights, tail lights, turn signal
lights, and other lights are all operating properly and
installed securely. Also check headlight aim.
Tyres*:
Check the pressure with a gauge periodically when
at a service station (including the spare) and adjust
to the specified pressure if necessary. Check care-
fully for damage, cuts or excessive wear.
Tyre rotation*:
Tyres should be rotated every 10,000 km (6,000
miles) for Two-Wheel Drive (2WD) models and
5,000 km (3,000 miles) for Four-Wheel Drive (4WD)
models. However, the timing for tyre rotation may
vary according to your driving habits and road sur-
face conditions.
Wheel alignment and balance:
If the vehicle pull to either side while driving on a
straight and level road, or if you detect uneven or
abnormal tyre wear, there may be a need for wheel
alignment. If the steering wheel or seat vibrates at
normal highway speeds, wheel balancing may be
needed.
Wheel nuts:
When checking the tyres, make sure no wheel nuts
are missing, and check for any loose wheel nuts.
Tighten if necessary.Windscreen:
Clean the windscreen on a regular basis. Check the
windscreen at least every six months for cracks or
other damage. Have a damaged windscreen re-
paired by a qualified repair facility.
Wiper blades*:
Check for cracks or wear if they do not wipe prop-
erly.
Under the bonnet and vehicle
The maintenance items listed here should be
checked periodically, e.g. each time you check the
engine oil or refuel.
Battery*:
Check if the green indicator on the top of the main-
tenance free battery is visible. If it is not visible,
replace the battery as soon as possible.
Vehicles operated in high temperatures or under
severe conditions, check the fluid level frequently.
Brake and clutch fluid level*:
Make sure that the brake and clutch fluid level is
between the MAX and MIN lines on the reservoir.
Engine coolant level*:
Check the coolant level when the engine is cold.
Engine drive belts*:
Make sure that the drive belts are not frayed, worn,
cracked or oily.Engine oil level*:
Check the level after parking the vehicle on a level
surface and turning off the engine.
Fluid leaks:
Check under the vehicle for fuel, oil, water or other
fluid leaks after the vehicle has been parked for a
while. Water dripping from the air conditioner after
use is normal. If you should notice any leaks or if
petrol fumes are evident, check for the cause and
have it corrected immediately.
Window washer fluid*:
Check that there is adequate fluid in the tank.
Inside the vehicle
The maintenance items listed here should be
checked on a regular basis, such as when perform-
ing periodic maintenance, cleaning the vehicle, etc.
Accelerator pedal:
Check the pedal for smooth operation and make
sure that the pedal does not catch or require uneven
effort. Keep the floor mats away from the pedal.
Brake pedal*:
Check the pedal for smooth operation. If the brake
pedal suddenly goes down further than normal, the
pedal feels spongy or the vehicle seems to take
longer to stop, contact a NISSAN dealer or qualified
workshop immediately. Keep the floor mat away
from the pedal.
Maintenance and do-it-yourself8-3
Page 263 of 297

Downloaded from www.Manualslib.com manuals search engine Replacement tyres may have a lower speed
rating than the factory equipped tyres, and
may not match the potential maximum vehicle
speed. Never exceed the maximum speed rat-
ing of the tyre.
All season tyres
NISSAN specifies all season tyres on some models
to provide good performance for use all year around,
including snowy and icy road conditions. All season
tyres are identified by ALL SEASON and/or M&S
on the tyre sidewall. Snow tyres have better snow
traction than all season tyres and may be more ap-
propriate in some areas.
Summer tyres
NISSAN specifies summer tyres as standard fit.
These tyres provide superior performance under
typical mild weather conditions.
If you plan to operate your vehicle in snowy or icy
conditions, NISSAN recommends the use of SNOW
or ALL SEASON tyres on all four wheels.
Snow tyres
If snow tyres are needed, it is necessary to select
tyres equivalent in size and load rating to the original
equipment tyres. If you do not, it can adversely af-
fect the safety and handling of your vehicle.
Generally, snow tyres will have lower speed ratings
than factory equipped tyres and may not match the
potential maximum vehicle speed. Never exceed the
maximum speed rating of the tyre.
For additional traction on icy roads, studded tyresmay be used. However, some provinces and states
prohibit their use. Check local, state and provincial
laws before installing studded tyres. Skid and trac-
tion capabilities of studded snow tyres, on wet or
dry surfaces, may be poorer than that of non-stud-
ded snow tyres.
SNOW CHAINS
Use of snow chains may be prohibited in some ar-
eas. Check the local laws before installing snow
chains. When installing snow chains, make sure they
are of proper size for the tyres on your vehicle and
are installed according to the chain manufacturer’s
suggestions. Use chain tensioners when recom-
mended by the snow chain manufacturer to ensure
a tight fit. Loose end links of the snow chain must be
secured or removed to prevent the possibility of
whipping action damage to the fenders or undercar-
riage.
In addition, drive at a reduced speed. Otherwise,
your vehicle can be damaged and/or vehicle han-
dling and performance may be adversely affected.
Snow chains must be installed only on the front
wheels and not on the rear wheels.
CAUTION
Never install snow chains on a temporary-use
or small size spare tyre.
Do not drive with snow chains on paved roads
which are clear of snow. Driving with chains in
such conditions can cause damage to the
various mechanisms of the vehicle due to
some overstress. When driving on clear paved
roads, be sure to change to 2WD mode, see
“Four-wheel Drive (4WD) (where fitted)” in the
“5. Starting and driving” section.
TYRE ROTATION
NISSAN recommends that tyres be rotated every
10,000 km (6,000 miles) for Two-Wheel Drive
(2WD) vehicles and 5,000 km (3,000 miles) for
Four-Wheel Drive (4WD) vehicles.
See “Flat tyre” in the “6. In case of emergency” sec-
tion for tyre replacing procedures.
WARNING
After rotating the tyres, adjust the tyre pres-
sure.
Retighten the wheel nuts when the vehicle
has been driven for the first 1,000 km (600
miles) (also in cases of a flat tyre, etc.).
Do not include the temporary-use spare tyre
in the tyre rotation.
NDI762Z
8-32Maintenance and do-it-yourself
Page 290 of 297

Downloaded from www.Manualslib.com manuals search engine – Driving with automatic transmission ...................... 5-14, 5-17
– Driving with continuously variable transmission (Models withmanual shift) .................................................................. 5-14
– Driving with continuously variable transmission (Models without manual shift) .................................................................. 5-17
– Driving with manual transmission ................................... 5-12
– Manual transmission (ignition knob) ................................. 5-8
– Manual transmission (ignition switch) ............................... 5-6
Travelling or transferring your registration to another country .. 9-8
Trip computer ...................................................................... 2-16
Turbocharger system (Diesel engine models) ......................... 5-5
Turn signal switch ............................................................... 2-26
Twin trip odometer .............................................................. 2-16
Tyre
– Changing tyres and wheels ........................................... 8-33
– Emergency tyre puncture repair kit ......................... 6-7, 8-34
– Flat tyre ........................................................................\
... 6-2
– Repairing flat tyre ............................................................ 6-7
– Spare tyre ..................................................................... 8-33
– Temporary-use spare tyre ................................................ 6-2
– Types of tyres ................................................................ 8-31
– Tyre age ........................................................................\
8-33
– Tyre equipment .............................................................. 5-43
– Tyre inflation pressure ................................................... 8-31
– Tyre placard .................................................................... 9-9
– Tyre pressure (Trailer) ................................................... 5-36
– Tyre rotation .................................................................. 8-32
– Tyre wear and damage .................................................. 8-33
– Wheels and tyres ................................................... 8-31, 9-7
U
Ultrasonic sensor
– Alarm sensor ................................................................. 3-13
– Parking sensor .............................................................. 5-24
USB Memory operation ....................................................... 4-37 Using Intelligent Key system .................................................. 3-7
V
Vehicle identification .............................................................. 9-8
– Vehicle identification number (VIN) (chassis number) ....... 9-8
– Vehicle identification plate ................................................ 9-8
Vehicle information display .................................................. 2-11
Vehicle security .......................................................... 3-13, 5-38
– Alarm system ................................................................. 3-13
Vents ........................................................................\
.......... 4-12W
Warning/indicator lights and audible reminders ...................... 2-3
Warnings and alerts (Vehicle information display) ................ 2-12
Washing ........................................................................\
....... 7-2
Waxing ........................................................................\
.......... 7-2
Wheel
– Blocking the wheels ........................................................ 6-3
– Care of wheels ................................................................ 7-3
– Changing tyres and wheels ........................................... 8-33
– Getting the tools and spare wheel .................................... 6-3
– Installing the wheel .......................................................... 6-6
– Removing the wheel ........................................................ 6-4
– Removing the wheel cover ............................................... 6-4
– Stowing the wheel and tools ............................................ 6-6
– Wheel balance .............................................................. 8-33
– Wheel lock key code ....................................................... 6-7
– Wheel lock nuts ....................................................... 6-4, 6-7
– Wheels and tyres ................................................... 8-31, 9-7
Wheel lock nuts .................................................................... 6-7
Windows
– Power window — Driver’s side (Reinitialisationprocedure) .................................................................... 2-35
Index10-9