2013 NISSAN QASHQAI air conditioner
[x] Cancel search: air conditionerPage 161 of 297
![NISSAN QASHQAI 2013 Owners Manual Downloaded from www.Manualslib.com manuals search engine 2. Turn the<TUNE/MENU> dial and scroll down to
[Phone Book] then press <ENTER>.
3. Scroll down through the list, select the appropri- ate conta NISSAN QASHQAI 2013 Owners Manual Downloaded from www.Manualslib.com manuals search engine 2. Turn the<TUNE/MENU> dial and scroll down to
[Phone Book] then press <ENTER>.
3. Scroll down through the list, select the appropri- ate conta](/manual-img/5/56763/w960_56763-160.png)
Downloaded from www.Manualslib.com manuals search engine 2. Turn the
[Phone Book] then press
3. Scroll down through the list, select the appropri- ate contact name (highlighted), and press
4. A following screen will show the number to be dialled. If correct, press
the number.
If the contact has more numbers assigned for
(home),(mobile), or(office), scroll,
and select the appropriate number to dial.
Alternatively, the quick search mode can be used as
follows:
1. Press
2. Turn the
betic or numerical letter of the contact name.
Once highlighted, press
letter.
3. The display will show the corresponding contact name(s). Where necessary, use the
priate contact name to call.
4. A following screen will show the number to be dialled. If correct, press
the number. Manually dialling a phone number:
WARNING
Park the vehicle in a safe location, and apply the
handbrake before making a call.
To dial a phone number manually use the audio sys-
tem display (virtual keyboard pad) as follows:
1. Press <
>, and turn the
highlight [Call Number].
2. Press
3. Turn the
select each number of the phone number. Once
highlighted, press
selection.
To delete the last number entered scroll to the
[←] (Backspace) symbol, and once highlighted
press
leted. Pressing
each subsequent number. 4. After entering the last number, scroll to the [
]
symbol, and press
dial the number.
Call Lists:
A number from the dialled, received, or missed call
lists can also be used to make a call.
Dialled call
Use the dialled call mode to make a call which is
based on the list of outgoing (dialled) calls.
Received call
Use the received call mode to make a call which
is based on the list of received calls.
Missed call
Use the missed call mode to make a call which
is based on the list of missed calls.
1. Press <
>, and select [Call Lists].
2. Turn the
and press
3. Scroll to the preferred phone number then press
>to dial the number.
NAA1198
4-54Display screen, heater and air conditioner, and audio system
Page 162 of 297

Downloaded from www.Manualslib.com manuals search engine Receiving a call
When receiving an incoming call, the display will
show the caller’s phone number (or a notification
message that the caller’s phone number cannot be
shown):
Answer the call by pressing<>briefly, or press
End the call, after the conversation, by:
– Pressing <
>briefly again.
– Pressing
] symbol is
highlighted.
If [
] is not highlighted, turn the
Reject the call by pressing <>with a long press
or select [] from the incoming call screen.
During a call:
During a call, by scrolling and pressing
you can select the following options:
[#123] — Use this item to enter numbers during
a call. For example, if directed by an automated
phone system to dial an extension number the
system will send the tone associated with the
selected number.
[] — Use this item (the transfer handset com-
mand) to transfer the call from the audio system
to your mobile phone.
To transfer the call back to hands-free via the
audio system select [
].
STEERING WHEEL SWITCHES
(where fitted)
j
A Telephone button
jB Volume control buttons
The hands-free mode can be operated using the
steering wheel switches.
Volume control buttons
The volume control buttons allow you to adjust the
volume of the speakers by pressing the <+>or<
—> button.
Telephone button
The phone <> button allows you to:
Accept an incoming call by pressing <>once.
Reject an incoming call by pressing <>for
more than 2 seconds during the incoming call.
End an active call by pressing the <>button
once.
Redial the last outgoing call by pressing the <>
button for more than 2 seconds.
NAA1200
NAA998Z
Display screen, heater and air conditioner, and audio system4-55
Page 177 of 297
Downloaded from www.Manualslib.com manuals search engine or the ultra sonic parking sensor (where fitted) will
be activated. For details, see “Rear-view monitor
(where fitted)” in the “4. Display screen, heater and
air conditioner, and audio system” section, “Around
view monitor (where fitted)” in the “4. Display
screen, heater and air conditioner, and audio
system” section or “Ultrasonic Parking Sensor
(where fitted)” later in this section.
If it is difficult to move the gear lever into R (Re-
verse) or 1st. Shift into N (Neutral), then release the
clutch pedal. Fully depress the clutch pedal again
and shift into R (Reverse) or 1st.
DRIVING WITH AUTOMATIC
TRANSMISSION OR WITH
CONTINUOUSLY VARIABLE
TRANSMISSION (Models with manual
shift)
CAUTION
The cold engine idle speed is high, so use
caution when shifting into a forward or re-
verse gear before the engine has warmed up.
Avoid revving up the engine while the vehicle
is stopped. This could cause unexpected ve-
hicle movement.
Driving precautions
Never shift to P (Park) or R (Reverse) while
the vehicle is moving, this could result in dam-
age to the transmission.
Start the engine in the P (Park) or N (Neutral)
position. The engine will not start in any otherselector position. If it does, have your vehicle
checked by a NISSAN dealer or qualified
workshop.
Do not depress the accelerator pedal while
shifting from P (Park) or N (Neutral) to R (Re-
verse), D (Drive) or Manual shift modes posi-
tion. Always depress the brake pedal until
shifting is completed.
On an uphill grade, do not hold the vehicle by
depressing the accelerator pedal. The foot-
brake should be used for this purpose, in or-
der to hold the vehicle in place and to prevent
overheating of the transmission.
Shift into the N (Neutral) position and apply
the handbrake when at a standstill for longer
than a short waiting period.
Keep the engine at idling speed while shifting
from the N (Neutral) position to any driving
position.
CAUTION (when starting the vehicle):
DEPRESS THE FOOTBRAKE PEDAL
When the engine is running, shifting the se-
lector lever into the R (Reverse), D (Drive) or
Manual shift mode position without depress-
ing the brake pedal causes the vehicle to
move slowly. Be sure the brake pedal is fully
depressed and the vehicle is stopped, before
shifting the selector lever.
BE AWARE OF THE SELECTOR LEVER POSI-
TION Make sure that the selector lever is in the
desired position. Use the D (Drive), or Manual
shift mode to move forwards and the R (Re-
verse) to move backwards. Release the hand-
brake lever and the footbrake pedal, then de-
press the accelerator pedal to start the vehicle
in motion and merge with traffic (avoid abrupt
starting and spinning the wheels).
Avoid revving up the engine while the vehicle
is stopped, this could cause unexpected ve-
hicle movement [if the selector lever is in the
R (Reverse), D (Drive), or Manual shift mode
position] or damage the engine [if the selec-
tor lever is in the N (Neutral) or P (Park) posi-
tion].
WARM THE ENGINE UP
Due to the higher idle speeds when the en-
gine is cold, extra caution must be taken when
shifting the selector lever into the driving po-
sition immediately after starting the engine.
PARKING THE VEHICLE
Depress the footbrake pedal and, once the
vehicle stops, move the selector lever into the
P (Park) position, pull the handbrake lever and
release the footbrake pedal.
Starting the vehicle
1. After starting the engine, fully depress the foot-
brake pedal before shifting the selector lever from
P (Park) to R (Reverse), D (Drive) or Manual shift
mode.
5-14Starting and driving
Page 178 of 297

Downloaded from www.Manualslib.com manuals search engine 2. Keep the footbrake pedal depressed and pushthe selector lever button to shift into a driving
gear.
3. Release the handbrake and footbrake, then gradually start the vehicle in motion by pressing
the accelerator pedal.
The automatic transmission or continuously variable
transmission is designed so that the footbrake pedal
MUST be depressed before shifting from P (Park)
to any drive position while the ignition switch is ON.
Shifting
j
A LHD models
jB RHD models
To move the selector lever:
mPush the button while depressing the
brake pedal.
mPush the button to shift.
mShift without depressing the brake
pedal.
Push the button to shift into P (Park) or R (Reverse).
All other positions can be selected without pushing
the button.
P (Park):
Use this position when the vehicle is parked or when
starting the engine. Always make sure that the ve-
hicle is completely stopped before moving the se-
lector lever into the P (Park) position. For maximum
safety, the footbrake pedal must be depressed be-
fore moving the selector lever into the P (Park) posi-
tion. Use this position together with the handbrake.
When parking on a hill, first depress the footbrake
pedal, apply the handbrake and then shift into the P
(Park) position.
R (Reverse):
CAUTION
Shift into this position only after the vehicle has
completely stopped.
Use this position to reverse the vehicle.
When the selector lever is in the R (Reverse) posi-
tion, either the NISSAN Connect monitor (where fit-
ted) or the ultra sonic parking sensor (where fitted)
will be activated. For details, see “Rear-view moni-
tor (where fitted)” in the “4. Display screen, heater and air conditioner, and audio system” section,
“Around view monitor (where fitted)” in the “4. Dis-
play screen, heater and air conditioner, and audio
system” section or “Ultrasonic Parking Sensor
(where fitted)” later in this section.
N (Neutral):
Neither forward nor reverse gear is engaged. The
engine can be started in this position. You may shift
to N and restart a stalled engine while driving the
vehicle.
D (Drive):
Use this position for all normal forward driving.
Gear shift indicator:
The gear shift indicator
jA located in the lower part
of the vehicle information display shows the current
position of the transmission.
It shows the P,R,N,D modes when the transmission
is in auto mode. It shows the gear number when the
transmission is in manual mode.
NSD323Z
NIC1649
Starting and driving5-15
Page 219 of 297
Downloaded from www.Manualslib.com manuals search engine CAUTION
Three-way catalyst equipped models should
not be started by pushing the vehicle as the
three-way catalyst may be damaged.
Automatic transmission (AT) or continuously
variable transmission (CVT) models cannot be
started by pushing the vehicle. This may cause
transmission damage.
Never try to start the vehicle by towing it; when
the engine starts, the forward surge could
cause the vehicle to collide with the tow ve-
hicle.
WARNING
Never continue driving if the engine of your
vehicle overheats. Doing so could cause a ve-
hicle fire.
Never open the bonnet if steam is coming
out.
Never remove engine coolant reservoir cap
when the engine is hot. If the engine coolant
reservoir cap is removed while the engine is
hot, pressurised hot water will spurt out and
possibly cause burning, scalding or serious
injury.
If steam or coolant is coming out of the en-
gine, stand clear of the vehicle to prevent get-
ting injured.
The engine cooling fan will start whenever the
coolant temperature exceeds preset degrees.
Be careful not to allow your hands, hair, jewel-
lery or clothing to come into contact with, or
get caught in, the cooling fan or drive belts.
If the engine of your vehicle is overheating (indi-
cated by the engine coolant temperature gauge) or
if you feel a lack of engine power, detect unusual
noise, etc., proceed as follows:
1. Move and park the vehicle safely off the road and away from traffic.
2. Turn on the hazard warning flasher lights.
3. Apply the handbrake. 4. Shift the gear lever (MT models) into the N (Neu-
tral) position [AT or CVT models, move the se-
lector lever to the P (Park) position].
DO NOT STOP THE ENGINE.
5. Open all windows.
6. Switch off the air conditioner system (where fit- ted).
7. Set the heater or air conditioner temperature control to maximum “HOT” and fan speed con-
trol to maximum speed.
8. Exit the vehicle.
9. Visually inspect and listen for steam or coolant escaping from the radiator before opening the
bonnet. Wait until no steam or coolant can be
seen before proceeding.
10. Open the bonnet. For details, see “Bonnet release” in the “3. Pre-driving checks and
adjustments” section.
11. Visually check if the cooling fan is running.
12. Visually check the radiator and radiator hoses for leakage.
WARNING
If coolant is leaking, the cooling fan belt is
missing or loose or the cooling fan is not run-
ning, stop the engine.
13. After the engine cools down, check the coolant level in the engine coolant reservoir with the
engine running.
PUSH-STARTING ENGINE OVERHEAT
6-12In case of emergency
Page 234 of 297
Downloaded from www.Manualslib.com manuals search engine Lights*:
Clean the headlights on a regular basis. Make sure
that the headlights, stop lights, tail lights, turn signal
lights, and other lights are all operating properly and
installed securely. Also check headlight aim.
Tyres*:
Check the pressure with a gauge periodically when
at a service station (including the spare) and adjust
to the specified pressure if necessary. Check care-
fully for damage, cuts or excessive wear.
Tyre rotation*:
Tyres should be rotated every 10,000 km (6,000
miles) for Two-Wheel Drive (2WD) models and
5,000 km (3,000 miles) for Four-Wheel Drive (4WD)
models. However, the timing for tyre rotation may
vary according to your driving habits and road sur-
face conditions.
Wheel alignment and balance:
If the vehicle pull to either side while driving on a
straight and level road, or if you detect uneven or
abnormal tyre wear, there may be a need for wheel
alignment. If the steering wheel or seat vibrates at
normal highway speeds, wheel balancing may be
needed.
Wheel nuts:
When checking the tyres, make sure no wheel nuts
are missing, and check for any loose wheel nuts.
Tighten if necessary.Windscreen:
Clean the windscreen on a regular basis. Check the
windscreen at least every six months for cracks or
other damage. Have a damaged windscreen re-
paired by a qualified repair facility.
Wiper blades*:
Check for cracks or wear if they do not wipe prop-
erly.
Under the bonnet and vehicle
The maintenance items listed here should be
checked periodically, e.g. each time you check the
engine oil or refuel.
Battery*:
Check if the green indicator on the top of the main-
tenance free battery is visible. If it is not visible,
replace the battery as soon as possible.
Vehicles operated in high temperatures or under
severe conditions, check the fluid level frequently.
Brake and clutch fluid level*:
Make sure that the brake and clutch fluid level is
between the MAX and MIN lines on the reservoir.
Engine coolant level*:
Check the coolant level when the engine is cold.
Engine drive belts*:
Make sure that the drive belts are not frayed, worn,
cracked or oily.Engine oil level*:
Check the level after parking the vehicle on a level
surface and turning off the engine.
Fluid leaks:
Check under the vehicle for fuel, oil, water or other
fluid leaks after the vehicle has been parked for a
while. Water dripping from the air conditioner after
use is normal. If you should notice any leaks or if
petrol fumes are evident, check for the cause and
have it corrected immediately.
Window washer fluid*:
Check that there is adequate fluid in the tank.
Inside the vehicle
The maintenance items listed here should be
checked on a regular basis, such as when perform-
ing periodic maintenance, cleaning the vehicle, etc.
Accelerator pedal:
Check the pedal for smooth operation and make
sure that the pedal does not catch or require uneven
effort. Keep the floor mats away from the pedal.
Brake pedal*:
Check the pedal for smooth operation. If the brake
pedal suddenly goes down further than normal, the
pedal feels spongy or the vehicle seems to take
longer to stop, contact a NISSAN dealer or qualified
workshop immediately. Keep the floor mat away
from the pedal.
Maintenance and do-it-yourself8-3
Page 238 of 297
Downloaded from www.Manualslib.com manuals search engine HR16DE, MR20DE, M9R or R9M
engine
1. Set the heater or air conditioner temperaturecontrol to the maximum “HOT” position.
2. Open the bonnet. For details, see “Bonnet release” in the “3. Pre-driving checks and
adjustments” section.
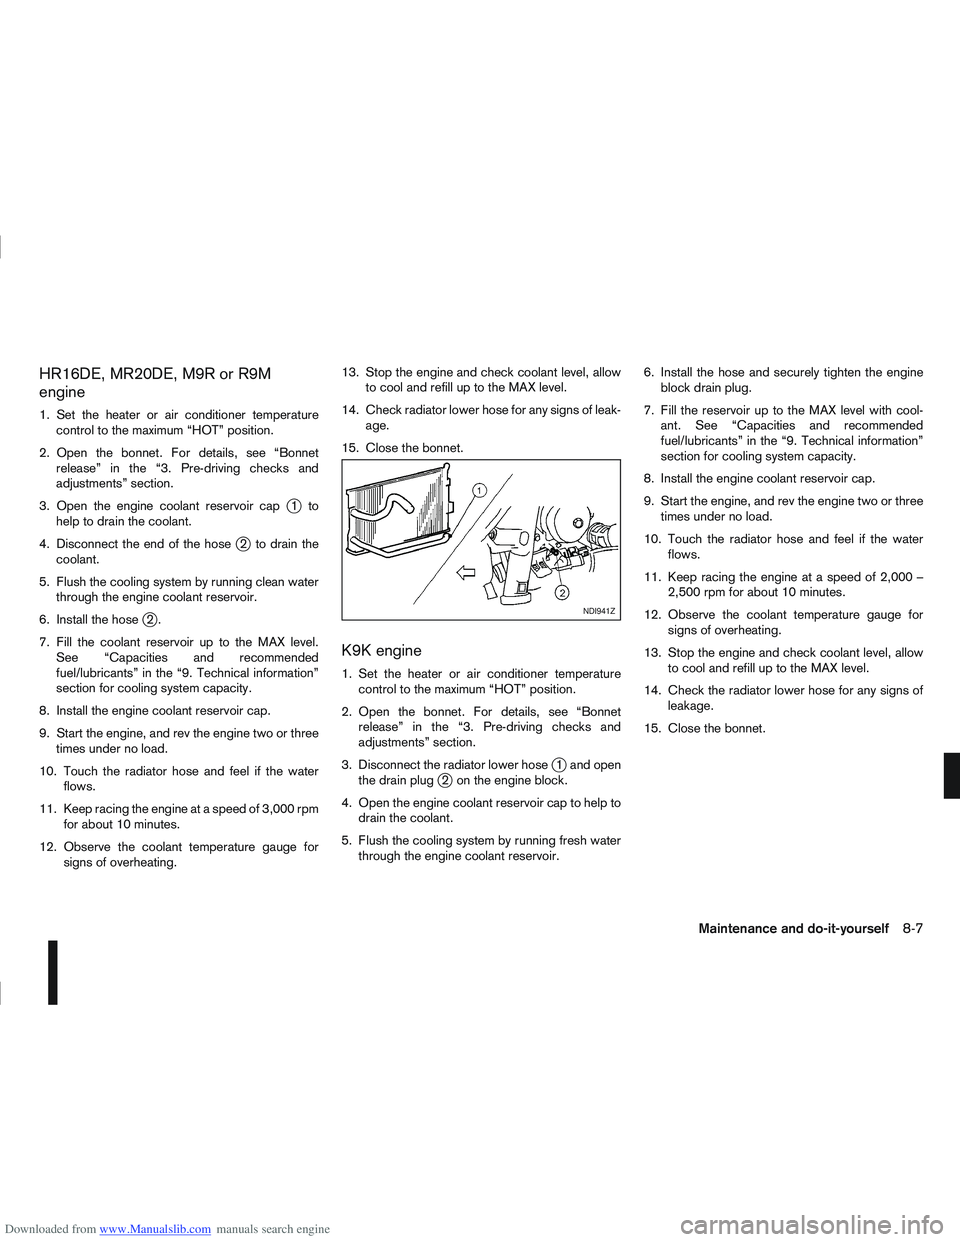
3. Open the engine coolant reservoir cap
j1to
help to drain the coolant.
4. Disconnect the end of the hose
j2 to drain the
coolant.
5. Flush the cooling system by running clean water through the engine coolant reservoir.
6. Install the hose
j2.
7. Fill the coolant reservoir up to the MAX level. See “Capacities and recommended
fuel/lubricants” in the “9. Technical information”
section for cooling system capacity.
8. Install the engine coolant reservoir cap.
9. Start the engine, and rev the engine two or three times under no load.
10. Touch the radiator hose and feel if the water flows.
11. Keep racing the engine at a speed of 3,000 rpm for about 10 minutes.
12. Observe the coolant temperature gauge for signs of overheating. 13. Stop the engine and check coolant level, allow
to cool and refill up to the MAX level.
14. Check radiator lower hose for any signs of leak- age.
15. Close the bonnet.
K9K engine
1. Set the heater or air conditioner temperature control to the maximum “HOT” position.
2. Open the bonnet. For details, see “Bonnet release” in the “3. Pre-driving checks and
adjustments” section.
3. Disconnect the radiator lower hose
j1 and open
the drain plugj2 on the engine block.
4. Open the engine coolant reservoir cap to help to drain the coolant.
5. Flush the cooling system by running fresh water through the engine coolant reservoir. 6. Install the hose and securely tighten the engine
block drain plug.
7. Fill the reservoir up to the MAX level with cool- ant. See “Capacities and recommended
fuel/lubricants” in the “9. Technical information”
section for cooling system capacity.
8. Install the engine coolant reservoir cap.
9. Start the engine, and rev the engine two or three times under no load.
10. Touch the radiator hose and feel if the water flows.
11. Keep racing the engine at a speed of 2,000 – 2,500 rpm for about 10 minutes.
12. Observe the coolant temperature gauge for signs of overheating.
13. Stop the engine and check coolant level, allow to cool and refill up to the MAX level.
14. Check the radiator lower hose for any signs of leakage.
15. Close the bonnet.
NDI941Z
Maintenance and do-it-yourself8-7
Page 245 of 297
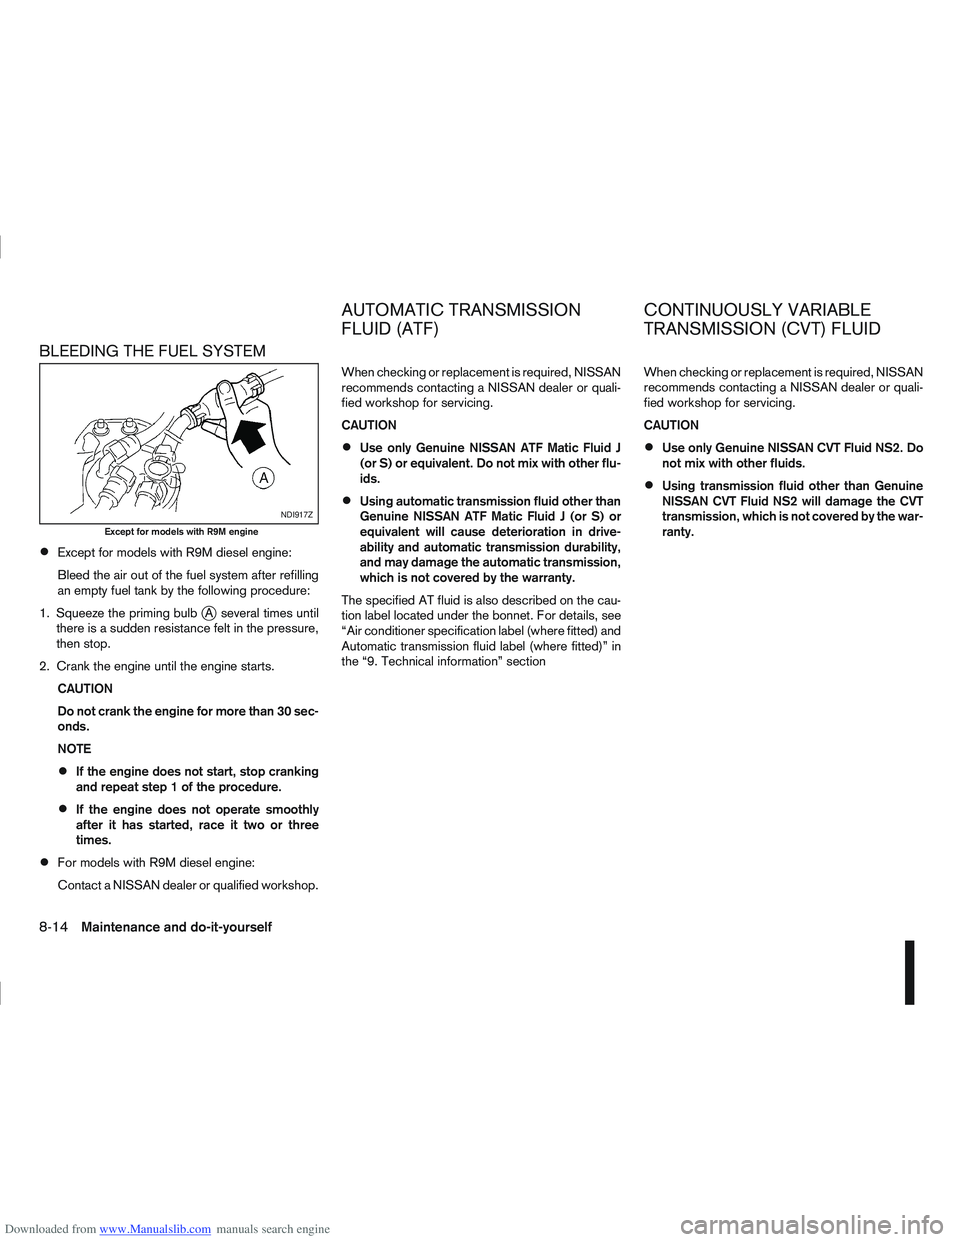
Downloaded from www.Manualslib.com manuals search engine BLEEDING THE FUEL SYSTEM
Except for models with R9M diesel engine:
Bleed the air out of the fuel system after refilling
an empty fuel tank by the following procedure:
1. Squeeze the priming bulb
jA several times until
there is a sudden resistance felt in the pressure,
then stop.
2. Crank the engine until the engine starts. CAUTION
Do not crank the engine for more than 30 sec-
onds.
NOTE
If the engine does not start, stop cranking
and repeat step 1 of the procedure.
If the engine does not operate smoothly
after it has started, race it two or three
times.
For models with R9M diesel engine:
Contact a NISSAN dealer or qualified workshop. When checking or replacement is required, NISSAN
recommends contacting a NISSAN dealer or quali-
fied workshop for servicing.
CAUTION
Use only Genuine NISSAN ATF Matic Fluid J
(or S) or equivalent. Do not mix with other flu-
ids.
Using automatic transmission fluid other than
Genuine NISSAN ATF Matic Fluid J (or S) or
equivalent will cause deterioration in drive-
ability and automatic transmission durability,
and may damage the automatic transmission,
which is not covered by the warranty.
The specified AT fluid is also described on the cau-
tion label located under the bonnet. For details, see
“Air conditioner specification label (where fitted) and
Automatic transmission fluid label (where fitted)” in
the “9. Technical information” section When checking or replacement is required, NISSAN
recommends contacting a NISSAN dealer or quali-
fied workshop for servicing.
CAUTION
Use only Genuine NISSAN CVT Fluid NS2. Do
not mix with other fluids.
Using transmission fluid other than Genuine
NISSAN CVT Fluid NS2 will damage the CVT
transmission, which is not covered by the war-
ranty.
NDI917Z
Except for models with R9M engine
AUTOMATIC TRANSMISSION
FLUID (ATF)
CONTINUOUSLY VARIABLE
TRANSMISSION (CVT) FLUID
8-14Maintenance and do-it-yourself