2013 NISSAN QASHQAI Water
[x] Cancel search: WaterPage 110 of 297

Downloaded from www.Manualslib.com manuals search engine than they appear. Use the inside mirror or
glance over your shoulder to properly judge
distances to other objects.
The lines which are displayed on the monitor, indi-
cate the vehicle’s clearance and distance between
the obstacle and the bumper
jA.
Displayed lines indicate the distances between the
obstacle and the bumper as follows:
j1 0.5m(1.5ft)–red
j2 1m(3ft)–yellow
j3 2m(7ft)–green
j4 3m(10ft)–green
NOTE
The vehicle clearance lines are wider than the
actual clearance.
The lines are indicated as reference distances
to the obstacle.
REAR-VIEW MONITOR SETTING
For details, see the separately provided NISSAN
Connect Owner’s Manual.
OPERATING TIPS
When the gear (MT) or selector (AT or CVT)
lever is shifted to R (Reverse), the NISSAN Con-
nect display automatically changes to the rear-
view monitor mode.
When the gear (MT) or selector (AT or CVT)
lever is returned to a position other than R (Re- verse), it may take some time until the screen
changes. Objects on the screen may be dis-
torted until they are completely displayed.
When the temperature is extremely high or low,
the screen may not clearly display objects. This
is not a malfunction.
When strong light directly enters the camera
lens, objects may not be displayed clearly. This
is not a malfunction.
Vertical lines may be seen in objects on the
screen. This is due to strong reflected light from
the bumper. This is not a malfunction.
The screen may flicker under fluorescent light.
This is not a malfunction.
The colours of objects on the rear-view monitor
may differ somewhat from those of the actual
object.
Objects on the monitor may not be clear in a
dark place or at night.
If dirt, rain or snow attaches to the transparent
camera cover, the rear-view monitor may not
clearly display objects. Clean the transparent
camera cover.
Do not use alcohol, benzine or thinner to clean
the transparent camera cover. This will cause
discoloration. To clean the transparent camera
cover, wipe with a cloth dampened with diluted
mild cleaning agent and then wipe with a dry
cloth.
Do not damage the transparent camera cover as
the NISSAN Connect display may be adversely
affected.
Do not use body wax on the transparent camera
cover. Wipe off any wax with a clean cloth damp-
ened with mild detergent diluted with water.
Display screen, heater and air conditioner, and audio system4-3
Page 112 of 297

Downloaded from www.Manualslib.com manuals search engine Do not use the Around View Monitor with the
outside mirror in the stored position, and
make sure that the back door is securely
closed when operating the vehicle using the
Around View Monitor.
The distance between objects viewed on the
Around View Monitor differs from the actual
distance.
The cameras are installed above the front
grille, the outside mirrors and above the rear
number plate. Do not put anything on or cover
the cameras.
When washing the vehicle with high-pressure
water, be sure not to spray it around the cam-
eras. Otherwise, water may enter the camera
unit causing water condensation on the lens,
a malfunction, fire or an electric shock.
Do not strike the cameras. They are precision
instruments. Doing so could cause a malfunc-
tion or cause damage resulting in a fire or an
electric shock.
In some areas the system will not detect ob-
jects. When in the front or the rear view dis-
play, an object below the bumper or on the
ground may not be detected
j1 . When in the
bird’s-eye view, a tall object near the seam of
the camera detecting areas will not appear in
the monitor
j2.
Due to electromagnetic radiation a red cross
might appear in the monitor. This is normal.
Check surroundings for safety. Move the ve-
hicle away from the source of the interfer-
ence if possible. If the red cross does not dis-
appear contact a NISSAN dealer or qualified
workshop.
NAA1234
Display screen, heater and air conditioner, and audio system4-5
Page 118 of 297

Downloaded from www.Manualslib.com manuals search engine Moving closer to a projecting object
The positionjC is shown further than the positionjB in the display. However, the positionjC is actu-
ally at the same distance as the positionjA . The
vehicle may hit the object when moving toward the
position
jA if the object projects over the actual
moving course.
HOW TO ADJUST THE SCREEN
VIEW
To adjust the display brightness of the Around View
Monitor, use the settings described in the sepa-
rately provided NISSAN Connect owner’s manual.
Do not adjust the settings while the vehicle is mov-
ing. Make sure the handbrake is firmly applied.
OPERATING TIPS
The screen displayed on the Around View Moni-
tor will automatically return to the previous screen
3 minutes after the
pushed while the gear selector lever is in a posi-
tion other than the R (Reverse) position.
The display of images on the screen may be
delayed after screens are switched. Objects in
the Around View Monitor may be distorted mo-
mentarily until the Around View Monitor screen
is displayed completely.
When the temperature is extremely high or low,
the screen may not display objects clearly. This
is not a malfunction.
When strong light directly shines on the camera,
objects may not be displayed clearly. This is not
a malfunction.
Vertical lines may be seen in objects on the
screen due to light reflections. This is not a mal-
function.
The screen may flicker under fluorescent light.
This is not a malfunction.
The colours of objects on the Around View Moni-
tor may differ somewhat from those of the actual
object.
Objects on the monitor may not be clear and the
colour of the object may differ in a dark location
or at night. This is not a malfunction.
There may be differences in clearness between
each camera view of the bird’s-eye view.
If dirt, rain or snow attaches to the camera, the
Around View Monitor may not display objects
clearly. Clean the camera.
CAUTION
Do not scratch lenses when cleaning the cam-
era.
Do not use alcohol, benzine or thinner to clean
the camera. This will cause discolouration. To
clean the camera, wipe with a cloth that has
been dampened with a diluted mild cleaning
agent and then wipe with a dry cloth.
Do not damage the camera because the monitor
screen may be adversely affected.
Do not use wax on the camera window. Wipe off
any wax with a clean cloth that has been damp-
ened with a mild detergent diluted with water.
NAA1240
Display screen, heater and air conditioner, and audio system4-11
Page 119 of 297

Downloaded from www.Manualslib.com manuals search engine SIDE AND CENTRE VENTS
The direction of the air flow can be adjusted byjA
opening,jB closing orjC adjusting.
HIGH LEVEL VENT (where fitted)
Press thebutton to switch the mild air flow from
the upper vent on or off. Use the upper vent on hot
days to let cool air flow along the roof to the rear
passengers; and on cold days to improve the de-
frosting or defogging of the windows with warm air.
WARNING
Do not leave children or adults who would
normally require the support of others alone
in your vehicle. Pets should not be left alone
either. On hot, sunny days, temperatures in a
closed vehicle could quickly become high
enough to cause severe or possibly fatal inju-
ries to people or animals.
Do not use the recirculation mode for long
periods as it may cause the interior air to be-
come stale and the windows to fog up. It is
recommended that you use the outside air
mode in cold weather to keep the windows
clear.
Do not adjust the positioning of the heating/
ventilation or air conditioning controls while
driving.
NOTE
Condensation forms inside the air condition-
ing unit when the air conditioner is running,
and is safely discharged underneath your ve-
hicle.
Traces of water on the ground are therefore
normal.
Models with Stop/Start System:
Whilst the engine is stopped by the Stop/Start
System, selecting airflow to the front defog-
ger or switching on the rear defogger will
cause the engine the be automatically re-
started. Whilst the engine is running, selecting airflow
to the front defogger or switching on the rear
defogger will prevent the Stop/Start System
automatically stopping the engine.
The Stop/Start System will prevent unneces-
sary fuel consumption and exhaust emis-
sions. When the engine is stopped by the
Stop/Start System heater and air conditioner
performance may be reduced. To keep full
heater and air conditioner performance, re-
start the engine by pressing the Stop/Start
System OFF switch, or by turning the ignition
switch.
For more information on the Stop/Start Sys-
tem, see “Stop/Start System (where fitted)”
in the “5. Starting and driving” section.
NAA945Z
NAA1150
VENTS
HEATER AND AIR CONDITIONER
OPERATION
4-12Display screen, heater and air conditioner, and audio system
Page 169 of 297

Downloaded from www.Manualslib.com manuals search engine Driving your vehicle to fit the circumstances is es-
sential for your safety and comfort. As a driver, you
should be the one who knows best how to drive in
the given circumstances.
ENGINE COLD START PERIOD
Due to the higher engine speeds when the engine is
cold, extra caution must be exercised when select-
ing a gear during the engine warm-up period after
starting the engine.
LOADING LUGGAGE
Loads, their distribution and the attachment of equip-
ment (coupling devices, roof luggage carriers, etc.)
will change the driving characteristics of the vehicle
considerably. Driving style and speed must be ad-
justed accordingly.
DRIVING ON WET ROADS
Avoid starting off, accelerating and stopping sud-
denly.
Avoid sharp turns or lane changes.
Extra distance should be kept from the vehicle in
front.
When water covers the road surface in puddles,
small streams, etc, REDUCE SPEED to prevent
aquaplaning which will cause skidding and loss
of control. Worn tyres increase this risk.
DRIVING UNDER WINTER
CONDITIONS
Drive safely.
Avoid starting off, accelerating or stopping sud-
denly.
Avoid sharp turns or lane changes.
Avoid sudden steering actions.
Extra distance should be kept from the vehicle in
front.
j1OFF
WARNING
Never remove the key or turn the ignition switch
to the LOCK position while driving. The steering
wheel will lock and could cause the driver to lose
control of the vehicle. This could result in serious
vehicle damage or personal injury.
The switch includes an anti-theft steering lock de-
vice.
There is an “OFF” position between the LOCK and
Acc positions, although it is not shown on the lock
cylinder. When the ignition switch is in the “OFF”
position, the steering wheel is not locked.
MANUAL TRANSMISSION
To lock the steering wheel, turn the ignition switch
to the LOCK position and remove the key from the
ignition switch, then turn the steering clockwise. To
NSD238Z
CARE WHEN DRIVING IGNITION SWITCH
5-6Starting and driving
Page 190 of 297

Downloaded from www.Manualslib.com manuals search engine – Blinks slowly (about once every 2 seconds)Change the driving mode to 2WD and reduce
the vehicle speed as soon as safely possible.
If the warning light is still on after performing
the above operation, have the system
checked by a NISSAN dealer or qualified
workshop as soon as possible.
4WD MODE INDICATOR LIGHTS
4WD mode indicator light ( LOCK):
This light comes on when the ignition switch is
turned to the ON position, and turns off within 1
second. When selecting LOCK mode while the
engine is running, this light will illuminate simul-
taneously along with the 4WD mode indicator
light (AUTO).
4WD mode indicator light ( AUTO):
This light comes on when the ignition switch is
turned to the ON position, and turns off within 1
second. If the engine is running, this light will illu-
minate when selecting AUTO mode.
The 4WD mode indicator light is located in the
tachometer.
The light should turn off within 1 second of the
ignition switch being turned to the ON position.
While the engine is running, the 4WD mode indi-
cator light will display the position selected by
the 4WD mode control. NOTE
The 4WD mode indicator light may blink while
shifting from one drive mode to another. Once
shifting is completed, the 4WD mode indicator
light will come on. If the indicator light does not
come on immediately, make sure that the area
around the vehicle is safe and free from ob-
stacles. Drive the vehicle straight (DO NOT ac-
celerate, decelerate or reverse), then turn the
4WD mode control.
If the 4WD warning lights comes on, the 4WD indi-
cator light(s) will go out.
DRIVING FOUR-WHEEL DRIVE (4WD)
SAFELY
Your NISSAN is designed for both normal and off-
road use. However, avoid driving in deep water or
mud as your NISSAN is mainly designed for leisure
use, unlike a conventional off-road vehicle.
Remember that Two-Wheel drive (2WD) models are
less capable than Four-Wheel Drive (4WD) models
for rough road driving and extrication when stuck,
for example, in deep snow or mud.
Please observe the following precautions:
Drive carefully when off-road and avoid danger-
ous areas. Always wear seat belts to help keep
you and your passengers in position when driv-
ing over rough terrain.
Do not drive across steep slopes. Instead drive
either straight up or straight down the slope. Off- road vehicles can tip over sideways much more
easily than they can forwards or backwards.
Many hills are too steep for any vehicle. If you
drive up them, you may stall. If you drive down
them, you may not be able to control your speed.
If you drive across them, you may roll over.
Do not shift gears when driving on downhill
grades as this could cause loss of control of the
vehicle.
Stay alert when driving to the top of a hill. At the
top there could be a drop-off or other hazard that
could cause an accident.
If the engine of the vehicle stalls or you cannot
make it to the top of a steep grade, never at-
tempt to turn around. Your vehicle could tip or
roll over. Always drive backwards and straight
down in R (Reverse) gear.
Never drive backwards under the following con-
ditions as this could result in loss of control:
– with the gear lever in N (Neutral) and/or with
the clutch depressed and using the brake
(MT models).
– with the selector lever in N (Neutral) and us- ing only the brake (AT or CVT models).
Heavy braking down a hill could cause your
brakes to overheat and fade, resulting in loss of
control and an accident. Apply the brakes lightly
and use a low gear to control your vehicle speed.
Starting and driving5-27
Page 191 of 297

Downloaded from www.Manualslib.com manuals search engine Unsecured cargo can be thrown around when
driving over rough terrain. Properly secure it so
that it will not be thrown forwards and cause
injury to you or your passengers.
To avoid raising the centre of gravity excessively,
do not exceed the rated capacity of the roof rack/
gear bin (where fitted) and evenly distribute the
load. Secure heavy loads in the luggage area as
far forwards and as low as possible. Do not equip
the vehicle with tyres larger than specified. This
could cause your vehicle to rollover.
Accelerating quickly, sharp steering manoeuvres
or sudden braking may cause loss of control.
Do not drive beyond the performance of the
tyres, even with 4WD. Sudden acceleration,
steering or braking may result in loss of control
and could cause the vehicle to become stuck.
If at all possible, avoid sharp turning manoeuvres,
particularly at high speeds. Your 4WD vehicle
has a higher centre of gravity than a 2WD ve-
hicle and can tip over more easily. The vehicle is
not designed for cornering at the same speeds
as conventional 2WD models any more than low
sports cars are designed to perform satisfacto-
rily under off-road conditions. Failure to operate
this vehicle correctly could result in loss of con-
trol and/or a rollover accident.
Do not grip the inside or spokes of the steering
wheel when driving off-road. The steering wheel
could jerk and injure your hands. Instead, drive
with your fingers and thumbs on the outside of
the rim.
Before operating the vehicle, ensure that the
driver and all passengers have their seat belts
fastened.
Avoid raising the centre of gravity by loading
things on the roof or equipping the vehicle with
tyres larger than specified in this manual.
Always drive with the floor mats in place as the
floor may become very hot. Particular care
should be taken if you are barefoot.
Lower your speed when encountering strong
crosswinds. With its higher centre of gravity your
NISSAN is more affected by gusty side winds.
Slower speeds ensure better vehicle control.
Be sure to check the brakes immediately after
driving in mud or water as specified in “Wet
brakes” later in this section.
Whenever you drive off-road through sand, mud
or water as deep as the wheel hub, more fre-
quent maintenance may be required. For details,
refer to the separately provided Warranty Infor-
mation and Maintenance Booklet.
Rinse the underside of the vehicle with fresh
water after driving through mud or sand. Re-
move any brush or sticks that are trapped.
Install the same size of winter tyres on all four (4)
wheels (such as studless tyres) or install snow
chains to the front wheels when driving on slip-
pery roads (e.g. after a snowfall) and drive care-
fully using 4WD.
Avoid parking your vehicle on steep hills. If you
get out of the vehicle and it rolls forwards, back-
wards or sideways, you could be injured.
5-28Starting and driving
Page 217 of 297
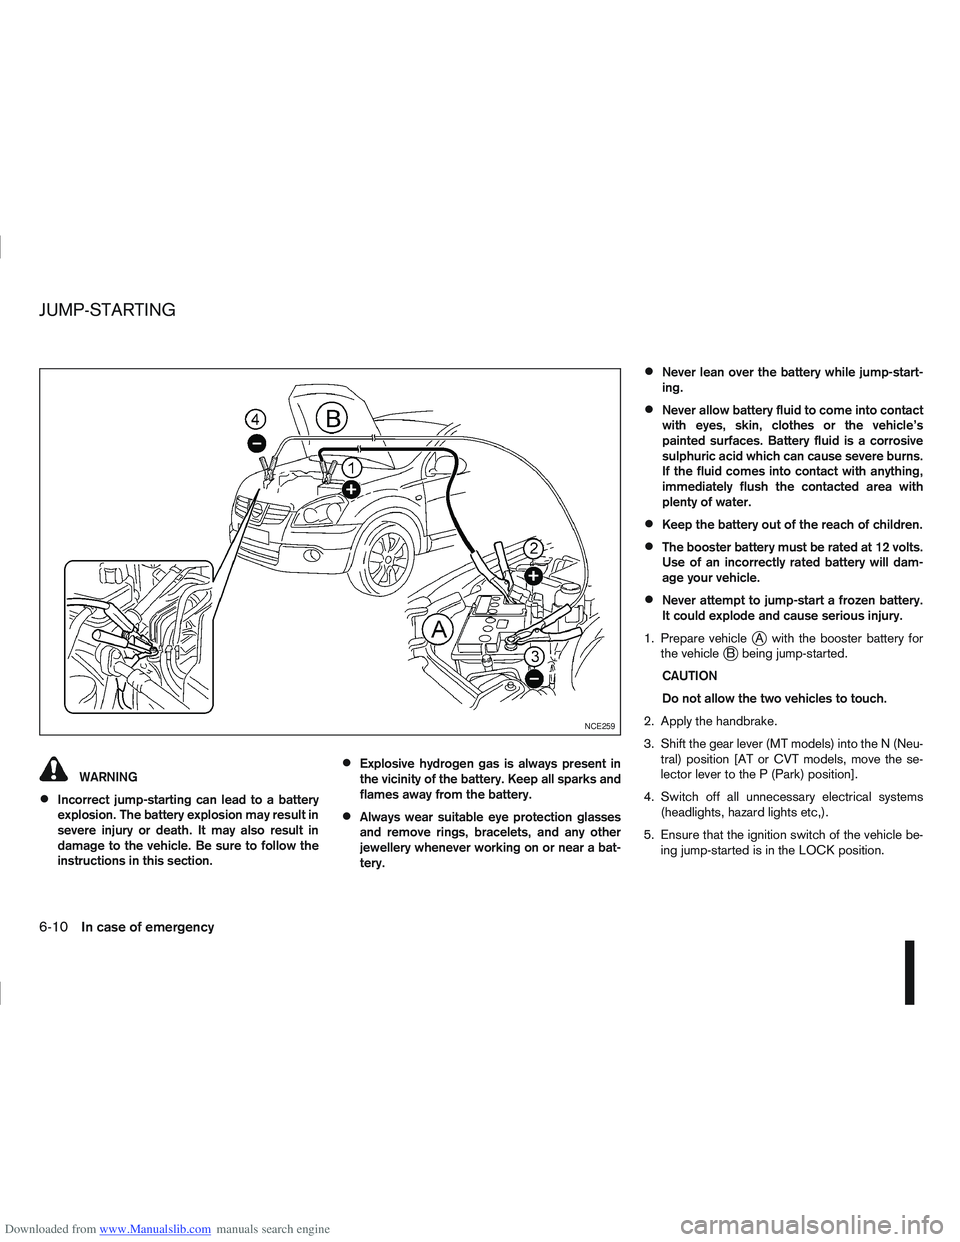
Downloaded from www.Manualslib.com manuals search engine WARNING
Incorrect jump-starting can lead to a battery
explosion. The battery explosion may result in
severe injury or death. It may also result in
damage to the vehicle. Be sure to follow the
instructions in this section.
Explosive hydrogen gas is always present in
the vicinity of the battery. Keep all sparks and
flames away from the battery.
Always wear suitable eye protection glasses
and remove rings, bracelets, and any other
jewellery whenever working on or near a bat-
tery.
Never lean over the battery while jump-start-
ing.
Never allow battery fluid to come into contact
with eyes, skin, clothes or the vehicle’s
painted surfaces. Battery fluid is a corrosive
sulphuric acid which can cause severe burns.
If the fluid comes into contact with anything,
immediately flush the contacted area with
plenty of water.
Keep the battery out of the reach of children.
The booster battery must be rated at 12 volts.
Use of an incorrectly rated battery will dam-
age your vehicle.
Never attempt to jump-start a frozen battery.
It could explode and cause serious injury.
1. Prepare vehicle
jA with the booster battery for
the vehiclejB being jump-started.
CAUTION
Do not allow the two vehicles to touch.
2. Apply the handbrake.
3. Shift the gear lever (MT models) into the N (Neu- tral) position [AT or CVT models, move the se-
lector lever to the P (Park) position].
4. Switch off all unnecessary electrical systems (headlights, hazard lights etc,).
5. Ensure that the ignition switch of the vehicle be- ing jump-started is in the LOCK position.
NCE259
JUMP-STARTING
6-10In case of emergency