Page 133 of 506

Genuine NISSAN accessory cros")
CARGO AREA STORAGE BIN
To access the floor storage area, push down�1
to raise the handle, then pull up on the handle to
lift the luggage board.
ROOF RACK (if so equipped)
Genuine NISSAN accessory cross bars are avail-
able through your NISSAN dealer. Contact an
NISSAN dealer for crossbar or other equipment
information.
Always distribute the luggage evenly on the cross
bars. Do not load more than 150 lb (68 kg) on the
cross bars. Observe the maximum load limit
shown on the cross bars or roof carriers when
you attach them on the roof cross bars. Contact
an NISSAN dealer for crossbar or other equip-
ment information.Do not apply any load directly to the roof side
rails. Cross bars must be installed before apply-
ing load/cargo/luggage to the roof of the vehicle.
Be careful that your vehicle does not exceed the
Gross Vehicle Weight Rating (GVWR) or its
Gross Axle Weight Rating (GAWR front and
rear) . The GVWR and GAWR are located on the
F.M.V.S.S. or C.V.M.S.S. certification label (lo-
cated on the driver’s door pillar) . For more infor-
mation regarding GVWR and GAWR, see “Ve-
hicle loading information” in the “Technical and
customer information” section.
WARNING
●
Drive extra carefully when the vehicle is
loaded at or near the cargo carrying
capacity, especially if the significant
portion of that load is carried on the
cross bars.
● Heavy loading of the cross bars has the
potential to affect the vehicle stability
and handling during sudden or unusual
handling maneuvers.
● Roof rack cross bars should be evenly
distributed.
● Do not exceed maximum roof rack
cross bars load.
LIC2244LIC2386
2-50Instruments and controls
Page 456 of 506
 at moderate
speed")
The tire pressures should be checked
when the tires are cold. The tires are
considered COLD after the vehicle has
been parked for 3 or more hours, or driven
less than 1 mile (1.6 km) at moderate
speeds.
The TPMS with Easy Fill Tire Alert pro-
vides visual and audible signals outside
the vehicle for inflating the tires to the
recommended COLD tire pressure. For
more information, see “TPMS with Easy
Fill Tire Alert” in the “Starting and driving”
section.
Incorrect tire pressure, including un-
der inflation, may adversely affect
tire life and vehicle handling.WARNING
● Improperly inflated tires can fail
suddenly and cause an accident.
● The Gross Vehicle Weight Rating
(GVWR) is located on the
F.M.V.S.S./C.M.V.S.S. certifica-
tion label. The vehicle weight ca-
pacity is indicated on the Tire and
Loading Information label. Do
not load your vehicle beyond this
capacity. Overloading your ve-
hicle may result in reduced tire
life, unsafe operating conditions
due to premature tire failure, or
unfavorable handling character-
istics and could also lead to a
serious accident. Loading be-
yond the specified capacity may
also result in failure of other ve-
hicle components.
● Before taking a long trip, or
whenever you heavily load your
vehicle, use a tire pressure gauge
to ensure that the tire pressures
are at the specified level. ●
For additional information re-
garding tires, refer to “Important
Tire Safety Information” (US) or
“Tire Safety Information”
(Canada) in the Warranty Infor-
mation Booklet.
Maintenance and do-it-yourself8-31
Page 459 of 506
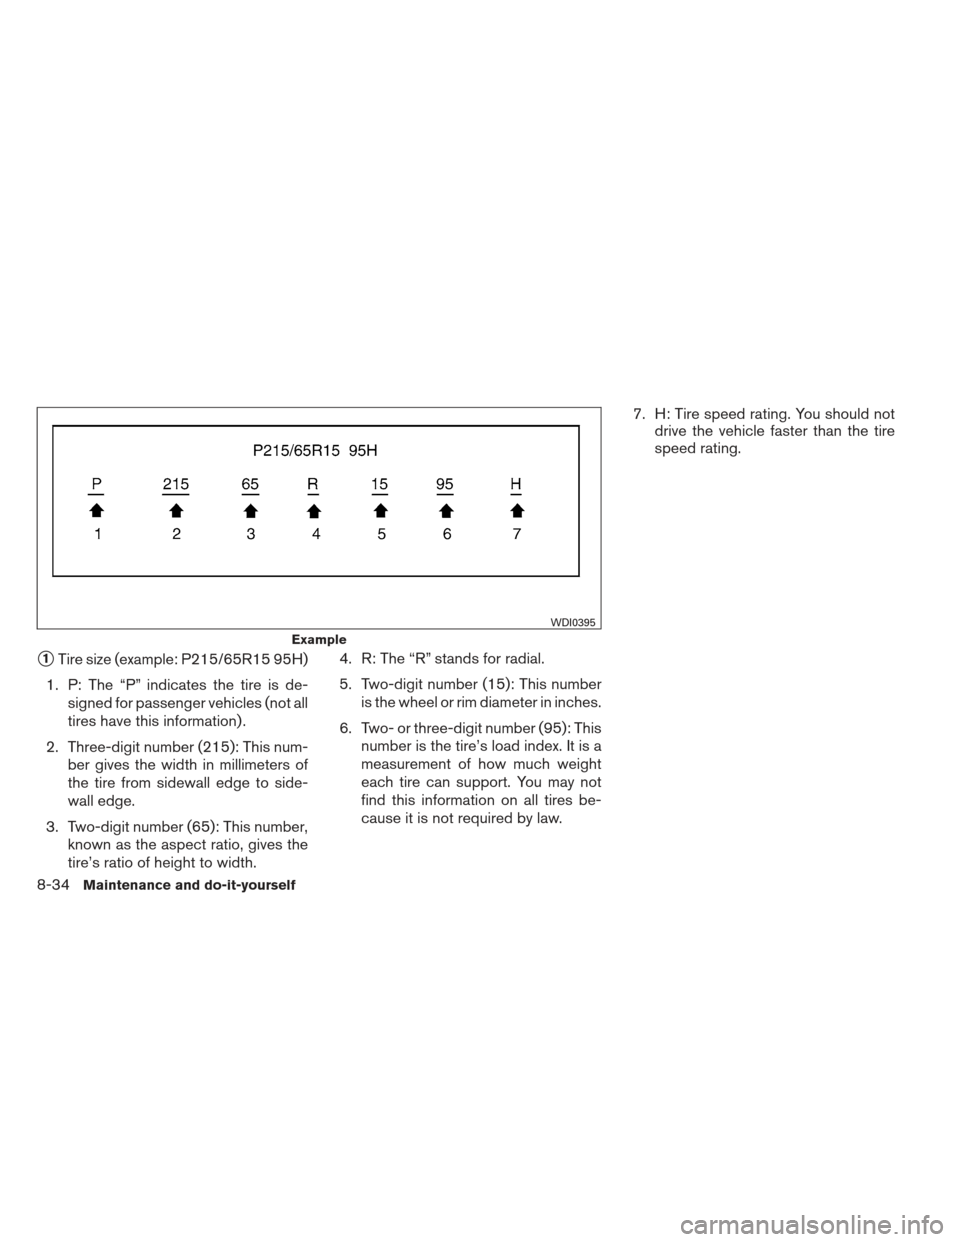
�1Tire size (example: P215/65R15 95H)
1. P: The “P” indicates the tire is de- signed for passenger vehicles (not all
tires have this information) .
2. Three-digit number (215): This num- ber gives the width in millimeters of
the tire from sidewall edge to side-
wall edge.
3. Two-digit number (65): This number, known as the aspect ratio, gives the
tire’s ratio of height to width. 4. R: The “R” stands for radial.
5. Two-digit number (15): This number
is the wheel or rim diameter in inches.
6. Two- or three-digit number (95): This number is the tire’s load index. It is a
measurement of how much weight
each tire can support. You may not
find this information on all tires be-
cause it is not required by law. 7. H: Tire speed rating. You should not
drive the vehicle faster than the tire
speed rating.
Example
WDI0395
8-34Maintenance and do-it-yourself
Page 466 of 506

9 Technical and consumer information
Capacities and recommended fuel/lubricants.........9-2
Fuel recommendation ...........................9-3
Engine oil and oil filter recommendations ..........9-5
Air conditioner system refrigerant and oil
recommendations ..............................9-6
Specifications .....................................9-7
Engine ........................................9-7
Wheels and tires ...............................9-8
Dimensions and weights ........................9-8
When traveling or registering your vehicle in
another country ...................................9-9
Vehicle identification ...............................9-9
Vehicle identification number (VIN) plate ..........9-9
Vehicle identification number
(chassis number) ...............................9-9
Engine serial number ........................... 9-10
F.M.V.S.S./C.M.V.S.S. certification label ..........9-10
Emission control information label ...............9-10
Tire and loading information label ................9-11Air conditioner specification label
................9-11
Installing front license plate ........................9-12
Vehicle loading information ........................9-13
Terms ........................................ 9-13
Vehicle load capacity .......................... 9-14
Securing the load .............................. 9-16
Loading tips . . . ............................... 9-17
Measurement of weights .......................9-17
Towing a trailer ................................... 9-17
Maximum load limits ........................... 9-18
Towing load/specification .......................9-21
Towing safety ................................. 9-21
Flat towing .................................... 9-28
Uniform tire quality grading ........................9-29
Emission control system warranty ..................9-30
Reporting safety defects .......................... 9-30
Readiness for inspection/maintenance (I/M) test .....9-31
Event Data Recorders (EDR) .......................9-32
Owner’s Manual/Service Manual order information . . . 9-32
Page 473 of 506
WHEELS AND TIRES
Wheel typeOffset in (mm) Size
Aluminum 1.97 (50) 18 x 7.5J
1.97 (50) 20 x 7.5J
Spare Wheel - Steel 18 x4T
Tire size 235/65R18
235/55R20
Spare tire T165/90D18
DIMENSIONS AND WEIGHTS
Overall lengthin (mm)197.2 (5,008.4)
Overall width in (mm)77.2 (1,960)
Overall height without roof rack in (mm)69.6 (1,67.5)
with roof rack in (mm)75.4 (1,914.2)
Front and Rear Track in (mm)65.7 (1,670)
Wheelbase in (mm)1 14.2 (2,900)
Gross vehicle weight rating lb (kg) See the “F.M.V.S.S./C.M.V.
S.S. certification label” on thecenter pillar between the
driver’s side front and rear doors.
Gross axle weight rating
Front lb (kg)
Rear lb (kg)
9-8Technical and consumer information
Page 475 of 506
ENGINE SERIAL NUMBER
The number is stamped on the engine as shown.
F.M.V.S.S./C.M.V.S.S.
CERTIFICATION LABEL
The Federal/Canadian Motor Vehicle Safety
Standard (F.M.V.S.S./C.M.V.S.S.) certification la-
bel is affixed as shown. This label contains valu-
able vehicle information, such as: Gross Vehicle
Weight Ratings (GVWR) , Gross Axle Weight
Rating (GAWR) , month and year of manufacture,
Vehicle Identification Number (VIN) , etc. Review
it carefully.
EMISSION CONTROL
INFORMATION LABEL
The emission control information label is at-
tached to the underside of the hood as shown.
LTI2034WTI0058WTI0167
9-10Technical and consumer information
Page 478 of 506
 diameter
holes on the bumper using the marks
�Fas a
center.
7. Inser")
Mark the center of the hole�Fon both sides with
a felt-tip pen. Remove the bracket from the bum-
per, and then open 0.79 in (20 mm) diameter
holes on the bumper using the marks
�Fas a
center.
7. Insert a J-nut into the license plate bracket before placing the license plate bracket on
the fascia.
8. Install the license plate bracket with screws.
9. Install the license plate with bolts that are no longer than 0.55 in (14 mm) .
WARNING
● It is extremely dangerous to ride
in a cargo area inside a vehicle. In
a collision, people riding in these
areas are more likely to be seri-
ously injured or killed.
● Do not allow people to ride in any
area of your vehicle that is not
equipped with seats and seat
belts.
● Be sure everyone in your vehicle
is in a seat and using a seat belt
properly.
TERMS
It is important to familiarize yourself with
the following terms before loading your
vehicle:
● Curb Weight (actual weight of your
vehicle) - vehicle weight including:
standard and optional equipment, flu-
ids, emergency tools, and spare tire
assembly. This weight does notin-
clude passengers and cargo. ●
GVW (Gross Vehicle Weight) - curb
weight plus the combined weight of
passengers and cargo.
● GVWR (Gross Vehicle Weight Rat-
ing) - maximum total combined
weight of the unloaded vehicle, pas-
sengers, luggage, hitch, trailer
tongue load and any other optional
equipment. This information is lo-
cated on the F.M.V.S.S./C.M.V.S.S.
certification label.
● GAWR (Gross Axle Weight Rating) -
maximum weight (load) limit specified
for the front or rear axle. This informa-
tion is located on the
F.M.V.S.S./C.M.V.S.S. certification
label.
● GCWR (Gross Combined Weight
rating) - The maximum total weight
rating of the vehicle, passengers,
cargo, and trailer.
LTI2033
VEHICLE LOADING INFORMATION
Technical and consumer information9-13
Page 479 of 506
 for the ve-
hicle. This is the maximum combined
weight of occupant")
●Vehicle Capacity Weight, Load limit,
Total load capacity - maximum total
weight limit specified of the load
(passengers and cargo) for the ve-
hicle. This is the maximum combined
weight of occupants and cargo that
can be loaded into the vehicle. If the
vehicle is used to tow a trailer, the
trailer tongue weight must be in-
cluded as part of the cargo load. This
information is located on the Tire and
Loading Information label.
● Cargo capacity - permissible weight
of cargo, the subtracted weight of
occupants from the load limit.
VEHICLE LOAD CAPACITY
Do not exceed the load limit of your ve-
hicle shown as “The combined weight of
occupants and cargo” on the Tire and
Loading Information label. Do not exceed
the number of occupants shown as
“Seating Capacity” on the Tire and Load-
ing Information label. To get “the combined weight of occu-
pants and cargo”, add the weight of all
occupants, then add the total luggage
weight. Examples are shown in the follow-
ing illustration.
9-14
Technical and consumer information
 Size
Aluminum 1.97 (50) 18 x 7.5J
1.97 (50) 20 x 7.5J
Spare Wheel - Steel 18 x4T
Tire size 235/65R18
235/55R20
Spare tire T165/90D18
DIMENSIONS AND WEIGHTS
Ov")
 certification la")