Page 306 of 506

SYSTEM COMPONENTS
Rear displays
CAUTION
●The glass screen on the liquid crystal
display may break if hit with a hard or
sharp object. If the glass breaks, do not
touch the liquid crystalline material. In
case of contact with skin, wash imme-
diately with soap and water.
● Use soft, damp cloth when cleaning the
Dual Head Restraint DVD System com-
ponents. Do not use solvents or clean-
ing solutions.
The rear displays are located on the back of the
front head restraints.
Use the remote controller to operate the rear
display screen.
Push the preferred side (L or R) of the power
ON/OFF button on the remote controller to acti-
vate the rear display.
The rear screens can also be activated using the
NISSAN controller. For more information, see
“Rear display settings” in this section.
Do not block the range of the wireless remote
controller receiver and wireless headphones
transmitter
�1.The angle of the rear display screen can be
adjusted for optimal viewing.
Gently apply pressure to the base of the screen
where indicated until the screen reached the
desired position. When the screen is released, it
will remain in the current position. To return to the
screen to the flat position, press the base of the
screen in all the way until it clicks and retracts.
SAA3329LHA2210
Monitor, climate, audio, phone and voice recognition systems4-115
Page 307 of 506

Rear auxiliary input jacks
The rear auxiliary input jacks are located on the
rear of the center console. NTSC/PAL compat-
ible devices can be connected to the auxiliary
jacks. The images from the connected device can
be viewed on the rear displays.
The rear auxiliary jacks are color coded for iden-
tification purposes.● Yellow - video input
● White - left channel audio input
● Red - right channel audio input Before connecting a device to a jack, turn off the
power of the portable device.
To display the rear AUX screen, press the pre-
ferred side (L or R) of the AUX (L)/AUX (R)
buttons (rear input jacks) on the remote control-
ler.
The connected device from the rear auxiliary in-
put jacks cannot be displayed on the front
screen.
Headphones
The headphones for this system are a wireless
type and no cables are necessary. The head-
phones can only be used in the rear seat.
Power ON/OFF:
Press the power ON/OFF button to turn the
headphones on or off.
LHA2260SAA3077
4-116Monitor, climate, audio, phone and voice recognition systems
Page 308 of 506

Volume control
Turn the volume control knob to adjust the vol-
ume.
The headphones will automatically turn off after
about four minutes if there is no sound during that
period. The headphones will also turn off after
approximately four hours of continuous use. To
prevent the battery from being discharged, keep
the power turned off when not in use.
If the sound from the headphones is not clear, it
may be due to interference from an infrared com-
munication device or a cellular phone. If this
happens, turn down the headphone volume or
stop using the headphones.It is also possible that the headphones may be
too far from the transmitter which is in the rear
display screen. This is not a malfunction.
The sound may also be interrupted temporarily
when there is an obstacle between the head-
phones and the transmitter. Remove the ob-
stacle, such as opaque materials, hands, hair,
etc.
Channel change:
When the rear displays are playing different
sources, slide the channel select switch to select
the sound.
SAA3078
Type A
LHA2211
Monitor, climate, audio, phone and voice recognition systems4-117
Page 309 of 506
“Left” is the sound on the left display. “Right” is
the sound on the right display.
Remote control
The remote controller has the following controls:1. POWER button
2. Display select switch (L or R) 3. MENU button
4. Directional buttons
5. SETUP button
6.
(next chapter) button
7.
(fast forward) button
8.
(stop) button
9. Volume control button
10.
(reverse) button
11.
(play and pause) button
12.
(previous chapter) button
13. BACK button
14. SOURCE buttonType B
LHA8801
LHA2551
4-118Monitor, climate, audio, phone and voice recognition systems
Page 310 of 506
Select rear displays audio source:
Slide the display select switch on the remote
control to the left (L) or right (R) to select each
screen source individually
�1.
The SOURCE button on the remote control se-
lects the source for front and rear screens at
once
�2.
Remote controller and headphones
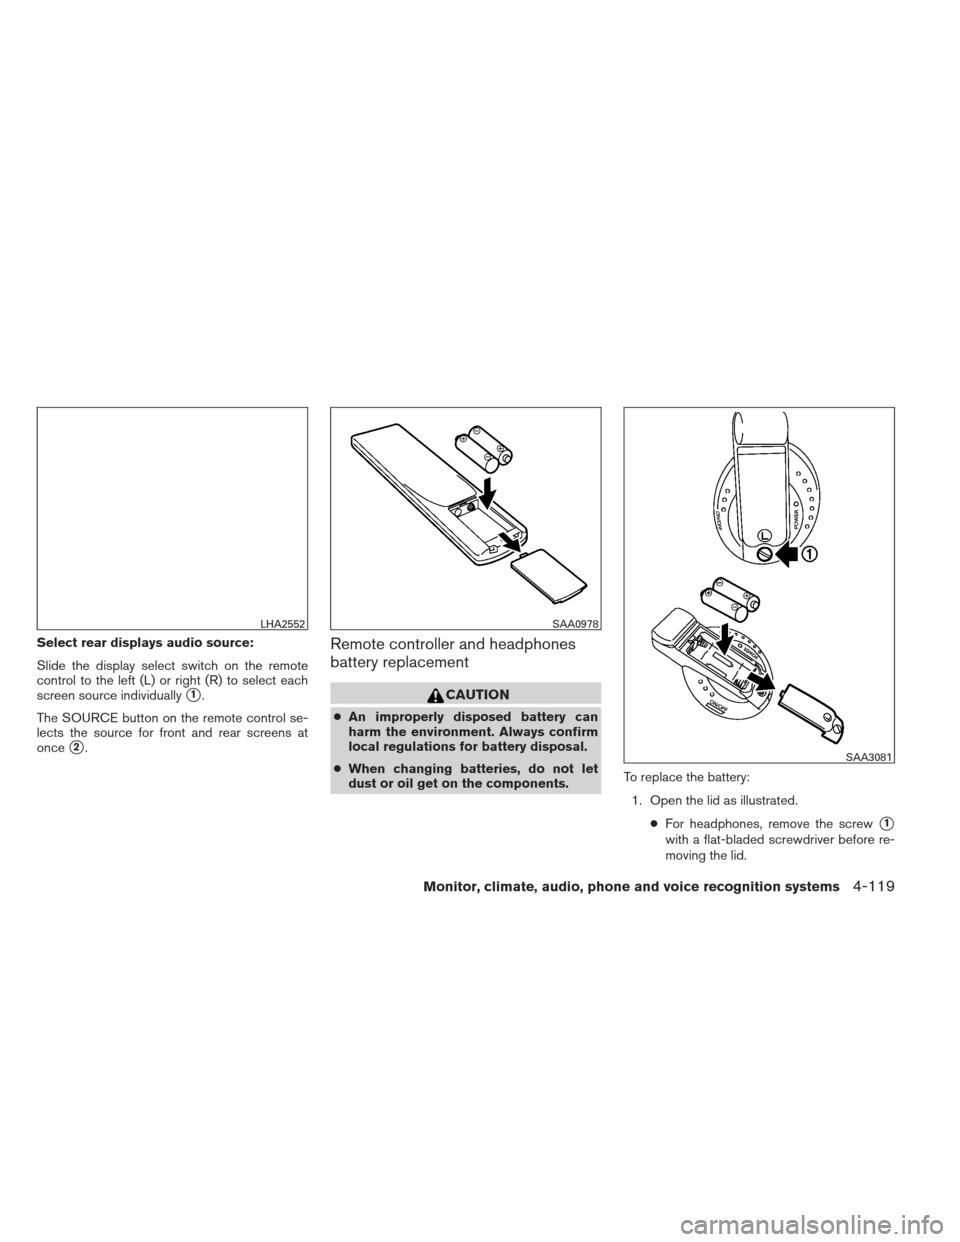
battery replacement
CAUTION
● An improperly disposed battery can
harm the environment. Always confirm
local regulations for battery disposal.
● When changing batteries, do not let
dust or oil get on the components. To replace the battery:
1. Open the lid as illustrated. ●For headphones, remove the screw
�1
with a flat-bladed screwdriver before re-
moving the lid.
LHA2552SAA0978
SAA3081
Monitor, climate, audio, phone and voice recognition systems4-119
Page 311 of 506

Size AAA 6 2 (headphones)
● Be careful not to touch the battery termi-
nal.
● Make sure that the")
2. Replace both batteries with new ones.●Recommended battery:
Size AA 6 2 (DVD remote controller)
Size AAA 6 2 (headphones)
● Be careful not to touch the battery termi-
nal.
● Make sure that the (+) and (-) ends on the
batteries match the markings inside the
compartment.
3. Close the lid securely. ●If you will not be using the remote control
for long periods of time, remove the bat-
teries.
● Replacement of the batteries is needed
when the remote control only functions at
extremely close distances to the Dual
Head Restraint DVD System or when it
does not function at all.
FCC Notice:
Changes or modifications not expressly ap-
proved by the party responsible for compli-
ance could void the user’s authority to op-
erate the equipment. This device complies
with Part 15 of the FCC Rules and RSS-210
of Industry Canada. Operation is subject to
the following two conditions: (1) This de-
vice may not cause harmful interference, and (2) this device must accept any inter-
ference received, including interference
that may cause undesired operation of the
device.
BEFORE OPERATING DUAL HEAD
RESTRAINT DVD SYSTEM
Precautions
Start the engine when using the Dual Head Re-
straint DVD System.
WARNING
The driver must not attempt to operate the
Dual Head Restraint DVD System or wear
the headphones while the vehicle is in
motion so that full attention may be given
to vehicle operation.
CAUTION
●
Only operate the Dual Head Restraint
DVD System while the vehicle engine is
running. Operating the Dual Head Re-
straint DVD System for extended peri-
ods of time with the engine OFF can
discharge the vehicle battery. ●
Do not allow the system to get wet.
Excessive moisture such as spilled liq-
uids may cause the system to
malfunction.
● While playing VIDEO-CD media, this
DVD player does not guarantee com-
plete functionality of all VIDEO-CD
formats.
Parental level (parental control)
Video data with the parental control setting can
be played with this system. Please use your own
judgement to set the parental control with the
system.
Disc selection
You can play the following disc formats with the
DVD player:
● DVD-VIDEO
● VIDEO-CD
● DTS-CD
Use DVDs with the region code “ALL” or the code
applicable to your country. The region code is
displayed as a small symbol printed on the top of
the DVD. This vehicle-installed DVD player can
only play DVDs with an applicable region code.
4-120Monitor, climate, audio, phone and voice recognition systems
Page 312 of 506
Available audio sources
The following sources are available to play on
each display:
Front display:● Radio
● CD/DVD
● USB memory/iPod®
● Bluetooth® audio
● AUX (front)
Rear display: ● DVD
● USB memory with video files
● AUX (front/rear)
PLAYING A DIGITAL VERSATILE
DISC (DVD)
DISC·AUX button
Park the vehicle in a safe location for the
front seat occupants to operate the DVD
player while watching the images.
Insert a DVD into the CD/DVD slot with the
labeled side up. The DVD will be guided auto-
matically into the slot. When ejecting the DVD,
press the EJECT button.
Front display
SAA3069
Rear display
SAA3082
Monitor, climate, audio, phone and voice recognition systems4-121
Page 313 of 506

Press the AUX·DVD button on the instrument
panel and turn the display to the DVD mode, and
begin playing the DVD automatically.
When a DVD is loaded, it will begin playing
automatically.
The front screen will be turned on when the
AUX·DVD button is pressed while a DVD is being
played, and it will turn off automatically after a
period of time. To turn it on again, press the
AUX·DVD button again.
Adjust front/rear displays
Front display:
To adjust the front display mode, press the DISP
button on the center multi-function control panel.
Follow the instructions displayed on the screen.
Rear display:
To adjust the rear display mode, press the pre-
ferred side (L or R) of the DISP button on the
remote controller.
DVD operation keys
To operate the DVD player, select the preferred
key displayed on the operation screen using the
NISSAN controller.
PAUSE:
Select this key and press the ENTER button to
pause the DVD. To resume playing the DVD, use
the “PLAY” key.
To pause the DVD, it is also possible to push the
pause button on the keypad of the remote con-
troller.
PLAY:
Select this key and press the ENTER button to
start playing the DVD, for example, after pausing
the DVD.
To start playing the DVD, it is also possible to
press the play button on the keypad of the remote
controller.
STOP:
Select this key and press the ENTER button to
stop playing the DVD.
To stop playing the DVD, it is also possible to
press the stop button on the keypad of the re-
mote controller.
SKIP (FORWARD):
Select this key and press the ENTER button to
skip the chapter(s) of the disc forward. The chap-
ters will advance the number of times the ENTER
button is pressed.
To skip the chapter(s) forward, it is also possible
to press the corresponding button on the keypad
of the remote controller.
SKIP (REWIND):
Select this key and press the ENTER button to
skip the chapter(s) of the disc backward. The
chapters will go back the number of times the
ENTER button is pressed.
To skip the chapter(s) backward, it is also pos-
sible to press the corresponding button on the
keypad of the remote controller.
Commercial Skip:
This function is only for DVD-VIDEO and DVD-
VR.
Select this key to skip forward or backwards by
the set amount as defined in the DVD settings
menu.
To skip forward or backward, it is also possible to
press the corresponding button on the keypad of
the remote controller.
4-122Monitor, climate, audio, phone and voice recognition systems


Rear display: ● DV")