Page 177 of 293
●If you decide that it is not safe to return the
vehicle to the road surface based on vehicle,
road or traffic conditions, gradually slow the
vehicle to a stop in a safe place off the road.
RAPID AIR PRESSURE LOSS
Rapid air pressure loss or a “blow-out” can occur
if the tire is punctured or is damaged due to
hitting a curb or pothole. Rapid air pressure loss
can also be caused by driving on under-inflated
tires.
Rapid air pressure loss can affect the handling
and stability of the vehicle, especially at highway
speeds.
Help prevent rapid air pressure loss by maintain-
ing the correct air pressure and visually inspect
the tires for wear and damage. For additional
information, refer to “Wheels and tires” in the
“Maintenance and do-it-yourself” section of this
manual. If a tire rapidly loses air pressure or
“blows-out” while driving, maintain control of the
vehicle by following the procedure below. Please
note that this procedure is only a general guide.
The vehicle must be driven as appropriate based
on the conditions of the vehicle, road and traffic.
Page 198 of 293
3. Tire chains may be used. For additional in-formation, refer to “Tire chains” in the “Main-
tenance and do-it-yourself” section of this
manual.
SPECIAL WINTER EQUIPMENT
It is recommended that the following items be
carried in the vehicle during winter:
● A scraper and stiff-bristled brush to remove
ice and snow from the windows and wiper
blades.
● A sturdy, flat board to be placed under the
jack to give it firm support.
● A shovel to dig the vehicle out of snowdrifts.
● Extra washer fluid to refill the windshield-
washer fluid reservoir.
DRIVING ON SNOW OR ICE
Page 202 of 293
WARNING
●Make sure the parking brake is securely
applied and the automatic transmission
(A/T) models is shifted into P (Park) , or
the manual transmission (M/T) model
into R (Reverse) .
● Never change tires when the vehicle is
on a slope, ice or slippery areas. This is
hazardous.
● Never change tires if oncoming traffic is
close to your vehicle. Wait for profes-
sional road assistance.
A. Blocks
B. Flat tire
Blocking wheels
Place suitable blocks at both the front and back
of the wheel diagonally opposite the flat tire to
prevent the vehicle from moving when it is jacked
up.
Page 206 of 293
WARNING
●Incorrect wheel nuts or improperly
tightened wheel nuts can cause the
wheel to become loose or come off.
This could cause an accident.
● Do not use oil or grease on the wheel
studs or nuts. This could cause the nuts
to become loose.
● Retighten the wheel nuts when the ve-
hicle has been driven for 1,000 km
(600 miles) (also in cases of a flat tire,
etc.) .
As soon as possible, tighten the wheel nuts
to the specified torque with a torque
wrench.
Wheel nut tightening torque: 113 N·m (83 ft-lb)
The wheel nuts must be kept tightened to
specification at all times. It is recom-
mended that wheel nuts be tightened to
specification at each lubrication interval.
Adjust tire pressure to the COLD pressure.
COLD pressure: After the vehicle has been
parked for 3 hours or more or driven less
than 1.6 km (1 mile) . COLD tire pressures are shown on the Tire
Placard.
5. Securely store the flat tire and jacking equip- ment in the vehicle.
Page 247 of 293
CAUTION
●High-pressure halogen gas is sealed in-
side the bulb. The bulb may break if the
glass envelope is scratched or the bulb
is dropped.
● Aiming should not be necessary after
replacing the H4 bulb. When aiming ad-
justment is necessary, contact a
NISSAN dealer.
● Do not leave the headlight assembly
open without a bulb installed for a long
period of time. Dust, moisture, smoke,
etc. entering the headlight body may
affect bulb performance. Remove the
bulb from the headlight assembly just
before a replacement bulb is installed.
● Only touch the base when handling the
bulb. Never touch the glass envelope.
Touching the glass could significantly
affect bulb life and/or headlight
performance.
● Use the same number and wattage as
shown in the chart.
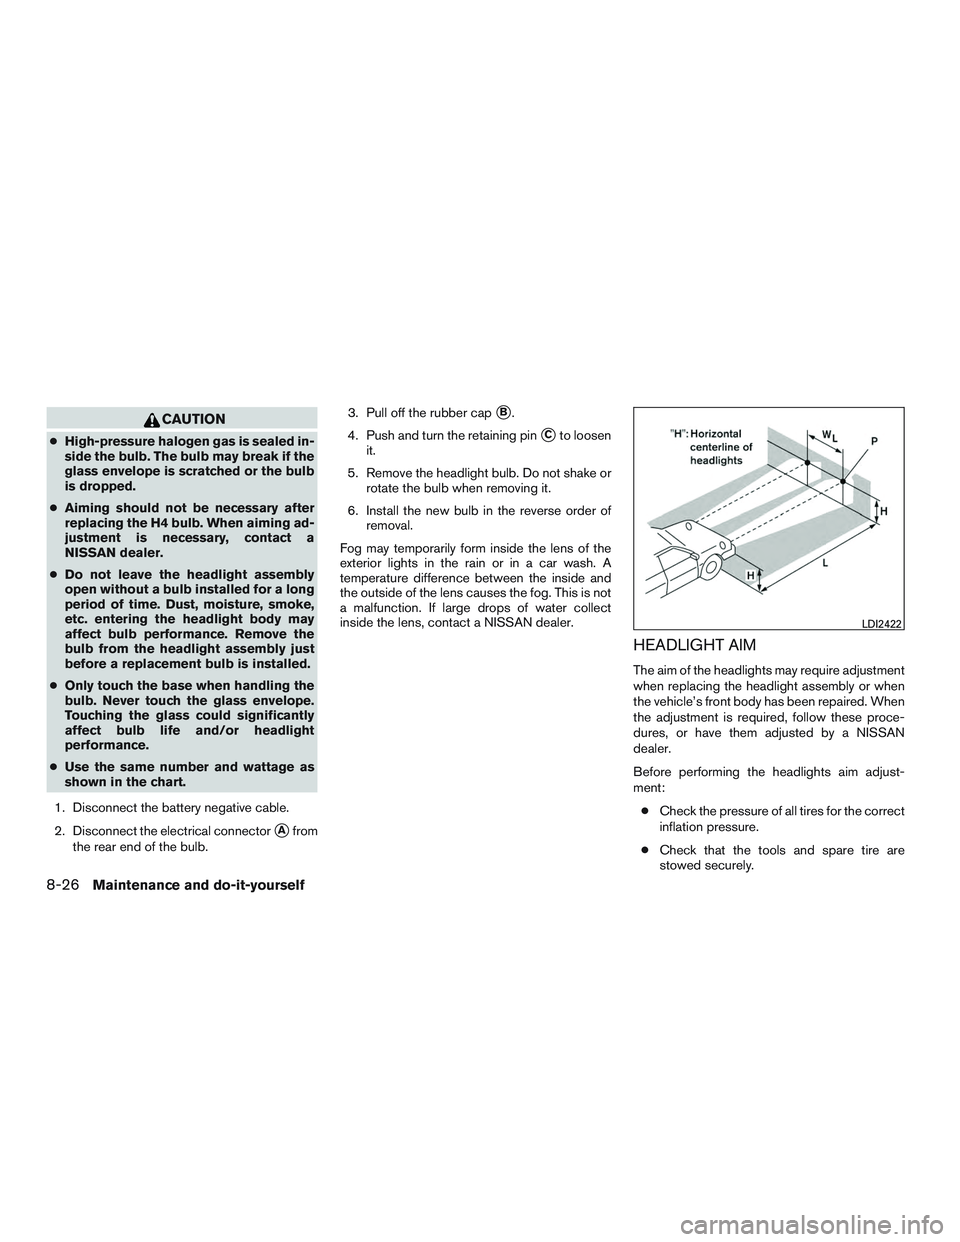
1. Disconnect the battery negative cable.
2. Disconnect the electrical connector
�Afrom
the rear end of the bulb. 3. Pull off the rubber cap
�B.
4. Push and turn the retaining pin
�Cto loosen
it.
5. Remove the headlight bulb. Do not shake or rotate the bulb when removing it.
6. Install the new bulb in the reverse order of removal.
Fog may temporarily form inside the lens of the
exterior lights in the rain or in a car wash. A
temperature difference between the inside and
the outside of the lens causes the fog. This is not
a malfunction. If large drops of water collect
inside the lens, contact a NISSAN dealer.
HEADLIGHT AIM
The aim of the headlights may require adjustment
when replacing the headlight assembly or when
the vehicle’s front body has been repaired. When
the adjustment is required, follow these proce-
dures, or have them adjusted by a NISSAN
dealer.
Before performing the headlights aim adjust-
ment:
● Check the pressure of all tires for the correct
inflation pressure.
● Check that the tools and spare tire are
stowed securely.
Page 255 of 293
If you have a flat tire, refer to “Flat tire” in
the “In case of emergency” section of this
manual for additional information.
TIRE PRESSURE
Tire inflation pressure
Check the tire pressures (including the
spare) often and always prior to long dis-
tance trips. The recommended tire pres-
sure specifications are shown on the tire
placard under the “Cold Tire Inflation
Pressure” heading. The tire placard (if so
equipped) is affixed to the driver side cen-
ter pillar. Tire pressures should be
checked regularly because:● Most tires naturally lose air over time.
● Tires can lose air suddenly when
driven over potholes or other objects
or if the vehicle strikes a curb while
parking.
The tire pressures should be checked
when the tires are cold. The tires are
considered COLD after the vehicle has been parked for 3 or more hours or driven
less than 1.6 km (1 mile) at moderate
speeds.
Incorrect tire pressure, including un-
der inflation, may adversely affect
tire life and vehicle handling.
Page 280 of 293
Steps for determining correct load
limit
1. Locate the statement “The combinedweight of occupants and cargo
should never exceed XXX lbs or XXX
kg” on your vehicle’s placard.
2. Determine the combined weight of the driver and passengers that will be
riding in your vehicle.
3. Subtract the combined weight of the driver and passengers from XXX lbs
or XXX kg.
4. The resulting figure equals the avail- able amount of cargo and luggage
load capacity. For example, if the
XXX amount equals 1,400 lbs. and
there will be five 150 lb. passengers
in your vehicle, the amount of avail-
able cargo and luggage load capac-
ity is 650 lbs. (1,400-750 (5 X 150)
= 650 lbs) or (640-340 (5 X 70) =
300 kg.) 5. Determine the combined weight of
luggage and cargo being loaded on
the vehicle. That weight may not
safely exceed the available cargo and
luggage load capacity calculated in
Step 4.
Before driving a loaded vehicle, confirm
that you do not exceed the Gross Vehicle
Weight Rating (GVWR) or the Gross Axle
Weight Rating (GAWR) for your vehicle.
For additional information, refer to “Mea-
surement of weights” in this section.
Also check tires for proper inflation pres-
sures. For additional information, refer to
the Tire and Loading Information label.
LOADING TIPS
● The GVW must not exceed GVWR
or GAWR as specified on the C.M-
.V.S.S. certification label.
● Do not load the front and rear axle to
the GAWR. Doing so will exceed the
GVWR.
Page 281 of 293
●Overloading and improper load-
ing not only can shorten the life
of your vehicle and the tire, but
can also cause unsafe vehicle
handling and longer braking dis-
tances. This may cause a prema-
ture tire failure which could result
in a serious accident and per-
sonal injury. Failures caused by
overloading are not covered by
the vehicle’s warranty.
MEASUREMENT OF WEIGHTS
Secure loose items to prevent weight
shifts that could affect the balance of your
vehicle. When the vehicle is loaded, drive
to a scale and weigh the front and the rear
wheels separately to determine axle
loads. Individual axle loads should not ex-
ceed either of the gross axle weight rat-
ings (GAWR) . The total of the axle loads
should not exceed the gross vehicle
weight rating (GVWR) . These ratings are
given on the vehicle certification label. If
weight ratings are exceeded, move or re-
move items to bring all weights below the
ratings.
Do not tow a trailer with your vehicle.
FLAT TOWING
Towing your vehicle with all four wheels on the
ground is sometimes called flat towing. This
method is sometimes used when towing a vehicle
behind a recreational vehicle, such as a motor
home.