2013 NISSAN MAXIMA washer fluid
[x] Cancel search: washer fluidPage 15 of 444
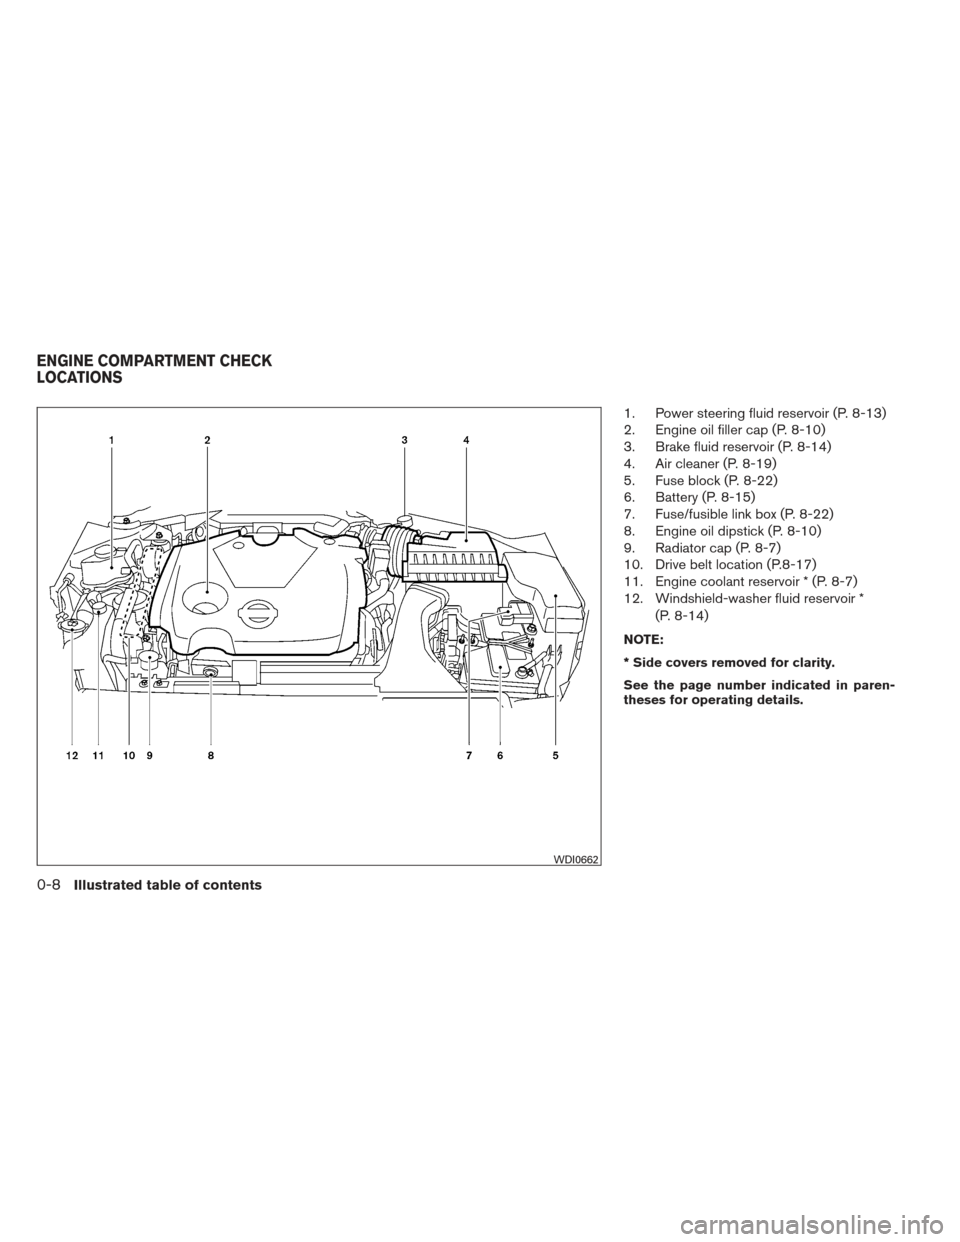
1. Power steering fluid reservoir (P. 8-13)
2. Engine oil filler cap (P. 8-10)
3. Brake fluid reservoir (P. 8-14)
4. Air cleaner (P. 8-19)
5. Fuse block (P. 8-22)
6. Battery (P. 8-15)
7. Fuse/fusible link box (P. 8-22)
8. Engine oil dipstick (P. 8-10)
9. Radiator cap (P. 8-7)
10. Drive belt location (P.8-17)
11. Engine coolant reservoir * (P. 8-7)
12. Windshield-washer fluid reservoir *(P. 8-14)
NOTE:
* Side covers removed for clarity.
See the page number indicated in paren-
theses for operating details.
WDI0662
ENGINE COMPARTMENT CHECK
LOCATIONS
0-8Illustrated table of contents
Page 84 of 444
TPMS malfunction:
If the TPMS is not functioning properly, the low
tire pressure warning light will flash for approxi-
mately 1 minute when the ignition switch is
placed in the ON position. The light will remain on
after the 1 minute. Have the system checked by a
NISSAN dealer. The CHECK TIRE PRESSURE
warning does not appear if the low tire pressure
warning light illuminates to indicate a TPMS mal-
function.
For additional information, see “Tire Pressure
Monitoring System (TPMS)” in the “Starting and
driving” section and “Tire pressure” in the “Main-
tenance and do-it-yourself” section in this
manual.
WARNING
●Radio waves could adversely affect
electrical medical equipment. Those
who use a pacemaker should contact
the electric medical equipment manu-
facturer for the possible influences be-
fore use.
● If the light does not illuminate with the
ignition switch in the ON position, have
the vehicle checked by a NISSAN dealer
as soon as possible. ●
If the light illuminates while driving,
avoid sudden steering maneuvers or
abrupt braking, reduce vehicle speed,
pull off the road to a safe location and
stop the vehicle as soon as possible.
Driving with under-inflated tires may per-
manently damage the tires and increase
the likelihood of tire failure. Serious ve-
hicle damage could occur and may lead
to an accident and could result in serious
personal injury. Check the tire pressure
for all four tires. Adjust the tire pressure
to the recommended COLD tire pressure
shown on the Tire and Loading Informa-
tion label located in the driver’s door
opening to turn the low tire pressure
warning light OFF. If the light still comes
on while driving after adjusting the tire
pressure, a tire may be flat. If you have a
flat tire, replace it with a spare tire as
soon as possible.
● When a spare tire is mounted or a wheel
is replaced, tire pressure will not be
indicated, the TPMS will not function
and the low tire pressure warning light
will flash for approximately 1 minute.
The light will remain on after 1 minute.
Contact your NISSAN dealer as soon as
possible for tire replacement and/or
system resetting. ●
Replacing tires with those not originally
specified by NISSAN could affect the
proper operation of the TPMS.
CAUTION
● The TPMS is not a substitute for the
regular tire pressure check. Be sure to
check the tire pressure regularly.
● If the vehicle is being driven at speeds
of less than 16 MPH (25 km/h), the
TPMS may not operate correctly.
● Be sure to install the specified size of
tires to the 4 wheels correctly.
Master warning light
When the ignition is in the ON position, the master
warning light illuminates if any of the following are
displayed on the vehicle information display.
● No key warning
● Low fuel warning
● Low windshield-washer fluid warning
● Parking brake release warning
● Door/trunk open warning
● Loose fuel cap
● Check tire pressure warning
Instruments and controls2-13
Page 94 of 444
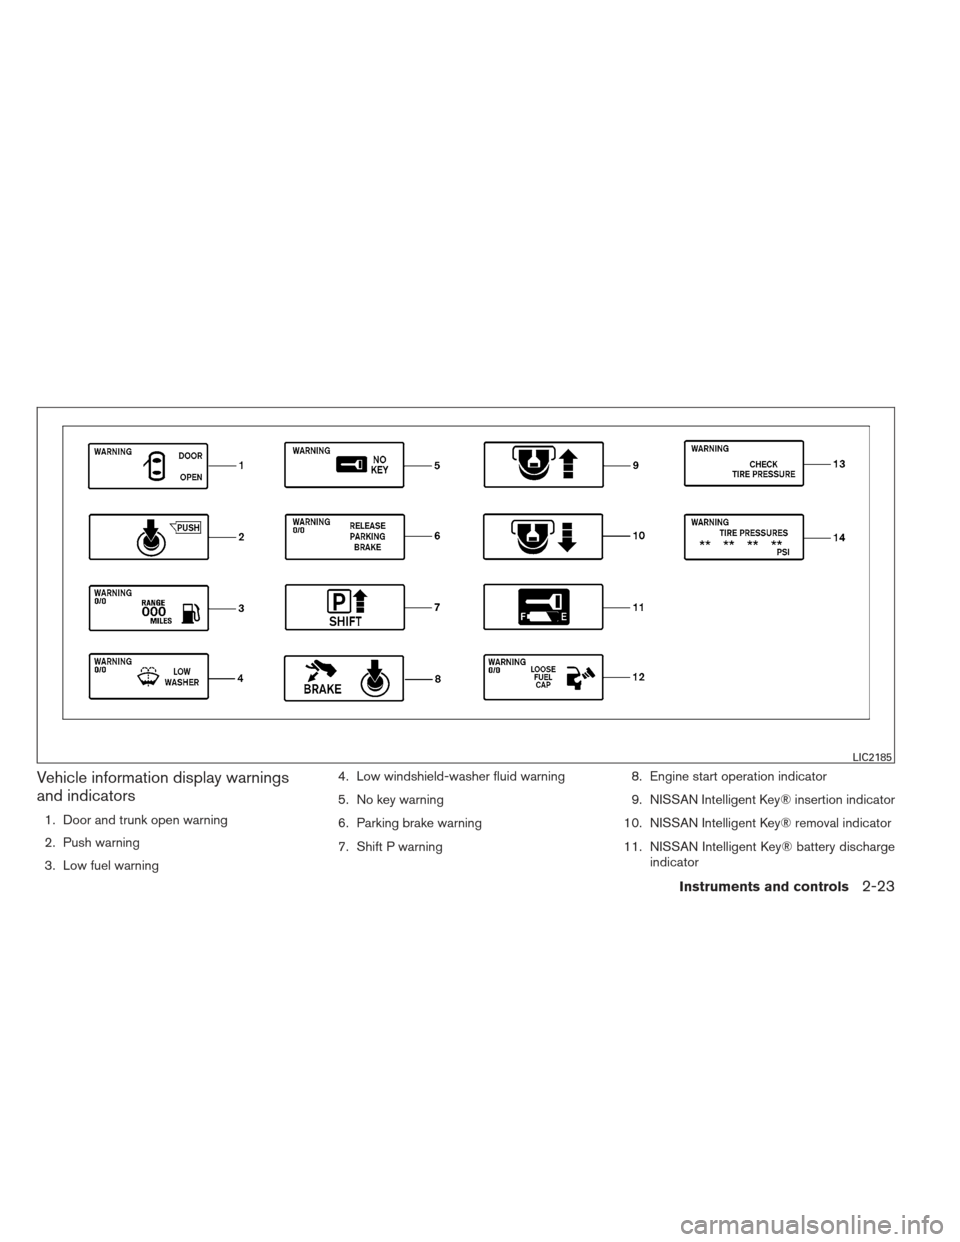
Vehicle information display warnings
and indicators
1. Door and trunk open warning
2. Push warning
3. Low fuel warning4. Low windshield-washer fluid warning
5. No key warning
6. Parking brake warning
7. Shift P warning
8. Engine start operation indicator
9. NISSAN Intelligent Key® insertion indicator
10. NISSAN Intelligent Key® removal indicator
11. NISSAN Intelligent Key® battery discharge indicator
LIC2185
Instruments and controls2-23
Page 95 of 444
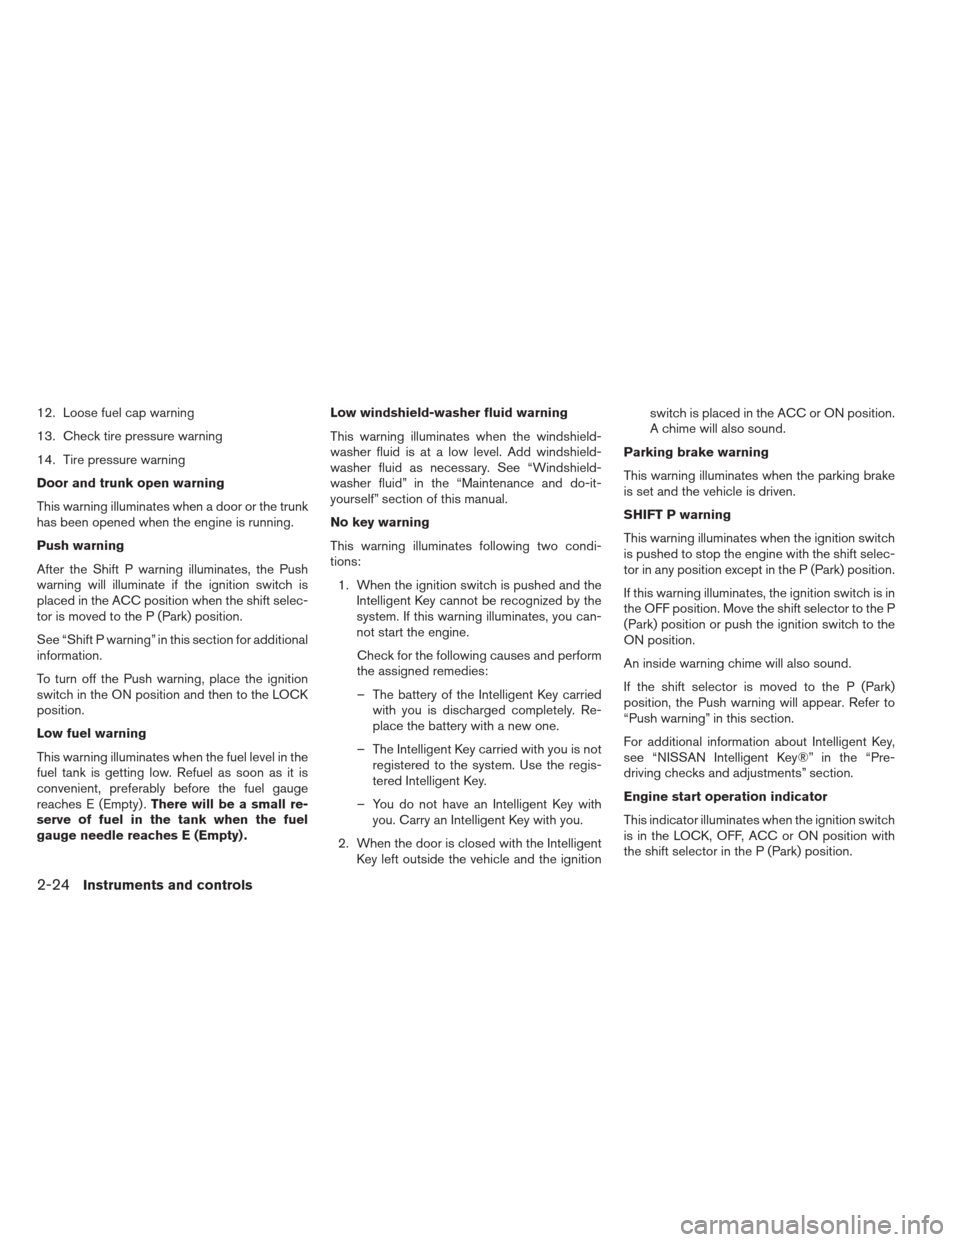
12. Loose fuel cap warning
13. Check tire pressure warning
14. Tire pressure warning
Door and trunk open warning
This warning illuminates when a door or the trunk
has been opened when the engine is running.
Push warning
After the Shift P warning illuminates, the Push
warning will illuminate if the ignition switch is
placed in the ACC position when the shift selec-
tor is moved to the P (Park) position.
See “Shift P warning” in this section for additional
information.
To turn off the Push warning, place the ignition
switch in the ON position and then to the LOCK
position.
Low fuel warning
This warning illuminates when the fuel level in the
fuel tank is getting low. Refuel as soon as it is
convenient, preferably before the fuel gauge
reaches E (Empty) .There will be a small re-
serve of fuel in the tank when the fuel
gauge needle reaches E (Empty) . Low windshield-washer fluid warning
This warning illuminates when the windshield-
washer fluid is at a low level. Add windshield-
washer fluid as necessary. See “Windshield-
washer fluid” in the “Maintenance and do-it-
yourself” section of this manual.
No key warning
This warning illuminates following two condi-
tions:
1. When the ignition switch is pushed and the Intelligent Key cannot be recognized by the
system. If this warning illuminates, you can-
not start the engine.
Check for the following causes and perform
the assigned remedies:
– The battery of the Intelligent Key carried with you is discharged completely. Re-
place the battery with a new one.
– The Intelligent Key carried with you is not registered to the system. Use the regis-
tered Intelligent Key.
– You do not have an Intelligent Key with you. Carry an Intelligent Key with you.
2. When the door is closed with the Intelligent Key left outside the vehicle and the ignition switch is placed in the ACC or ON position.
A chime will also sound.
Parking brake warning
This warning illuminates when the parking brake
is set and the vehicle is driven.
SHIFT P warning
This warning illuminates when the ignition switch
is pushed to stop the engine with the shift selec-
tor in any position except in the P (Park) position.
If this warning illuminates, the ignition switch is in
the OFF position. Move the shift selector to the P
(Park) position or push the ignition switch to the
ON position.
An inside warning chime will also sound.
If the shift selector is moved to the P (Park)
position, the Push warning will appear. Refer to
“Push warning” in this section.
For additional information about Intelligent Key,
see “NISSAN Intelligent Key®” in the “Pre-
driving checks and adjustments” section.
Engine start operation indicator
This indicator illuminates when the ignition switch
is in the LOCK, OFF, ACC or ON position with
the shift selector in the P (Park) position.
2-24Instruments and controls
Page 100 of 444
CAUTION
●Do not operate the washer continu-
ously for more than 30 seconds.
● Do not operate the washer if the
windshield-washer fluid reservoir is
empty.
● Do not fill the windshield-washer fluid
reservoir with washer fluid concen-
trates at full strength. Some methyl al-
cohol based washer fluid concentrates
may permanently stain the grille if
spilled while filling the windshield-
washer fluid reservoir.
● Pre-mix washer fluid concentrates with
water to the manufacturer’s recom-
mended levels before pouring the fluid
into the windshield-washer fluid reser-
voir. Do not use the windshield-washer
fluid reservoir to mix the washer fluid
and water. To defrost the rear window glass and outside
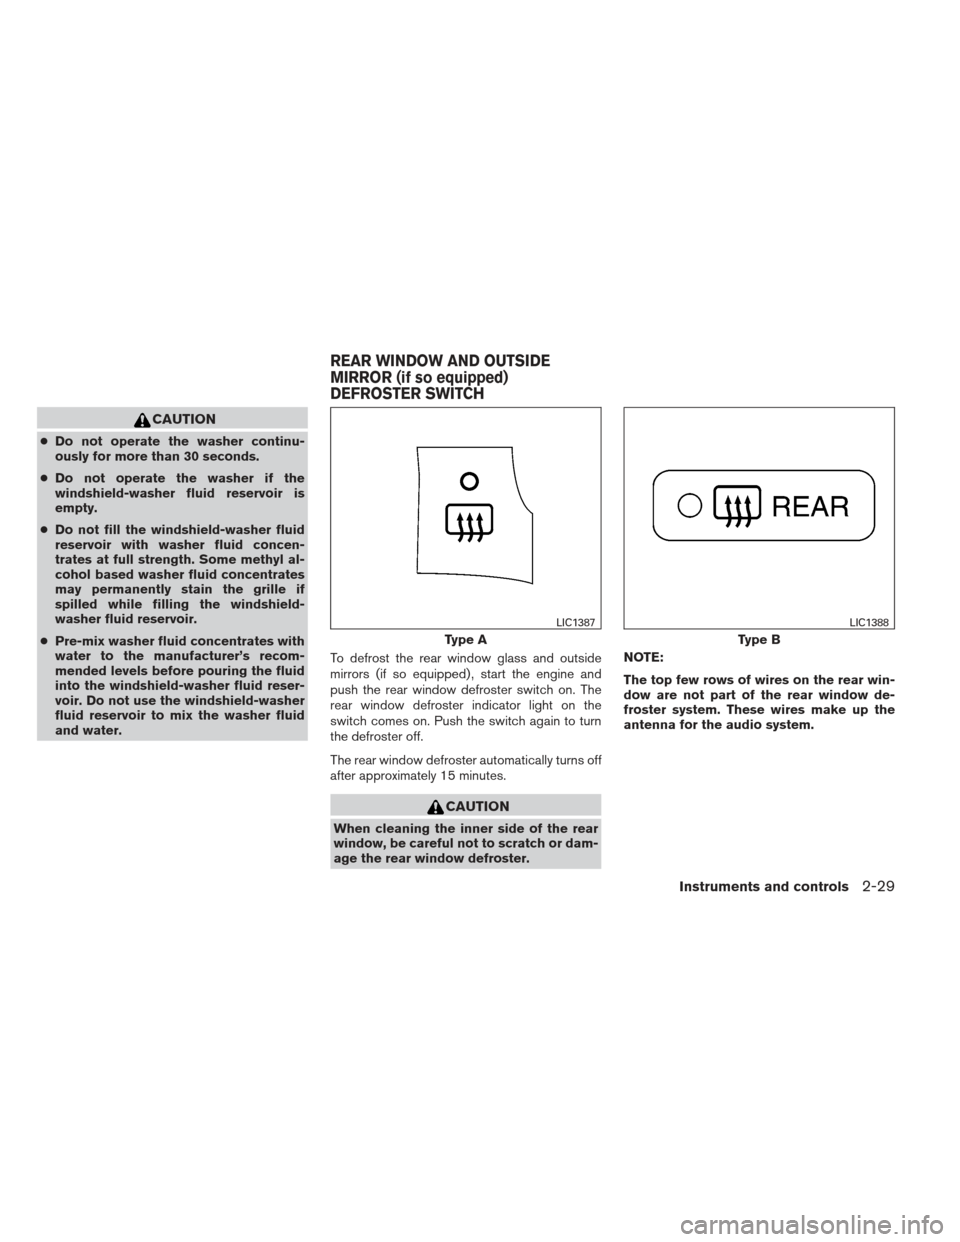
mirrors (if so equipped) , start the engine and
push the rear window defroster switch on. The
rear window defroster indicator light on the
switch comes on. Push the switch again to turn
the defroster off.
The rear window defroster automatically turns off
after approximately 15 minutes.
CAUTION
When cleaning the inner side of the rear
window, be careful not to scratch or dam-
age the rear window defroster. NOTE:
The top few rows of wires on the rear win-
dow are not part of the rear window de-
froster system. These wires make up the
antenna for the audio system.
Type A
LIC1387
Type B
LIC1388
REAR WINDOW AND OUTSIDE
MIRROR (if so equipped)
DEFROSTER SWITCH
Instruments and controls2-29
Page 322 of 444
●Make sure the area around the vehicle is
clear.
● Check fluid levels such as engine oil, cool-
ant, brake fluid, and window washer fluid as
frequently as possible, or at least whenever
you refuel.
● Check that all windows and lights are clean.
● Visually inspect tires for their appearance
and condition. Also check tires for proper
inflation.
● Lock all doors.
● Position seat and adjust head restraints.
● Adjust inside and outside mirrors.
● Fasten seat belts and ask all passengers to
do likewise.
● Check the operation of warning lights when
the ignition switch is pushed to the ON
position. See “Warning/indicator lights and
audible reminders” in the “Instruments and
controls” section of this manual. 1. Apply the parking brake.
2. Move the shift selector to P (Park) or N
(Neutral) . P (Park) is recommended.
The starter is designed not to operate if
the shift selector is in any of the driving
positions.
3. Push the ignition switch to the ON position. Depress the brake pedal and push the igni-
tion switch to start the engine.
To start the engine immediately, push and
release the ignition switch while depressing
the brake pedal with the ignition switch in
any position.
● If the engine is very hard to start in ex-
tremely cold weather or when restarting,
depress the accelerator pedal a little (ap-
proximately 1/3 to the floor) and while
holding, crank the engine. Release the
accelerator pedal when the engine starts.
● If the engine is very hard to start because
it is flooded, depress the accelerator
pedal all the way to the floor and hold it.
Push the ignition switch to the ON posi-
tion to start cranking the engine. After 5 or
6 seconds, stop cranking by pushing the
ignition switch to LOCK. After cranking
the engine, release the accelerator pedal.
Crank the engine with your foot off the accelerator pedal by depressing the
brake pedal and pushing the push-button
ignition switch to start the engine. If the
engine starts, but fails to run, repeat the
above procedure.
CAUTION
Do not operate the starter for more than
15 seconds at a time. If the engine does
not start, push the ignition switch to the
OFF position and wait 10 seconds before
cranking again, otherwise the starter
could be damaged.
4. Warm-up
Allow the engine to idle for at least 30 sec-
onds after starting. Do not race the engine
while warming it up. Drive at moderate
speed for a short distance first, especially in
cold weather. In cold weather, keep the en-
gine running for a minimum of2-3minutes
before shutting it off. Starting and stopping
the engine over a short period of time may
make the vehicle more difficult to start.
5. To stop the engine, shift the shift selector to the P (Park) position and push the ignition
switch to the OFF position.
BEFORE STARTING THE ENGINE STARTING THE ENGINE
Starting and driving5-11
Page 339 of 444
FREEING A FROZEN DOOR LOCK
To prevent a door lock from freezing, apply de-
icer through the key hole. If the lock becomes
frozen, heat the key before inserting it into the key
hole or use the remote keyless entry function on
the Intelligent Key.
ANTI-FREEZE
In the winter when it is anticipated that the tem-
perature will drop below 32°F (0°C) , check the
anti-freeze to assure proper winter protection.
For details, see “Engine cooling system” in the
“Maintenance and do-it-yourself” section of this
manual.
BATTERY
If the battery is not fully charged during extremely
cold weather conditions, the battery fluid may
freeze and damage the battery. To maintain maxi-
mum efficiency, the battery should be checked
regularly. For details, see “Battery” in the “Main-
tenance and do-it-yourself” section of this
manual.
DRAINING OF COOLANT WATER
If the vehicle is to be left outside without anti-
freeze, drain the cooling system, including the
engine block. Refill before operating the vehicle.
For details, see “Changing engine coolant” in the
“Maintenance and do-it-yourself” section of this
manual.
TIRE EQUIPMENT
1. SUMMER tires have a tread designed toprovide superior performance on dry pave-
ment. However, the performance of these
tires will be substantially reduced in snowy
and icy conditions. If you operate your ve-
hicle on snowy or icy roads, NISSAN recom-
mends the use of MUD & SNOW or ALL
SEASON TIRES on all four wheels. Please
consult a NISSAN dealer for the tire type,
size, speed rating and availability informa-
tion.
2. For additional traction on icy roads, studded tires may be used. However, some U.S.
states and Canadian provinces prohibit their
use. Check local, state and provincial laws
before installing studded tires.
Skid and traction capabilities of studded
snow tires on wet or dry surfaces may be
poorer than that of non-studded snow tires. 3. Tire chains may be used. For details, see
“Tire chains” in the “Maintenance and do-it-
yourself” section of this manual.
SPECIAL WINTER EQUIPMENT
It is recommended that the following items be
carried in the vehicle during winter:
● A scraper and stiff-bristled brush to remove
ice and snow from the windows and wiper
blades.
● A sturdy, flat board to be placed under the
jack to give it firm support.
● A shovel to dig the vehicle out of snowdrifts.
● Extra washer fluid to refill the windshield-
washer fluid reservoir.
DRIVING ON SNOW OR ICE
WARNING
● Wet ice (32°F, 0°C and freezing rain) ,
very cold snow or ice can be slick and
very hard to drive on. The vehicle will
have much less traction or “grip” under
these conditions. Try to avoid driving on
wet ice until the road is salted or
sanded.
COLD WEATHER DRIVING
5-28Starting and driving
Page 364 of 444
8 Maintenance and do-it-yourself
Maintenance requirements..........................8-2
General maintenance ..............................8-2
Explanation of general maintenance items .........8-2
Maintenance precautions ...........................8-5
Engine compartment check locations ................8-6
Engine cooling system .............................8-7
Checking engine coolant level ...................8-9
Changing engine coolant ........................8-9
Engine oil ........................................ 8-10
Checking engine oil level .......................8-10
Changing engine oil ........................... 8-11
Changing engine oil filter .......................8-12
Continuously Variable Transmission (CVT) fluid ......8-12
Power steering fluid ............................... 8-13
Brake fluid ....................................... 8-13
Brake fluid .................................... 8-14
Windshield-washer fluid ........................... 8-14
Windshield-washer fluid reservoir ...............8-14
Battery .......................................... 8-15
Jump starting ................................. 8-16
Variable voltage control system .....................8-17
Drive belt ........................................ 8-17
Spark plugs ...................................... 8-18Replacing spark plugs
......................... 8-18
Air cleaner ....................................... 8-19
In-cabin microfilter ............................. 8-19
Windshield wiper blades .......................... 8-20
Cleaning ..................................... 8-20
Replacing .................................... 8-20
Brakes .......................................... 8-21
Fuses ........................................... 8-22
Engine compartment ........................... 8-22
Passenger compartment .......................8-24
Battery replacement .............................. 8-26
NISSAN Intelligent Key® .......................8-26
Lights ........................................... 8-27
Headlights .................................... 8-27
Front
park/turn/sidemarker light .................8-28
Fog lights (if so equipped) ......................8-28
Exterior and interior lights .......................8-28
Wheels and tires ................................. 8-32
Tire pressure . . . ............................... 8-32
Tire labeling ................................... 8-36
Types of tires .................................. 8-39
Tire chains .................................... 8-40
Changing wheels and tires .....................8-40