2013 NISSAN MAXIMA engine oil
[x] Cancel search: engine oilPage 15 of 444
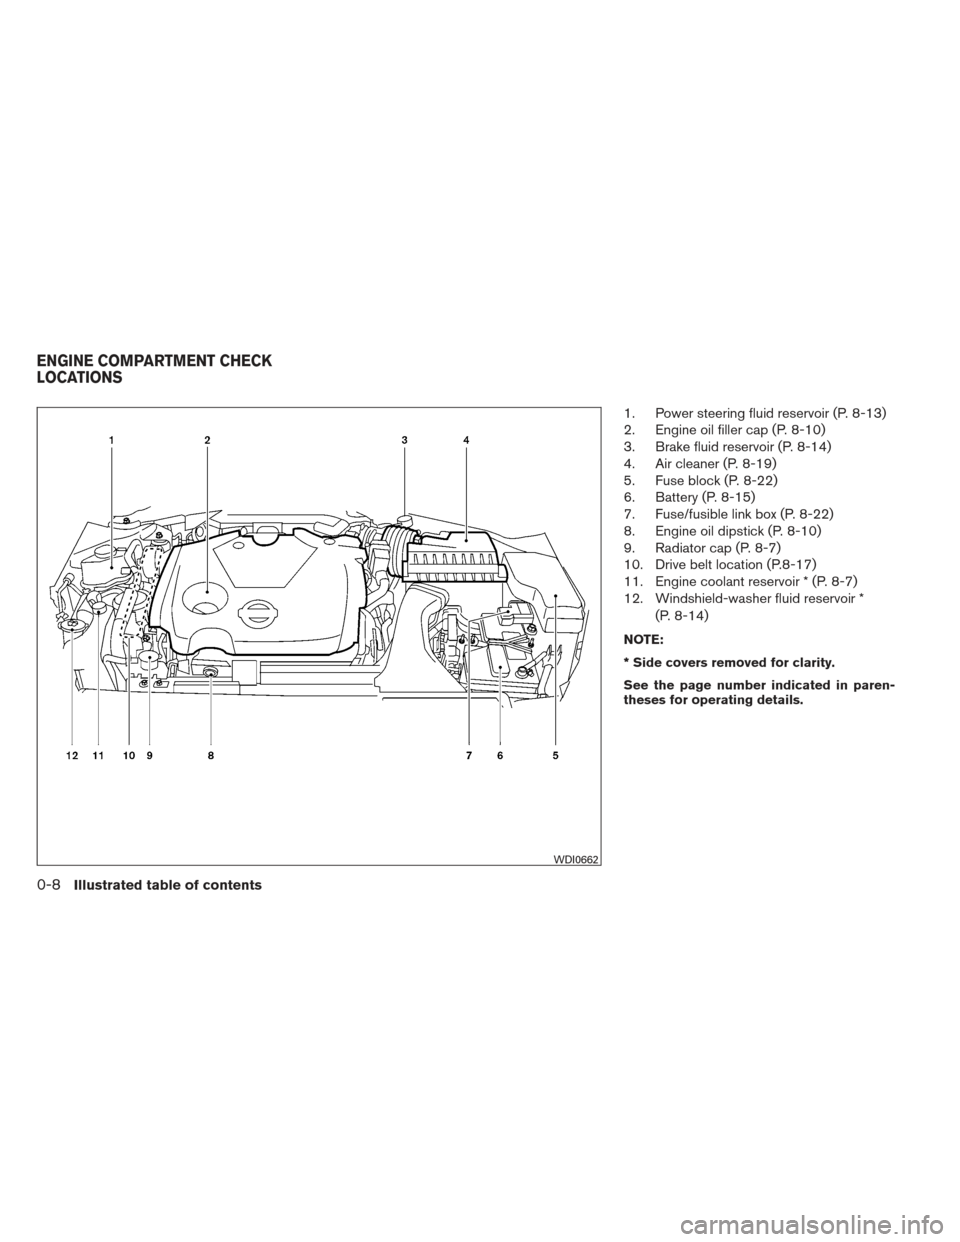
1. Power steering fluid reservoir (P. 8-13)
2. Engine oil filler cap (P. 8-10)
3. Brake fluid reservoir (P. 8-14)
4. Air cleaner (P. 8-19)
5. Fuse block (P. 8-22)
6. Battery (P. 8-15)
7. Fuse/fusible link box (P. 8-22)
8. Engine oil dipstick (P. 8-10)
9. Radiator cap (P. 8-7)
10. Drive belt location (P.8-17)
11. Engine coolant reservoir * (P. 8-7)
12. Windshield-washer fluid reservoir *(P. 8-14)
NOTE:
* Side covers removed for clarity.
See the page number indicated in paren-
theses for operating details.
WDI0662
ENGINE COMPARTMENT CHECK
LOCATIONS
0-8Illustrated table of contents
Page 16 of 444
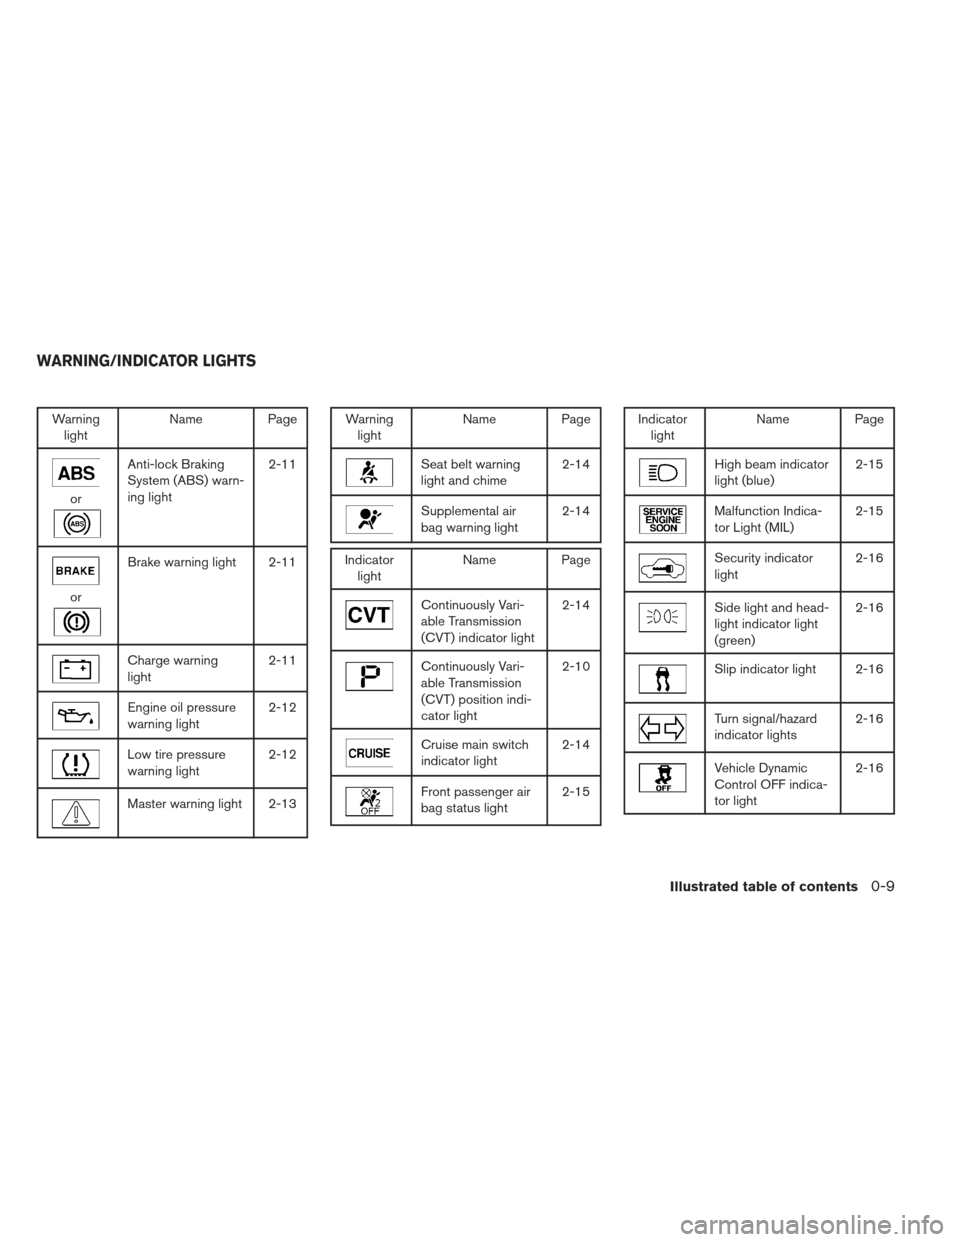
Warninglight Name Page
or
Anti-lock Braking
System (ABS) warn-
ing light 2-11
or
Brake warning light 2-11
Charge warning
light
2-11
Engine oil pressure
warning light2-12
Low tire pressure
warning light2-12
Master warning light 2-13
Warning
light Name Page
Seat belt warning
light and chime 2-14
Supplemental air
bag warning light2-14
Indicator
light Name Page
Continuously Vari-
able Transmission
(CVT) indicator light 2-14
Continuously Vari-
able Transmission
(CVT) position indi-
cator light2-10
Cruise main switch
indicator light
2-14
Front passenger air
bag status light2-15
Indicator
light Name Page
High beam indicator
light (blue) 2-15
Malfunction Indica-
tor Light (MIL)2-15
Security indicator
light2-16
Side light and head-
light indicator light
(green)2-16
Slip indicator light 2-16
Turn signal/hazard
indicator lights
2-16
Vehicle Dynamic
Control OFF indica-
tor light2-16
WARNING/INDICATOR LIGHTS
Illustrated table of contents0-9
Page 81 of 444
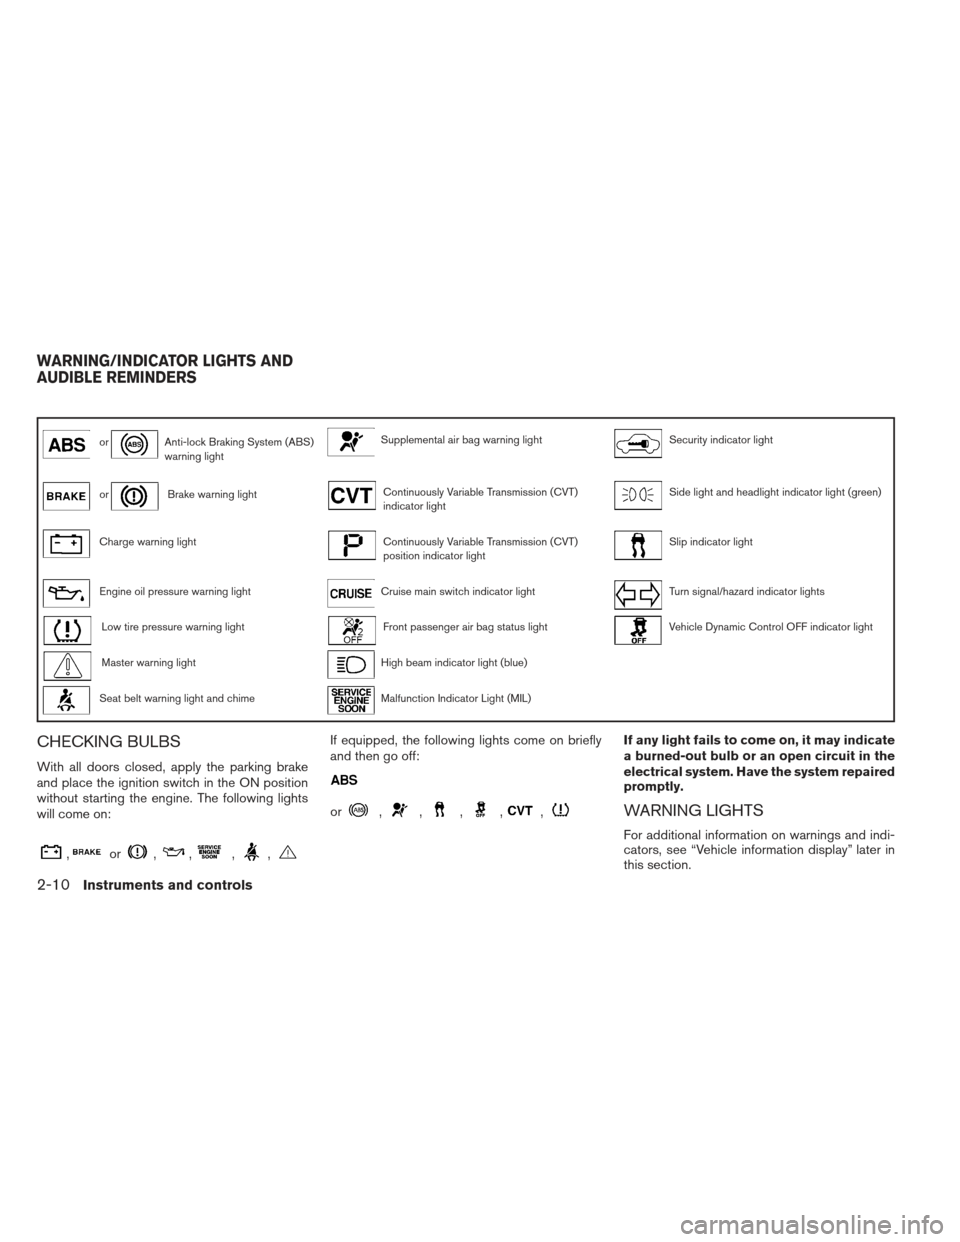
orAnti-lock Braking System (ABS)
warning lightSupplemental air bag warning lightSecurity indicator light
orBrake warning lightContinuously Variable Transmission (CVT)
indicator lightSide light and headlight indicator light (green)
Charge warning lightContinuously Variable Transmission (CVT)
position indicator lightSlip indicator light
Engine oil pressure warning lightCruise main switch indicator lightTurn signal/hazard indicator lights
Low tire pressure warning lightFront passenger air bag status lightVehicle Dynamic Control OFF indicator light
Master warning lightHigh beam indicator light (blue)
Seat belt warning light and chimeMalfunction Indicator Light (MIL)
CHECKING BULBS
With all doors closed, apply the parking brake
and place the ignition switch in the ON position
without starting the engine. The following lights
will come on:
,or,,,,
If equipped, the following lights come on briefly
and then go off:
or,,,,,
If any light fails to come on, it may indicate
a burned-out bulb or an open circuit in the
electrical system. Have the system repaired
promptly.
WARNING LIGHTS
For additional information on warnings and indi-
cators, see “Vehicle information display” later in
this section.
WARNING/INDICATOR LIGHTS AND
AUDIBLE REMINDERS
2-10Instruments and controls
Page 83 of 444
CAUTION
●Do not ground electrical accessories
directly to the battery terminal. Doing
so will bypass the variable control sys-
tem and the vehicle battery may not
charge completely. Refer to “Variable
voltage control system (if so equipped)
” in the “Maintenance and do-it-
yourself” section later in this manual.
● Do not continue driving if the generator
belt is loose, broken or missing.
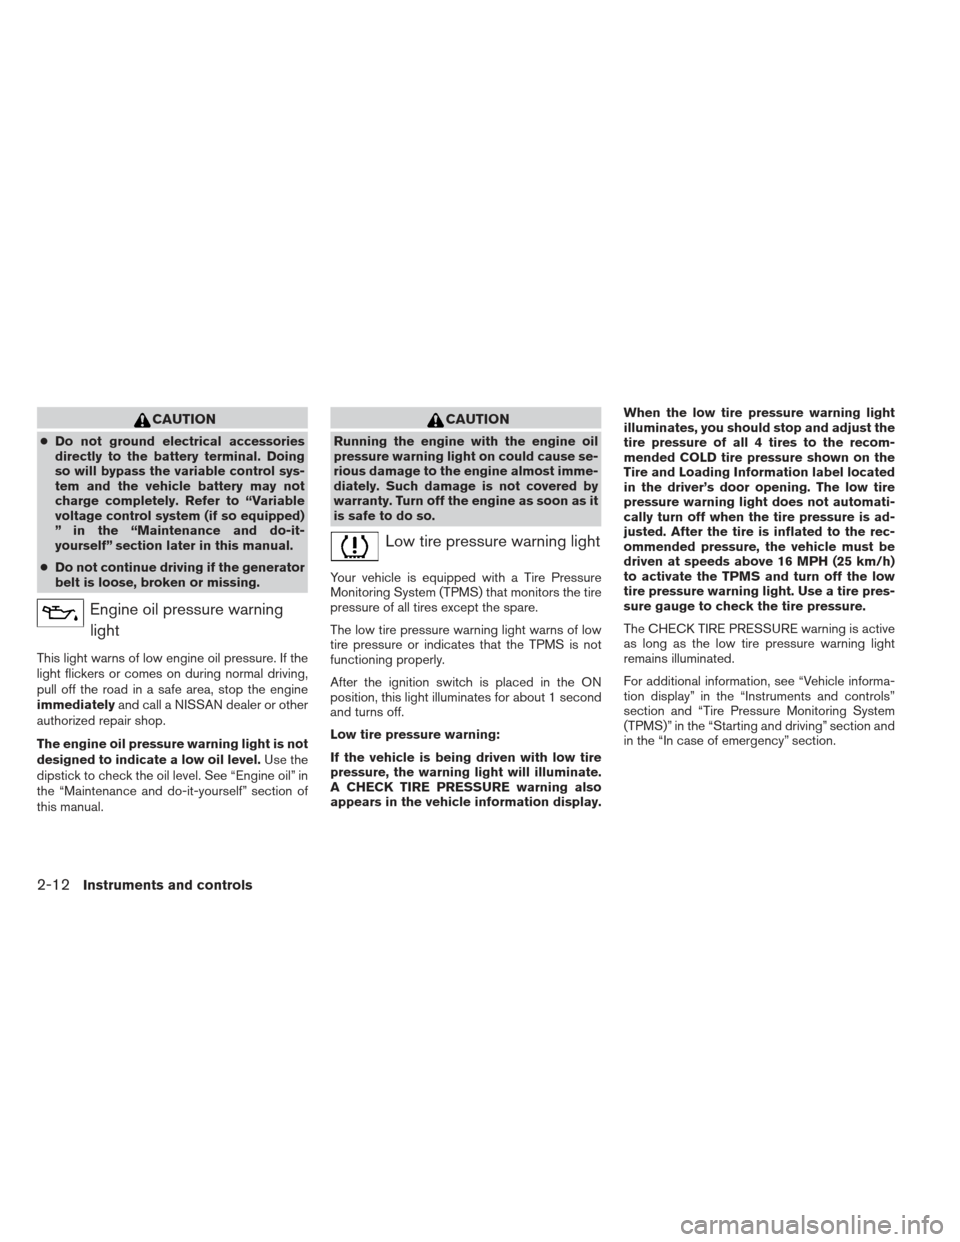
Engine oil pressure warning
light
This light warns of low engine oil pressure. If the
light flickers or comes on during normal driving,
pull off the road in a safe area, stop the engine
immediately and call a NISSAN dealer or other
authorized repair shop.
The engine oil pressure warning light is not
designed to indicate a low oil level. Use the
dipstick to check the oil level. See “Engine oil” in
the “Maintenance and do-it-yourself” section of
this manual.
CAUTION
Running the engine with the engine oil
pressure warning light on could cause se-
rious damage to the engine almost imme-
diately. Such damage is not covered by
warranty. Turn off the engine as soon as it
is safe to do so.
Low tire pressure warning light
Your vehicle is equipped with a Tire Pressure
Monitoring System (TPMS) that monitors the tire
pressure of all tires except the spare.
The low tire pressure warning light warns of low
tire pressure or indicates that the TPMS is not
functioning properly.
After the ignition switch is placed in the ON
position, this light illuminates for about 1 second
and turns off.
Low tire pressure warning:
If the vehicle is being driven with low tire
pressure, the warning light will illuminate.
A CHECK TIRE PRESSURE warning also
appears in the vehicle information display. When the low tire pressure warning light
illuminates, you should stop and adjust the
tire pressure of all 4 tires to the recom-
mended COLD tire pressure shown on the
Tire and Loading Information label located
in the driver’s door opening. The low tire
pressure warning light does not automati-
cally turn off when the tire pressure is ad-
justed. After the tire is inflated to the rec-
ommended pressure, the vehicle must be
driven at speeds above 16 MPH (25 km/h)
to activate the TPMS and turn off the low
tire pressure warning light. Use a tire pres-
sure gauge to check the tire pressure.
The CHECK TIRE PRESSURE warning is active
as long as the low tire pressure warning light
remains illuminated.
For additional information, see “Vehicle informa-
tion display” in the “Instruments and controls”
section and “Tire Pressure Monitoring System
(TPMS)” in the “Starting and driving” section and
in the “In case of emergency” section.
2-12Instruments and controls
Page 92 of 444
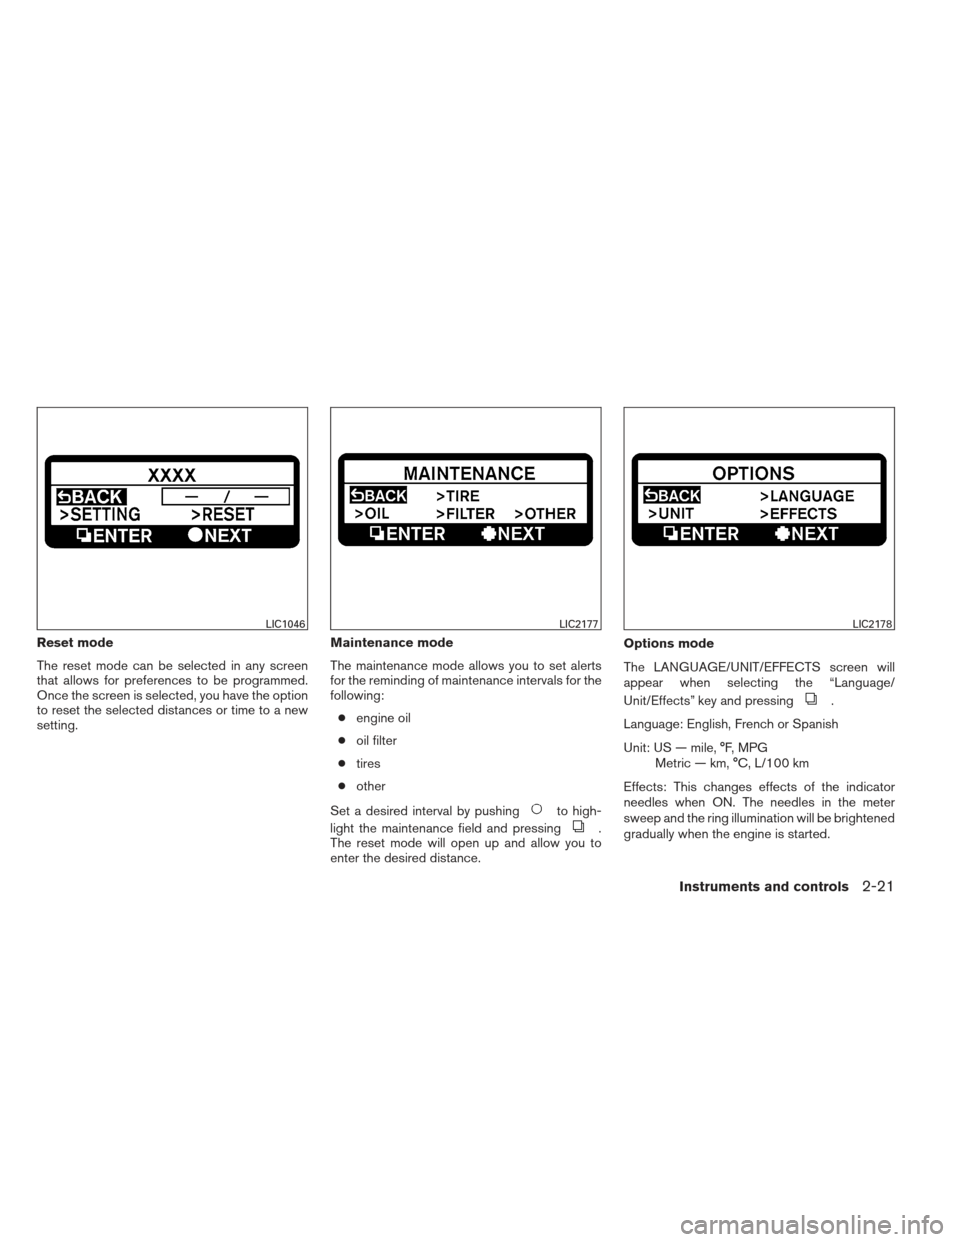
Reset mode
The reset mode can be selected in any screen
that allows for preferences to be programmed.
Once the screen is selected, you have the option
to reset the selected distances or time to a new
setting.Maintenance mode
The maintenance mode allows you to set alerts
for the reminding of maintenance intervals for the
following:
● engine oil
● oil filter
● tires
● other
Set a desired interval by pushing
to high-
light the maintenance field and pressing
.
The reset mode will open up and allow you to
enter the desired distance. Options mode
The LANGUAGE/UNIT/EFFECTS screen will
appear when selecting the “Language/
Unit/Effects” key and pressing
.
Language: English, French or Spanish
Unit: US — mile, °F, MPG Metric — km, °C, L/100 km
Effects: This changes effects of the indicator
needles when ON. The needles in the meter
sweep and the ring illumination will be brightened
gradually when the engine is started.
LIC1046LIC2177LIC2178
Instruments and controls2-21
Page 167 of 444
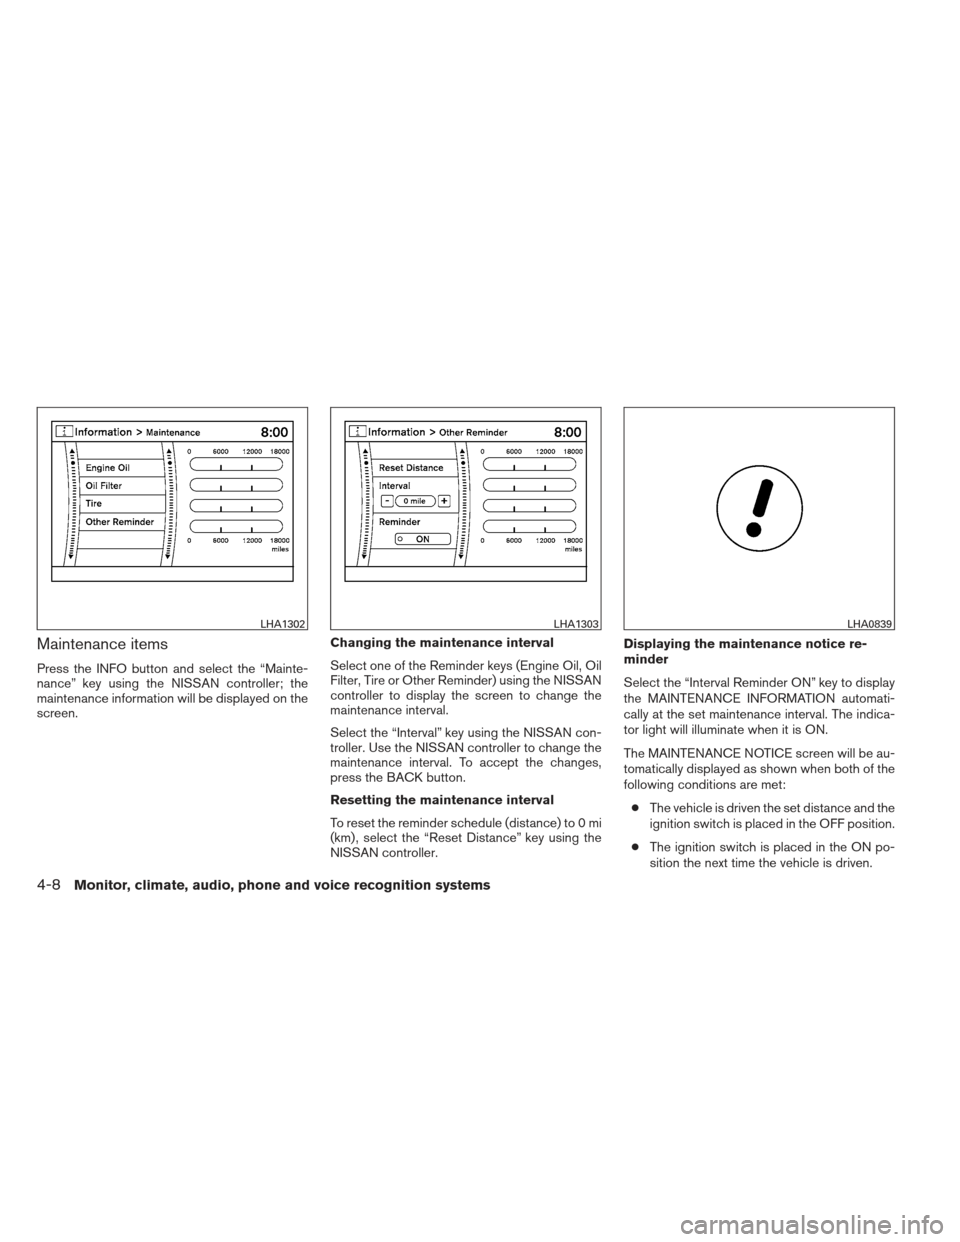
Maintenance items
Press the INFO button and select the “Mainte-
nance” key using the NISSAN controller; the
maintenance information will be displayed on the
screen.Changing the maintenance interval
Select one of the Reminder keys (Engine Oil, Oil
Filter, Tire or Other Reminder) using the NISSAN
controller to display the screen to change the
maintenance interval.
Select the “Interval” key using the NISSAN con-
troller. Use the NISSAN controller to change the
maintenance interval. To accept the changes,
press the BACK button.
Resetting the maintenance interval
To reset the reminder schedule (distance) to 0 mi
(km) , select the “Reset Distance” key using the
NISSAN controller.Displaying the maintenance notice re-
minder
Select the “Interval Reminder ON” key to display
the MAINTENANCE INFORMATION automati-
cally at the set maintenance interval. The indica-
tor light will illuminate when it is ON.
The MAINTENANCE NOTICE screen will be au-
tomatically displayed as shown when both of the
following conditions are met:
● The vehicle is driven the set distance and the
ignition switch is placed in the OFF position.
● The ignition switch is placed in the ON po-
sition the next time the vehicle is driven.
LHA1302LHA1303LHA0839
4-8Monitor, climate, audio, phone and voice recognition systems
Page 181 of 444
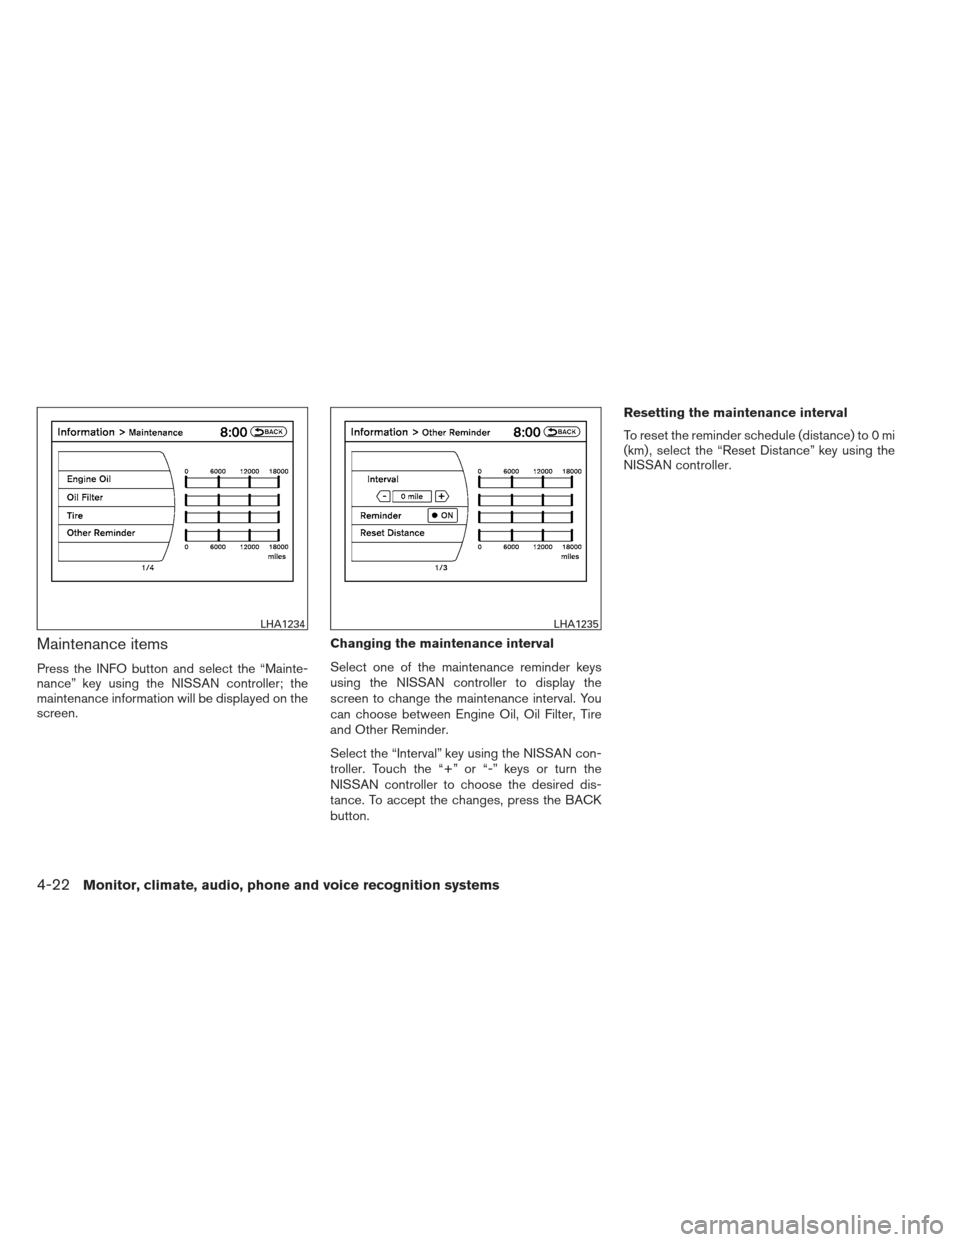
Maintenance items
Press the INFO button and select the “Mainte-
nance” key using the NISSAN controller; the
maintenance information will be displayed on the
screen.Changing the maintenance interval
Select one of the maintenance reminder keys
using the NISSAN controller to display the
screen to change the maintenance interval. You
can choose between Engine Oil, Oil Filter, Tire
and Other Reminder.
Select the “Interval” key using the NISSAN con-
troller. Touch the “+” or “-” keys or turn the
NISSAN controller to choose the desired dis-
tance. To accept the changes, press the BACK
button.Resetting the maintenance interval
To reset the reminder schedule (distance) to 0 mi
(km) , select the “Reset Distance” key using the
NISSAN controller.
LHA1234LHA1235
4-22Monitor, climate, audio, phone and voice recognition systems
Page 206 of 444
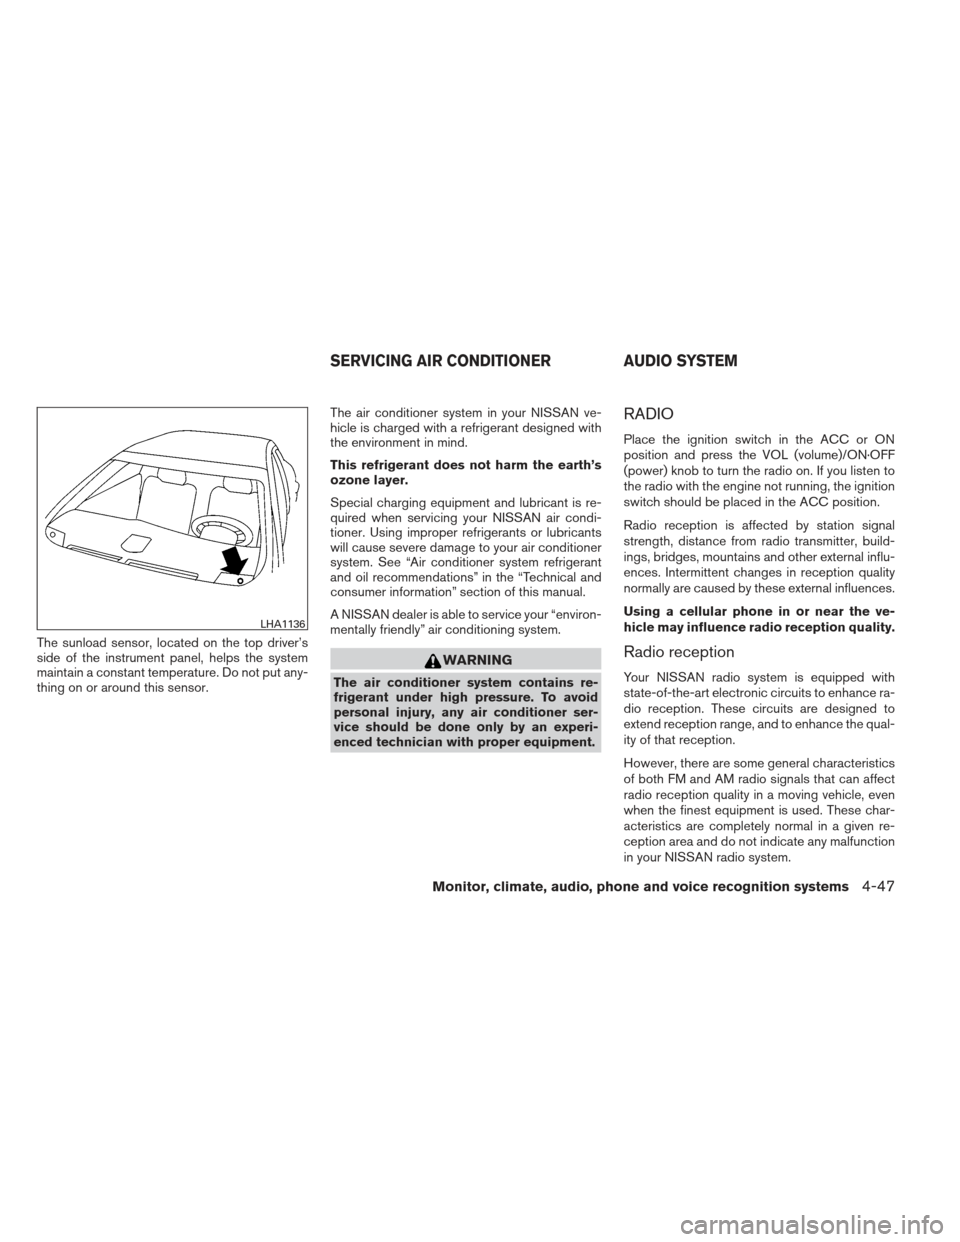
The sunload sensor, located on the top driver’s
side of the instrument panel, helps the system
maintain a constant temperature. Do not put any-
thing on or around this sensor.The air conditioner system in your NISSAN ve-
hicle is charged with a refrigerant designed with
the environment in mind.
This refrigerant does not harm the earth’s
ozone layer.
Special charging equipment and lubricant is re-
quired when servicing your NISSAN air condi-
tioner. Using improper refrigerants or lubricants
will cause severe damage to your air conditioner
system. See “Air conditioner system refrigerant
and oil recommendations” in the “Technical and
consumer information” section of this manual.
A NISSAN dealer is able to service your “environ-
mentally friendly” air conditioning system.
WARNING
The air conditioner system contains re-
frigerant under high pressure. To avoid
personal injury, any air conditioner ser-
vice should be done only by an experi-
enced technician with proper equipment.
RADIO
Place the ignition switch in the ACC or ON
position and press the VOL (volume)/ON·OFF
(power) knob to turn the radio on. If you listen to
the radio with the engine not running, the ignition
switch should be placed in the ACC position.
Radio reception is affected by station signal
strength, distance from radio transmitter, build-
ings, bridges, mountains and other external influ-
ences. Intermittent changes in reception quality
normally are caused by these external influences.
Using a cellular phone in or near the ve-
hicle may influence radio reception quality.
Radio reception
Your NISSAN radio system is equipped with
state-of-the-art electronic circuits to enhance ra-
dio reception. These circuits are designed to
extend reception range, and to enhance the qual-
ity of that reception.
However, there are some general characteristics
of both FM and AM radio signals that can affect
radio reception quality in a moving vehicle, even
when the finest equipment is used. These char-
acteristics are completely normal in a given re-
ception area and do not indicate any malfunction
in your NISSAN radio system.
LHA1136
SERVICING AIR CONDITIONER AUDIO SYSTEM
Monitor, climate, audio, phone and voice recognition systems4-47