2013 NISSAN LEAF turn signal
[x] Cancel search: turn signalPage 136 of 275

4-2Audio system
RADIO
Push the power switch to the "ACC" or "ON"
position and push the radio band select button
to turn on the radio. If you listen to the radio with
the READY to drive indicator light is OFF, the
power switch should be pushed to the "ACC"
position.
Radio reception is affected by station signal
strength, distance from radio transmitter, build-
ings, bridges, mountains and other external
influences. Intermittent changes in reception
quality normally are caused by these external
influences.
Using a cellular phone in or near the
vehicle may influence radio reception
quality.
Radio reception
Your NISSAN radio system is equipped with
state-of-the-art electronic circuits to enhance
radio reception. These circuits are designed to
extend reception range, and to enhance the
quality of that reception.
However there are some general characteristics
of both FM and AM radio signals that can affect
radio reception quality in a moving vehicle, even
when the finest equipment is used. These
characteristics are completely normal in a given
reception area, and do not indicate any mal-function in your NISSAN radio system.
Reception conditions will constantly change
because of vehicle movement. Buildings, terrain,
signal distance and interference from other
vehicles can work against ideal reception.
Described below are some of the factors that
can affect your radio reception.
Some cellular phones or other devices may
cause interference or a buzzing noise to come
from the audio system speakers. Storing the
device in a different location may reduce or
eliminate the noise.
While charging the vehicle, radio programs may
not be tuned in to because the reception of the
radio becomes weak.
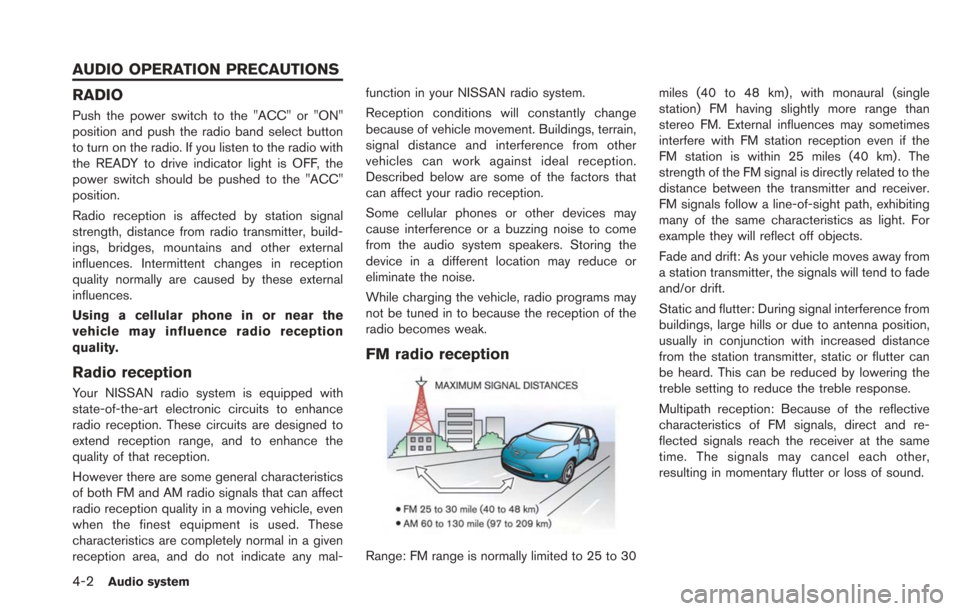
FM radio reception
Range: FM range is normally limited to 25 to 30
miles (40 to 48 km) , with monaural (single
station) FM having slightly more range than
stereo FM. External influences may sometimes
interfere with FM station reception even if the
FM station is within 25 miles (40 km). The
strength of the FM signal is directly related to the
distance between the transmitter and receiver.
FM signals follow a line-of-sight path, exhibiting
many of the same characteristics as light. For
example they will reflect off objects.
Fade and drift: As your vehicle moves away from
a station transmitter, the signals will tend to fade
and/or drift.
Static and flutter: During signal interference from
buildings, large hills or due to antenna position,
usually in conjunction with increased distance
from the station transmitter, static or flutter can
be heard. This can be reduced by lowering the
treble setting to reduce the treble response.
Multipath reception: Because of the reflective
characteristics of FM signals, direct and re-
flected signals reach the receiver at the same
time. The signals may cancel each other,
resulting in momentary flutter or loss of sound.
AUDIO OPERATION PRECAUTIONS
Page 146 of 275
![NISSAN LEAF 2013 1.G Navigation Manual 4-12Audio system
*2 The Pandora®is only available in U.S.
Audio settings
It is possible to adjust the speaker tone quality
and sound balance.
1. Push theMENUbutton and touch [Set-
tings].
2. Touch [A NISSAN LEAF 2013 1.G Navigation Manual 4-12Audio system
*2 The Pandora®is only available in U.S.
Audio settings
It is possible to adjust the speaker tone quality
and sound balance.
1. Push theMENUbutton and touch [Set-
tings].
2. Touch [A](/manual-img/5/324/w960_324-145.png)
4-12Audio system
*2 The Pandora®is only available in U.S.
Audio settings
It is possible to adjust the speaker tone quality
and sound balance.
1. Push theMENUbutton and touch [Set-
tings].
2. Touch [Audio].
3. Touch the item you would like to adjust.
Available settings
. [Bass]:
Adjust the tone quality of the bass by
touching [+] or [-].
. [Treble]:
Adjust the tone quality of the treble by
touching [+] or [-].
. [Balance]:
Adjust the sound level between the left and
right speakers by touching [L] or [R]. .
[Fade]:
Adjust the sound level between the front and
rear speakers by touching [R] or [F].
. [Speed Sensitive Vol.]:
The sound volume is increased based on the
vehicle speed. Touch [+] or [-] to adjust the
effect level from 0 (OFF) to 3.
FM-AM-SAT RADIO OPERATION
When the FM·AMbutton or the XMbutton is
pushed while the power switch is in the "ACC"
or "ON" position, the radio will turn on at the
channel last played.
The last channel played will also turn on when
the
button is pushed to ON. The satellite
radio is not available in Alaska, Hawaii and
Guam.
If another audio source is playing when the
FM·AM button or the XMbutton is turned to
ON, the audio source will automatically be
turned off and the last radio channel played will
turn on.
When the stereo broadcast signal is weak, the
radio will automatically change from stereo to
monaural reception.
The satellite radio mode requires an active
SiriusXM Satellite Radio subscription. The sa-
tellite radio is not available in Alaska, Hawaii and
Guam. It may take some time to receive the activation
signal after subscribing the SiriusXM Satellite
Radio. After receiving the activation signal, an
available channel list will be automatically
updated in the radio. Push the power switch
from LOCK to ACC to update the channel list.
Selecting FM/AM/SAT radio band
FM/AM radio band select:
Pushing the
FM·AMbutton will change the
band as follows:
AM ?FM1 ?FM2 ?AM
SiriusXM Satellite Radio band select:
Pushing the XMbutton will change the band as
follows:
XM1 ?XM2 ?XM3 ?XM1
How to view radio screen
Page 223 of 275

The side-of-vehicle line*2shows the vehicle
width including the outside mirror.
The extensions
*3of both the front*1and
side
*2lines are shown with a green dotted
line.
CAUTION
. Do not scratch the lens when clean-
ing dirt or snow from the front of the
camera.
. The turn signal light may overlap
with the side-of-vehicle line. This is
not a malfunction.
DIFFERENCE BETWEEN PREDIC-
TIVE AND ACTUAL DISTANCES
The distance guide line and the vehicle width
guide line on the front and the rear view should
be used as a reference only when the vehicle is
on a level, paved surface. The distance viewed
on the monitor is for reference only and may be
different than the actual distance between the
vehicle and displayed objects.
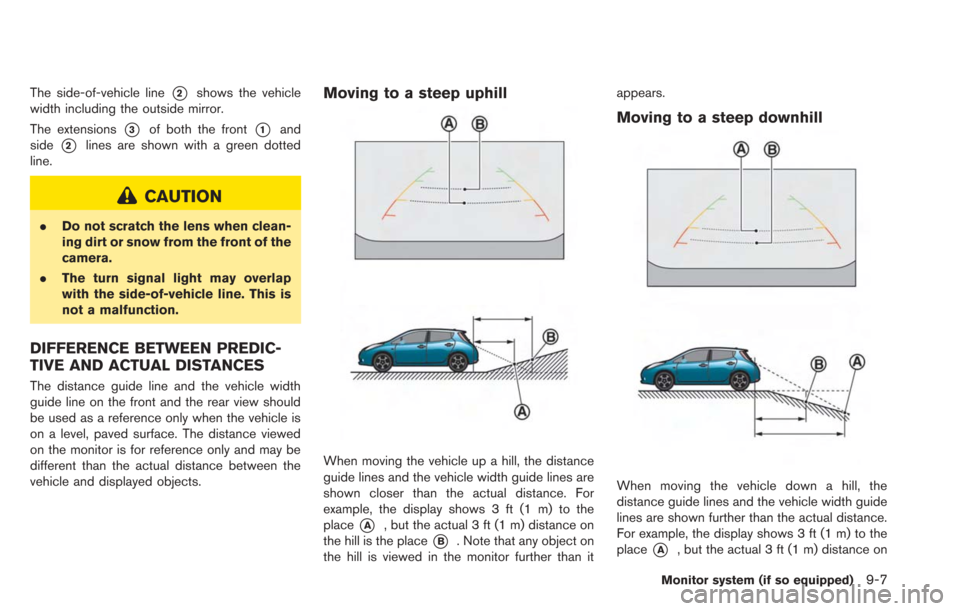
Moving to a steep uphill
When moving the vehicle up a hill, the distance
guide lines and the vehicle width guide lines are
shown closer than the actual distance. For
example, the display shows 3 ft (1 m) to the
place
*A, but the actual 3 ft (1 m) distance on
the hill is the place
*B. Note that any object on
the hill is viewed in the monitor further than it appears.
Moving to a steep downhill
When moving the vehicle down a hill, the
distance guide lines and the vehicle width guide
lines are shown further than the actual distance.
For example, the display shows 3 ft (1 m) to the
place
*A, but the actual 3 ft (1 m) distance on
Monitor system (if so equipped)9-7
Page 236 of 275

10-10Troubleshooting guide/General system information
Vehicle icon
SymptomPossible cause Possible solution
Names of roads and locations differ between
Plan View and Birdview
TM. This is because the quantity of the displayed information is reduced
so that the screen does not become too cluttered. There is also a
chance that names of the roads or locations may be displayed
multiple times, and the names appearing on the screen may be
different because of a processing procedure. This is not a malfunction.
The vehicle icon is not displayed in the correct
position. The vehicle was transported after the power switch was pushed off,
for example, by a ferry or car transporter. Drive the vehicle for a period of time on a road where
GPS signals can be received.
The position and direction of the vehicle icon may be incorrect
depending on the driving environments and the levels of positioning
accuracy of the navigation system. This is not a malfunction. Drive the vehicle for a
period of time to automatically correct the position
and direction of the vehicle icon.
“Current vehicle location” (page 10-28)
When the vehicle is traveling on a new road,
the vehicle icon is located on another road
nearby. Because the new road is not stored in the map data, the system
automatically places the vehicle icon on the nearest road available.
Updated road information will be included in the next
version of the map data.
The screen does not switch to the night screen
even after turning on the headlights. The daytime screen was set the last time the headlights were turned
on. Set the screen to the night screen mode using the
button when turning on the headlights.“Display adjustment” (page 1-14)
The map does not scroll even when the vehicle
is moving. The current location map screen is not displayed.
Push theMAPbutton.
The vehicle icon is not displayed. The current location map screen is not displayed. Push the MAPbutton.
The GPS indicator on the screen remains gray. GPS signals cannot be received under certain conditions, such as in a parking garage, on a road with many tall buildings, etc. Drive on an open, straight road for a period of time.
GPS signals cannot be received because objects are placed on the
instrument panel. Remove the objects from the instrument panel.
A sufficient number of GPS satellites is not available. Wait for the satellites to move to locations available for the navigation system.
Page 255 of 275

*In a canyon
INFO:
The GPS antenna is located on the instrument
panel inside the vehicle. Do not place any
objects, especially cellular phones or transcei-
vers, on the instrument panel. Because the
strength of the GPS signal is approximately one
billionth of that of TV waves, phones and
transceivers will affect or may totally disrupt
the signal.
Display of GPS information:
GPS information can be displayed.
“Viewing GPS current location informa-
tion” (page 6-11)
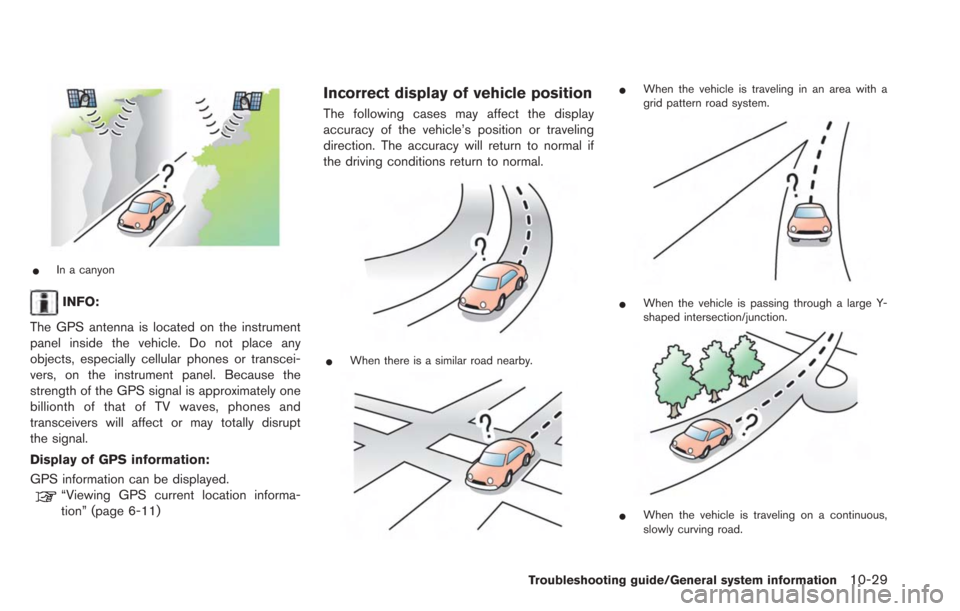
Incorrect display of vehicle position
The following cases may affect the display
accuracy of the vehicle’s position or traveling
direction. The accuracy will return to normal if
the driving conditions return to normal.
*When there is a similar road nearby.
*When the vehicle is traveling in an area with a
grid pattern road system.
*When the vehicle is passing through a large Y-
shaped intersection/junction.
*When the vehicle is traveling on a continuous,
slowly curving road.
Troubleshooting guide/General system information10-29