Page 2 of 24
*See your Owner’s Manual and Multi Function Display Owner’s Manual\
for information.
INSTRUMENT BRIGHTNESS CONTROL*
NEXT / ENTER SWITCHES
DRIVE COMPUTER
OUTSIDE MIRROR CONTROL SWITCH
HEADLIGHT AND TURN SIGNAL CONTROLPADDLE SHIFTERS*
VEHICLE INFORMATION DISPLAY*
LOW TIRE PRESSURE WARNING LIGHT
WINDSHIELD WIPER / WASHER SWITCH
STEERING WHEEL SWITCHES FOR AUDIO
CONTROL* / BLUETOOTH
® / NAVIGATIONCRUISE CONTROL
TRUNK RELEASE
INTELLIGENT KEY PORT
HOOD RELEASE*
STEERING WHEEL TILT AND TELESCOPIC
ADJUSTMENT*
MULTI FUNCTION DISPLAY
AU D I O SYSTE M
AUTOMATIC CLIMATE CONTROLS
VDC, TRANSMISSION AND
SUSPENSION SETUP SWITCHES*
FRONT PASSENGER AIR BAG
STATUS LIGHT*
0102030504
06
11
16
0709
12
17181920
0810
131415
01
02
03
04
05
09
06
06
12
07
08
14
15
161718
19
20
13
10
11
Page 6 of 24

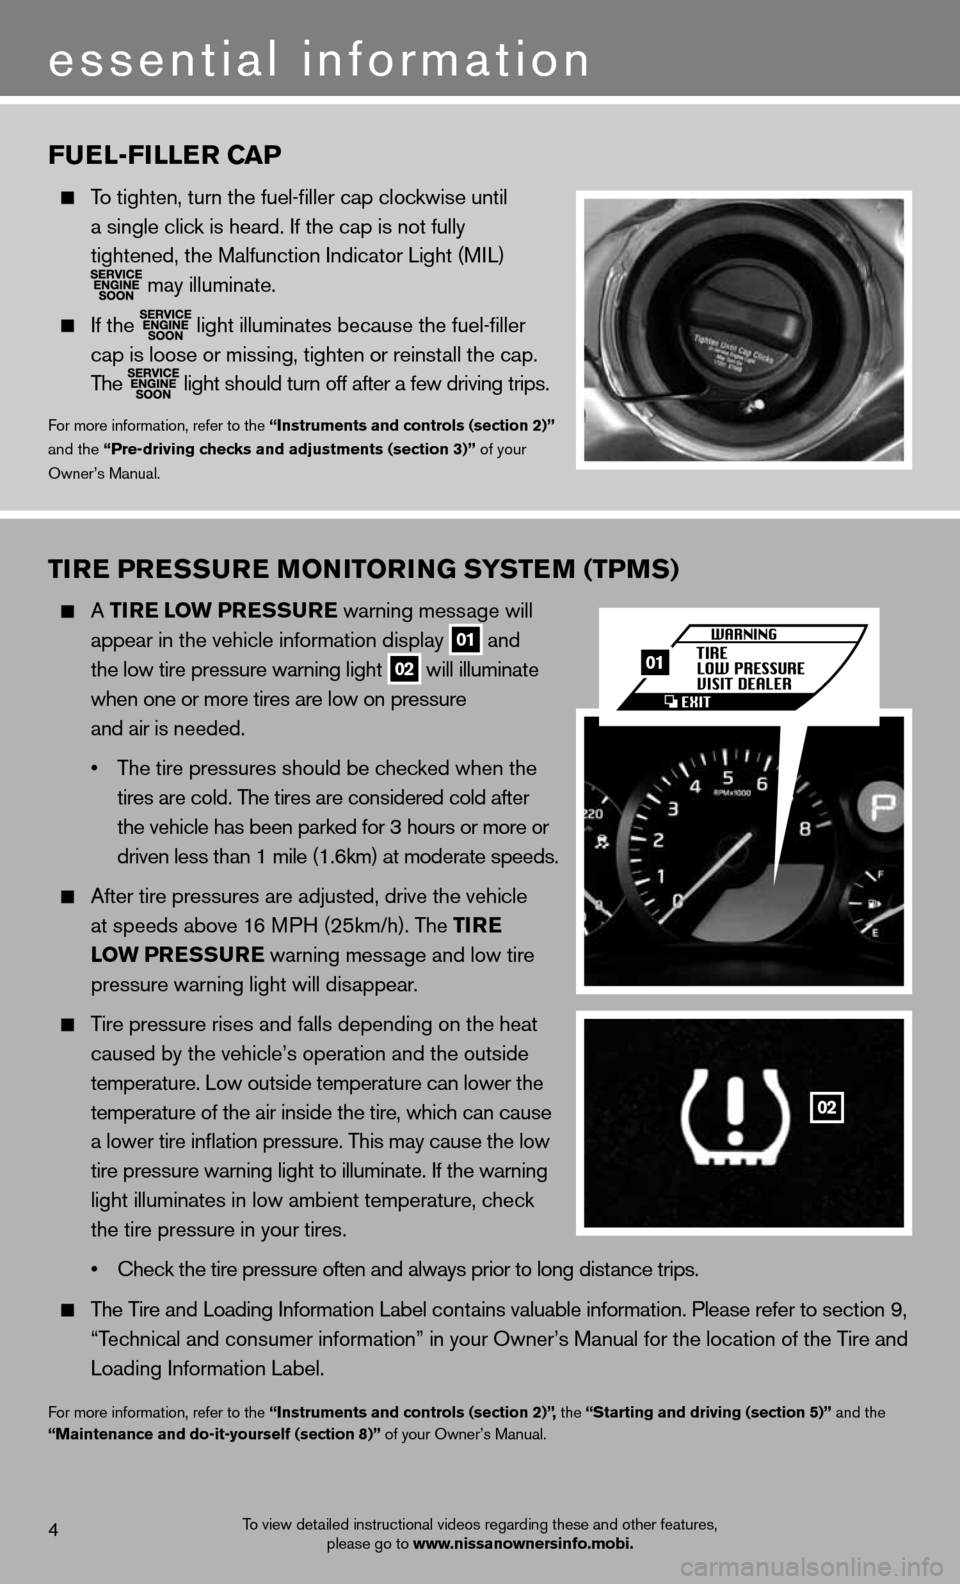
Tire PreSSure M oNiTori NG SYSTe M (TPMS)
A Tire l ow PreSS ure warning message will
appear in the vehicle information display
01 and
the low tire pressure warning light 02 will illuminate
when one or more tires are low on pressure
and air is needed.
• The tire pressures should be checked when the
tires are cold. The tires are considered cold after
the vehicle has been parked for 3 hours or more or
driven less than 1 mile (1.6km) at moderate speeds.
After tire pressures are adjusted, drive the vehicle
at speeds above 16 MPH (25km/h). The T ire
low PreSS ure warning message and low tire
pressure warning light will disappear.
Tire pressure rises and falls depending on the heat
caused by the vehicle’s operation and the outside
temperature. Low outside temperature can lower the
temperature of the air inside the tire, which can cause
a lower tire inflation pressure. This may cause the low
tire pressure warning light to illuminate. If the warning
light illuminates in low ambient temperature, check
the tire pressure in your tires.
• Check the tire pressure often and always prior to long distance trips.
The Tire and Loading Information Label contains valuable information. Please refer to section 9,
“Technical and consumer information” in your Owner’s Manual for the lo\
cation of the Tire and
Loading Information Label.
For more information, refer to the “instruments and controls (section 2)”, the “Starting and driving (section 5)” and the
“Maintenance and do-it-yourself (section 8)” of your Owner’s Manual.
Fuel-Filler caP
To tighten, turn the fuel-filler cap clockwise until
a single click is heard. If the cap is not fully
tightened, the Malfunction Indicator Light (MIL)
may illuminate.
If the
light illuminates because the fuel-filler
cap is loose or missing, tighten or reinstall the cap.
The
light should turn off after a few driving trips.
For more information, refer to the “instruments and controls (section 2)”
and the “Pre-driving checks and adjustments (section 3)” of your
Owner’s Manual.
4
essential information
To view detailed instructional videos regarding these and other features, please go to www.nissanownersinfo.mobi.
02
01
Page 8 of 24

NiSSaN i NTelliGeNT K eY® SYST eM
The NISSAN Intelligent Key® system allows you to lock or
unlock the vehicle, open the trunk and start the engine.
NOTE: It is important to make sure the Intelligent Key is
with you (that is, in your pocket or purse).
The operating range of the Intelligent Key is within
31.5 in (80 cm) from each request switch.
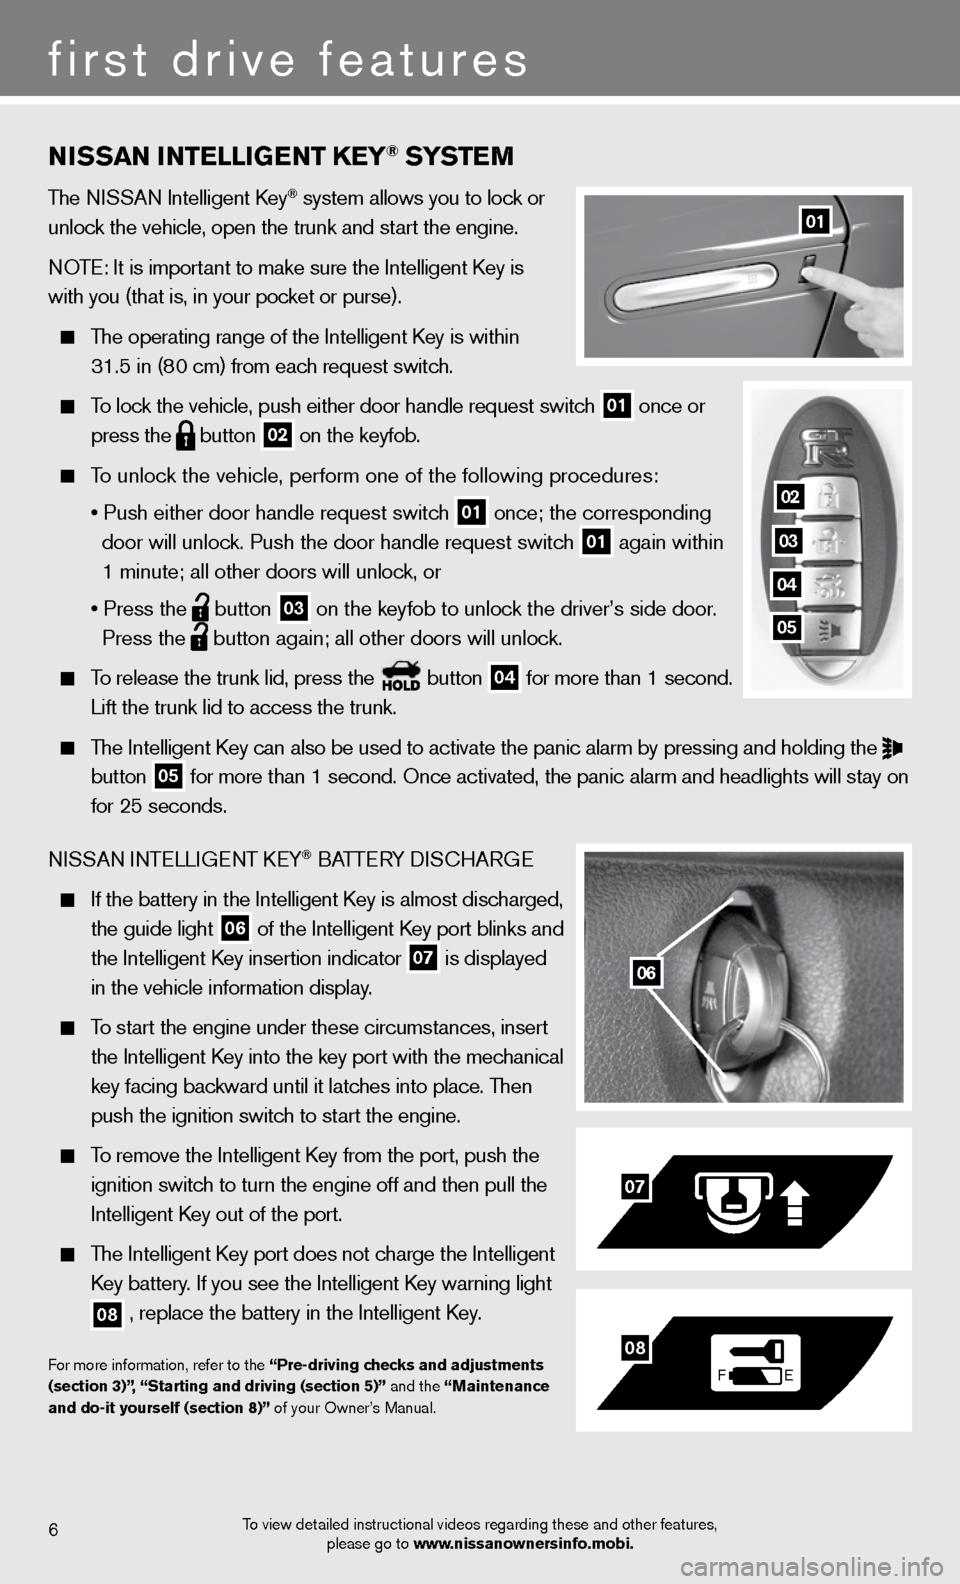
To lock the vehicle, push either door handle request switch
01 once or
press the
button
02 on the keyfob.
To unlock the vehicle, perform one of the following procedures:
• Push either door handle request switch
01 once; the corresponding
door will unlock. Push the door handle request switch
01 again within
1 minute; all other doors will unlock, or
• Press the
button
03 on the keyfob to unlock the driver’s side door.
Press the
button again; all other doors will unlock.
To release the trunk lid, press the button
04 for more than 1 second.
Lift the trunk lid to access the trunk.
The Intelligent Key can also be used to activate the panic alarm by pressing and holding \
the
button
05 for more than 1 second. Once activated, the panic alarm and headlights w\
ill stay on
for 25 seconds.
NISSAN INTELLIGENT KEY
® BATTERY DISCHARGE
If the battery in the Intelligent Key is almost discharged,
the guide light
06 of the Intelligent Key port blinks and
the Intelligent Key insertion indicator
07 is displayed
in the vehicle information display.
To start the engine under these circumstances, insert
the Intelligent Key into the key port with the mechanical
key facing backward until it latches into place. Then
push the ignition switch to start the engine.
To remove the Intelligent Key from the port, push the
ignition switch to turn the engine off and then pull the
Intelligent Key out of the port.
The Intelligent Key port does not charge the Intelligent
Key battery. If you see the Intelligent Key warning light
08 , replace the battery in the Intelligent Key.
For more information, refer to the “Pre-driving checks and adjustments
(section 3)”, “Starting and driving (section 5)” and the “Maintenance
and do-it yourself (section 8)” of your Owner’s Manual.
06
F
E
07
08
6
first drive features
01
To view detailed instructional videos regarding these and other features,
please go to www.nissanownersinfo.mobi.
02
03
04
05