2013 NISSAN GT-R instrument panel
[x] Cancel search: instrument panelPage 9 of 24
TruNK li D releaS e
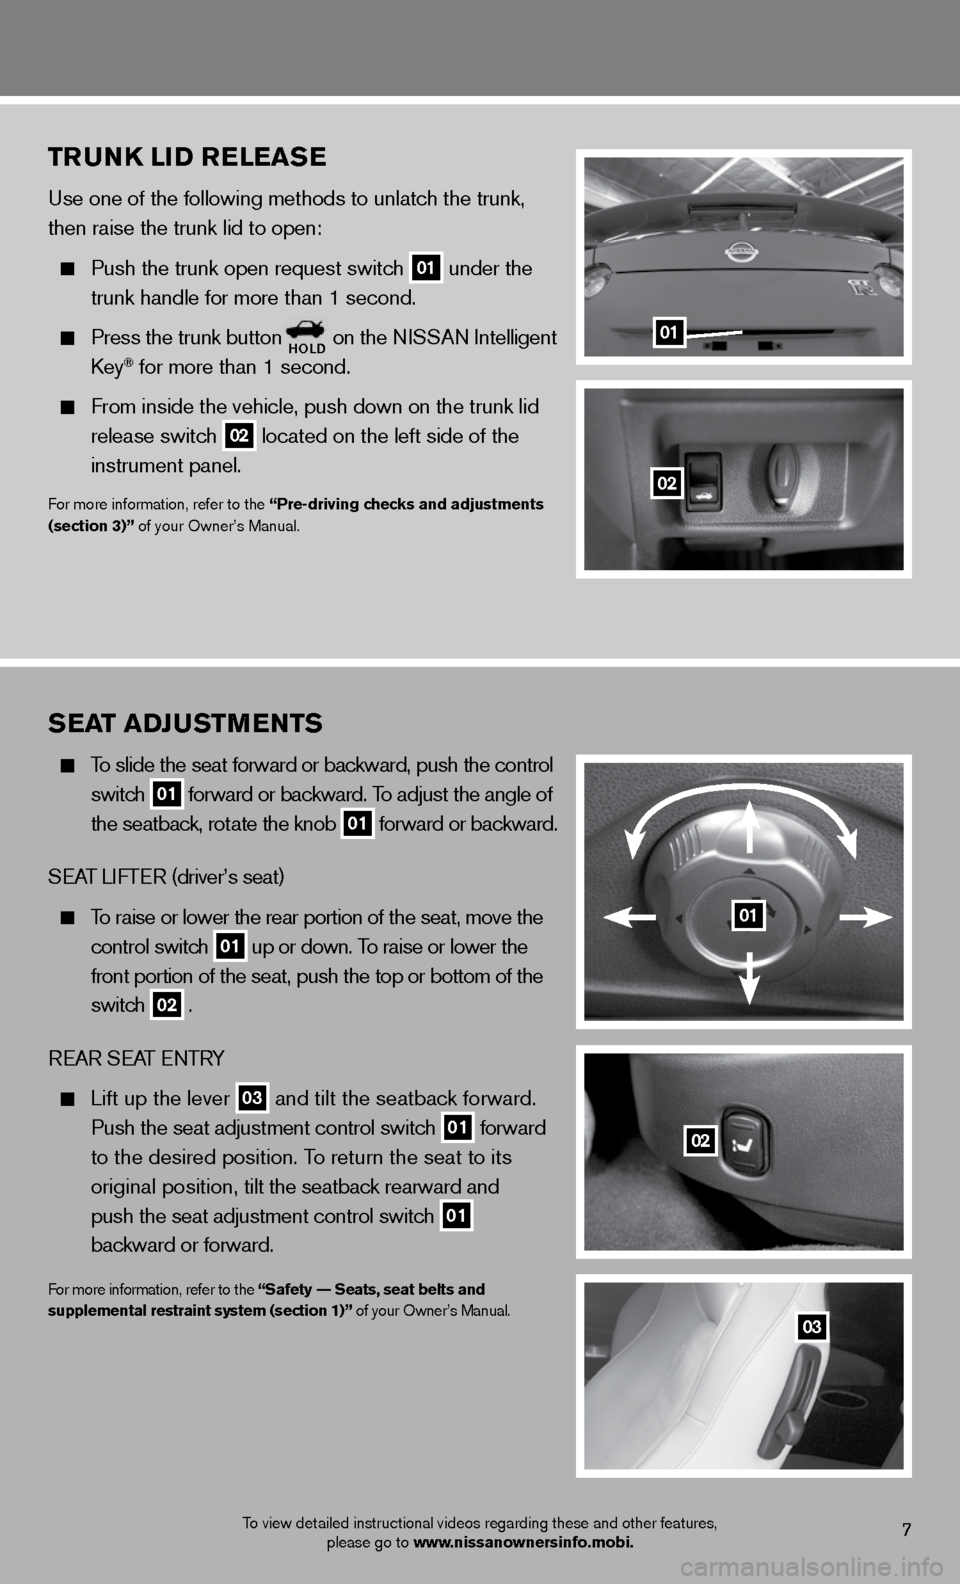
Use one of the following methods to unlatch the trunk,
then raise the trunk lid to open:
Push the trunk open request switch
01 under the
trunk handle for more than 1 second.
Press the trunk buttonholD on the NISSAN Intelligent
Key® for more than 1 second.
From inside the vehicle, push down on the trunk lid
release switch
02 located on the left side of the
instrument panel.
For more information, refer to the “Pre-driving checks and adjustments
(section 3)” of your Owner’s Manual.
01
02
7
Sea T aDJ uSTM eNTS
To slide the seat forward or backward, push the control
switch
01 forward or backward. To adjust the angle of
the seatback, rotate the knob
01 forward or backward.
SEAT LIFTER (driver’s seat)
To raise or lower the rear portion of the seat, move the
control switch
01 up or down. To raise or lower the
front portion of the seat, push the top or bottom of the
switch
02 .
REAR SEAT ENTRY
Lift up the lever
03 and tilt the seatback forward.
Push the seat adjustment control switch
01 forward
to the desired position. To return the seat to its
original position, tilt the seatback rearward and
push the seat adjustment control switch
01
backward or forward.
For more information, refer to the “Safety –– Seats, seat belts and
supplemental restraint system (section 1)” of your Owner’s Manual.
03
01
02
To view detailed instructional videos regarding these and other features,
please go to www.nissanownersinfo.mobi.
Page 10 of 24
ouTSiD e M irror coNTrol SwiT ch
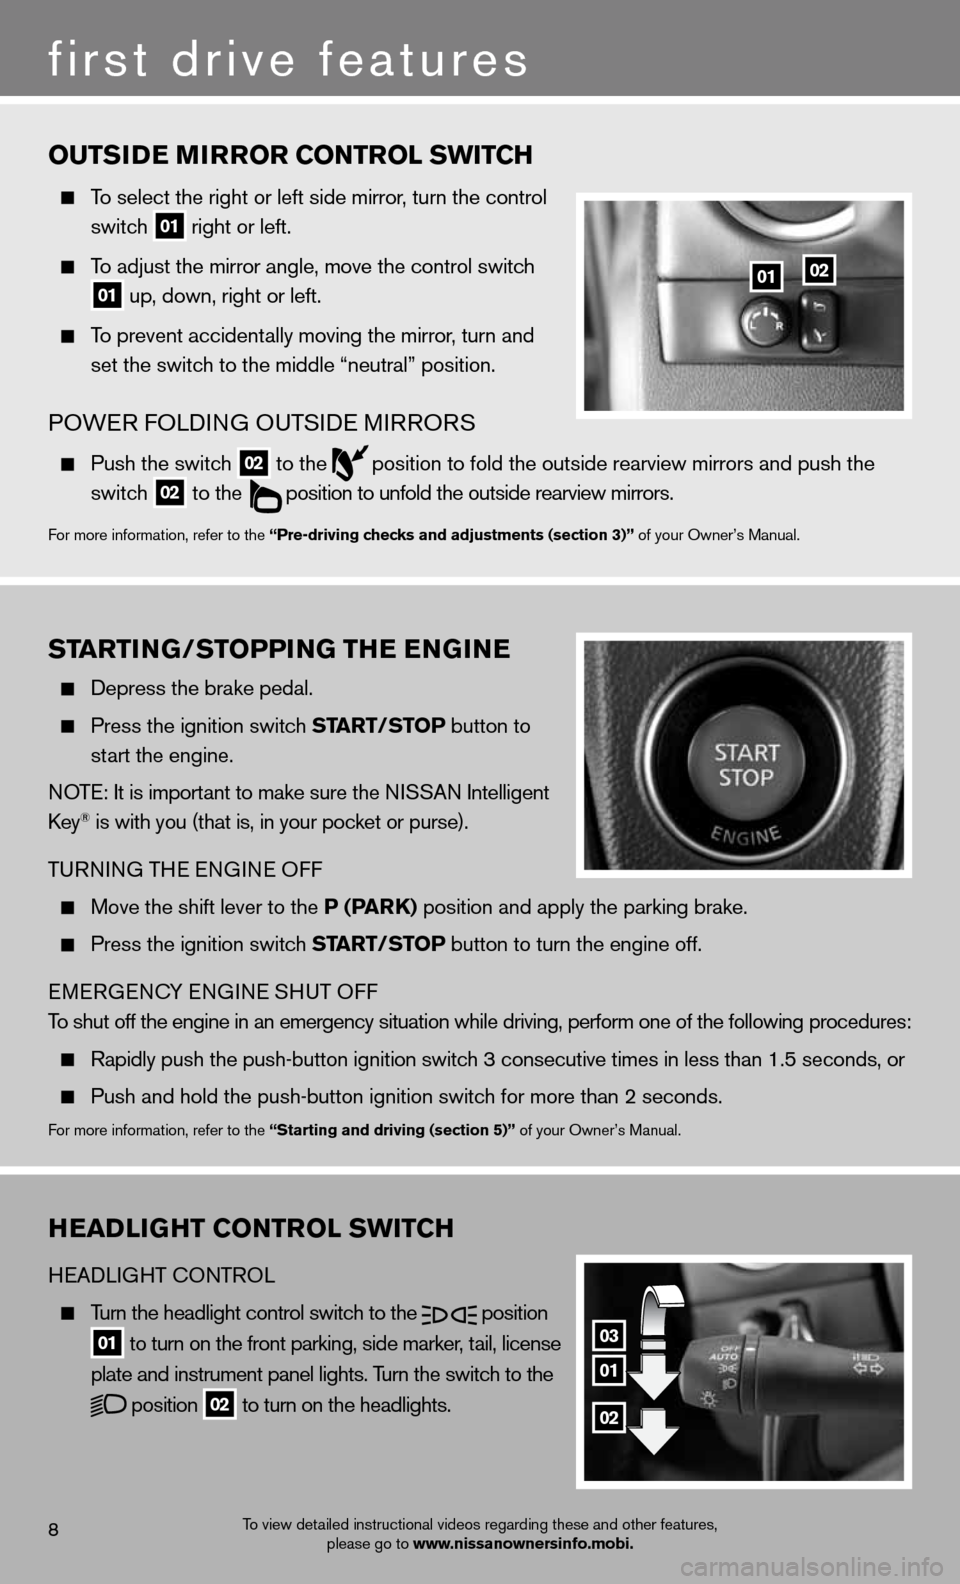
To select the right or left side mirror , turn the control
switch
01 right or left.
To adjust the mirror angle, move the control switch
01 up, down, right or left.
To prevent accidentally moving the mirror, turn and
set the switch to the middle “neutral” position.
POWER FOLDING OUTSIDE MIRRORS
Push the switch
02 to the
position to fold the outside rearview mirrors and push the
switch
02 to the
position to unfold the outside rearview mirrors.
For more information, refer to the “Pre-driving checks and adjustments (section 3)” of your Owner’s Manual.
heaDliGhT coNTrol SwiT ch
HEADLIGHT CONTROL
Turn the headlight control switch to the
position
01 to turn on the front parking, side marker, tail, license
plate and instrument panel lights. Turn the switch to the
position
02 to turn on the headlights.
03
01
02
first drive features
8
01
ST arTi NG/ST oPPiNG The e NGiN e
Depress the brake pedal.
Press the ignition switch ST arT/SToP button to
start the engine.
NOTE: It is important to make sure the NISSAN Intelligent
Key
® is with you (that is, in your pocket or purse).
TURNING THE ENGINE OFF
Move the shift lever to the P (P arK) position and apply the parking brake.
Press the ignition switch ST arT/SToP button to turn the engine off.
EMERGENCY ENGINE SHUT OFF
To shut off the engine in an emergency situation while driving, perform o\
ne of the following procedures:
Rapidly push the push-button ignition switch 3 consecutive times in less than 1.5 seconds, or
Push and hold the push-button ignition switch for more than 2 seconds.
For more information, refer to the “Starting and driving (section 5)” of your Owner’s Manual.
02
To view detailed instructional videos regarding these and other features,
please go to www.nissanownersinfo.mobi.
Page 11 of 24
wiNDShielD wiPer/waSher Swi Tch
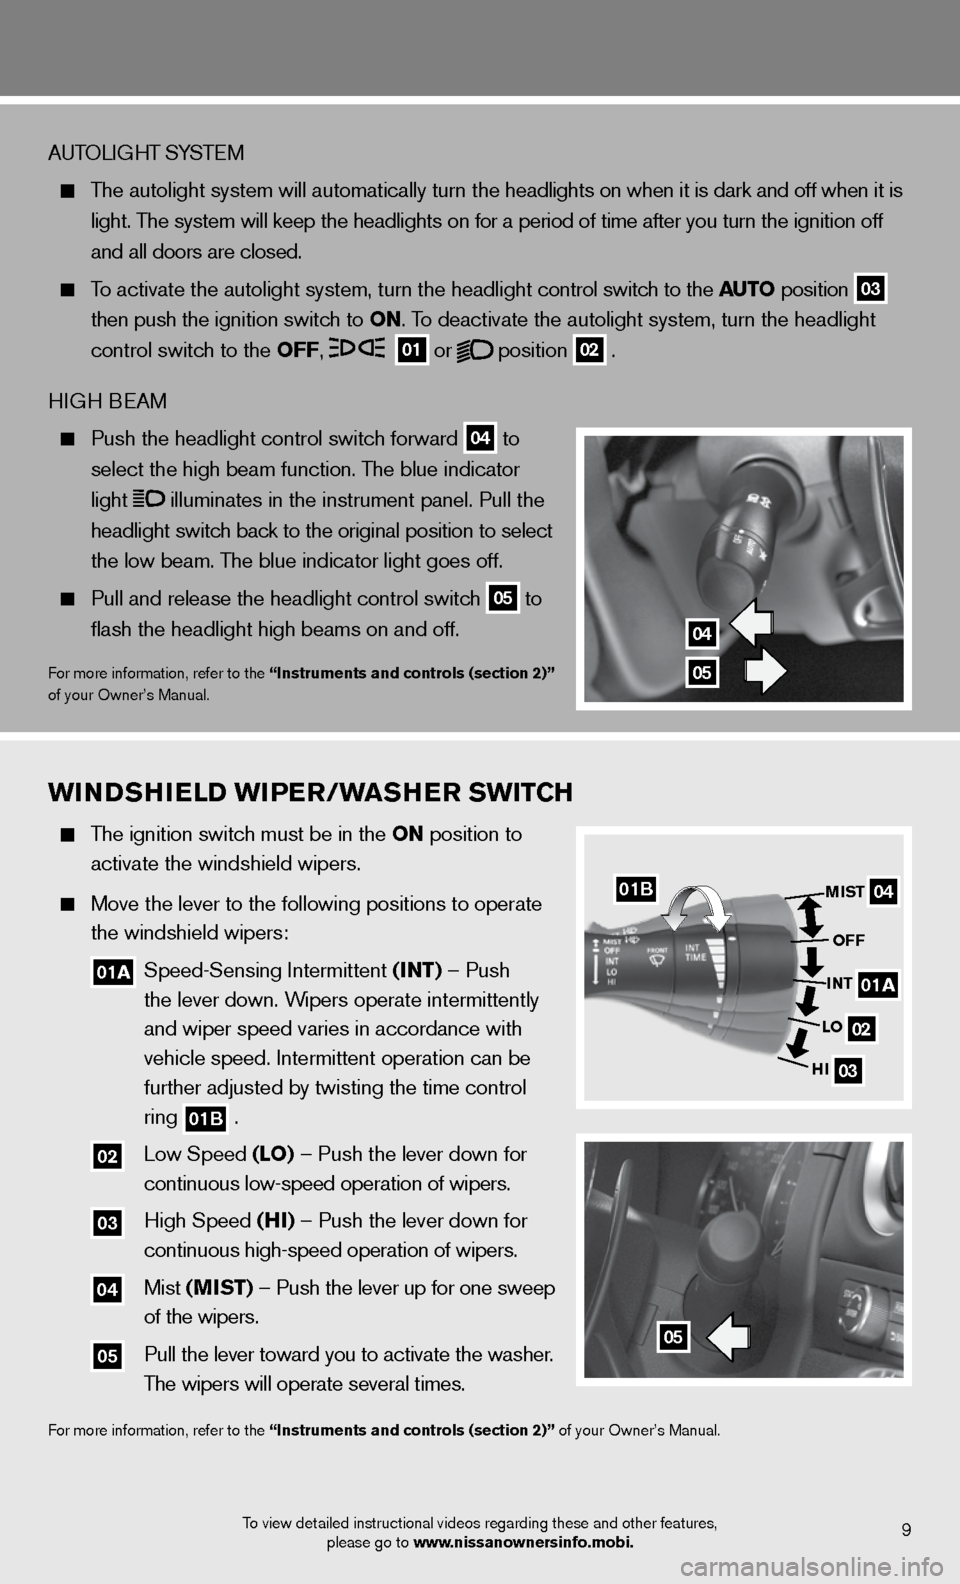
The ignition switch must be in the oN position to
activate the windshield wipers.
Move the lever to the following positions to operate
the windshield wipers:
01a Speed-Sensing Intermittent (i NT) – Push
the lever down. Wipers operate intermittently
and wiper speed varies in accordance with
vehicle speed. Intermittent operation can be
further adjusted by twisting the time control
ring
01B .
02 Low Speed (lo) – Push the lever down for
continuous low-speed operation of wipers.
03 High Speed (hi) – Push the lever down for
continuous high-speed operation of wipers.
04 Mist (MiST) – Push the lever up for one sweep
of the wipers.
05 Pull the lever toward you to activate the washer.
The wipers will operate several times.
For more information, refer to the “instruments and controls (section 2)” of your Owner’s Manual.
9
AUTOLIGHT SYSTEM
The autolight system will automatically turn the headlights on when it is dark and off when it is
light. The system will keep the headlights on for a period of time after you tur\
n the ignition off
and all doors are closed.
To activate the autolight system, turn the headlight control switch to the auTo position
03
then push the ignition switch to
oN. To deactivate the autolight system, turn the headlight
control switch to the oFF,
01 or
position
02 .
HIGH BEAM
Push the headlight control switch forward 04 to
select the high beam function. The blue indicator
light
illuminates in the instrument panel. Pull the
headlight switch back to the original position to select
the low beam. The blue indicator light goes off.
Pull and release the headlight control switch 05 to
flash the headlight high beams on and off.
For more information, refer to the “instruments and controls (section 2)”
of your Owner’s Manual.
04
05
To view detailed instructional videos regarding these and other features,
please go to www.nissanownersinfo.mobi.
04
02
03
MiST
oFF
i NT
lo
hi
05
01a
01B
Page 12 of 24
first drive features
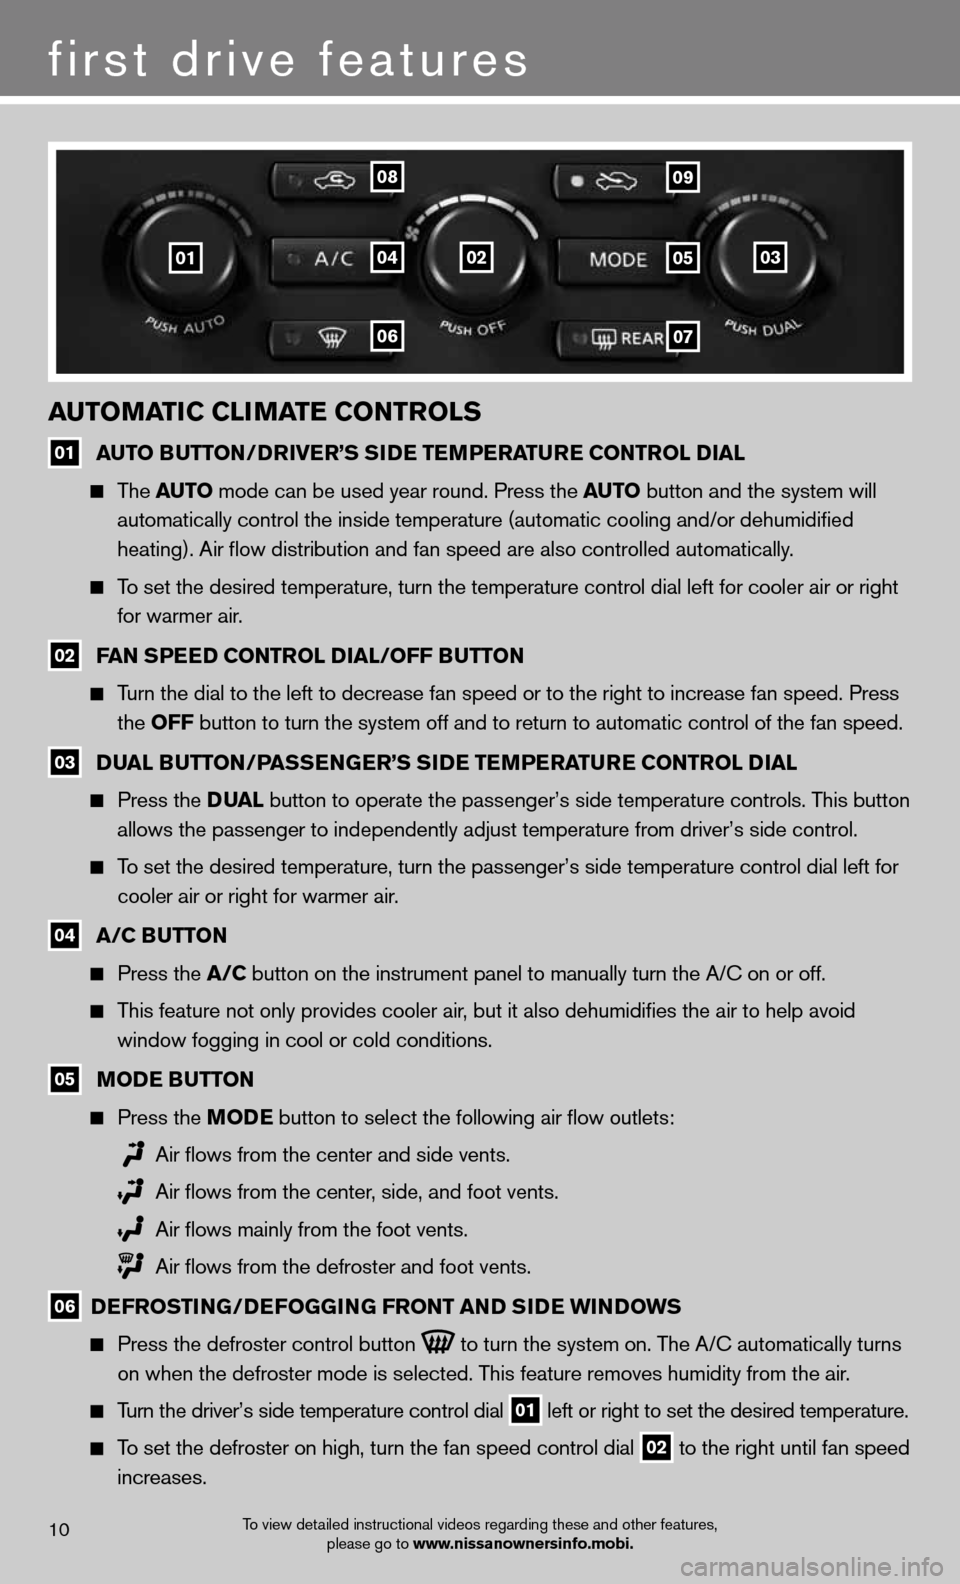
auToMa Tic cli MaTe coNTrolS
01 auT
o BuTT oN/D river’S S iD e Te MPera Ture coNTrol D ial
The auTo mode can be used year round. Press the au To button and the system will
automatically control the inside temperature (automatic cooling and/or \
dehumidified
heating). Air flow distribution and fan speed are also controlled aut\
omatically.
To set the desired temperature, turn the temperature control dial left fo\
r cooler air or right
for warmer air.
02 F
aN SPee D coNTrol D ial/oFF BuTToN
Turn the dial to the left to decrease fan speed or to the right to increa\
se fan speed. Press
the oFF button to turn the system off and to return to automatic control of the\
fan speed.
03 D
ual B uTToN/P aSSeNG er’S S iD e Te MPera Ture coNTrol D ial
Press the D ual button to operate the passenger’s side temperature controls. This button
allows the passenger to independently adjust temperature from driver’\
s side control.
To set the desired temperature, turn the passenger’s side temperature \
control dial left for
cooler air or right for warmer air.
04 a/c B
uTToN
Press the a/c button on the instrument panel to manually turn the A/C on or off.
This feature not only provides cooler air, but it also dehumidifies the air to help avoid
window fogging in cool or cold conditions.
05 M
oD e B uTT oN
Press the M oDe button to select the following air flow outlets:
Air flows from the center and side vents.
Air flows from the center, side, and foot vents.
Air flows mainly from the foot vents.
Air flows from the defroster and foot vents.
06 D
eFroSTi NG/DeFoGG iNG FroNT aND S iD e wi NDowS
Press the defroster control button
to turn the system on. The A/C automatically turns
on when the defroster mode is selected. This feature removes humidity from the air.
Turn the driver’s side temperature control dial
01 left or right to set the desired temperature.
To set the defroster on high, turn the fan speed control dial
02 to the right until fan speed
increases.
010405
0607
0809
0203
To view detailed instructional videos regarding these and other features,
please go to www.nissanownersinfo.mobi.10
Page 15 of 24
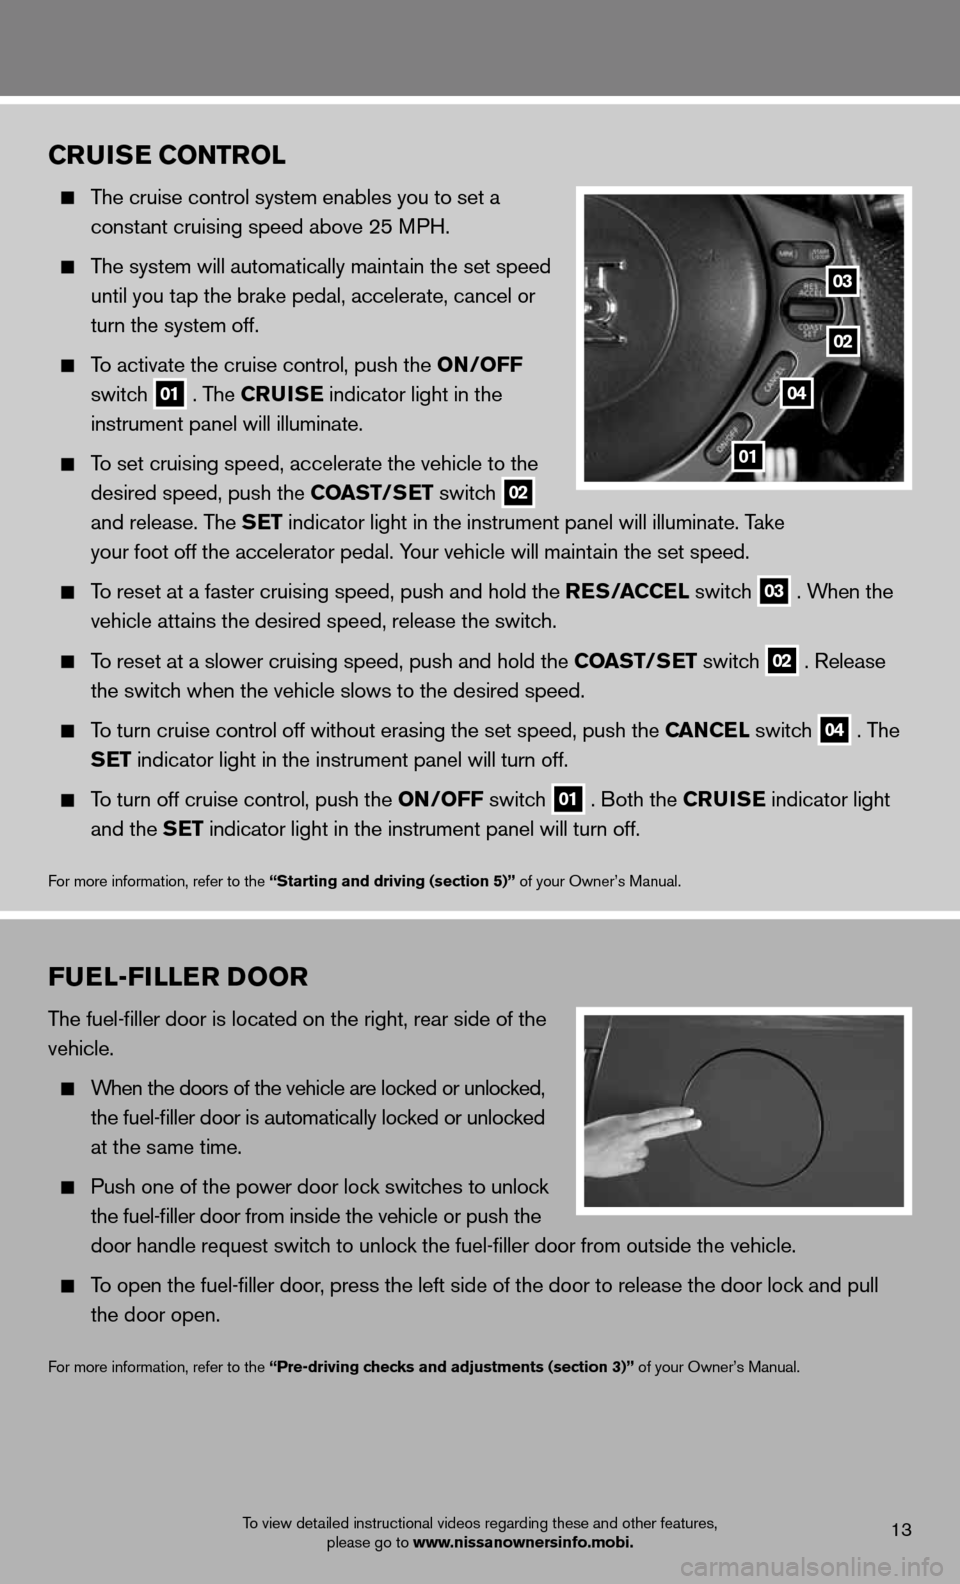
cruiSe coNTrol
The cruise control system enables you to set a
constant cruising speed above 25 MPH.
The system will automatically maintain the set speed
until you tap the brake pedal, accelerate, cancel or
turn the system off.
To activate the cruise control, push the oN/oFF
switch
01 . The cruiSe
indicator light in the
instrument panel will illuminate.
To set cruising speed, accelerate the vehicle to the
desired speed, push the coaST/S eT switch
02
and release. The S
eT indicator light in the instrument panel will illuminate. Take
your foot off the accelerator pedal. Your vehicle will maintain the set speed.
To reset at a faster cruising speed, push and hold the reS/ accel switch
03 . When the
vehicle attains the desired speed, release the switch.
To reset at a slower cruising speed, push and hold the coaST/S eT switch
02 . Release
the switch when the vehicle slows to the desired speed.
To turn cruise control off without erasing the set speed, push the caN cel switch
04 . The
SeT indicator light in the instrument panel will turn off.
To turn off cruise control, push the oN/oFF switch
01 . Both the cruiSe
indicator light
and the S eT indicator light in the instrument panel will turn off.
For more information, refer to the “Starting and driving (section 5)” of your Owner’s Manual.
01
02
03
04
To view detailed instructional videos regarding these and other features,
please go to www.nissanownersinfo.mobi.13
Fuel-Filler D oor
The fuel-filler door is located on the right, rear side of the
vehicle.
When the doors of the vehicle are locked or unlocked,
the fuel-filler door is automatically locked or unlocked
at the same time.
Push one of the power door lock switches to unlock
the fuel-filler door from inside the vehicle or push the
door handle request switch to unlock the fuel-filler door from outside the vehicle.
To open the fuel-filler door, press the left side of the door to release the door lock and pull
the door open.
For more information, refer to the “Pre-driving checks and adjustments (section 3)” of your Owner’s Manual.