2013 NISSAN GT-R battery
[x] Cancel search: batteryPage 205 of 346
5-12Starting and driving
the Intelligent Key out of the port.
NOTICE
Never place anything except the Intelli-
gent Key in the Intelligent Key port.
Doing so may cause damage to the
equipment.
NOTE:
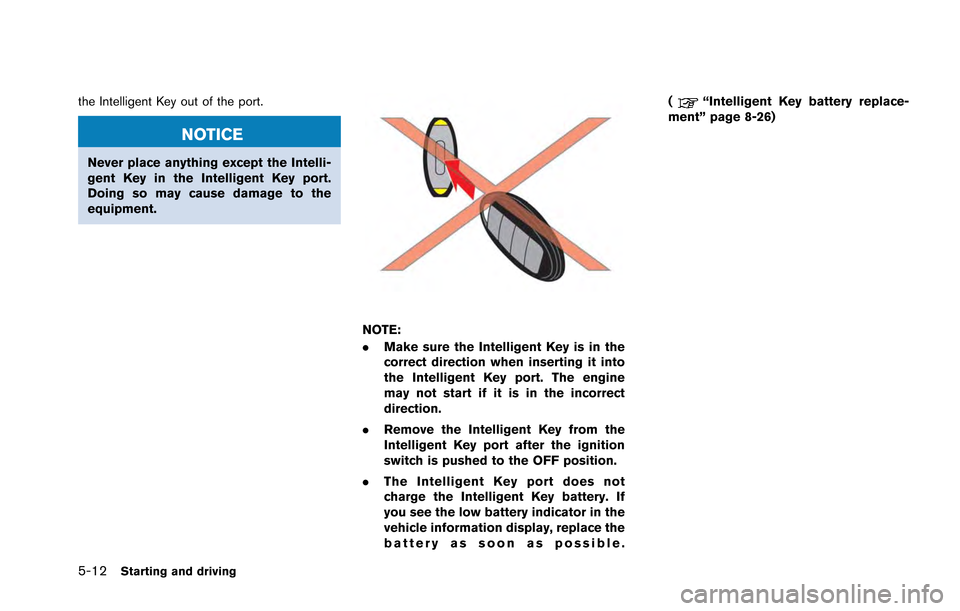
.Make sure the Intelligent Key is in the
correct direction when inserting it into
the Intelligent Key port. The engine
may not start if it is in the incorrect
direction.
. Remove the Intelligent Key from the
Intelligent Key port after the ignition
switch is pushed to the OFF position.
. The Intelligent Key port does not
charge the Intelligent Key battery. If
you see the low battery indicator in the
vehicle information display, replace the
battery as soon as possible. (
“Intelligent Key battery replace-
ment” page 8-26)
Page 207 of 346
5-14Starting and driving
NOTE:
.If the engine is difficult to start, de-
press the accelerator pedal all the way
to the floor and hold it. Push the
ignition switch with the brake pedal
depressed to start cranking the engine.
After 5 or 6 seconds, stop cranking by
pushing the ignition switch to the OFF
position, and then release the accel-
erator pedal. Then perform steps 1 to 5
to start the engine. If the engine starts,
but fails to run, repeat this procedure.
. Starting and stopping the engine over a
short period of time may make the
vehicle more difficult to start. If this
occurs, wait for more than 3 minutes,
and then push the ignition switch again
to start the engine.
. To maintain high performance over a
long period of time, the engine speed is
limited to 5,000 rpm when the engine is
revved with the shift lever in the
&Nor
&Pposition, and to 4,000 rpm when the
engine oil or coolant temperature is
low or higher than normal.
. If the ignition switch is pushed before
the shift lever is moved to the
&Pposition, the ignition switch will not change to the OFF position. If this
occurs, the SHIFT
&Pwarning display
appears on the vehicle information
display. When stopping the engine, be
sure to move the shift lever to the
&Pposition and then push the ignition
switch. Failure to do so may result in
discharge of the battery. (
“Shift
“P” warning” page 2-42)
. If the shift lever was in the
&A↔&Mor&Rposition when the engine was stopped,
then be sure to move the shift lever to
the
&Pposition before starting the
engine the next time. If the engine is
started with the shift lever in the
&Nposition, then it may not be possible to
drive the vehicle even when the shift
lever is moved to the
&A↔&Mor&Rposition. If this occurs, the SHIFT&Pwarning appears on the vehicle infor-
mation display. (“Shift “P” warn-
ing” page 2-42)
CAUTION
If the engine was stopped soon when
the engine is hot, the cooling fan may
operate for approximately 2 minutes
after the engine was stopped to cool the components in the engine compart-
ment. When the cooling fan is operat-
ing, be sure that hands or other items
do not get caught in it.
Page 212 of 346
Shift lock release
If the battery charge is low or discharged, the
shift lever may not be moved from the&Pposition even with the brake pedal depressed
and the shift lever button pushed.
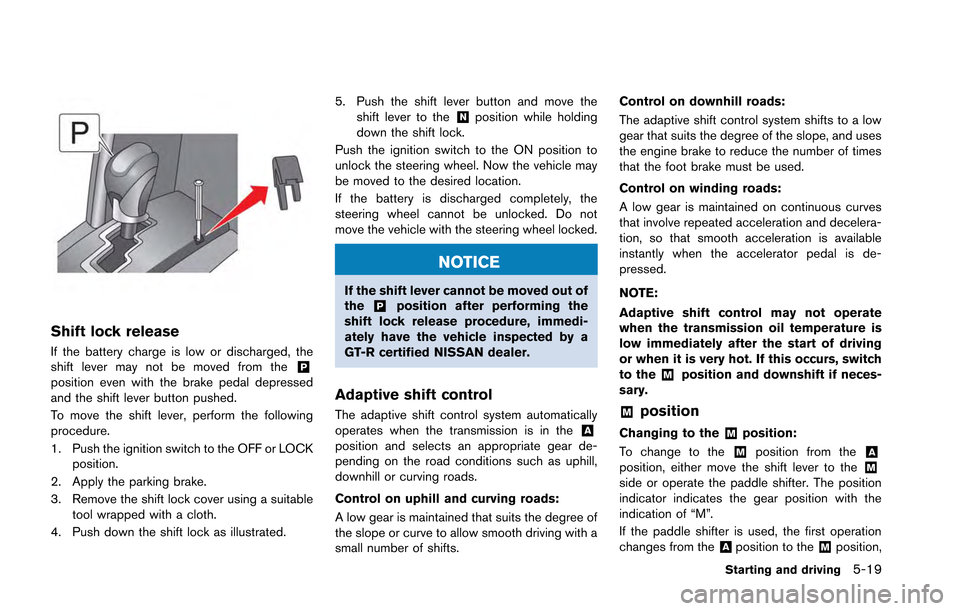
To move the shift lever, perform the following
procedure.
1. Push the ignition switch to the OFF or LOCKposition.
2. Apply the parking brake.
3. Remove the shift lock cover using a suitable tool wrapped with a cloth.
4. Push down the shift lock as illustrated. 5. Push the shift lever button and move the
shift lever to the
&Nposition while holding
down the shift lock.
Push the ignition switch to the ON position to
unlock the steering wheel. Now the vehicle may
be moved to the desired location.
If the battery is discharged completely, the
steering wheel cannot be unlocked. Do not
move the vehicle with the steering wheel locked.
NOTICE
If the shift lever cannot be moved out of
the&Pposition after performing the
shift lock release procedure, immedi-
ately have the vehicle inspected by a
GT-R certified NISSAN dealer.
Adaptive shift control
The adaptive shift control system automatically
operates when the transmission is in the&Aposition and selects an appropriate gear de-
pending on the road conditions such as uphill,
downhill or curving roads.
Control on uphill and curving roads:
A low gear is maintained that suits the degree of
the slope or curve to allow smooth driving with a
small number of shifts. Control on downhill roads:
The adaptive shift control system shifts to a low
gear that suits the degree of the slope, and uses
the engine brake to reduce the number of times
that the foot brake must be used.
Control on winding roads:
A low gear is maintained on continuous curves
that involve repeated acceleration and decelera-
tion, so that smooth acceleration is available
instantly when the accelerator pedal is de-
pressed.
NOTE:
Adaptive shift control may not operate
when the transmission oil temperature is
low immediately after the start of driving
or when it is very hot. If this occurs, switch
to the
&Mposition and downshift if neces-
sary.
&Mposition
Changing to the&Mposition:
To change to the
&Mposition from the&Aposition, either move the shift lever to the&Mside or operate the paddle shifter. The position
indicator indicates the gear position with the
indication of “M”.
If the paddle shifter is used, the first operation
changes from the
&Aposition to the&Mposition,
Starting and driving5-19
Page 244 of 346
See your 2013 Warranty Information Booklet for
important related information and warranty
coverage exclusions. See also section 2 (page
2-29) and section 5 (page 5-49) of this Owner’s
Manual, “Transmission Clutch Temperature
High” and “Vehicle Dynamic Control (VDC)
System” for important additional related informa-
tion.
.Except for the emergency cases above,
any issues related to driving stability
(e.g., steering maneuvers and maneu-
vers during acceleration and decelera-
tion) and any damages to drivetrain
components (e.g., transfer, clutch, a
sort of gear, transaxle case) will not
be covered by warranty if there is a
record in the Vehicle Status Data
Recorder (VSDR) that the vehicle was
driven with VDC off.
. When attempting to free the vehicle
from mud or fresh snow, the VDC will
detect the tire slipping, and the engine
speed may not increase even when the
accelerator pedal is depressed. To raise
the engine speed, use the VDC set up
switch to turn the VDC system OFF and
select SAVE mode with the transmis-
sion switch. (
“VDC, transmission
and suspension setup switches” page 5-24)
. When the VDC system is turned OFF,
all VDC functions (including traction
control) , except for the ABS functions,
are deactivated.
FREEING A FROZEN DOOR LOCK
To prevent a door lock from freezing, apply
deicer through the key hole. If the lock becomes
frozen, heat the key before inserting it into the
key hole or use the Intelligent Key system.
ANTI-FREEZE
In the winter when it is anticipated that the
outside temperature will drop below 328F(0 8C) ,
check antifreeze to assure proper winter protec-
tion. (
“Engine cooling system” page 8-10)
BATTERY
If the battery is not fully charged during
extremely cold weather conditions, the battery
fluid may freeze and damage the battery. To
maintain maximum efficiency, the battery should
be checked regularly. (
“Battery” page 8-
17)
DRAINING OF COOLANT WATER
If the vehicle is to be left outside without
antifreeze, drain the cooling system, including
the engine block. Refill before operating the
vehicle. For details, contact a GT-R certified
NISSAN dealer.
Starting and driving5-51
COLD WEATHER DRIVING
Page 251 of 346
6-4In case of emergency
NOTICE
.Never install tire chains on a punc-
tured run-flat tire, as this could
damage your vehicle.
. Avoid driving over any projection or
pothole, as the clearance between
the vehicle and the ground is smal-
ler than normal.
. Do not enter an automated car wash
with a punctured run-flat tire.
. Have the punctured tire replaced by
your GT-R certified NISSAN dealer
as soon as possible, as the tire’s
performance capability is reduced.
If you have a flat tire and have to stop the
vehicle, follow the instructions below.
1. Safely move the vehicle off the road and away from traffic.
2. Turn on the hazard warning flashers.
3. Park on a level surface and apply the parking brake. Move the shift lever to the
&Pposition.
4. Turn off the engine.
5. Raise the hood to warn other traffic, and to signal professional road assistance person-
nel that you need assistance. 6. Have all passengers get out of the vehicle
and stand in a safe place, away from traffic
and clear of the vehicle.
If needed Roadside Assistance is available.
Please see your Warranty Information Booklet
for the toll-free number to call (U.S.) or Warranty
Information Booklet (Canada).
For the tire removing procedure, see the
following section. (
“Jacking vehicle and
removing wheels” page 8-42)
The following circumstances indicate that the
battery is discharged.
. The starter motor does not turn or it turns
weakly and the engine does not start.
. The vehicle lights are much dimmer than
usual.
. The sound of the horn is weak. The horn
makes no sound.
NOTICE
When the battery is discharged, do not
close either of the front doors. The
automatic window adjusting function
will not work, and the side roof panel
may be damaged.
To start your engine with a booster battery, the
instructions and precautions below must be
followed.
For the battery maintenance information, see the
following section. (
“Battery” page 8-17)
JUMP STARTING
Page 252 of 346
WARNING
.If done incorrectly, jump starting
can lead to a battery explosion,
resulting in severe injury or death.
It could also damage your vehicle.
. Explosive hydrogen gas is always
present in the vicinity of the battery.
Keep all sparks and flames away
from the battery.
. Do not allow battery fluid to come
into contact with eyes, skin, clothing
or painted surfaces. Battery fluid is
a corrosive sulphuric acid solution
which can cause severe burns. If the
fluid should come into contact with
anything, immediately flush the con-
tacted area with water.
. Keep the battery out of the reach of
children.
. The booster battery must be rated at
12 volts. Use of an improperly rated
battery can damage your vehicle.
. Whenever working on or near a
battery, always wear suitable eye
protectors (for example, goggles or
industrial safety spectacles) and remove rings, metal bands, or any
other jewelry. Do not lean over the
battery when jump starting.
. Do not attempt to jump start a
frozen battery. It could explode
and cause serious injury.
. Your vehicle has an automatic en-
gine cooling fan. It could come on at
any time. Keep hands and other
objects away from it.
If needed, Roadside Assistance is available.
Please see your Warranty Information Booklet
for the toll-free number to call (U.S.) or Warranty
Information Booklet (Canada).
In case of emergency6-5
Page 253 of 346
6-6In case of emergency
WARNING
Always follow the instructions below.
Failure to do so could result in damage
to the charging system and cause
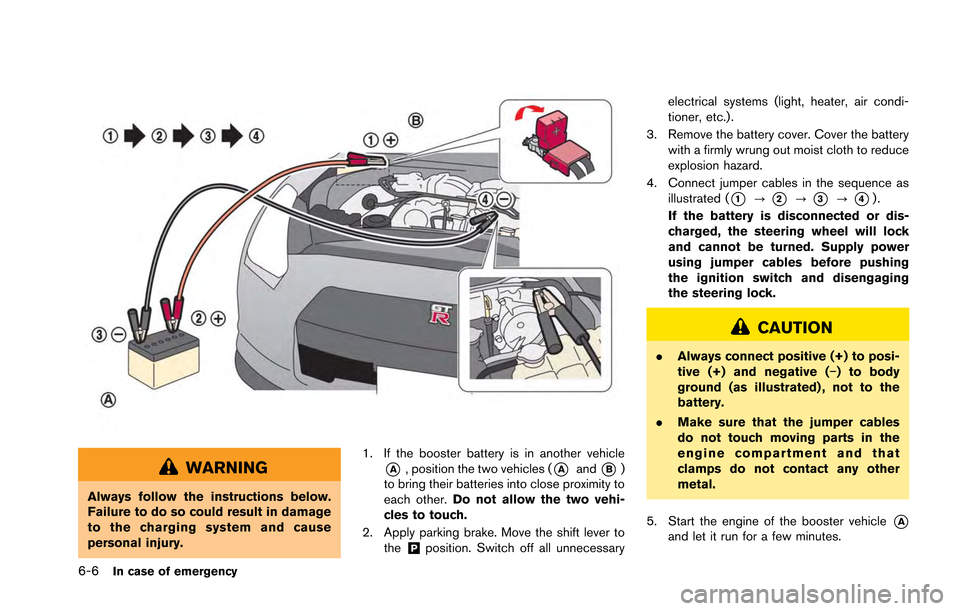
personal injury.1. If the booster battery is in another vehicle
*A, position the two vehicles (*Aand*B)
to bring their batteries into close proximity to
each other. Do not allow the two vehi-
cles to touch.
2. Apply parking brake. Move the shift lever to the
&Pposition. Switch off all unnecessary electrical systems (light, heater, air condi-
tioner, etc.).
3. Remove the battery cover. Cover the battery with a firmly wrung out moist cloth to reduce
explosion hazard.
4. Connect jumper cables in the sequence as illustrated (
*1?*2?*3?*4).
If the battery is disconnected or dis-
charged, the steering wheel will lock
and cannot be turned. Supply power
using jumper cables before pushing
the ignition switch and disengaging
the steering lock.
CAUTION
. Always connect positive (+) to posi-
tive (+) and negative (−) to body
ground (as illustrated) , not to the
battery.
. Make sure that the jumper cables
do not touch moving parts in the
engine compartment and that
clamps do not contact any other
metal.
5. Start the engine of the booster vehicle
*Aand let it run for a few minutes.
Page 254 of 346
6. Keep the engine speed of the boostervehicle
*Aat about 2,000 rpm, and start
the engine of the vehicle being jump started
*B.
NOTE:
Do not keep the starter motor engaged
for more than 10 seconds. If the engine
does not start right away, push the
ignition switch to the OFF position and
wait 10 seconds before trying again.
7. After starting your engine, carefully discon- nect the negative cable and then the positive
cable (
*4?*3?*2?*1).
8. Be sure to dispose of the cloth used to cover the vent holes as it may be contami-
nated with corrosive acid.
9. Put the battery cover on.
NOTE:
If the clamp clip is difficult to connect to
the battery terminal, remove the cowl top
cover to make it easier. (
“Removing
the cowl top cover” page 8-9)
Do not attempt to start the engine by pushing.
NOTICE
Your NISSAN cannot be push-started or
tow-started. Attempting to do so may
cause transmission damage.
If needed, Roadside Assistance is available.
Please see your Warranty Information Booklet
for the toll-free number to call (U.S.) or Warranty
& Roadside Assistance Information Booklet
(Canada) .
WARNING
. Do not continue to drive if your
vehicle overheats. Doing so could
cause engine damage or a vehicle
fire.
. To avoid the danger of being
scalded, never remove the radiator
filler cap and the coolant reservoir
cap while the engine is still hot.
When the cap is removed, pressur-
ized hot water will spurt out, possi-
bly causing serious injury.
. Do not open the hood if steam is
coming out.
If your vehicle is overheating (indicated by an
extremely high temperature gauge reading) , or if
you feel a lack of engine power, detect unusual
noise, etc., take the following steps:
1. Move the vehicle safely off the road, apply the parking brake and move the shift lever to
the
&Pposition.
Do not stop the engine.
2. Turn off the air conditioner. Open all the windows, move the temperature control to
maximum hot and fan control to high speed.
In case of emergency6-7
PUSH STARTING IF YOUR VEHICLE OVERHEATS