2013 NISSAN GT-R check engine light
[x] Cancel search: check engine lightPage 165 of 346
3-4Pre-driving checks and adjustments
WARNING
.Always have the doors locked while
driving. Along with the use of seat
belts, this provides greater safety in
the event of an accident by helping
to prevent persons from being
thrown from the vehicle. This also
helps keep children and others from
unintentionally opening the doors,
and will help keep out intruders.
. Before opening any door, always
look for and avoid oncoming traffic.
. Do not leave children unattended
inside the vehicle. They could un-
knowingly activate switches or con-
trols. Unattended children could
become involved in serious acci-
dents.
CAUTION
To prevent theft or accidents, be sure to
stop the engine and lock the doors
before stepping away from the vehicle.
NOTICE
When the battery cable is removed from
the battery terminal, do not close either
of the front doors. The automatic win-
dow adjusting function will not work,
and the side roof panel may be da-
maged. (
“Automatic adjusting
function” page 2-60)
NOTE:
. The doors of this vehicle are somewhat
harder to close than those of an
ordinary vehicle (especially when the
vehicle is new) . This is because the
stiffness of the rubber has been in-
creased to improve the airtightness of
the vehicle interior during situations
such as higher speed driving. This does
not indicate that there is a malfunction.
. When the driver’s door is locked or
unlocked, the fuel-filler door is auto-
matically locked or unlocked at the
same time.
When the door is being opened, the window is
automatically lowered slightly to avoid contact
between the window and the side roof panel.
When the door is closed, the window is automatically raised slightly. (
“Automatic
adjusting function” page 2-60)
DOORS
Page 179 of 346
3-18Pre-driving checks and adjustments
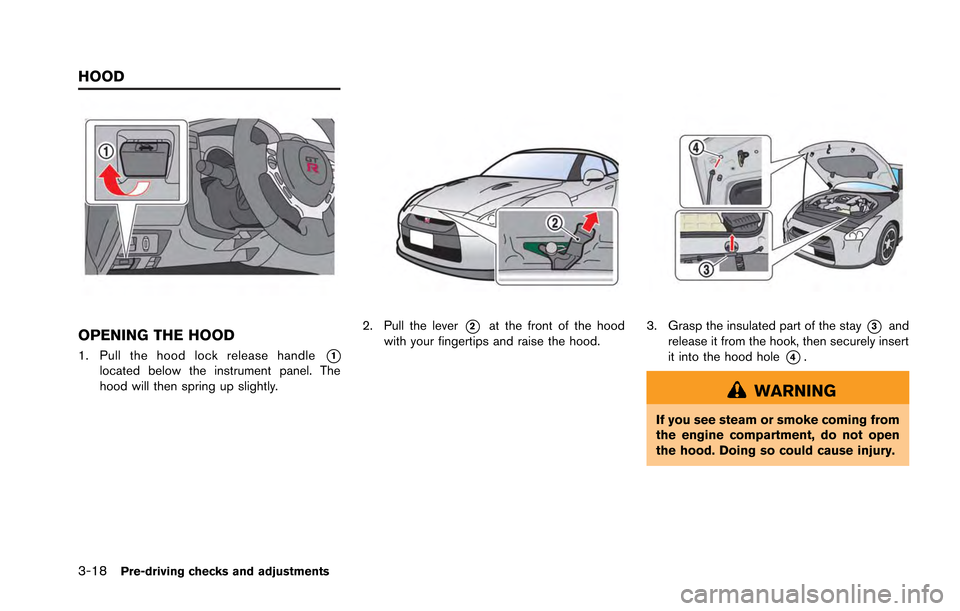
OPENING THE HOOD
1. Pull the hood lock release handle*1located below the instrument panel. The
hood will then spring up slightly.
2. Pull the lever*2at the front of the hood
with your fingertips and raise the hood.3. Grasp the insulated part of the stay*3and
release it from the hook, then securely insert
it into the hood hole
*4.
WARNING
If you see steam or smoke coming from
the engine compartment, do not open
the hood. Doing so could cause injury.
HOOD
Page 184 of 346
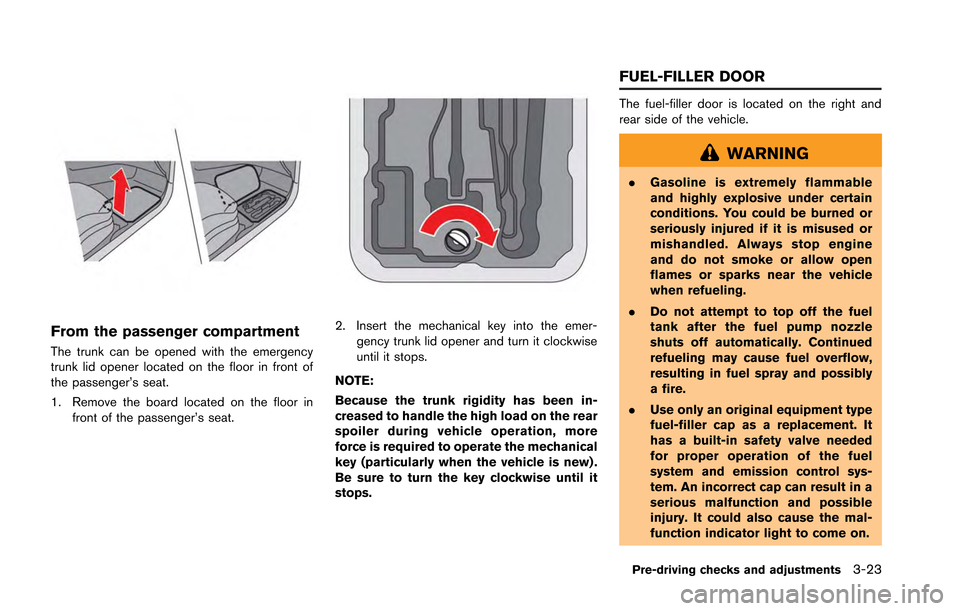
From the passenger compartment
The trunk can be opened with the emergency
trunk lid opener located on the floor in front of
the passenger’s seat.
1. Remove the board located on the floor infront of the passenger’s seat.
2. Insert the mechanical key into the emer-gency trunk lid opener and turn it clockwise
until it stops.
NOTE:
Because the trunk rigidity has been in-
creased to handle the high load on the rear
spoiler during vehicle operation, more
force is required to operate the mechanical
key (particularly when the vehicle is new) .
Be sure to turn the key clockwise until it
stops.
The fuel-filler door is located on the right and
rear side of the vehicle.
WARNING
. Gasoline is extremely flammable
and highly explosive under certain
conditions. You could be burned or
seriously injured if it is misused or
mishandled. Always stop engine
and do not smoke or allow open
flames or sparks near the vehicle
when refueling.
. Do not attempt to top off the fuel
tank after the fuel pump nozzle
shuts off automatically. Continued
refueling may cause fuel overflow,
resulting in fuel spray and possibly
a fire.
. Use only an original equipment type
fuel-filler cap as a replacement. It
has a built-in safety valve needed
for proper operation of the fuel
system and emission control sys-
tem. An incorrect cap can result in a
serious malfunction and possible
injury. It could also cause the mal-
function indicator light to come on.
Pre-driving checks and adjustments3-23
FUEL-FILLER DOOR
Page 197 of 346
5-4Starting and driving
WARNING
.The exhaust gas and the exhaust
system are very hot. Keep people,
animals or flammable materials
away from the exhaust system com-
ponents.
. Do not stop or park the vehicle over
flammable materials such as dry
grass, waste paper or rags. They
may ignite and cause a fire.
NOTICE
.Do not use leaded gasoline. Depos-
its from leaded gasoline seriously
reduce the three-way catalyst’s abil-
ity to help reduce exhaust pollu-
tants.
. Keep your engine tuned up. Mal-
functions in the ignition, fuel injec-
tion, or electrical systems can cause
overrich fuel flow into the three-way
catalyst, causing it to overheat. Do
not keep driving if the engine mis-
fires, or if noticeable loss of perfor-
mance or other unusual operating conditions are detected. Have the
vehicle inspected promptly by a
GT-R certified NISSAN dealer.
. Avoid driving with an extremely low
fuel level. Running out of fuel could
cause the engine to misfire, dama-
ging the three-way catalyst.
. Do not race the engine while warm-
ing it up.
. Do not push or tow your vehicle to
start the engine.
TIRE PRESSURE MONITORING
SYSTEM (TPMS)
Each tire should be checked monthly when cold
and inflated to the inflation pressure recom-
mended by the vehicle manufacturer on the
vehicle placard or tire inflation pressure label. (If
your vehicle has tires of a different size than the
size indicated on the vehicle placard or tire
inflation pressure label, you should determine
the proper tire inflation pressure for those tires.)
As an added safety feature, your vehicle has
been equipped with a Tire Pressure Monitoring
System (TPMS) that illuminates a low tire
pressure telltale when one or more of your tires
is significantly under-inflated. Accordingly, when the low tire pressure telltale illuminates, you
should stop and check your tires as soon as
possible, and inflate them to the proper pres-
sure. Driving on a significantly under-inflated tire
causes the tire to overheat and can lead to tire
failure. Under-inflation also reduces fuel effi-
ciency and tire tread life, and may affect the
vehicle’s handling and stopping ability.
If the vehicle is being driven with one or more flat
tires, the run-flat tire warning light will illuminate
continuously and a chime will sound for 10
seconds. The chime will only sound at the first
indication of a flat tire, and the warning light will
illuminate continuously. When the Flat tire
warning is activated, have the system reset
and the tire checked and replaced if necessary
by a GT-R certified NISSAN dealer. Even if the
tire is inflated to the specified COLD tire
pressure, the warning light will continue to
illuminate until the system is reset by a GT-R
certified NISSAN dealer. Your vehicle can be
driven for a limited time on a flat tire. (
“Run-
flat tires” page 8-37)
Please note that the TPMS is not a substitute for
proper tire maintenance, and it is the driver’s
responsibility to maintain correct tire pressure,
even if under-inflation has not reached the level
to trigger illumination of the TPMS low tire
pressure telltale.
Page 206 of 346
.Make sure the area around the vehicle is
clear.
. Check fluid levels such as engine oil, cool-
ant, brake fluid and window washer fluid as
frequently as possible, or at least whenever
you refuel.
. Check that all windows and lights are clean.
. Visually inspect tires for their appearance
and condition. Also check tires for proper
inflation.
. Lock all doors.
. Position seat.
. Adjust inside and outside mirrors.
. Fasten seat belts and ask all passengers to
do likewise.
. Check the operation of warning lights when
the ignition switch is pushed to the ON
position. (
“Warning/indicator lights
and audible reminders” page 2-24)
NOTE:
. This vehicle includes spark plugs that
are designed for maximum perfor-
mance. If the start time becomes long-
er, the plugs may be fouled, making the
engine difficult to start. If this occurs,
start the engine using the procedure
described in this section.
. A click sound may be heard when the
brake pedal is depressed and released.
This is normal.
. A low rattling operating sound may
occur when the engine is started or
stopped. This is because of the trans-
mission gear design, light flywheel and
dry sump lubrication system used in
this transmission. This does not indi-
cate that there is a malfunction. This
sound is likely to occur in particular if
the engine is stopped when the tem-
perature of the transmission oil is high.
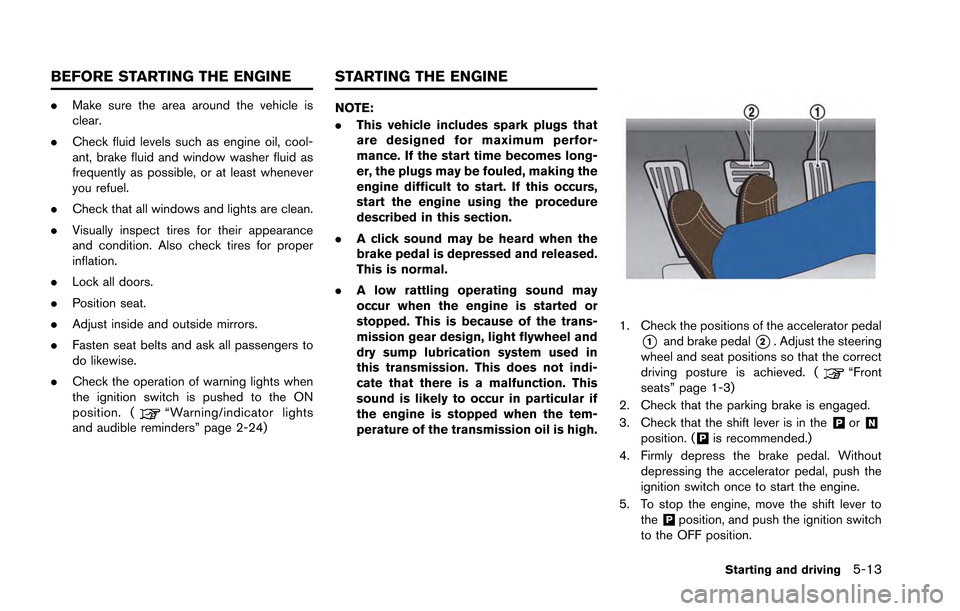
1. Check the positions of the accelerator pedal
*1and brake pedal*2. Adjust the steering
wheel and seat positions so that the correct
driving posture is achieved. (
“Front
seats” page 1-3)
2. Check that the parking brake is engaged.
3. Check that the shift lever is in the
&Por&Nposition. (&Pis recommended.)
4. Firmly depress the brake pedal. Without depressing the accelerator pedal, push the
ignition switch once to start the engine.
5. To stop the engine, move the shift lever to the
&Pposition, and push the ignition switch
to the OFF position.
Starting and driving5-13
BEFORE STARTING THE ENGINE STARTING THE ENGINE
Page 208 of 346
DUAL CLUTCH TRANSMISSION
The GT-R dual clutch transmission is a newly-
developed system that uses an electronically
controlled multiple-disc wet clutch attached to
the highly efficient manual transmission. This
transmission has two driving modes.
.
&Aposition (Automatic gearshift):
allows automatic shifting of the manual
transmission.
.
&Mposition (Manual gearshift):
allows quick shifting of the manual transmis-
sion.
NOTE:
When starting or driving on a steep uphill
grade, shift to the
&Mposition and operate
the paddle shifter to shift down to 1st gear
similar to a manual transmission vehicle.
The GT-R dual clutch transmission was devel-
oped specifically to maximize vehicle perfor-
mance and driving enjoyment. The GT-R
transmission components were designed using
different engineering standards than typical
passenger car transmissions. Because of this,
the GT-R has different operating characteristics,
and various rattle noises may be heard during
some driving conditions because of the follow-
ing items: .
Gear clearances
. Ultralight flywheel
. Dry sump lubrication
These noises do not indicate that there is a
malfunction.
WARNING
. Do not depress the accelerator
pedal while shifting from the&Por
&Nposition to the&Ror&A↔&Mposition. Always depress the brake
pedal until shifting is completed.
Failure to do so could cause loss
of control and an accident.
. Cold engine idle speed is high, so
use caution when shifting into a
forward or reverse gear before the
engine has warmed up.
. Never shift to the
&Por&Rposition
while the vehicle is moving forward.
Never shift to the
&Por&A↔&Mposition while the vehicle is moving
rearward. Doing so could cause loss
of control and an accident.
. The shift lever contains a powerful
magnet. Do not place electronic medical devices or other electronic
products that are susceptible to
magnetic force close to the shift
lever.
. Do not downshift abruptly on slip-
pery roads. This may cause a loss of
control.
. If the shift lever is moved from
&Rto
&A↔&Mposition, or&A↔&Mto&Rposition before the vehicle stops,
you may not be able to shift gear or
it may take longer to shift gear.
Make sure to depress the brake
pedal and check that the vehicle
has stopped before shifting.
CAUTION
.Because the vehicle includes a dual
clutch transmission that automati-
cally controls the clutch and shifting
operation of the manual transmis-
sion, whenever the shift lever is in a
position other then
&Por&N, the
vehicle will begin to move slowly, in
the same way as when the clutch in
a manual transmission vehicle is
Starting and driving5-15
DRIVING THE VEHICLE
Page 234 of 346
AWD WARNING LIGHT
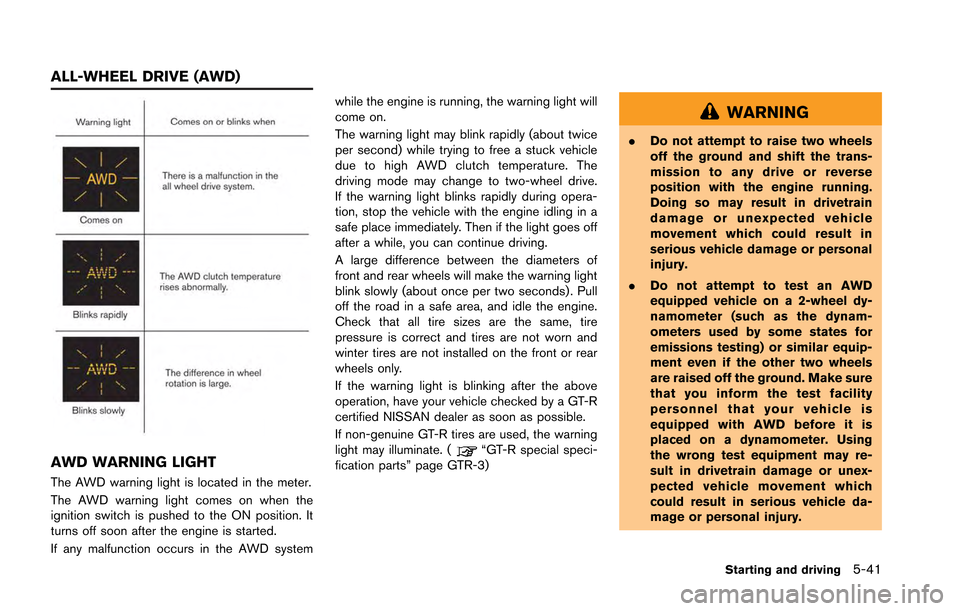
The AWD warning light is located in the meter.
The AWD warning light comes on when the
ignition switch is pushed to the ON position. It
turns off soon after the engine is started.
If any malfunction occurs in the AWD systemwhile the engine is running, the warning light will
come on.
The warning light may blink rapidly (about twice
per second) while trying to free a stuck vehicle
due to high AWD clutch temperature. The
driving mode may change to two-wheel drive.
If the warning light blinks rapidly during opera-
tion, stop the vehicle with the engine idling in a
safe place immediately. Then if the light goes off
after a while, you can continue driving.
A large difference between the diameters of
front and rear wheels will make the warning light
blink slowly (about once per two seconds) . Pull
off the road in a safe area, and idle the engine.
Check that all tire sizes are the same, tire
pressure is correct and tires are not worn and
winter tires are not installed on the front or rear
wheels only.
If the warning light is blinking after the above
operation, have your vehicle checked by a GT-R
certified NISSAN dealer as soon as possible.
If non-genuine GT-R tires are used, the warning
light may illuminate. (
“GT-R special speci-
fication parts” page GTR-3)
WARNING
. Do not attempt to raise two wheels
off the ground and shift the trans-
mission to any drive or reverse
position with the engine running.
Doing so may result in drivetrain
damage or unexpected vehicle
movement which could result in
serious vehicle damage or personal
injury.
. Do not attempt to test an AWD
equipped vehicle on a 2-wheel dy-
namometer (such as the dynam-
ometers used by some states for
emissions testing) or similar equip-
ment even if the other two wheels
are raised off the ground. Make sure
that you inform the test facility
personnel that your vehicle is
equipped with AWD before it is
placed on a dynamometer. Using
the wrong test equipment may re-
sult in drivetrain damage or unex-
pected vehicle movement which
could result in serious vehicle da-
mage or personal injury.
Starting and driving5-41
ALL-WHEEL DRIVE (AWD)
Page 235 of 346
5-42Starting and driving
NOTICE
.If the warning light comes on while
driving there may be a malfunction
in the AWD system. Reduce the
vehicle speed and have your vehicle
checked by a GT-R certified NISSAN
dealer as soon as possible.
. If the warning light remains on after
the above operation, have your
vehicle checked by a GT-R certified
NISSAN dealer as soon as possible.
. The powertrain may be damaged if
you continue driving with the warn-
ing light blinking.
. Do not spin the rear wheels while
driving. Spinning the rear wheels
may increase the temperatures of
the AWD clutch system and damage
the system. Adjust the accelerator
pedal position to stop wheel spin.
TIGHT CORNER BRAKING PHE-
NOMENON
If the steering wheel is turned more than half a
turn when the vehicle is started when it is cold, it
may be harder to move the vehicle forward and
backward. This phenomenon is known as the
“tight corner braking phenomenon”.
This phenomenon is unique to AWD vehicles,
and occurs due to a difference in speeds
between the front and rear wheels while the
vehicle is turning. This does not indicate that
there is a malfunction.
NOTE:
If the tight corner braking phenomenon
occurs, a slipping sound may be heard
from the tires, or a squeaking sound may
be heard from the drive system.
Reducing tight corner braking phe-
nomenon
The tight corner braking phenomenon can be
temporarily reduced.
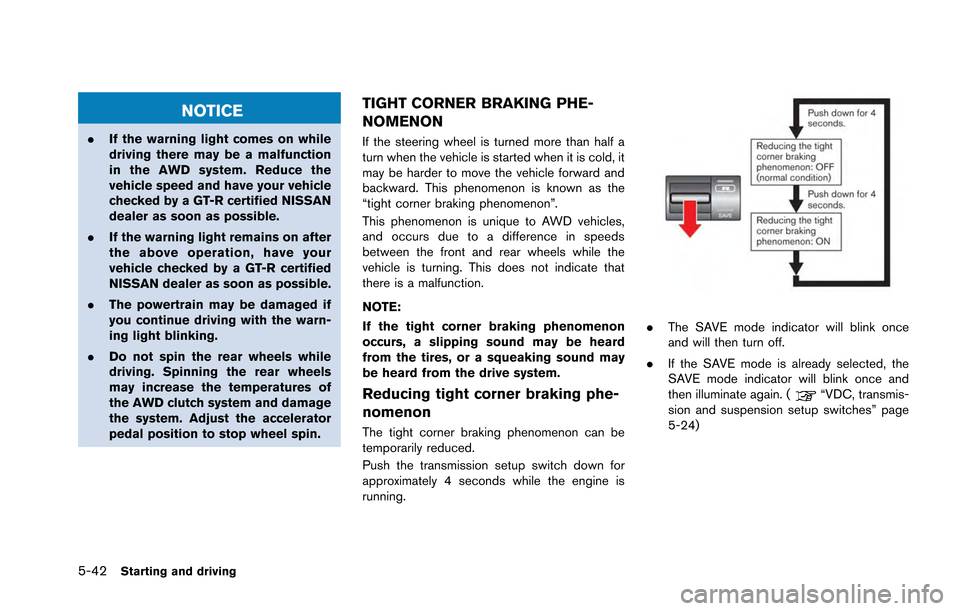
Push the transmission setup switch down for
approximately 4 seconds while the engine is
running.
.The SAVE mode indicator will blink once
and will then turn off.
. If the SAVE mode is already selected, the
SAVE mode indicator will blink once and
then illuminate again. (
“VDC, transmis-
sion and suspension setup switches” page
5-24)