2013 NISSAN GT-R tow
[x] Cancel search: towPage 145 of 346
2-50Instruments and controls
Autolight system
The autolight system allows the headlights to be
set so they turn on and off automatically.
To set the autolight system:
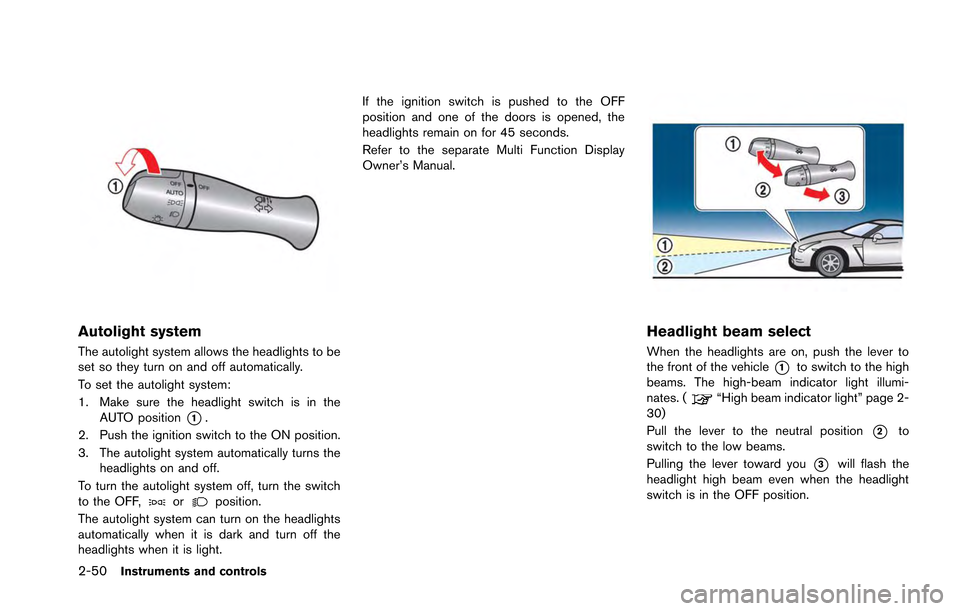
1. Make sure the headlight switch is in theAUTO position
*1.
2. Push the ignition switch to the ON position.
3. The autolight system automatically turns the headlights on and off.
To turn the autolight system off, turn the switch
to the OFF,
orposition.
The autolight system can turn on the headlights
automatically when it is dark and turn off the
headlights when it is light. If the ignition switch is pushed to the OFF
position and one of the doors is opened, the
headlights remain on for 45 seconds.
Refer to the separate Multi Function Display
Owner’s Manual.
Headlight beam select
When the headlights are on, push the lever to
the front of the vehicle
*1to switch to the high
beams. The high-beam indicator light illumi-
nates. (
“High beam indicator light” page 2-
30)
Pull the lever to the neutral position
*2to
switch to the low beams.
Pulling the lever toward you
*3will flash the
headlight high beam even when the headlight
switch is in the OFF position.
Page 151 of 346
2-56Instruments and controls
Front
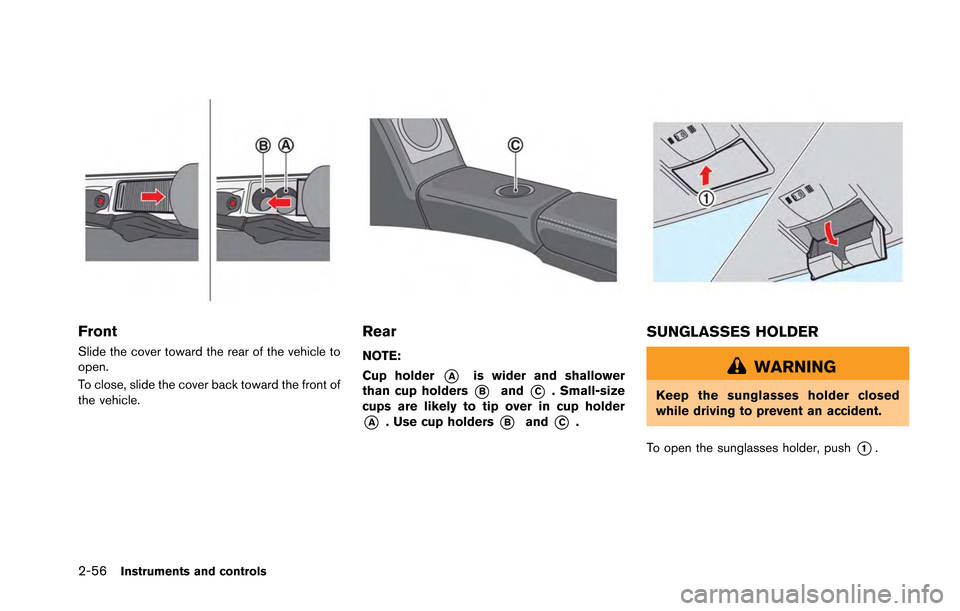
Slide the cover toward the rear of the vehicle to
open.
To close, slide the cover back toward the front of
the vehicle.
Rear
NOTE:
Cup holder
*Ais wider and shallower
than cup holders
*Band*C. Small-size
cups are likely to tip over in cup holder
*A. Use cup holders*Band*C.
SUNGLASSES HOLDER
WARNING
Keep the sunglasses holder closed
while driving to prevent an accident.
To open the sunglasses holder, push
*1.
Page 152 of 346
CAUTION
Do not use for anything other than
glasses.
NOTICE
Do not leave glasses in the sunglasses
holder while parking in direct sunlight.
The heat may damage the glasses.
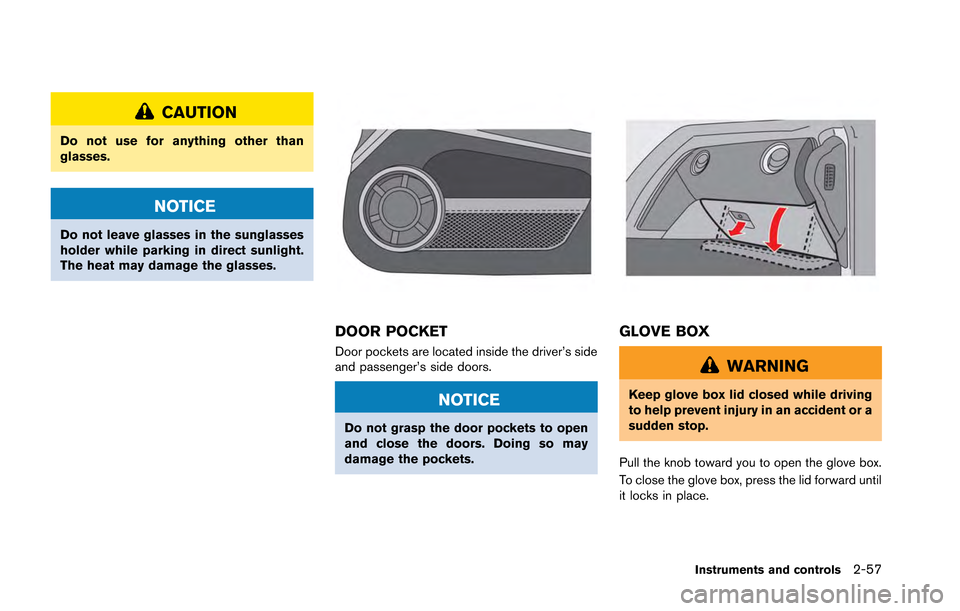
DOOR POCKET
Door pockets are located inside the driver’s side
and passenger’s side doors.
NOTICE
Do not grasp the door pockets to open
and close the doors. Doing so may
damage the pockets.
GLOVE BOX
WARNING
Keep glove box lid closed while driving
to help prevent injury in an accident or a
sudden stop.
Pull the knob toward you to open the glove box.
To close the glove box, press the lid forward until
it locks in place.
Instruments and controls2-57
Page 168 of 346
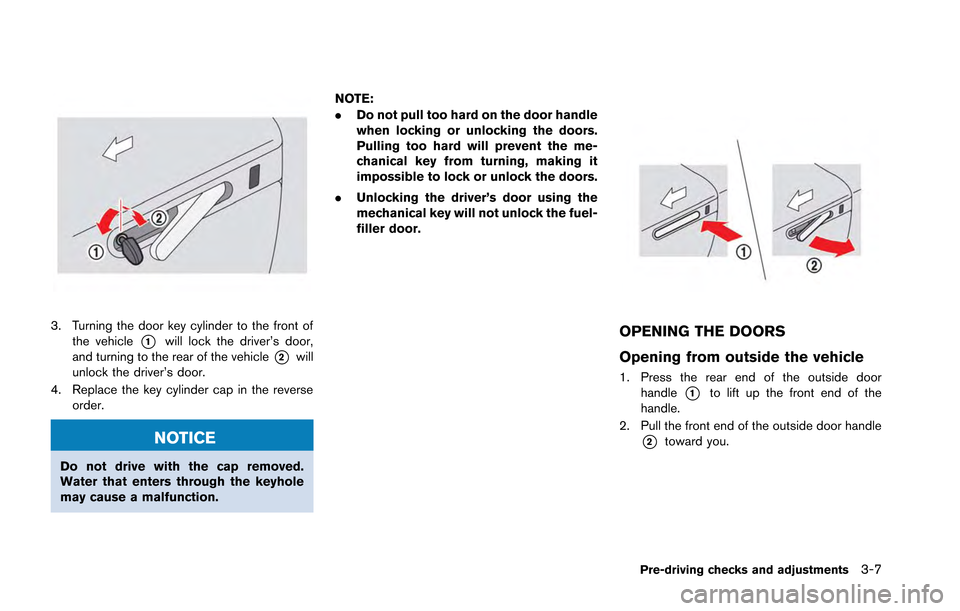
3. Turning the door key cylinder to the front ofthe vehicle
*1will lock the driver’s door,
and turning to the rear of the vehicle
*2will
unlock the driver’s door.
4. Replace the key cylinder cap in the reverse order.
NOTICE
Do not drive with the cap removed.
Water that enters through the keyhole
may cause a malfunction. NOTE:
.
Do not pull too hard on the door handle
when locking or unlocking the doors.
Pulling too hard will prevent the me-
chanical key from turning, making it
impossible to lock or unlock the doors.
. Unlocking the driver’s door using the
mechanical key will not unlock the fuel-
filler door.
OPENING THE DOORS
Opening from outside the vehicle
1. Press the rear end of the outside door
handle
*1to lift up the front end of the
handle.
2. Pull the front end of the outside door handle
*2toward you.
Pre-driving checks and adjustments3-7
Page 169 of 346
3-8Pre-driving checks and adjustments
Opening from inside the vehicle
Lift up the inside door handle to open a door
from inside the vehicle.
NOTICE
Do not grasp the door pockets to open
and close the doors. Doing so may
damage the pockets.
WARNING
.Radio waves could adversely affect
electric medical equipment. Those
who use a pacemaker should con-
tact the electric medical equipment
manufacturer for the possible influ-
ences before use.
. The Intelligent Key transmits radio
waves when the buttons are
pushed. The Federal Aviation
Agency (FAA) advises the radio
waves may affect aircraft navigation
and communication systems. Do not
operate the Intelligent Key while on
an airplane. Make sure the buttons
are not operated unintentionally
when the unit is stored for a flight.
The Intelligent Key system can operate all the
door locks using the remote controller function
or pushing the request switch on the vehicle
without taking the key out from a pocket or
purse. The operating environment and/or condi-
tions may affect the Intelligent Key system
operation.
Be sure to read the following before using the
Intelligent Key system.
CAUTION
. Be sure to carry the Intelligent Key
with you when operating the vehi-
cle.
. Never leave the Intelligent Key in
the vehicle when you leave the
vehicle.
. The Intelligent Key is always communicating
with the vehicle as it receives radio waves.
The Intelligent Key system transmits weak
radio waves. Environmental conditions may
interfere with the operation of the Intelligent
Key system under the following operating
conditions. In such cases, correct the
operating conditions before using the In-
telligent Key function or use the mechanical
key.
— When operating near a location where
strong radio waves are transmitted, such
as a TV tower, power station and broad-
casting station.
— When in possession of wireless equip- ment, such as a cellular telephone,
transceiver, and CB radio.
— When the Intelligent Key is in contact with or covered by metallic materials.
INTELLIGENT KEY SYSTEM
Page 197 of 346
5-4Starting and driving
WARNING
.The exhaust gas and the exhaust
system are very hot. Keep people,
animals or flammable materials
away from the exhaust system com-
ponents.
. Do not stop or park the vehicle over
flammable materials such as dry
grass, waste paper or rags. They
may ignite and cause a fire.
NOTICE
.Do not use leaded gasoline. Depos-
its from leaded gasoline seriously
reduce the three-way catalyst’s abil-
ity to help reduce exhaust pollu-
tants.
. Keep your engine tuned up. Mal-
functions in the ignition, fuel injec-
tion, or electrical systems can cause
overrich fuel flow into the three-way
catalyst, causing it to overheat. Do
not keep driving if the engine mis-
fires, or if noticeable loss of perfor-
mance or other unusual operating conditions are detected. Have the
vehicle inspected promptly by a
GT-R certified NISSAN dealer.
. Avoid driving with an extremely low
fuel level. Running out of fuel could
cause the engine to misfire, dama-
ging the three-way catalyst.
. Do not race the engine while warm-
ing it up.
. Do not push or tow your vehicle to
start the engine.
TIRE PRESSURE MONITORING
SYSTEM (TPMS)
Each tire should be checked monthly when cold
and inflated to the inflation pressure recom-
mended by the vehicle manufacturer on the
vehicle placard or tire inflation pressure label. (If
your vehicle has tires of a different size than the
size indicated on the vehicle placard or tire
inflation pressure label, you should determine
the proper tire inflation pressure for those tires.)
As an added safety feature, your vehicle has
been equipped with a Tire Pressure Monitoring
System (TPMS) that illuminates a low tire
pressure telltale when one or more of your tires
is significantly under-inflated. Accordingly, when the low tire pressure telltale illuminates, you
should stop and check your tires as soon as
possible, and inflate them to the proper pres-
sure. Driving on a significantly under-inflated tire
causes the tire to overheat and can lead to tire
failure. Under-inflation also reduces fuel effi-
ciency and tire tread life, and may affect the
vehicle’s handling and stopping ability.
If the vehicle is being driven with one or more flat
tires, the run-flat tire warning light will illuminate
continuously and a chime will sound for 10
seconds. The chime will only sound at the first
indication of a flat tire, and the warning light will
illuminate continuously. When the Flat tire
warning is activated, have the system reset
and the tire checked and replaced if necessary
by a GT-R certified NISSAN dealer. Even if the
tire is inflated to the specified COLD tire
pressure, the warning light will continue to
illuminate until the system is reset by a GT-R
certified NISSAN dealer. Your vehicle can be
driven for a limited time on a flat tire. (
“Run-
flat tires” page 8-37)
Please note that the TPMS is not a substitute for
proper tire maintenance, and it is the driver’s
responsibility to maintain correct tire pressure,
even if under-inflation has not reached the level
to trigger illumination of the TPMS low tire
pressure telltale.
Page 213 of 346
5-20Starting and driving
and the second and later operations change the
gears.
To return to the
&Aposition, move the shift lever
to the&Mside again. The position indicator
indicates the gear position with the indication of
“A”.
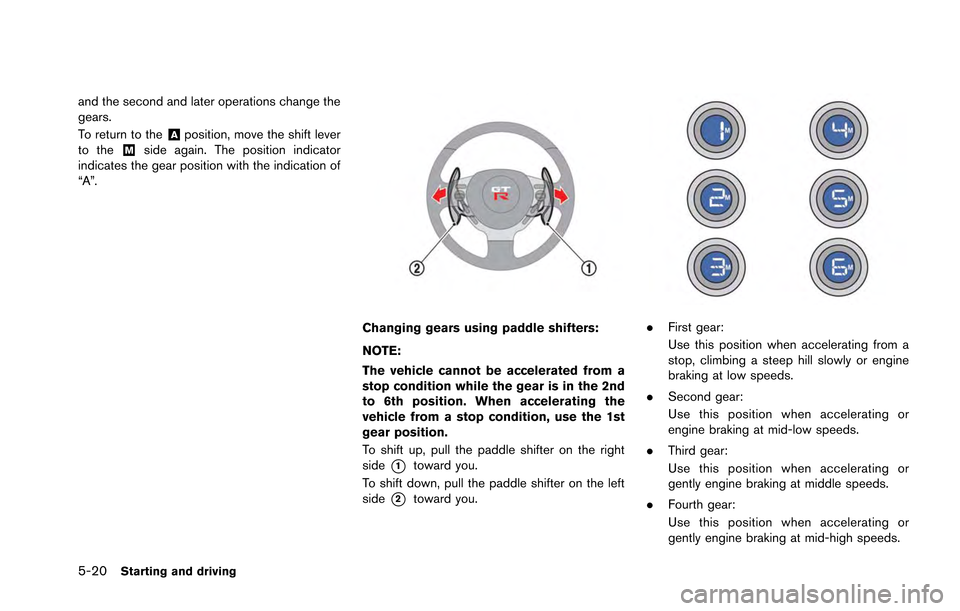
Changing gears using paddle shifters:
NOTE:
The vehicle cannot be accelerated from a
stop condition while the gear is in the 2nd
to 6th position. When accelerating the
vehicle from a stop condition, use the 1st
gear position.
To shift up, pull the paddle shifter on the right
side
*1toward you.
To shift down, pull the paddle shifter on the left
side
*2toward you.
. First gear:
Use this position when accelerating from a
stop, climbing a steep hill slowly or engine
braking at low speeds.
. Second gear:
Use this position when accelerating or
engine braking at mid-low speeds.
. Third gear:
Use this position when accelerating or
gently engine braking at middle speeds.
. Fourth gear:
Use this position when accelerating or
gently engine braking at mid-high speeds.
Page 232 of 346
hill start assist will stop operating completely.
Hill start assist will not operate when the shift
lever is moved to the
&Nor&Pposition or on a
flat and level road.
NOTE:
This system does not function when the
Vehicle Dynamic Control VDC) system
warning appears on the vehicle informa-
tion display located in the tachometer.
(
“Vehicle Dynamic Control (VDC) sys-
tem warning” page 2-36)
NOTICE
Follow these recommendations to ob-
tain maximum engine performance and
ensure the future reliability and econo-
my of your new vehicle. Failure to
follow these recommendations may
result in shortened engine life and
reduced vehicle performance.
Please observe the following types of driving
until the mileage shown below has been
reached.
Until 300 miles (500 km):
. Do not depress the accelerator pedal more
than halfway and avoid rapid acceleration.
. Drive with the engine speed kept at less
than 3,500 RPM.
. Avoid unnecessary quick steering, abrupt
braking and driving on poor roads.
300 to 600 miles (500 to 1,000 km)
. Avoid rapid acceleration in a low gear (1st to
3rd gears) with the accelerator pedal fully
depressed. Depress the pedal slowly.
. Avoid unnecessary quick steering and
abrupt braking. .
Drive with the suspension setup switch in
the COMF mode to allow more suspension
stroke.
600 to 1,200 miles (1,000 to 2,000 km)
. Drive with the engine speed kept relatively
high with the shift lever in the
&Mposition.
Shifting is recommended between 1st and
4th gears.
. Avoid unnecessary quick steering and
abrupt braking.
. Drive with the suspension setup switch in
the COMF mode to allow more suspension
stroke.
Even though the mileage reaches over 1,200
miles (2,000 km) , the clutch may take longer to
properly engage if the vehicle is mainly driven in
town at a low speed. NISSAN recommends
breaking in the clutch at a GT-R certified
NISSAN dealer.
WHEEL ALIGNMENT
Do not adjust the wheel alignment until the
mileage reaches 1,000 miles (1,600 km). Until
then, the suspension may not engage enough
and the height may be higher.
However, make sure to adjust the alignment
after 1,000 miles (1,600 km) .
The wheel alignment can be adjusted by a GT-R
Starting and driving5-39
BREAK-IN SCHEDULE