2013 NISSAN GT-R steering wheel
[x] Cancel search: steering wheelPage 86 of 346
NISSAN ADVANCED AIR BAG SYS-
TEM (front seats)
This vehicle is equipped with the NISSAN
Advanced Air Bag System for the driver and
front passenger seats. This system is designed
to meet certification requirements under U.S.
regulations. It is also permitted in Canada.
However, all of the information, cautions
and warnings in this manual still apply and
must be followed.
The driver supplemental front-impact air bag is
located in the center of the steering wheel. The
front passenger supplemental front-impact air
bag is mounted in the instrument panel above
the glove box. The front air bags are designed to
inflate in higher severity frontal collisions,
although they may inflate if the forces in another
type of collision are similar to those of a higher
severity frontal impact. They may not inflate in
certain frontal collisions. Vehicle damage (or lack
of it) is not always an indication of proper front
air bag operation.
The NISSAN Advanced Air Bag System has
dual stage air bag inflators. The system monitors
information from the Air bag Control Unit (ACU) ,
seat belt buckle sensors and the occupant
classification sensor (pattern sensor). Inflator
operation is based on the severity of a collision
and seat belt usage for the driver. For the frontpassenger, the occupant classification sensor is
also monitored. Based on information from the
sensors, only one front air bag may inflate in a
crash, depending on the crash severity and
whether the front occupants are belted or
unbelted. Additionally, the front passenger air
bag may be automatically turned OFF under
some conditions, depending on the information
provided by the occupant classification sensor.
If the front passenger air bag is OFF, the
passenger air bag status light will be illuminated
(if the seat is unoccupied, the light will not be
illuminated, but the air bag will be off) . One front
air bag inflating does not indicate improper
performance of the system. (
“Front pas-
senger air bag and status light” page 1-38)
If you have any questions about your air bag
system, contact NISSAN or a GT-R certified
NISSAN dealer. If you are considering modifica-
tion of your vehicle due to a disability, you may
also contact NISSAN. Contact information is
contained in the front of this Owner’s Manual.
When a front air bag inflates, a fairly loud noise
may be heard, followed by release of smoke.
This smoke is not harmful and does not indicate
a fire. Care should be taken not to inhale it, as it
may cause irritation and choking. Those with a
history of a breathing condition should get fresh
air promptly. Front air bags, along with the use of seat belts,
help to cushion the impact force on the head
and chest of the front occupants. They can help
save lives and reduce serious injuries. However,
an inflating front air bag may cause facial
abrasions or other injuries. Front air bags do
not provide restraint to the lower body.
Even with NISSAN advanced air bags, seat
belts should be correctly worn and the driver
and passenger seated upright as far as practical
away from the steering wheel or instrument
panel. The front air bags inflate quickly in order
to help protect the front occupants. Because of
this, the force of the front air bag inflating can
increase the risk of injury if the occupant is too
close to, or is against, the air bag module during
inflation.
The front air bags deflate quickly after a collision.
The front air bags operate only when the
ignition switch is in the ON position.
After pushing the ignition switch to the ON
position, the supplemental air bag warning
light illuminates. The supplemental air bag
warning light will turn off after about 7
seconds if the system is operational.
Safety — Seats, seat belts and supplemental restraint system1-37
Page 89 of 346
1-40Safety — Seats, seat belts and supplemental restraint system
Other supplemental front air bag
precautions
WARNING
.Do not place any objects on the
steering wheel pad or on the instru-
ment panel. Also, do not place any
objects between any occupant and
the steering wheel or instrument
panel. Such objects may become
dangerous projectiles and cause
injury if the front air bag inflates.
. Do not place objects with sharp
edges on the seat. Also, do not
place heavy objects on the seat that
will leave permanent impressions in
the seat. Such objects can damage
the seat or occupant classification
sensor (pattern sensor) . This can
affect the operation of the air bag
system and result in serious perso-
nal injury.
. Do not use water or acidic cleaners
(hot steam cleaners) on the seat.
This can damage the seat or occu-
pant classification sensor. This can
also affect the operation of the air bag system and result in serious
personal injury.
. Immediately after inflation, several
front air bag system components
will be hot. Do not touch them; you
may severely burn yourself.
. No unauthorized changes should be
made to any components or wiring
of the supplemental air bag system.
This is to prevent accidental infla-
tion of the supplemental air bag or
damage to the supplemental air bag
system.
. Do not make unauthorized changes
to your vehicle’s electrical system,
suspension system or front end
structure. This could affect proper
operation of the front air bag sys-
tem.
. Tampering with the supplemental
air bag system may result in serious
personal injury. Tampering includes
changes to the steering wheel and
the instrument panel assembly by
placing material over the steering
wheel pad and above the instrument
panel or by installing additional trim
material around the air bag system. .
Modifying or tampering with the
front passenger seat may result in
serious personal injury. For exam-
ple, do not change the front seats by
placing material on the seat cushion
or by installing additional trim ma-
terial, such as seat covers, on the
seat that is not specifically designed
to assure proper air bag operation.
Additionally, do not stow any ob-
jects under the front passenger seat
or the seat cushion and seatback.
Such objects may interfere with the
proper operation of the occupant
classification sensor.
. No unauthorized changes should be
made to any components or wiring
of the seat belt system. This may
affect the front air bag system.
Tampering with the seat belt system
may result in serious personal in-
jury.
. Work on and around the front air
bag system should be done by a
GT-R certified NISSAN dealer. In-
stallation of electrical equipment
should also be done by a GT-R
certified NISSAN dealer. The Sup-
plemental Restraint System (SRS)
Page 98 of 346
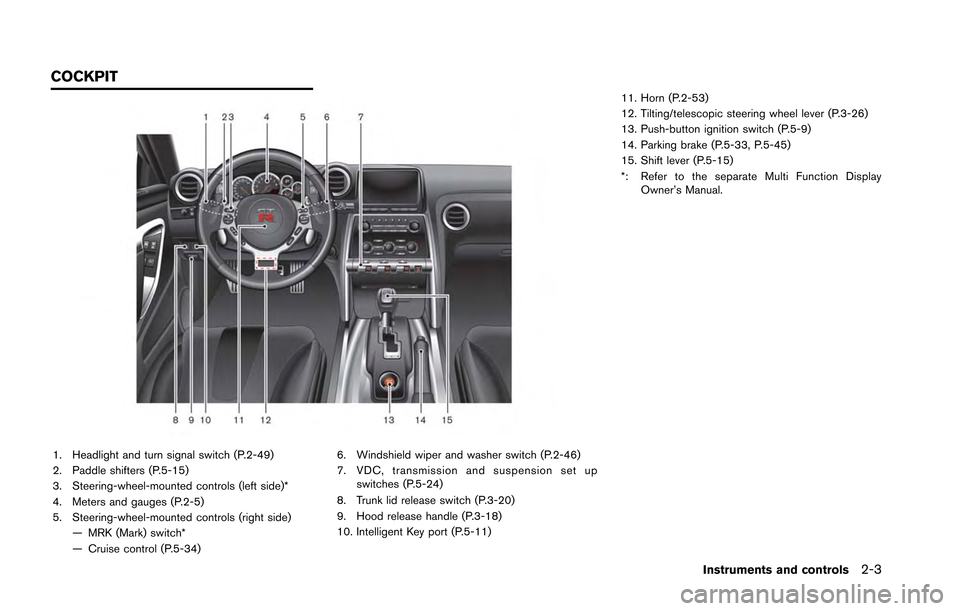
1. Headlight and turn signal switch (P.2-49)
2. Paddle shifters (P.5-15)
3. Steering-wheel-mounted controls (left side)*
4. Meters and gauges (P.2-5)
5. Steering-wheel-mounted controls (right side)— MRK (Mark) switch*
— Cruise control (P.5-34) 6. Windshield wiper and washer switch (P.2-46)
7. VDC, transmission and suspension set up
switches (P.5-24)
8. Trunk lid release switch (P.3-20)
9. Hood release handle (P.3-18)
10. Intelligent Key port (P.5-11) 11. Horn (P.2-53)
12. Tilting/telescopic steering wheel lever (P.3-26)
13. Push-button ignition switch (P.5-9)
14. Parking brake (P.5-33, P.5-45)
15. Shift lever (P.5-15)
*: Refer to the separate Multi Function Display
Owner’s Manual.
Instruments and controls2-3
COCKPIT
Page 122 of 346
Low tire pressure warning:
If the vehicle is being driven with low tire
pressure, the warning light will illuminate.
When the low tire pressure warning light
illuminates, you should stop and adjust the
tire pressure of all 4 wheels to the
recommended COLD tire pressure shown
on the Tire and Loading Information label
located in the driver’s door opening. The
low tire pressure warning light does not
automatically turn off when the tire pres-
sure is adjusted. After the tire is inflated to
the recommended pressure, the vehicle
must be driven at speeds above 16 MPH
(25 km/h) to activate the TPMS and turn off
the low tire pressure warning light. Use a
tire pressure gauge to check the tire
pressure. (
“Tire Pressure Monitoring
System (TPMS)” page 5-4) (“Tire
Pressure Monitoring System (TPMS)” page
6-2)
Run-flat tire warning:
The run-flat tire warning light warns of a flat tire.
If the vehicle is being driven with one or more flat
tires, the warning light will illuminate continu-
ously and a chime will sound for 10 seconds.
The chime will only sound at the first indication
of a flat tire and the warning light will illuminate continuously. When the Flat tire warning is
activated, have the system reset and the tire
checked and replaced if necessary by a GT-R
certified NISSAN dealer. Even if the tire is
inflated to the specified COLD tire pressure, the
warning light will continue to illuminate until the
system is reset by a GT-R certified NISSAN
dealer.
If you select the tire pressure information in the
multi function display, the LOW PRESSURE
warning message will be displayed. The tire
pressure for each tire will also be displayed.
Refer to the separate Multi Function Display
Owner’s Manual.
Your vehicle can be driven for a limited time on a
flat tire. (
“Tire Pressure Monitoring System
(TPMS)” page 5-4) (“Tire Pressure Mon-
itoring System (TPMS)” page 6-2)
TPMS malfunction:
If the TPMS is not functioning properly, the low
tire pressure warning light will flash for approxi-
mately 1 minute when the ignition switch is
pushed ON. The light will remain on after the 1
minute. Have the system checked by a GT-R
certified NISSAN dealer. (
“Tire Pressure
Monitoring System (TPMS)” page 5-4)
(
“Tire pressure” page 8-31)
WARNING
. If the light does not illuminate with
the ignition switch pushed ON, have
the vehicle checked by a GT-R
certified NISSAN dealer as soon as
possible.
. If the light illuminates while driving,
avoid sudden steering maneuvers or
abrupt braking, reduce vehicle
speed, pull off the road to a safe
location and stop the vehicle as
soon as possible. Driving with un-
der-inflated tires may permanently
damage the tires and increase the
likelihood of tire failure. Serious
vehicle damage could occur and
may lead to an accident and could
result in serious personal injury.
Check the tire pressure for all four
tires. Adjust the tire pressure to the
recommended COLD tire pressure
shown on the Tire and Loading
Information label located in the
driver’s door opening to turn the
low tire pressure warning light off. If
the light still illuminates while driv-
ing after adjusting the tire pressure,
a tire may be flat.
Instruments and controls2-27
Page 137 of 346
2-42Instruments and controls
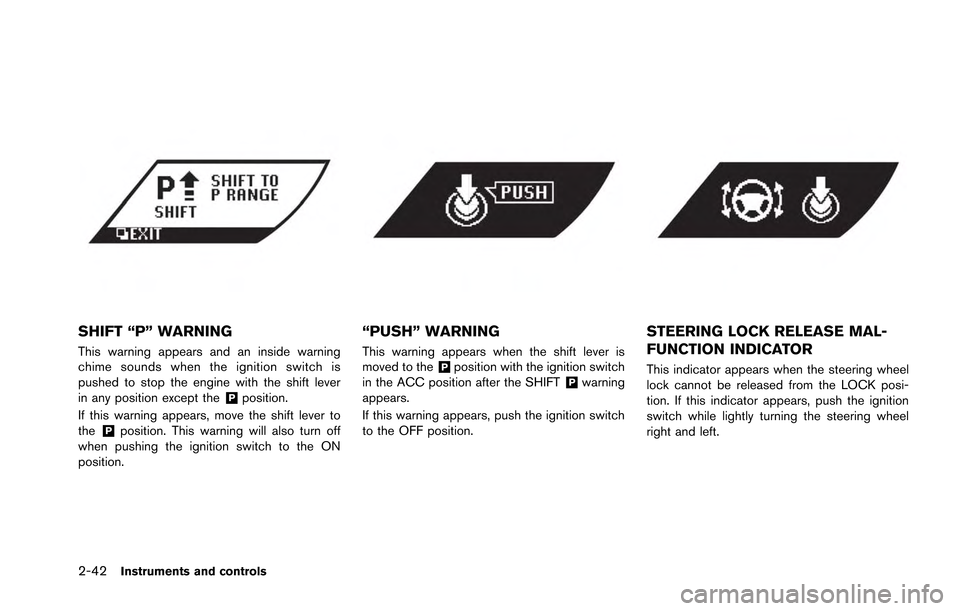
SHIFT “P” WARNING
This warning appears and an inside warning
chime sounds when the ignition switch is
pushed to stop the engine with the shift lever
in any position except the
&Pposition.
If this warning appears, move the shift lever to
the
&Pposition. This warning will also turn off
when pushing the ignition switch to the ON
position.
“PUSH” WARNING
This warning appears when the shift lever is
moved to the&Pposition with the ignition switch
in the ACC position after the SHIFT&Pwarning
appears.
If this warning appears, push the ignition switch
to the OFF position.
STEERING LOCK RELEASE MAL-
FUNCTION INDICATOR
This indicator appears when the steering wheel
lock cannot be released from the LOCK posi-
tion. If this indicator appears, push the ignition
switch while lightly turning the steering wheel
right and left.
Page 148 of 346
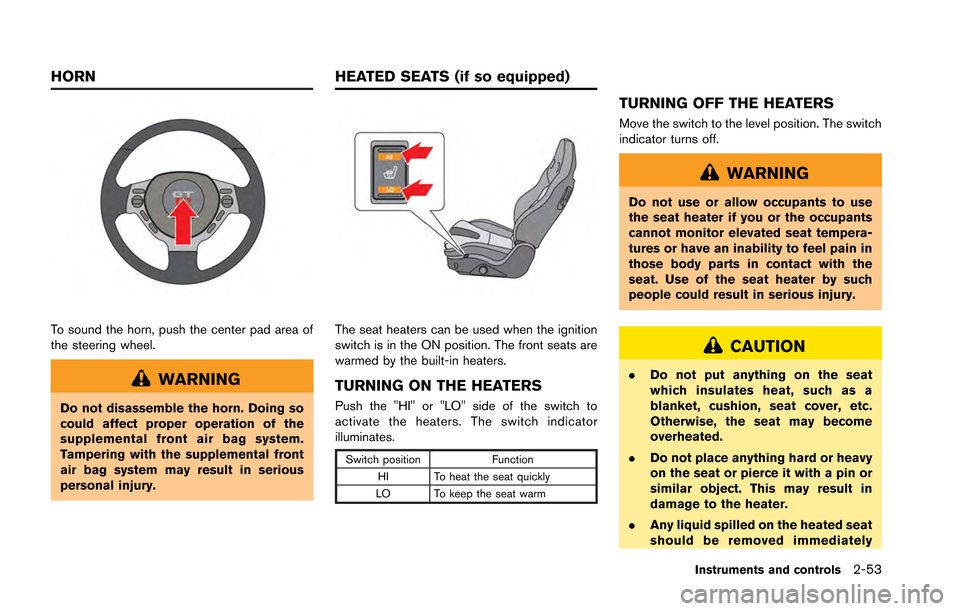
To sound the horn, push the center pad area of
the steering wheel.
WARNING
Do not disassemble the horn. Doing so
could affect proper operation of the
supplemental front air bag system.
Tampering with the supplemental front
air bag system may result in serious
personal injury.
The seat heaters can be used when the ignition
switch is in the ON position. The front seats are
warmed by the built-in heaters.
TURNING ON THE HEATERS
Push the "HI" or "LO" side of the switch to
activate the heaters. The switch indicator
illuminates.
Switch positionFunction
HI To heat the seat quickly
LO To keep the seat warm
TURNING OFF THE HEATERS
Move the switch to the level position. The switch
indicator turns off.
WARNING
Do not use or allow occupants to use
the seat heater if you or the occupants
cannot monitor elevated seat tempera-
tures or have an inability to feel pain in
those body parts in contact with the
seat. Use of the seat heater by such
people could result in serious injury.
CAUTION
. Do not put anything on the seat
which insulates heat, such as a
blanket, cushion, seat cover, etc.
Otherwise, the seat may become
overheated.
. Do not place anything hard or heavy
on the seat or pierce it with a pin or
similar object. This may result in
damage to the heater.
. Any liquid spilled on the heated seat
should be removed immediately
Instruments and controls2-53
HORN HEATED SEATS (if so equipped)
Page 150 of 346
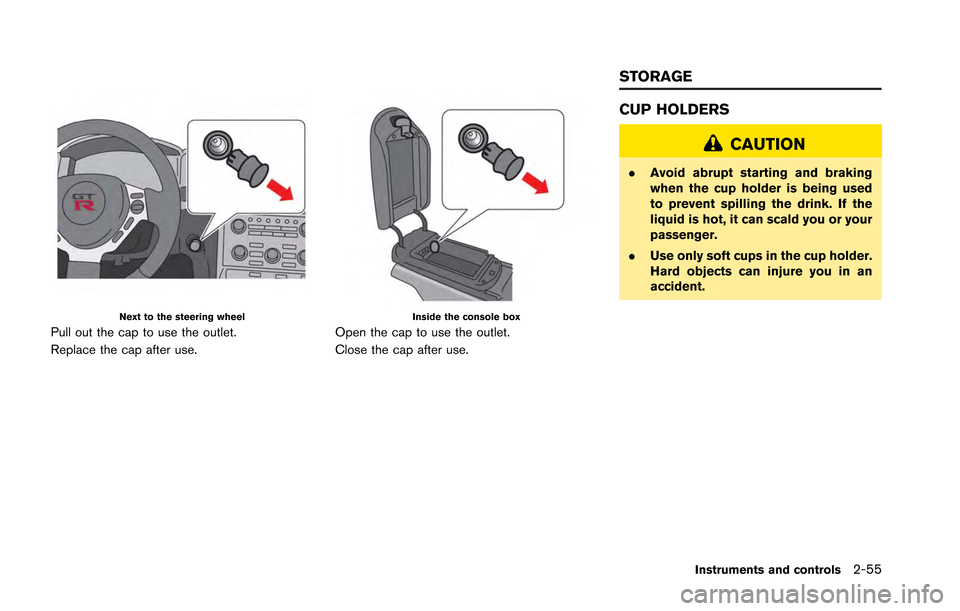
Next to the steering wheel
Pull out the cap to use the outlet.
Replace the cap after use.
Inside the console box
Open the cap to use the outlet.
Close the cap after use.
CUP HOLDERS
CAUTION
.Avoid abrupt starting and braking
when the cup holder is being used
to prevent spilling the drink. If the
liquid is hot, it can scald you or your
passenger.
. Use only soft cups in the cup holder.
Hard objects can injure you in an
accident.
Instruments and controls2-55
STORAGE
Page 162 of 346
3 Pre-driving checks and adjustments
Keys ........................................................................\
..................... 3-2Intelligent Key ...................................................................... 3-2
Doors ........................................................................\
................... 3-4
Locking with inside lock knob ........................................ 3-5
Locking with power door lock switch ........................... 3-5
Automatic door lock system ............................................ 3-5
Locking with mechanical key ........................................... 3-6
Opening the doors ............................................................ 3-7
Intelligent Key system ............................................................. 3-8 Intelligent Key functions .................................................... 3-9
Remote keyless entry functions ................................... 3-12
Setting hazard indicator and horn mode .................. 3-13
Warning signals ............................................................... 3-16
Troubleshooting guide ................................................... 3-17
Hood ........................................................................\
................. 3-18 Opening the hood ........................................................... 3-18
Closing the hood ............................................................. 3-19 Trunk ........................................................................\
................ 3-20
Trunk open request switch ......................................... 3-20
Trunk lid release switch ............................................... 3-20
Trunk release power cancel switch .......................... 3-21Opening and closing the trunk .................................. 3-21
Emergency trunk lid release ....................................... 3-22
Fuel-filler door ....................................................................... 3-23 Opening the fuel filler door ........................................ 3-24
Closing the fuel-filler door .......................................... 3-25
Steering wheel ...................................................................... 3-26
Tilt/telescopic steering column .................................. 3-26
Sun visors ........................................................................\
....... 3-27
Mirrors ........................................................................\
............. 3-27
Inside mirror .................................................................... 3-27
Outside mirrors .............................................................. 3-28
Vanity mirror .................................................................... 3-29