2013 NISSAN GT-R engine
[x] Cancel search: enginePage 283 of 346
8-16Maintenance and do-it-yourself
WARNING
Antifreeze is poisonous and should be
stored carefully in marked containers
out of the reach of children.
Fill the window washer fluid reservoir periodi-
cally. Add window washer fluid when the low
washer fluid warning appears on the vehicle
information display. (
“Low washer fluid
warning” page 2-40)
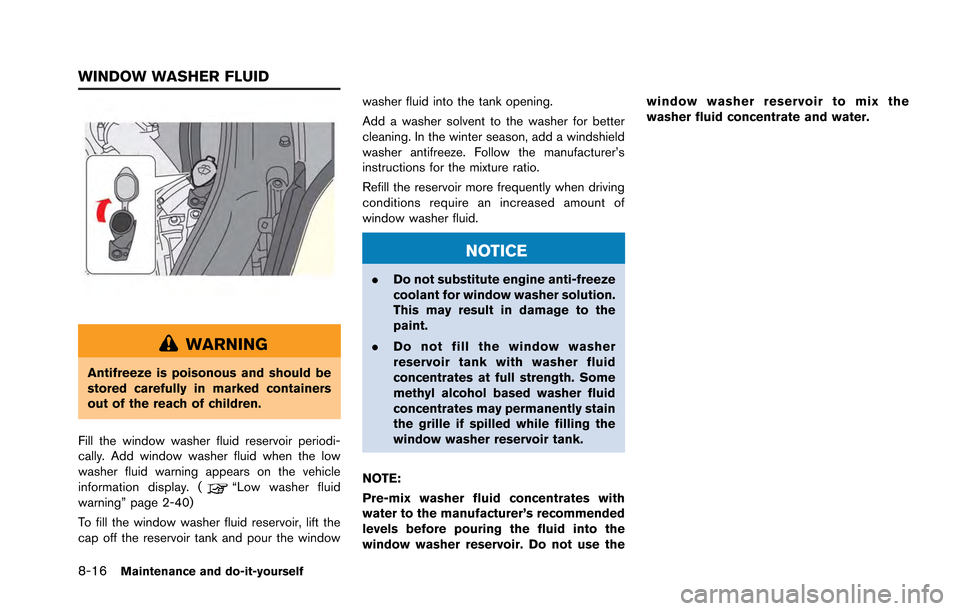
To fill the window washer fluid reservoir, lift the
cap off the reservoir tank and pour the window washer fluid into the tank opening.
Add a washer solvent to the washer for better
cleaning. In the winter season, add a windshield
washer antifreeze. Follow the manufacturer’s
instructions for the mixture ratio.
Refill the reservoir more frequently when driving
conditions require an increased amount of
window washer fluid.
NOTICE
.
Do not substitute engine anti-freeze
coolant for window washer solution.
This may result in damage to the
paint.
. Do not fill the window washer
reservoir tank with washer fluid
concentrates at full strength. Some
methyl alcohol based washer fluid
concentrates may permanently stain
the grille if spilled while filling the
window washer reservoir tank.
NOTE:
Pre-mix washer fluid concentrates with
water to the manufacturer’s recommended
levels before pouring the fluid into the
window washer reservoir. Do not use the window washer reservoir to mix the
washer fluid concentrate and water.
WINDOW WASHER FLUID
Page 285 of 346
8-18Maintenance and do-it-yourself
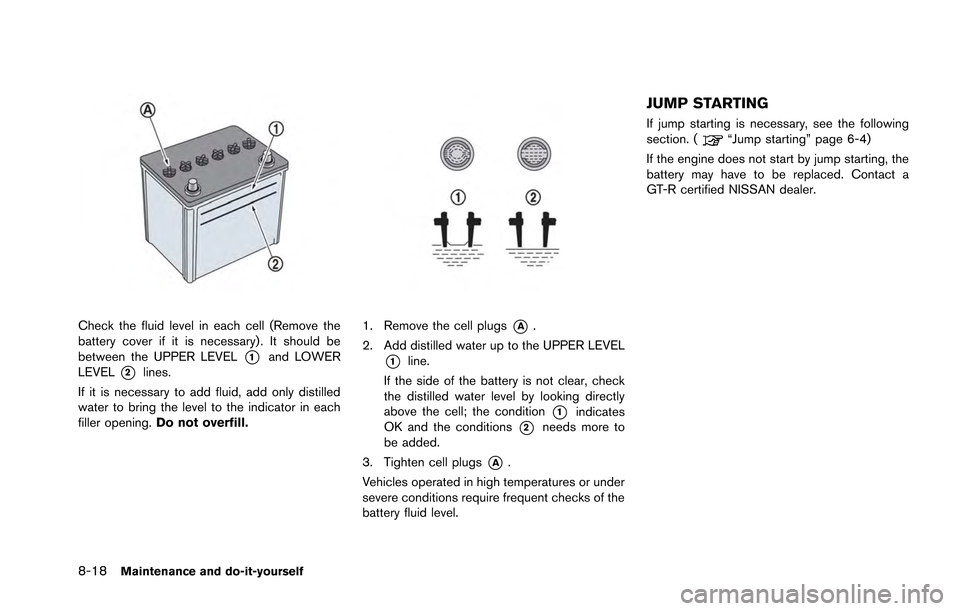
Check the fluid level in each cell (Remove the
battery cover if it is necessary) . It should be
between the UPPER LEVEL
*1and LOWER
LEVEL
*2lines.
If it is necessary to add fluid, add only distilled
water to bring the level to the indicator in each
filler opening. Do not overfill.
1. Remove the cell plugs*A.
2. Add distilled water up to the UPPER LEVEL
*1line.
If the side of the battery is not clear, check
the distilled water level by looking directly
above the cell; the condition
*1indicates
OK and the conditions
*2needs more to
be added.
3. Tighten cell plugs
*A.
Vehicles operated in high temperatures or under
severe conditions require frequent checks of the
battery fluid level.
JUMP STARTING
If jump starting is necessary, see the following
section. (“Jump starting” page 6-4)
If the engine does not start by jump starting, the
battery may have to be replaced. Contact a
GT-R certified NISSAN dealer.
Page 286 of 346
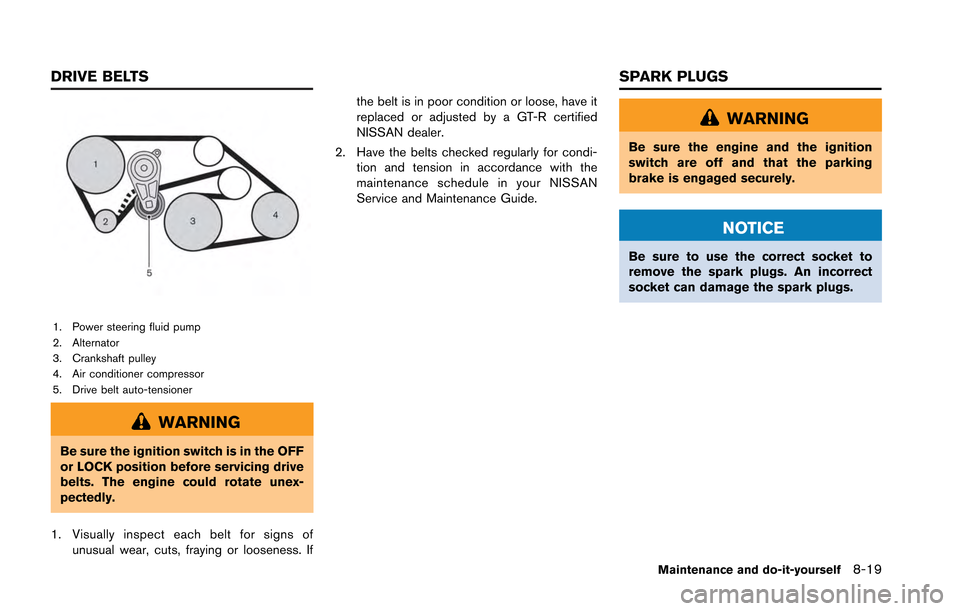
1. Power steering fluid pump
2. Alternator
3. Crankshaft pulley
4. Air conditioner compressor
5. Drive belt auto-tensioner
WARNING
Be sure the ignition switch is in the OFF
or LOCK position before servicing drive
belts. The engine could rotate unex-
pectedly.
1. Visually inspect each belt for signs of unusual wear, cuts, fraying or looseness. If the belt is in poor condition or loose, have it
replaced or adjusted by a GT-R certified
NISSAN dealer.
2. Have the belts checked regularly for condi- tion and tension in accordance with the
maintenance schedule in your NISSAN
Service and Maintenance Guide.
WARNING
Be sure the engine and the ignition
switch are off and that the parking
brake is engaged securely.
NOTICE
Be sure to use the correct socket to
remove the spark plugs. An incorrect
socket can damage the spark plugs.
Maintenance and do-it-yourself8-19
DRIVE BELTS SPARK PLUGS
Page 287 of 346
8-20Maintenance and do-it-yourself
REPLACING SPARK PLUGS
If replacement is required, see a GT-R certified
NISSAN dealer for servicing.
Iridium-tipped spark plugs
It is not necessary to replace the iridium-tipped
spark plugs as frequently as the conventional
type spark plugs since they will last much longer.
Follow the maintenance schedule in NISSAN
Service and Maintenance Guide, but do not
reuse them by cleaning or regapping.
Always replace spark plugs with recom-
mended or equivalent ones.
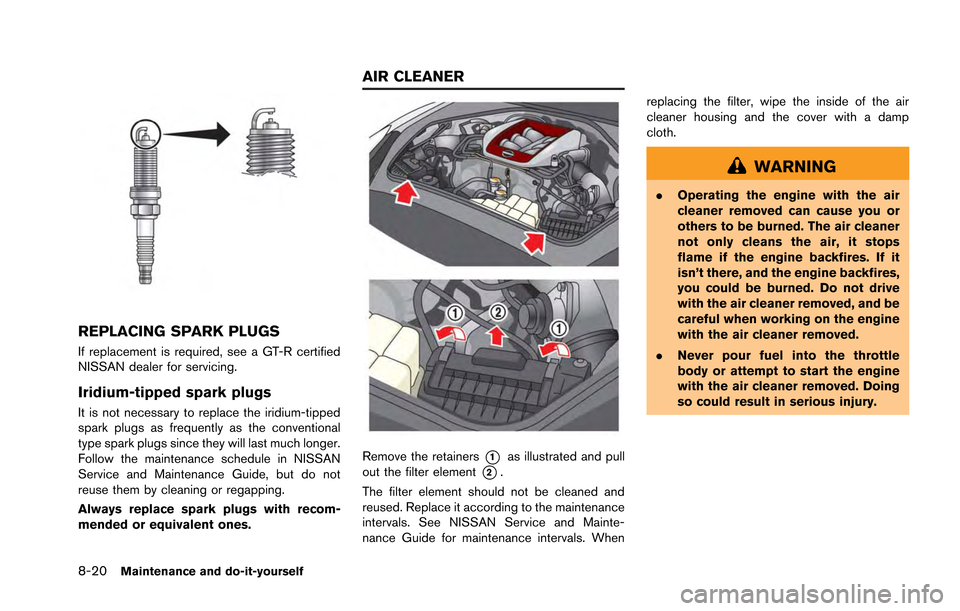
Remove the retainers*1as illustrated and pull
out the filter element
*2.
The filter element should not be cleaned and
reused. Replace it according to the maintenance
intervals. See NISSAN Service and Mainte-
nance Guide for maintenance intervals. When replacing the filter, wipe the inside of the air
cleaner housing and the cover with a damp
cloth.
WARNING
.
Operating the engine with the air
cleaner removed can cause you or
others to be burned. The air cleaner
not only cleans the air, it stops
flame if the engine backfires. If it
isn’t there, and the engine backfires,
you could be burned. Do not drive
with the air cleaner removed, and be
careful when working on the engine
with the air cleaner removed.
. Never pour fuel into the throttle
body or attempt to start the engine
with the air cleaner removed. Doing
so could result in serious injury.
AIR CLEANER
Page 290 of 346
dry road, especially after washing the vehicle or
driving in rain. Contact a GT-R certified NISSAN
dealer if the noise and vibration continue.
Frequent hard braking may cause scorching of
the brake pads. This will require the brake pads
to be replaced, even if the wear limit has not
been reached. Have the brake pads and disc
rotors inspected at the regular vehicle inspec-
tions.
For more details, contact a GT-R certified
NISSAN dealer.
REPLACING THE BRAKE PADS
NISSAN generally recommends to replace all
four sets of brake pads and disc rotors at the
same time to maintain maximum brake perfor-
mance.
However, replacing only the brake pads may be
allowed in some cases (four wheels or only front
wheels depending on the conditions). A GT-R
certified technician must inspect the vehicle and
determine that only the brake pads need to be
replaced. In this case, replacing all brake pads
and disc rotors as a set is not necessary.
Note that the replacement of brake pads and the
disc rotors as a set on all four wheels should be
performed when a GT-R certified technician
determines that this is the correct repair.If the inside of the disc rotors are cold during the
winter and the surface becomes hot due to a
heavy force being applied repeatedly to the
brakes, cracks may occur near the coolant hole
on the surface of the disc rotor. Cracks may also
occur due to a heavy force being repeatedly
applied to the brakes during high performance
driving. In these cases it may be necessary to
replace the disc rotors or brake pads depending
on the condition of the crack. Contact a GT-R
certified NISSAN dealer for replacement.
ENGINE COMPARTMENT
CAUTION
Never use a fuse of a higher or lower
amperage rating than that specified on
the fuse box cover. This could damage
the electrical system or cause a fire.
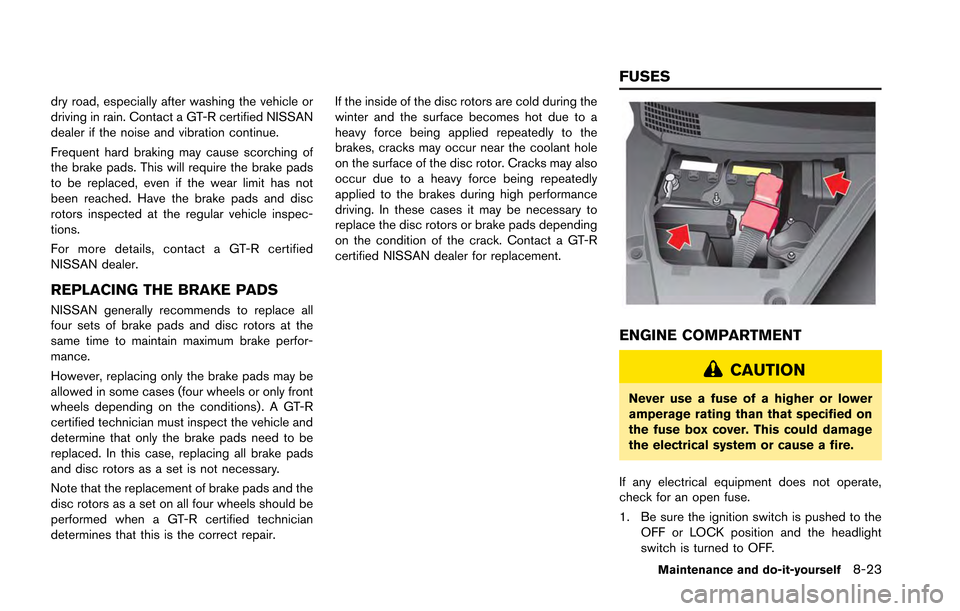
If any electrical equipment does not operate,
check for an open fuse.
1. Be sure the ignition switch is pushed to the OFF or LOCK position and the headlight
switch is turned to OFF.
Maintenance and do-it-yourself8-23
FUSES
Page 291 of 346
8-24Maintenance and do-it-yourself
2. Open the engine hood and remove thecover on the battery and the fuse/fusible link
holder.
3. Remove the fuse/fusible link holder cover.
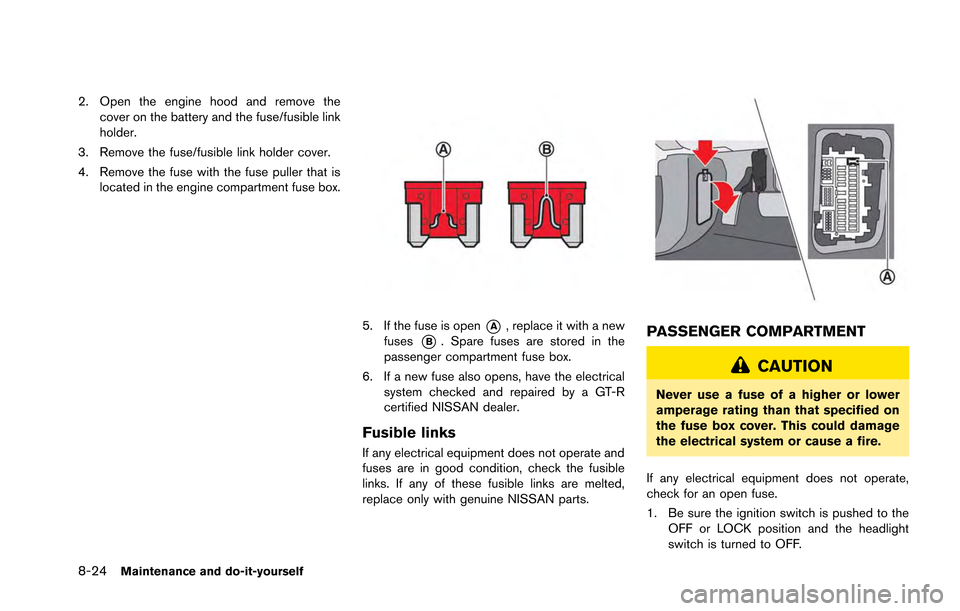
4. Remove the fuse with the fuse puller that is located in the engine compartment fuse box.
5. If the fuse is open*A, replace it with a new
fuses
*B. Spare fuses are stored in the
passenger compartment fuse box.
6. If a new fuse also opens, have the electrical system checked and repaired by a GT-R
certified NISSAN dealer.
Fusible links
If any electrical equipment does not operate and
fuses are in good condition, check the fusible
links. If any of these fusible links are melted,
replace only with genuine NISSAN parts.
PASSENGER COMPARTMENT
CAUTION
Never use a fuse of a higher or lower
amperage rating than that specified on
the fuse box cover. This could damage
the electrical system or cause a fire.
If any electrical equipment does not operate,
check for an open fuse.
1. Be sure the ignition switch is pushed to the OFF or LOCK position and the headlight
switch is turned to OFF.
Page 310 of 346
CAUTION
After using the tools, put them back in
their original places. An accident may
occur if you leave them in the car
unsecured.
Jacking up the vehicle and removing
the tire
WARNING
.Never get under the vehicle while it
is supported only by the jack. If it is
necessary to work under the vehicle,
support it with safety stands.
. Use the correct jack-up points.
Never use any other part of the
vehicle for jack support.
. Never jack up the vehicle more than
necessary.
. Never use blocks on or under the
jack.
. Do not start or run the engine while
vehicle is on the jack, as it may
cause the vehicle to move. This is
especially true for vehicles with limited slip differentials.
. Do not allow passengers to stay in
the vehicle while it is on the jack.
Carefully read the caution label attached
to the jack body and the following instruc-
tions.
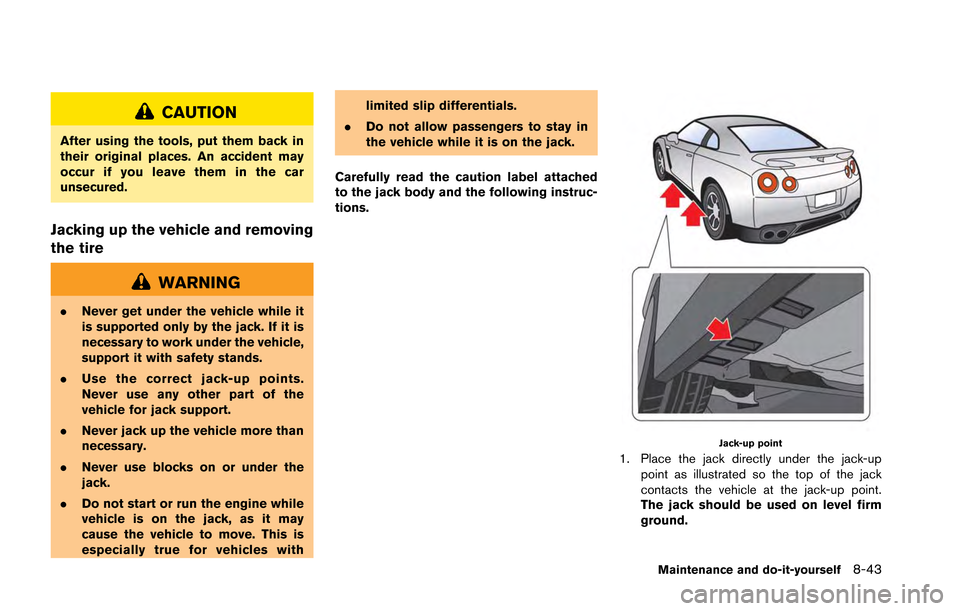
Jack-up point
1. Place the jack directly under the jack-up point as illustrated so the top of the jack
contacts the vehicle at the jack-up point.
The jack should be used on level firm
ground.
Maintenance and do-it-yourself8-43
Page 314 of 346
9 Technical and consumer information
Capacities and recommended fuel/lubricants .................. 9-2Fuel recommendation ........................................................ 9-4
Engine oil and oil filter recommendation ...................... 9-6
Air conditioning system refrigerant and
lubricant recommendations .............................................. 9-7
Specifications ........................................................................\
.... 9-8
Engine ........................................................................\
........... 9-8
Wheels and tires ................................................................ 9-9
Dimensions ....................................................................... 9-11
When traveling or registering your vehicle in
another country ...................................................................... 9-11 Vehicle identification ............................................................. 9-11 Vehicle Identification Number (VIN) plate ................. 9-11
Vehicle identification number (chassis number) ..... 9-12
Engine serial number ...................................................... 9-12
F.M.V.S.S./C.M.V.S.S. certification label ................... 9-12
Emission control information label .............................. 9-13
Tire and loading information label ............................... 9-13
Air conditioner specification label ............................... 9-13 Installing front license plate ............................................... 9-14
Vehicle loading information ................................................ 9-14
Terms ........................................................................\
........ 9-14
Vehicle load capacity ................................................... 9-15
Loading tips .................................................................... 9-16
Measurement of weights ............................................. 9-16
Towing a trailer ...................................................................... 9-17
Flat towing ........................................................................\
...... 9-17
Uniform tire quality grading ................................................ 9-18 Treadwear ....................................................................... 9-18
Traction AA, A, B and C ............................................. 9-18
Temperature A, B and C ............................................. 9-18
Emission control system warranty .................................... 9-19
Reporting safety defects .................................................... 9-19
Readiness for Inspection/Maintenance (I/M) test
(US only) ........................................................................\
........ 9-20
Event Data Recorders (EDR) ............................................ 9-21
Vehicle status data recorder (VSDR) ............................. 9-21 Handling of data ............................................................ 9-21
Owner’s Manual/Service Manual order information .... 9-22