Page 16 of 315

1-6About Multi function display system
CONTROL PANEL
Navigation, Multi function meter
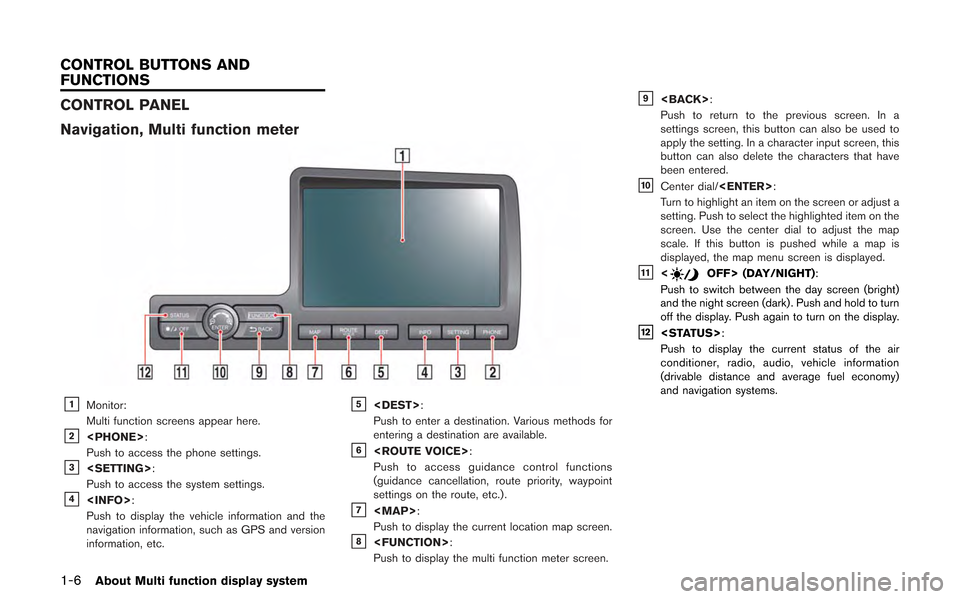
&1Monitor:
Multi function screens appear here.
&2:
Push to access the phone settings.
&3:
Push to access the system settings.
&4:
Push to display the vehicle information and the
navigation information, such as GPS and version
information, etc.
&5:
Push to enter a destination. Various methods for
entering a destination are available.
&6:
Push to access guidance control functions
(guidance cancellation, route priority, waypoint
settings on the route, etc.) .
&7
Page 22 of 315
1-12About Multi function display system
MENU SCREEN AND HOW TO OP-
ERATE
Menu screens and their purposes
Push, ,
, or to dis-
play the corresponding menu screen.
How to select a menu item:
Example: screen
1. Turn the center dial clockwise or counter- clockwise. An item is highlighted accord-
ingly. 2. To select the preferred menu item, highlight
the item and push . The next
screen is displayed.
3. Push to return to the previous
screen without applying any changes.
Push
Page 23 of 315
Using controls to adjust values, levels, etc.
There are three main methods you can use to
control the navigation system: the center dial or
the touch panel. Use these controls to adjust the
volume of phone and voice guidance, the display
brightness, etc.
How to adjust:
1. Highlight the preferred setting item andpush . The color of the corre-
sponding adjustment item changes. 2. Use the center dial or the touch panel, and
the value or bar indicating levels increases
or decreases accordingly.
3. Push or to apply the
setting.
INFO:
. You can also adjust the volume of phone and
voice guidance, etc. by tilting the steering
switch up and down.
. This same adjustment can also be made by
the touch panel operation.
“List screen” (page 1-14)
About Multi function display system1-13
Page 24 of 315

1-14About Multi function display system
LIST SCREEN
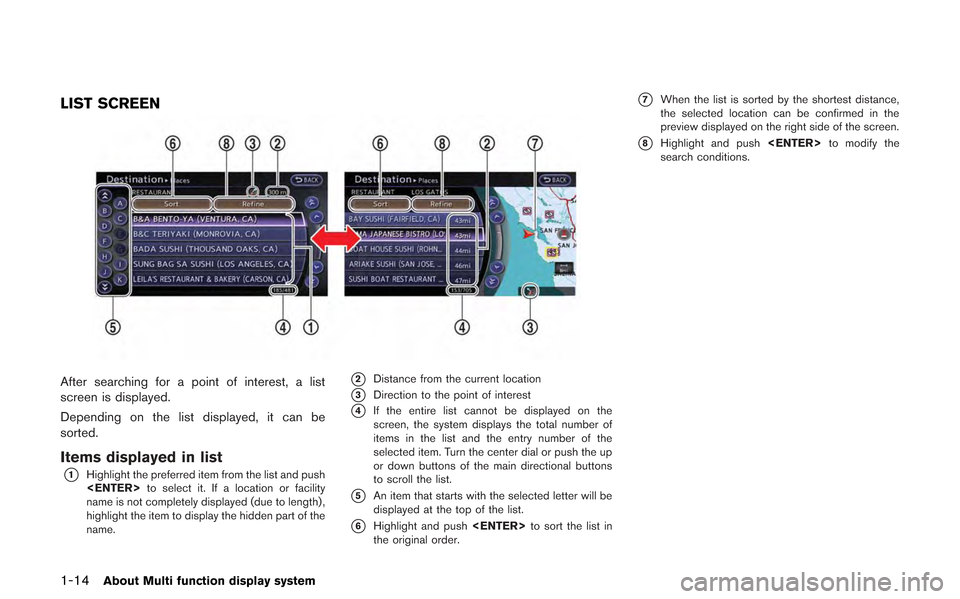
After searching for a point of interest, a list
screen is displayed.
Depending on the list displayed, it can be
sorted.
Items displayed in list
*1Highlight the preferred item from the list and push
to select it. If a location or facility
name is not completely displayed (due to length) ,
highlight the item to display the hidden part of the
name.
*2Distance from the current location
*3Direction to the point of interest
*4If the entire list cannot be displayed on the
screen, the system displays the total number of
items in the list and the entry number of the
selected item. Turn the center dial or push the up
or down buttons of the main directional buttons
to scroll the list.
*5An item that starts with the selected letter will be
displayed at the top of the list.
*6Highlight and push to sort the list in
the original order.
*7When the list is sorted by the shortest distance,
the selected location can be confirmed in the
preview displayed on the right side of the screen.
*8Highlight and push to modify the
search conditions.
Page 26 of 315

1-16About Multi function display system
CHARACTER (letters and numbers)
INPUT SCREEN
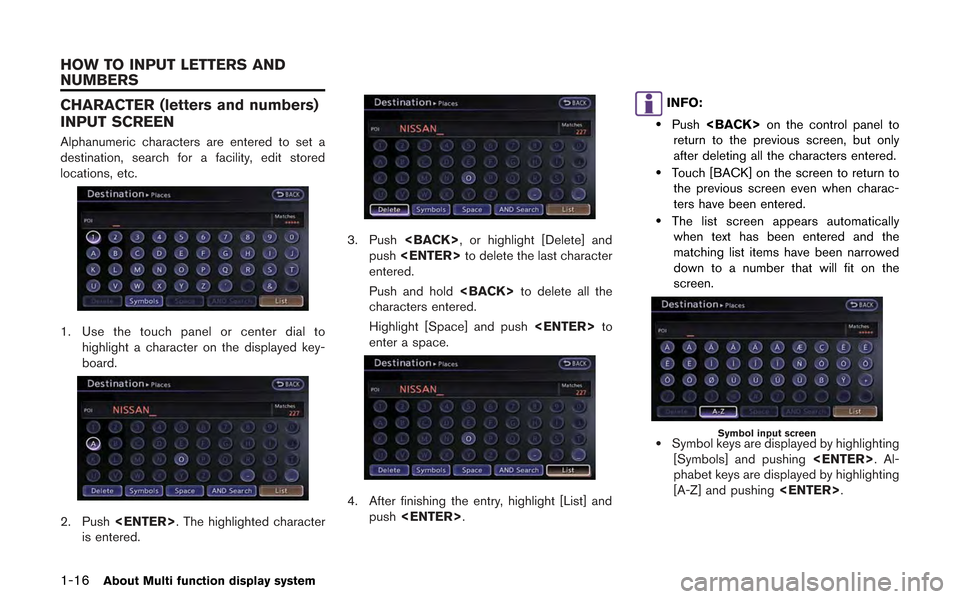
Alphanumeric characters are entered to set a
destination, search for a facility, edit stored
locations, etc.
1. Use the touch panel or center dial tohighlight a character on the displayed key-
board.
2. Push . The highlighted character
is entered.
3. Push , or highlight [Delete] and
push to delete the last character
entered.
Push and hold to delete all the
characters entered.
Highlight [Space] and push to
enter a space.
4. After finishing the entry, highlight [List] and push .
INFO:
.Push on the control panel to
return to the previous screen, but only
after deleting all the characters entered.
.Touch [BACK] on the screen to return to the previous screen even when charac-
ters have been entered.
.The list screen appears automaticallywhen text has been entered and the
matching list items have been narrowed
down to a number that will fit on the
screen.
Symbol input screen
.Symbol keys are displayed by highlighting
[Symbols] and pushing . Al-
phabet keys are displayed by highlighting
[A-Z] and pushing .
HOW TO INPUT LETTERS AND
NUMBERS
Page 27 of 315
NUMBER INPUT SCREEN
A phone number or a street number can also be
entered as a search method to look for a
destination. Perform the following procedure to
enter a number.
INFO:
Only the locations included in the map data
database can be searched for by a phone
number.
1. Use the touch panel or center dial to highlight a number on the displayed key-
board.
2. Push . The highlighted number is
entered.
3. Push , or highlight [Delete] and
push to delete the last number
entered.
Push and hold to delete all the
numbers entered.
4. After finishing the entry, highlight [List] and push .
INFO:
. Push on the control panel to
return to the previous screen, but only after
deleting all the numbers entered.
. Touch [BACK] on the screen to return to the
previous screen even when numbers have
been entered.
About Multi function display system1-17
Page 39 of 315
Example: The most detailed level (2D map)
Example: The widest level (2D map)
Example: The most detailed level (BirdviewTMmap)
Example: The widest level (BirdviewTMmap)
INFO:
The traffic information icons are not displayed on
the map screen when the map scale is set to 32
miles (64 km) or higher.
“Traffic information display and scale le-
vels” (page 6-11)
CHANGING MAP VIEW
The map view can be changed between the 2D
and BirdviewTMmaps. The map can also be
displayed in the split screen mode.
1. Push while the current location
map screen is displayed.
2. Highlight [Map View] and push .
Navigation2-11
Page 40 of 315
![NISSAN GT-R 2013 R35 Multi Function Display Owners Manual 2-12Navigation
3. Highlight [Change View] and push the rightbutton of the directional buttons.
4. Highlight the preferred map view and push <ENTER>. The indicator of the selected
map view illuminates. NISSAN GT-R 2013 R35 Multi Function Display Owners Manual 2-12Navigation
3. Highlight [Change View] and push the rightbutton of the directional buttons.
4. Highlight the preferred map view and push <ENTER>. The indicator of the selected
map view illuminates.](/manual-img/5/316/w960_316-39.png)
2-12Navigation
3. Highlight [Change View] and push the rightbutton of the directional buttons.
4. Highlight the preferred map view and push . The indicator of the selected
map view illuminates.
5. The display automatically returns to the map screen.
Available views
. [2D Map]:
Switches to the 2D map.
. [Birdview (3D)]:
Switches to the Birdview
TMmap.
. [Split: 2D Map]:
Changes to the split screen mode and both
halves display maps in 2D.
. [Split: Birdview Map]:
Changes to the split screen mode and the
left half displays the map in 2D and the right
half displays the map in Birdview
TM.
INFO:
. When the split screen mode is selected, the
map settings for the left screen can be
changed independently.
“Setting left screen display”
(page 2-16)
. If the split screen mode is selected, the
normal map scrolling and scale adjustment
are set in the right screen. However, if an
icon is touched before adjusting the map
direction or scale, then each screen can be
adjusted independently.
Split: 2D Map
Split: BirdviewTMMap
Other settings
The map view can also be set by performing the
following procedure.
1. Push .
2. Highlight [Navigation] and push .
3. Highlight [Map View] and push .
4. Highlight [Change View] and push .