Page 101 of 444
1. Vents (P. 4-17)
2. Headlight/fog light (if so equipped)/turnsignal switch (P. 2-28)
3. Steering wheel switch for audio control
(if so equipped)/Bluetooth® Hands-
Free Phone System (if so equipped)
(P. 4-75, P. 4-70, 4-71)
4. Driver supplemental air bag/horn
(P. 1-63, P. 2-32)
5. Meters, gauges and warning/indicator
lights (P. 2-3, 2-14)
6. Cruise control main/set switches
(if so equipped) (P. 5-21)
7. Windshield wiper/washer switch
P. 2-26)
8. Storage (P. 2-38)
9. Audio system controls (if so equipped)
(P. 4-35)
10. Front passenger supplemental air bag
(P. 1-63)
11. Upper and lower glove box (P. 2-42)
12. Passenger air bag status light (P. 1-72)
13. Power outlet (P. 2-37)
14. Power outlet (P. 2-37)
LIC2471
INSTRUMENT PANEL
2-2Instruments and controls
Page 127 of 444
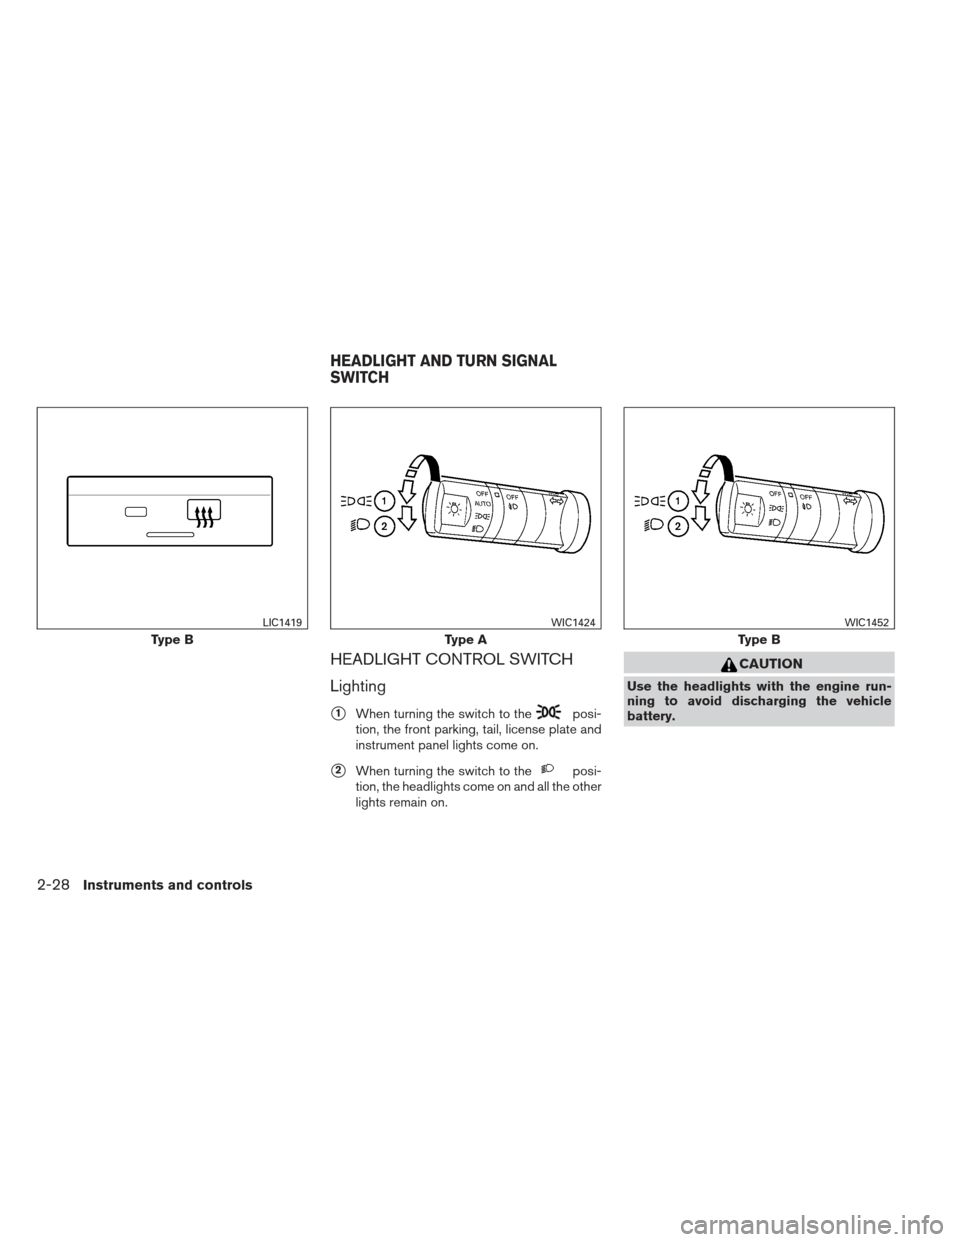
HEADLIGHT CONTROL SWITCH
Lighting
�1When turning the switch to theposi-
tion, the front parking, tail, license plate and
instrument panel lights come on.
�2When turning the switch to theposi-
tion, the headlights come on and all the other
lights remain on.
CAUTION
Use the headlights with the engine run-
ning to avoid discharging the vehicle
battery.
Type B
LIC1419
Type A
WIC1424
Type B
WIC1452
HEADLIGHT AND TURN SIGNAL
SWITCH
2-28Instruments and controls
Page 128 of 444
Autolight system (if so equipped)
The autolight system allows the headlights to be
set so they turn on and off automatically. The
autolight system can:● Turn on the headlights, front parking, tail,
license plate and instrument panel lights au-
tomatically when it is dark.
● Turn off all the lights when it is light.
● Keep all the lights on for a period of time after
you turn the key to OFF and all doors are
closed. To turn on the autolight system:
1. Turn the headlight switch to the AUTO posi- tion
�1.
2. Turn the ignition switch to ON.
3. The autolight system automatically turns the headlights on and off.
Initially, if the ignition switch is turned OFF and a
door is opened and left open, the headlights
remain ON for a period of time. If another door is
opened while the headlights are on, then the
timer is reset.
To turn the autolight system off, turn the switch to
the OFF,
,orposition.Type C
WIC1426WIC1453
Instruments and controls2-29
Page 129 of 444

Be sure you do not put anything on top of
the autolight sensor
�1located in the top
side of the instrument panel. The autolight
sensor controls the autolight; if it is cov-
ered, the autolight sensor reacts as if it is
dark out and the headlights will illuminate.
If this occurs while parked with the engine
off and the switch in the ON position, your
vehicle’s battery could become discharged.Headlight beam select
�1To select the high beam function, push the
lever forward. The high beam lights come on
and the
light illuminates.
�2Pull the lever back to select the low beam.
�3Pulling and releasing the lever flashes the
headlight high beams on and off.
Battery saver system
If the ignition switch is placed in the OFF position
while the headlight switch is in the
orposition, the headlights will turn off after
a period of time.
After the headlights automatically turn off with the
headlight switch in the
orposition,
the headlights will illuminate again if the headlight
switch is moved to the OFF position and then
turned to the
orposition.
CAUTION
Even though the battery saver feature au-
tomatically turns off the headlights after a
period of time, you should turn the head-
light switch to the OFF position when the
engine is not running to avoid discharging
the vehicle battery.
DAYTIME RUNNING LIGHT SYSTEM
(Canada only)
The headlights automatically illuminate at a re-
duced intensity when the engine is started with
the parking brake released. The daytime running
lights operate with the headlight switch in the
OFF position or in the
position. Turn the
headlight switch to the
position for full
illumination when driving at night.
LIC0835WIC1427
2-30Instruments and controls
Page 130 of 444

If the parking brake is applied before the engine is
started, the daytime running lights do not illumi-
nate. The daytime running lights illuminate when
the parking brake is released. The daytime run-
ning lights will remain on until the ignition switch
is placed in the OFF position.
WARNING
When the daytime running light system is
active, tail lights on your vehicle are not
on. It is necessary at dusk to turn on your
headlights. Failure to do so could cause
an accident injuring yourself and others.
INSTRUMENT BRIGHTNESS
CONTROL
The instrument brightness control operates when
the headlight control switch is in the AUTO (if so
equipped) ,
orposition.
Turn the control
�Ato adjust the brightness of the
instrument panel lights when driving at night.
TURN SIGNAL SWITCH
Turn signal
�1Move the lever up or down to signal the
turning direction. When the turn is com-
pleted, the turn signals cancel automatically.
Lane change signal
�2To signal a lane change, move the lever up or
down to the point where the indicator light
begins to flash, but the lever does not latch.
The turn signal will flash three times automati-
cally.
WIC0917WIC1428
Instruments and controls2-31
Page 147 of 444
1. Window lock button
2. Power door lock switch
3. Front passenger side window switch
4. Right rear passenger window switch(Crew Cab models only)
5. Left rear passenger window switch
(Crew Cab models only)
6. Driver’s side automatic switch
Driver’s side power window switch
The driver’s side control panel is equipped with
switches to open or close the front and rear
passenger windows.
To open a window, push the switch and hold it
down. To close a window, pull the switch and
hold it up. To stop the opening or closing function
at any time, simply release the switch.
Front passenger’s power window
switch
The passenger’s window switch operates only
the corresponding passenger’s window. To open
the window, push the switch and hold it down
�1.
To close the window, pull the switch up
�2.
LIC1329LIC0786
2-48Instruments and controls
Page 167 of 444

Silencing the horn beep feature
If desired, the horn beep feature can be deacti-
vated using the keyfob.
To deactivate:Press and hold the
andbuttonsfor at least 2 seconds.
The hazard warning lights will flash three times to
confirm that the horn beep feature has been
deactivated.
To activate: Press and hold the
andbuttonsfor at least 2 seconds
once more. The hazard warning lights will flash once and the
horn will sound once to confirm that the horn
beep feature has been reactivated.
Deactivating the horn beep feature does not si-
lence the horn if the alarm is triggered.
�1Pull the hood lock release handle located
below the driver’s side instrument panel. The
hood will spring up slightly.
�2Push the lever at the front of the hood to the
side as illustrated with your fingertips and
raise the hood.
�3Insert the support rod into the slot on the
underside of the hood.
When closing the hood, return the hood rod to its
original position. Lower the hood approximately
12 in (30 cm) above the latch and release it. This
allows proper engagement of the hood latch.
LPD0262LPD0302
HOOD
3-10Pre-driving checks and adjustments
Page 214 of 444

The sunload sensor�1, located on the top center
of the instrument panel, helps the system main-
tain a constant temperature. Do not put anything
on or around this sensor. The air conditioner system in your NISSAN ve-
hicle is charged with a refrigerant designed with
the environment in mind.
This refrigerant does not harm the earth’s
ozone layer.
Special charging equipment and lubricant is re-
quired when servicing your NISSAN air condi-
tioner. Using improper refrigerants or lubricants
will cause severe damage to your air conditioner
system. See “Air conditioner system refrigerant
and oil recommendations” in the “Technical and
consumer information” section of this manual.
A NISSAN dealer is able to service your “environ-
mentally friendly” air conditioning system.
WARNING
The air conditioner system contains re-
frigerant under high pressure. To avoid
personal injury, any air conditioner ser-
vice should be done only by an experi-
enced technician with proper equipment.
RADIO
With the ignition placed in the ACC or ON posi-
tion, press the PWR (power)/VOL (volume) knob
to turn the radio on. If you listen to the radio with
the engine not running, the ignition should be
placed in the ACC position.
Radio reception is affected by station signal
strength, distance from radio transmitter, build-
ings, bridges, mountains and other external influ-
ences. Intermittent changes in reception quality
normally are caused by these external influences.
Using a cellular phone in or near the ve-
hicle may influence radio reception quality.
Radio reception
Your NISSAN radio system is equipped with
state-of-the-art electronic circuits to enhance ra-
dio reception. These circuits are designed to
extend reception range, and to enhance the qual-
ity of that reception.
However, there are some general characteristics
of both FM and AM radio signals that can affect
radio reception quality in a moving vehicle, even
when the finest equipment is used. These char-
acteristics are completely normal in a given re-
ception area and do not indicate any malfunction
in your NISSAN radio system.
LIC0515
SERVICING AIR CONDITIONER (if so
equipped)
AUDIO SYSTEM (if so equipped)
Monitor, climate, audio, phone and voice recognition systems4-35

2. Headlight/fog light (if so equipped)/turnsignal switch (P. 2-28)
3. Steering wheel switch for audio control
(if so equipped)/Bluetooth® Hands-
Free Phone System (if so equipped)")

The autolight system allows the headlights to be
set so they turn on and off automatically. The
autolight system can:● Turn on the headlights, front parking, tail,")

5. Left rear passenger window switch
(Crew Cab models")