Page 374 of 444

6. Return the wiper to its original position andrelease it until it has made contact with the
windshield.
CAUTION
●After wiper blade replacement, return
the wiper arm to its original position;
otherwise it may be damaged when the
hood is opened.
● Make sure the wiper blades contact the
glass; otherwise the arms may be dam-
aged from wind pressure.
If you wax the surface of the hood, be careful not
to let wax get into the windshield washer nozzle
�A. This may cause clogging or improper wind-
shield washer operation. If wax gets into the
nozzle, remove it with a needle or small pin
�B. If the brakes do not operate properly, have the
brakes checked by a NISSAN dealer.
Self-adjusting brakes
Your vehicle is equipped with self-adjusting
brakes.
The front and rear disc-type brakes self-adjust
every time the brake pedal is applied.
WARNING
See a NISSAN dealer for a brake system
check if the brake pedal height does not
return to normal.
Brake pad wear indicators
The disc brake pads on your vehicle have audible
wear indicators. When a brake pad requires re-
placement, a high pitched scraping or screech-
ing sound will be heard when the vehicle is in
motion. The noise will be heard whether or not the
brake pedal is depressed. Have the brakes
checked as soon as possible if the wear indicator
sound is heard.
Under some driving or climate conditions, occa-
sional brake squeak, squeal or other noise may
be heard. Occasional brake noise during light to
moderate stops is normal and does not affect the
function or performance of the brake system.
LDI2142
BRAKES
Maintenance and do-it-yourself8-23
Page 376 of 444
ENGINE COMPARTMENT
CAUTION
Never use a fuse of a higher or lower
amperage rating than specified on the
fuse box cover. This could damage the
electrical system or cause a fire.
If any electrical equipment does not come on,
check for an open fuse. 1. Be sure the ignition switch and the headlight switch are OFF.
2. Open the engine hood. 3. Remove the fuse box cover by pushing the
tab and lifting the cover up.
4. Remove the fuse with the fuse puller. The fuse puller is located in the center of the fuse
block in the passenger compartment.
5. If the fuse is open
�A, replace it with a new
fuse
�B.
6. If a new fuse also opens, have the electrical system checked and repaired by a NISSAN
dealer.
LDI0444WDI0452
Maintenance and do-it-yourself8-25
Page 377 of 444
Fusible links
If the electrical equipment does not operate and
fuses are in good condition, check the fusible
links. If any of these fusible links are melted,
replace with only Genuine NISSAN parts.
PASSENGER COMPARTMENT
CAUTION
Never use a fuse of a higher or lower
amperage rating than specified on the
fuse box cover. This could damage the
electrical system or cause a fire.If any electrical equipment does not operate,
check for an open fuse.
1. Be sure the ignition switch and the headlight switch are OFF.
2. Pull the fuse box cover to remove.
3. Remove the fuse with the fuse puller.
4. If the fuse is open
�A, replace it with an
equivalent good fuse
�B.
5. Push the fuse box cover to install.
6. If a new fuse also opens, have the electrical system checked and repaired by a NISSAN
dealer.
LDI0445
Type A
WDI0452
8-26Maintenance and do-it-yourself
Page 378 of 444
Extended storage switch
If any electrical equipment does not operate,
remove the extended storage switch and check
for an open fuse.
NOTE:
The extended storage switch is used for
long term vehicle storage. Even if the ex-
tended storage switch is broken it is not
necessary to replace it. Replace only the
open fuse in the switch with a new fuse.How to replace the extended storage switch:
1. To remove the extended storage switch, be sure the ignition switch is in the OFF or
LOCK position.
2. Be sure the headlight switch is in the OFF position.
3. Remove the fuse box cover.
4. Pinch the locking tabs
�1found on each
side of the storage switch.
5. Pull the storage switch straight out from the fuse box
�2.
Type B
LDI0456LDI2035
Maintenance and do-it-yourself8-27
Page 380 of 444

●Do not touch the internal circuit and electric
terminals as it could cause a malfunction.
● When changing the battery, do not let dust
or oil get on the keyfob.
● There is danger of explosion if a lithium bat-
tery is incorrectly replaced. Replace only
with the same or equivalent type.
Recommended battery: CR2025 or equivalent.
�4Close the lid securely.
5. Press the
button, then thebutton two or three times to check the key-
fob operation.
If the battery is removed for any reason
other than replacement, perform step 5. ● An improperly disposed battery can
hurt the environment. Always confirm
local regulations for battery disposal.
● The keyfob is water-resistant; how-
ever, if it does get wet, immediately
wipe completely dry.
● The operational range of the keyfob
extends to approximately 33 ft (10 m)
from the vehicle. This range may vary
with conditions. FCC Notice:
For USA:
This device complies with Part 15 of the
FCC Rules. Operation is subject to the fol-
lowing two conditions: (1) This device may
not cause harmful interference, and (2) this
device must accept any interference re-
ceived, including interference that may
cause undesired operation. Note: Changes
or modifications not expressly approved by
the party responsible for compliance could
void the user’s authority to operate the
equipment.
For Canada:
This device complies with RSS-210 of In-
dustry Canada. Operation is subject to the
following two conditions: (1) this device
may not cause interference, and (2) this
device must accept any interference, in-
cluding interference that may cause unde-
sired operation of the device.
HEADLIGHTS
The headlight is a semi-sealed beam type which
uses a replaceable headlight (halogen) bulb. A
bulb can be replaced from inside the engine
compartment without removing the headlight as-
sembly.
CAUTION
●
High pressure halogen gas is sealed
inside the halogen bulb. The bulb may
break if the glass envelope is scratched
or the bulb is dropped.
● When handling the bulb, do not touch
the glass envelope.
● DO NOT TOUCH THE BULB WITH BARE
HANDS.
● Use the same number and wattage as
shown in the chart.
● Do not leave the bulb out of the head-
light reflector for a long period of time
as dust, moisture and smoke may enter
the headlight body and affect the per-
formance of the headlight.
● Aiming is not necessary after replacing
the bulb. When aiming adjustment is
necessary, contact a NISSAN dealer.
LIGHTS
Maintenance and do-it-yourself8-29
Page 381 of 444

Fog may temporarily form inside the lens of the
exterior lights in the rain or in a car wash. A
temperature difference between the inside and
the outside of the lens causes the fog. This is not
a malfunction. If large drops of water collect
inside the lens, contact a NISSAN dealer.
Removing the headlight bulb
1. Open the hood.
2. Disconnect the negative (-) battery cable.
3. Disconnect the electrical connector from therear end of the bulb. 4. Turn the bulb retaining ring counterclock-
wise until it is free from the headlight reflec-
tor and then remove it
�A.
5. Carefully remove the headlight bulb. Do not shake or rotate the bulb when removing it
�B.
Replacing the headlight bulb
1. Insert the bulb.
DO NOT TOUCH THE BULB WITH BARE
HANDS.
2. Install and tighten the bulb retainer. ●Be sure the lip of the bulb socket con-
tacts the headlight body.
3. Push the electrical connector into the bulb plastic base until it snaps and stops.
4. Connect the negative (-) battery cable.
5. Close the hood.
LDI0446
8-30Maintenance and do-it-yourself
Page 382 of 444
EXTERIOR AND INTERIOR LIGHTS
ItemWattage (W)Bulb No.*1
Headlight 60/559007 (HB5)
Turn signal light/Parking light 28/8HT7444NA
Side marker 5168
Rear combination light Turn signal 273156AK
Stop/Tail 27/83157K
Back-up 18921
License plate light 5W5W
Fog light*
2(if so equipped) 55H11
Map lights (if so equipped) 8AL12
Interior light 8AL25
High-mounted stop light/cargo light*
212.8 912LF
Always check with the Parts Department at a NISSAN dealer for the latest parts information.
* The bulb is not serviceable in-vehicle. See a NISSAN dealer for assistance.1. Map lights (if so equipped)
2. Interior light
3. High-mounted stop light/cargo light
4. License plate light
5. Rear combination light
6. Fog light (if so equipped)
7. Headlight assembly
LDI0713
Maintenance and do-it-yourself8-31
Page 383 of 444
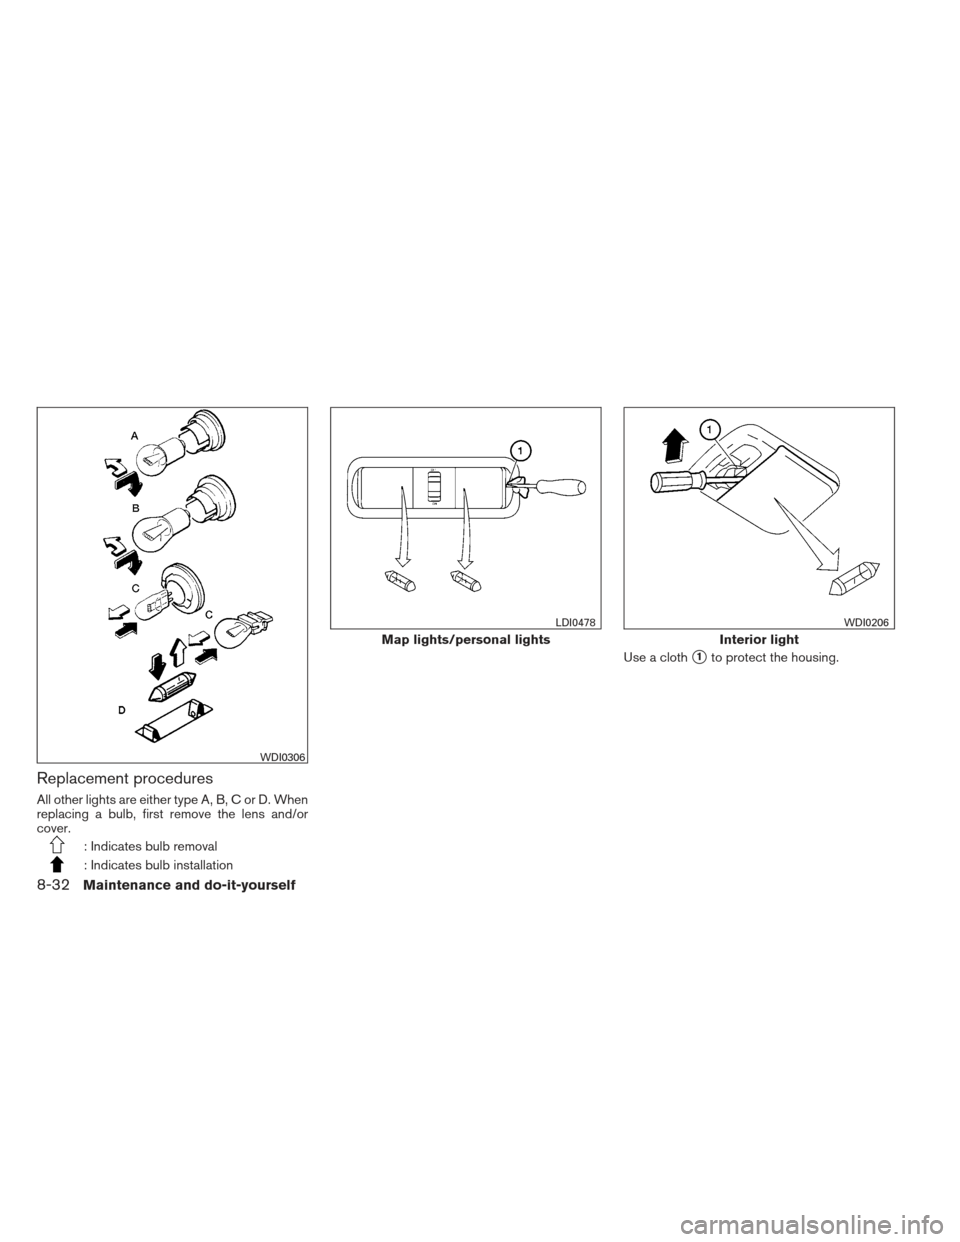
Replacement procedures
All other lights are either type A, B, C or D. When
replacing a bulb, first remove the lens and/or
cover.
: Indicates bulb removal
: Indicates bulb installationUse a cloth
�1to protect the housing.
WDI0306
Map lights/personal lights
LDI0478
Interior light
WDI0206
8-32Maintenance and do-it-yourself


Bulb No.*1
Headlight 60/559007 (HB5)
Turn signal light/Parking light 28/8HT7444NA
Side marker 5168
Rear combination light Turn signal 273156AK
Stop/Tail 27/")